To avoid these ads, REGISTER NOW!

Overseas Jack Rebuild Help Tutorial.

OP
H

Hiball

Well-known member
Joined
Apr 30, 2009
Messages
14,026
Location
Missery
I checked the bearing #9 on the Norco jack and didn't find anything unusual. Most likely I don't know what I'm looking for. I thought there could be some debris or something obstructing the checkball but I did not find anything. I did tap the checkball to help it seat but it did not work, the jack still lowers until the handle peaks.

Any suggestions on what to look for and how to address the checkball issue?

Could it be some other issue besides the bearing not sitting properly? Looking at the diagram, I did not check the condition of the #8 Oring, could that be the issue?


View media item 100559

Cylinder pressure can only gain access to the pump cylinder via movement around the upper ball/seat. You will need to investigate whether it’s a issue with the seat being worn or damaged, or possibly someone added a weight in between the lower and upper ball and it’s not allowing the upper ball to seat properly.
 
To avoid these ads, REGISTER NOW!

ALTEREGO

Well-known member
Joined
May 15, 2018
Messages
420
Location
@HOME
What would be the best way to check if if the seat is damaged? Is this just a visual inspection or something else? I had no luck finding a picture online.

I pulled both checkballs and they looked fine, no visible wear or damage and they appeared to be the correct size. I found nothing in between the two checkballs, no debris, no spring nor anything else.

Is it possible to repair seat damage? I believe I read on one of Hiball's posts that that in some cases the seat can be lightly sanded using a deburring (? not sure if that's the right name) tool to help the ball seat, am I remembering that correctly?

As usual, thanks everyone for the help, specially Hiball.
 
OP
H

Hiball

Well-known member
Joined
Apr 30, 2009
Messages
14,026
Location
Missery
What would be the best way to check if if the seat is damaged? Is this just a visual inspection or something else? I had no luck finding a picture online.

I pulled both checkballs and they looked fine, no visible wear or damage and they appeared to be the correct size. I found nothing in between the two checkballs, no debris, no spring nor anything else.

Is it possible to repair seat damage? I believe I read on one of Hiball's posts that that in some cases the seat can be lightly sanded using a deburring (? not sure if that's the right name) tool to help the ball seat, am I remembering that correctly?

As usual, thanks everyone for the help, specially Hiball.

I linked some pictures somewhere around here that gives a pretty good diagram of a properly formed seat versus one that is overseated etc. The seat should have a uniform bevel that matches the angle of where the ball meets the seat, it should be free of chips or grooves or any damage that would prevent a good seat. The inspection should be done with a inspection light with the oil drained below the seat. On occasion I’ve had to hit seats with some valve lapping compound and the proper sized ball to clean up seat damage, generally a whack with a punch/hammer will reform the seat “IF” here isn’t any visible damage or rust. As always... the proper sized ball is a must, if someone has been in there and added a oversized or undersized ball, obvious the seat angle will be off.
 

ALTEREGO

Well-known member
Joined
May 15, 2018
Messages
420
Location
@HOME
If the picture is in this forum, I'll find it! Thank you for the prompt response, I sincerely appreciate it!
 
OP
H

Hiball

Well-known member
Joined
Apr 30, 2009
Messages
14,026
Location
Missery
If the picture is in this forum, I'll find it! Thank you for the prompt response, I sincerely appreciate it!

FWIW wasn’t my personal literature, I believe it was a enerpac training diagram. I might have it on my computer at home, I’ll try and post it when I get a chance.
 

Lassen Forge

Well-known member
Joined
Apr 26, 2014
Messages
14,997
Location
The romantic hills of central Umbria, Italy,
Have a weird problem on mine, its a 3 1/2 ton dual pump, I saw it one time on a Warner 2 ton single pump decades ago and I can't remember the cause or cure... maybe someone can help?

The jack raises and lowers when you pump the handle - push down, the jack goes up, let the handle up, and the jack goes back down.

Checked the fluid level (fine), Lifted the "pedestal" with the handle valve open and it went up and down, closed the handle valve and it holds up (like it's supposed to) but still exhibits this strange behavior regardless of where the platform is...

Damned if I remember what caused this 30 years ago, hoping one of the jack men here can steer me right, before I rip into it and probably screw it up.
 
OP
H

Hiball

Well-known member
Joined
Apr 30, 2009
Messages
14,026
Location
Missery
Have a weird problem on mine, its a 3 1/2 ton dual pump, I saw it one time on a Warner 2 ton single pump decades ago and I can't remember the cause or cure... maybe someone can help?

The jack raises and lowers when you pump the handle - push down, the jack goes up, let the handle up, and the jack goes back down.

Checked the fluid level (fine), Lifted the "pedestal" with the handle valve open and it went up and down, closed the handle valve and it holds up (like it's supposed to) but still exhibits this strange behavior regardless of where the platform is...

Damned if I remember what caused this 30 years ago, hoping one of the jack men here can steer me right, before I rip into it and probably screw it up.

Upper ball seat issue also, just more pronounced to the point that the upper ball isn’t seating at all, probably a piece of seal has made its way into the valve system. I should clarify, it could be a debris holding the release/overload open also, but generally the seesaw effect is delayed a little more IMO.
 
Last edited:

ALTEREGO

Well-known member
Joined
May 15, 2018
Messages
420
Location
@HOME
I tried (and failed) to take good pictures of the seat, sharing them anyways in case it helps someone.

I also took a picture of the checkball, I don't have a caliper to measure it but it seems to be the correct size (3/8), I took the picture next to a 3/8 wrench for reference.

Checkball # 9 looks in good shape to me,
do you guys agree?


View media item 101618


Seat pictures. First time I try to inspect one, it doesn't look smooth at all to me but what do I know? What do you guys think?


View media item 101619
View media item 101621
View media item 101622
View media item 101624
 
Last edited:

ALTEREGO

Well-known member
Joined
May 15, 2018
Messages
420
Location
@HOME

Unless someone with experience advises otherwise, I will try to improve the seat for Checkball #9 for my Norco floor jack.

I've read that some people use a drill bit (no idea how), cutting die (not sure where to get the right one), and lapping compound (I'll go with that).

I was thinking of JB Welding a 3/8 ball bearing (that's the correct ball bearing size that goes in there) to a screwdriver (or other metal handle), put some lapping compound on it and go at it slowly.

Do you guys think that would work? Will the lapping compound grind the ball bearing instead of the seat? What lapping compound grit should I buy?

As always, thank you in advance for your time and advise!

 
OP
H

Hiball

Well-known member
Joined
Apr 30, 2009
Messages
14,026
Location
Missery
Sorry, I didn’t get a email notification concerning your previous post, It’s difficult to tell where the shadows start and stop in your pictures and if there is a culprit that is causing pressurized oil to seep by. The beveled seat should be free of any type of rust or slag, I have a small round brush that I first hit any compromised seat with to clean up any particles of debris. Once that is accomplished I then assess the seat again, if any debris has dented the seat it’s time to grab the lapping compound/appropriate sized ball attached to a stem of some sort that you can rotate between your fingers to clean the seat. It’s not a high speed operation and it’s important to keep the stem as vertically centered as possible during the procedure. Once you are happy with the surface, A clean ball + punch and a tap with the hammer should finish it off. Obviously this all needs to be done so you can flush the system when done to remove any debris prior to the reinstall. Unless you have severe damage you can get by with lapping compound, they do make carbide tipped reamers for serious damage caused by improperly installed parts etc, but I’m not seeing that type of damage.
 

ALTEREGO

Well-known member
Joined
May 15, 2018
Messages
420
Location
@HOME
Sorry, I didn’t get a email notification concerning your previous post, It’s difficult to tell where the shadows start and stop in your pictures and if there is a culprit that is causing pressurized oil to seep by. The beveled seat should be free of any type of rust or slag, I have a small round brush that I first hit any compromised seat with to clean up any particles of debris. Once that is accomplished I then assess the seat again, if any debris has dented the seat it’s time to grab the lapping compound/appropriate sized ball attached to a stem of some sort that you can rotate between your fingers to clean the seat. It’s not a high speed operation and it’s important to keep the stem as vertically centered as possible during the procedure. Once you are happy with the surface, A clean ball + punch and a tap with the hammer should finish it off. Obviously this all needs to be done so you can flush the system when done to remove any debris prior to the reinstall. Unless you have severe damage you can get by with lapping compound, they do make carbide tipped reamers for serious damage caused by improperly installed parts etc, but I’m not seeing that type of damage.

Hello again Hiball,

If anyone has to be sorry is me, sorry for taking up so much of your time. I'm sure you could have repaired all my floor jacks that you have helped me work on through your posts in half the time it has taken you to decipher my poorly written posts. I sincerely appreciate your help.

I know the pictures don't help much, but they are better (for me) than just looking at it, I need better eyes or a good magnifying glass.

Anyways, the brush that you use first is a brass brush? Does it matter what type of brush it is? I'm very clumsy and I don't want to cause further damage.


You wrote that after using the brush "it’s time to grab the lapping compound/appropriate sized ball attached to a stem of some sort that you can rotate between your fingers to clean the seat"

Will a 3/8 bearing ball (that's the correct size) bonded with JB Weld to a metal stem (punch pin or screwdriver) work? Do you use something different/better? What lapping compound (grit and brand) do you use/recommend?

The last step (hopefully not needed in my case) is to use a "carbide tipped reamer(s)". Is the tool below similar to what you would use?

View media item 101764
Thank you once more for all your help!

 
Last edited:
OP
H

Hiball

Well-known member
Joined
Apr 30, 2009
Messages
14,026
Location
Missery
It’s a stiff bristle nylon type brush, I don’t see any issue with using a brass bristle is that is what you have. The purpose of cleaning any funk/rust off the seat is so you can further evaluate the seat.

The lapping compound I use is from the local orielly store, it’s a permatex product, I’m not sure what grit it is to be honest with you. If the upper ball is a 3/8 size, Yes you will want to use 3/8” ball in conjunction with lapping compound (if needed). Any metal stem will work, you just want it to be round, I have a set that I picked up from HPS years ago, but others have been successful using super glue to fit the stem to the ball, just make sure you are centered on the ball as best as possible.

Yes you picture is of a carbide tipped valve tool, that is super aggressive for most jobs.
 

ajchien

Well-known member
Joined
Sep 3, 2010
Messages
2,649
Location
Los Angeles, stuck on the 60 freeway.
Hi everyone,

After reading this thread and double - triple checking, I’m convinced that my 3T orange HF Jack is leaking from an unusual location ... it is the tank-nut to tank reservoir. By the looks of it, according to the original post, there is no seal here, but a threaded connection.

It’s a very slow seep. After putting rags all around the hydraulic unit, no leak at all seen in the first 3 days, and then around day 4-6 I can see a dime sized oily spot on the rag. It’ll eventually leave a half foot stain on a piece of cardboard after a month.

I’ve just been filling the reservoir once every year. What say you guys? Leave it alone? Tighten the main tank nut? Take off the tank nut and put some thread sealant on? Or ... am I crazy - it must be from some other location other than the nut-reservoir junction?

I’ve been ignoring this leak/seep for almost decade now. Just getting around to it. I think I’ve had the jack for about 10 years. This Leak/seep started maybe a year after I bought it. I’ve ignored it since I have other jacks that work fine.
 
Last edited:

ALTEREGO

Well-known member
Joined
May 15, 2018
Messages
420
Location
@HOME
It’s a stiff bristle nylon type brush, I don’t see any issue with using a brass bristle is that is what you have. The purpose of cleaning any funk/rust off the seat is so you can further evaluate the seat.

The lapping compound I use is from the local orielly store, it’s a permatex product, I’m not sure what grit it is to be honest with you. If the upper ball is a 3/8 size, Yes you will want to use 3/8” ball in conjunction with lapping compound (if needed). Any metal stem will work, you just want it to be round, I have a set that I picked up from HPS years ago, but others have been successful using super glue to fit the stem to the ball, just make sure you are centered on the ball as best as possible.

Yes you picture is of a carbide tipped valve tool, that is super aggressive for most jobs.


I'll try a nylon brush first, clean, test, brass brush,clean, test and then lapping with a 3/8 bearing bonded to a stem.

After lapping I will flush and clean everything, refill oil and then test again.

I thought the carbide tipped tool seemed too strong for fixing a sit, how about this one instead? Hopefully I won't need it but it doesn't hurt to be prepared.

Thanks again!


View media item 101765
 
OP
H

Hiball

Well-known member
Joined
Apr 30, 2009
Messages
14,026
Location
Missery
Hi everyone,

After reading this thread and double - triple checking, I’m convinced that my 3T orange HF Jack is leaking from an unusual location ... it is the tank-nut to tank reservoir. By the looks of it, according to the original post, there is no seal here, but a threaded connection.

It’s a very slow seep. After putting rags all around the hydraulic unit, no leak at all seen in the first 3 days, and then around day 4-6 I can see a dime sized oily spot on the rag. It’ll eventually leave a half foot stain on a piece of cardboard after a month.

I’ve just been filling the reservoir once every year. What say you guys? Leave it alone? Tighten the main tank nut? Take off the tank nut and put some thread sealant on? Or ... am I crazy - it must be from some other location other than the nut-reservoir junction?

I’ve been ignoring this leak/seep for almost decade now. Just getting around to it. I think I’ve had the jack for about 10 years. This Leak/seep started maybe a year after I bought it. I’ve ignored it since I have other jacks that work fine.

Could have been a factory defect since it’s been going on since New, Normally Reservoir leaks don’t just appear outside of it being dropped etc. Another point of leakage could be between the Ram/Tank nut seal from oil sitting on the top end of the cylinder. Hydraulic oil is funny stuff, it can have you chasing your tail..
 

ajchien

Well-known member
Joined
Sep 3, 2010
Messages
2,649
Location
Los Angeles, stuck on the 60 freeway.
Could have been a factory defect since it’s been going on since New, Normally Reservoir leaks don’t just appear outside of it being dropped etc. Another point of leakage could be between the Ram/Tank nut seal from oil sitting on the top end of the cylinder. Hydraulic oil is funny stuff, it can have you chasing your tail..

Yes, I figured the ram-tank nut should be more likely. It just really seems to originate from the tank-nut reservoir junction. It could have been there since new and I never noticed it until months later.

The Jack has never failed to lift a load, nor has it ever self- lowered after lifting. The only annoyances I’ve had with it ... every once in a while I notice it doesn’t lift to max height - almost always because the reservoir is low on fluid because of the seep/leak. A second annoyance is that it does seem to need air bleeding quite often. A third annoyance is that the release valve is somewhat sticky/crude sometimes letting the load down quickly, but I recently drilled and put a t-bar across the handle for better control.

Thanks for the reply hiball. I’ve got to decide whether or not It’s worth chasing and fixing.
 

ALTEREGO

Well-known member
Joined
May 15, 2018
Messages
420
Location
@HOME

In case it helps someone else, a lot of the questions I have been asking in regards to valve re-seating have already been answered by Hiball in the thread below (valve seat specific questions start on post #21). The thread has some very good before/after pictures of a valve seat that was worked on using lapping compound as well as general information of the process.

https://www.garagejournal.com/forum/showthread.php?t=173844&showall=1


The valve seat chart pdf link (below) was posted by Hiball on that thread (post #49), unfortunately that link is no longer valid (at least not for me), if I find the info I'll edit the link in this post with the updated info.

http://www.ohiohydraulic.com/enerpac/VALVE SEAT CHART INFORMATION.pdf
 

ALTEREGO

Well-known member
Joined
May 15, 2018
Messages
420
Location
@HOME
anyone know where I can buy a repair kit for a Blackhawk 67411 2 ton Floor Jack ?


Hi Supraman007,

Have you tried Hydraulic Parts Supply at 620-594-2247? I highly recommend them, if they don't carry it, I'm sure they will be able to point you in the right direction.


mikeinri

Well-known member
Joined
Nov 29, 2019
Messages
8,206
Location
MA
Hey guys,

I have this Taiwan-made, 2-ton, Sears jack from the 80s. Model number 214.125400. The release valve is a separate screw (handle must be removed to loosen and tighten the valve screw). Is this style covered in this thread, or another?

Doesn't lift weight very well. I see fluid leaking out by the pumping piston. Took that out, the o-ring looks OK. There's another rubber seal with a nylon ring/spacer around part of it. That nylon piece has a split, but I'm not sure that isn't normal (would be pretty hard to get the rubber seal in place if the nylon ring didn't have some give). The nylon ring is where my key is pointing in the third pic below.

Sears lists all parts for this as unavailable, and there is no breakdown for the "power unit," so I'm flying blind...

Anyway, here are some pics. Any help would be greatly appreciated!

Mike
 

Attachments

  • 20200607_164347.jpg
    20200607_164347.jpg
    148.2 KB · Views: 37
  • 20200607_164400.jpg
    20200607_164400.jpg
    147.3 KB · Views: 36
  • 20200607_175154.jpg
    20200607_175154.jpg
    105.5 KB · Views: 44
Last edited:
To avoid these ads, REGISTER NOW!

mikeinri

Well-known member
Joined
Nov 29, 2019
Messages
8,206
Location
MA
Well, I grabbed two sets of Dorman o-rings, 80000 and 80020 (viton). Both were thinner than the o-ring that I was replacing, but the viton one looked a little thicker, so I put that in.

Put new jack fluid in, bled it a few times, and jacked up the front of my tractor with no problem. No obvious leaking on the shaft anymore, so I'm hoping it's fixed.

I'll try it under my truck tomorrow. I'd prefer to replace all the seals, but some of these are oddly shaped, and I have no idea where to get them.

Mike
 

ajchien

Well-known member
Joined
Sep 3, 2010
Messages
2,649
Location
Los Angeles, stuck on the 60 freeway.
I thought I’d give some follow up on my post #1093. Man, it’s hard to find the time or motivation for find a minor leak on your non-primary jack, but I finally did. This is a jack that I swore had a reservoir leak from the main tank nut to reservoir body.

FWIW, it is a 10 year old-ish orange Hf model 34271, 3 ton.

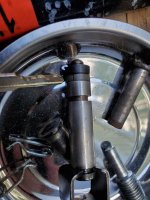
Taking it out of the frame was straightforward. The first surprise was after I got the hydraulic cylinder into the vise. The main Tank nut was loose. Like, it’s coming off easy with a pair of 12” channellocks loose. Im surprised it held in any fluid from the reservoir.

In any case, 2 differences of this Jack from Hiball’s instructions... First, there was a gasket of some sort between the tank and the base of the hydraulic unit. I wish I could tell you what kind of shape it was, but it was beaten into a few pieces. I’m not sure how this held in any oil either. Secondly, there was also a gasket between the top of the reservoir cylinder and the tank nut. I pulled the main ram, and it’s the o ring with retainer type. It looked to be in fine shape.

I put a 4.5mm CS x 68mm ID o ring into the base / reservoir junction and a 3mm CS x 66 mm ID o ring into The groove that seals the main tank nut to top of reservoir junction (now my measurement for this off of the metal parts were 3mm x 66mm. When I compared it to the original o ring, the new one had a thinner CS, but during test fit, it seemed just right. Nevertheless, I added a thin layer of RTV).

Putting the hydraulic unit back into the frame was a pain. If it doesn’t sit just “perfectly“, the spider gears for the release valve bind. In addition, I had to chase loose ball bearings from the wheels around the Garage.

Anyway, it’s been a week since it’s been put back together with 2 uses of the jack. No leaks anymore. I know Hiball always says to do a whole rebuild. But I just changed out the parts that were suspect. I will assume Hiball was right, and I’ll be redoing this again in the future when the main ram leaks or the pump piston leaks.

the biggest pain was trying to Measure and source the o rings. Something like $2 parts, $8 shipping.
 
Last edited:

mikeinri

Well-known member
Joined
Nov 29, 2019
Messages
8,206
Location
MA
Well, I grabbed two sets of Dorman o-rings, 80000 and 80020 (viton). Both were thinner than the o-ring that I was replacing, but the viton one looked a little thicker, so I put that in.

Put new jack fluid in, bled it a few times, and jacked up the front of my tractor with no problem. No obvious leaking on the shaft anymore, so I'm hoping it's fixed.

I'll try it under my truck tomorrow. I'd prefer to replace all the seals, but some of these are oddly shaped, and I have no idea where to get them.

Mike

...And it's not fixed. Actually seems to leak more now than before.

Is this style of Taiwan-made jack covered here, or is there a different thread? All of the pages I've viewed show the jacks with the release built into the handle.

This one is different, you have to remove the handle and use it to turn the release screw, which is to the left of the jacking mechanism.

I'm ready to toss this and buy a new one, but want something I can trust, preferably not made in China.

Mike
 

Attachments

  • 20200607_164400.jpg
    20200607_164400.jpg
    147.3 KB · Views: 62
  • 20200607_164347.jpg
    20200607_164347.jpg
    148.2 KB · Views: 57
Last edited:

ajchien

Well-known member
Joined
Sep 3, 2010
Messages
2,649
Location
Los Angeles, stuck on the 60 freeway.
...And it's not fixed. Actually seems to leak more now than before.

Is this style of Taiwan-made jack covered here, or is there a different thread? All of the pages I've viewed show the jacks with the release built into the handle.

This one is different, you have to remove the handle and use it to turn the release screw, which is to the left of the jacking mechanism.

I'm ready to toss this and buy a new one, but want something I can trust, preferably not made in China.

Mike

Hi. Your Jack is not the style that is initially featured in this thread. The responses are few because a lot of people are likely waiting for one of the more experienced jack hydraulic repair members to chime in. I’m not one of them and would defer to their experience. Consider this a bump to the top to give those guys another chance to see the thread.

Based on what I’ve seen in your 2 posts, I am going to guess that the plastic spacer / heel on the piston is not normal. The “split” rings I’ve seen have only been as thinner backup rings to o rings in my limited experience. As far as sizing o rings and seals, I think most folks suggest measuring the metal pump piston for an ID and OD and then calculating a cross sectional CS diameter rather than “matching up the closest one from a set”. Also, my guess is that the seals are going to be metric.

FWIW, my first 2 floor jacks were of the “style” yours is. Despite being a person that prefers to fix rather than toss out, I’ve long since moved on from those jacks in favor of ones that have a larger frame.
 
OP
H

Hiball

Well-known member
Joined
Apr 30, 2009
Messages
14,026
Location
Missery
...And it's not fixed. Actually seems to leak more now than before.

Is this style of Taiwan-made jack covered here, or is there a different thread? All of the pages I've viewed show the jacks with the release built into the handle.

This one is different, you have to remove the handle and use it to turn the release screw, which is to the left of the jacking mechanism.

I'm ready to toss this and buy a new one, but want something I can trust, preferably not made in China.

Mike

My guess is that “thicker” Oring that you utilized was too big and after a a few pumps it decided to start shedding size to fit it’s surroundings. In all honesty, unless you have access to near cost seals, that trolley jack isn’t really worth fixing.
 

mikeinri

Well-known member
Joined
Nov 29, 2019
Messages
8,206
Location
MA
That's exactly the answer I was waiting for. Thanks!!!

Moving forward, are there any good ones made today?

Mike
 

mikeinri

Well-known member
Joined
Nov 29, 2019
Messages
8,206
Location
MA
BTW, I have a bigger (stupid heavy) floor jack. The main use for this one now is lighter stuff, like a garden tractor.

I just tossed this Craftsman into the recycling bucket. There was a puddle under it this morning.

Mike
 

M635_Guy

Well-known member
Joined
Dec 5, 2019
Messages
4,333
Location
NC
That's exactly the answer I was waiting for. Thanks!!!

Moving forward, are there any good ones made today?

Mike

For under 80 bucks, the 1.5-ton HF aluminum jack is hard to beat IMHO. At that money, you're probably talking about ten bucks a year and then replace it. 33lb is pretty gentle too - lol.

I keep eyeballing the Daytona jack, but my Pittsburgh low-profile is still flawless... :(
 
OP
H

Hiball

Well-known member
Joined
Apr 30, 2009
Messages
14,026
Location
Missery
That's exactly the answer I was waiting for. Thanks!!!

Moving forward, are there any good ones made today?

Mike

If your looking for a lightweight jack for small chores to replace the trolley jack, I would recommend buying locally from whomever has the best warranty, Lots of aluminum options out there. It will undoubtably be a Import in this particular area of lift equipment, As with all jacks foreign and domestic a quality set of jack stands are a must.

I suspect there is 100’s of Hydraulic jack questions regarding the “Best” Overall jack out there here at GJ, Those threads generally end in a Chaos. The reason being is because the QC control is **** at the cheaper price points, thus performance is all over the map.

Good luck
 

mikeinri

Well-known member
Joined
Nov 29, 2019
Messages
8,206
Location
MA
Thanks, those answers confirm what I thought. I'm a firm believer in jack stands, especially after dealing with this jack.

I do have a Pittsburgh floor jack (3-ton, I believe), which I've used under my RV (with non-HF jack stands). Weighs a ton, and is much too wide and long for using around small equipment.

Didn't mean to start a fiasco here, BTW...

Mike
 
Last edited:

L5wolvesf

Well-known member
Joined
Dec 4, 2011
Messages
1,831
Location
Northern AZ
A question about getting o-ring/Seal Kits. I went to Hydraulic Parts Supply's website and the online ordering, which directed me to eBay, has nothing there. Do they only do phone orders?

Also, is there a way to determine which HF jack I have when the part number is gone?
 
OP
H

Hiball

Well-known member
Joined
Apr 30, 2009
Messages
14,026
Location
Missery
A question about getting o-ring/Seal Kits. I went to Hydraulic Parts Supply's website and the online ordering, which directed me to eBay, has nothing there. Do they only do phone orders?

Also, is there a way to determine which HF jack I have when the part number is gone?

I don’t believe Hydraulic Parts supply has a website, Lemme rephrase that. The HPS that I’m familiar with in Sawyer Kansas doesn’t, It’s strictly run via phone/paper catalog.
 

L5wolvesf

Well-known member
Joined
Dec 4, 2011
Messages
1,831
Location
Northern AZ
I don’t believe Hydraulic Parts supply has a website, Lemme rephrase that. The HPS that I’m familiar with in Sawyer Kansas doesn’t, It’s strictly run via phone/paper catalog.

Here is where I went: https://www.hydraulicpartssupply.com/
But I found the one in Sawyer.

Would they know which seals etc to sent if I just describe the jack? The model number is gone.
 

Merrill

Member
Joined
Nov 19, 2020
Messages
15
Location
Orlando and Inland Empire
Dear Hiball, this is a great thread. Gives lots of information otherwise unavailable. My jack is, I believe, a 3 ton Craftsman model and it looks very close to your pictures. I took it apart as you describe and didn't see any problems with the ram and ram cylinder. I went to a local seal/ hydraulic shop and purchased a new plunger seal which was worn. It doesn't leak out there, so that is good. I put it back together, no problems, and added hydraulic Jack fluid. However, I am not getting the proper lifting when pushing the plunger down. After I turn the raise/lower star wheel valve control to the close position (counter clockwise, not using the handle, just moving the star wheel by hand), there is some lifting, but when I lift the plunger up for the next stroke the main ram goes back down with the plunger being lifted. If I hold the main arm up when i depress the plunger and go for another down stroke the main arm will stay higher and move up again with the second downstroke of the plunger. At that time it seems that the main arm is locked solidly in the higher position, and it descends easily when the star valve is opened. If I press the plunger and hold the main arm up each time it will go up about 1/2 way, but then it will blow the plunger and a bunch of oil out the plunger hole. However it never starts going up by itself, it just goes up and back down when the plunger is lifted up in its normal pumping action. So it likely is a bleeding issue, which I have tried to do but so far can't get it to pump up. So, I would be most grateful for any help on the bleeding procedure. This jack nominally should be a Craftsman 875.501152.
In this thread by Hiball he describes how to set the overload spring/ball which I haven't done yet, but will very soon try. Maybe that will deal with the up/down of the ram with the plunger movement. So my fellow Jacksters, any advice/ recommendations would be greatly appreciated. Today is November 20, 2020.
 
OP
H

Hiball

Well-known member
Joined
Apr 30, 2009
Messages
14,026
Location
Missery
Let’s start here..

1. With the lift arm down, Check and add oil via the fill hole to where it rests just above the inner cylinder when peeking thru the hole.

2. With the jack in the release position, pump the handle 6-10 times. This will flush the circuit of any trapped air. Recheck the oil level and add as necessary.

I didn’t read whether you ventured into the working valve, but if there is a issue with the upper ball/seat it can cause a teeter totter scenario like you mentioned. The same scenario can also be because of trapped air, which is why I suggest you bleed the jack and make sure you have enough oil in the reservoir.
 
Last edited:

Merrill

Member
Joined
Nov 19, 2020
Messages
15
Location
Orlando and Inland Empire
I'm honored you took the time to reply. Much appreciated!
So I will try your suggestion again. One question, I currently don't have a filler plug, so having that in the hole, will that make a difference in the bleeding or jacking?
And I did remove the two balls, assuming you meant where these balls are is the "working valve". Small one at the bottom, spring above (not very stiff) then the large ball, then screw in seal (mine with plain screwdriver slot) and I blew out the holes with compressed air; didn't see any dirt, but by your mentioning this i will remove the balls again and check and clean again. So the 6-10 pumps is the way to eliminate air and arrive at the need to fill the reservoir, correct?
Thanks again for your reply. I will report results.
PS, after I relogin the browser does not return to where I was replying. Wonder why not. I have to visit another thread to get back to this thread.
 
OP
H

Hiball

Well-known member
Joined
Apr 30, 2009
Messages
14,026
Location
Missery
I'm honored you took the time to reply. Much appreciated!
So I will try your suggestion again. One question, I currently don't have a filler plug, so having that in the hole, will that make a difference in the bleeding or jacking?
And I did remove the two balls, assuming you meant where these balls are is the "working valve". Small one at the bottom, spring above (not very stiff) then the large ball, then screw in seal (mine with plain screwdriver slot) and I blew out the holes with compressed air; didn't see any dirt, but by your mentioning this i will remove the balls again and check and clean again. So the 6-10 pumps is the way to eliminate air and arrive at the need to fill the reservoir, correct?
Thanks again for your reply. I will report results.
PS, after I relogin the browser does not return to where I was replying. Wonder why not. I have to visit another thread to get back to this thread.

Not sure about any login/redirect issues.

The missing filler plug won’t affect the jacks ability to operate or bleed, obviously it can allow contaminates to enter the system and cause problems over time. The reason you need to recheck the oil after bleeding is because the air that is displaced by the bleeding procedure is replaced with oil and needs to be replenished to make sure the jack doesn’t run out of oil at Max lift and push air back into the system.

I would definitely try bleeding the jack first, then proceed into valves looking for any issues if it doesn’t fix the problem.
 

ajchien

Well-known member
Joined
Sep 3, 2010
Messages
2,649
Location
Los Angeles, stuck on the 60 freeway.
And I did remove the two balls, assuming you meant where these balls are is the "working valve". Small one at the bottom, spring above (not very stiff) then the large ball, then screw in seal.

Is that a spring in between the two balls or a weight? I’m also curious as to the diameter of the spring relative to the diameter size of the two balls?
 
Last edited:
To avoid these ads, REGISTER NOW!
Top Bottom