To avoid these ads, REGISTER NOW!

Overseas Jack Rebuild Help Tutorial.

ajchien

Well-known member
Joined
Sep 3, 2010
Messages
2,649
Location
Los Angeles, stuck on the 60 freeway.
hey alterego, yes i have seen that diagram before. unfortunately, i need the power unit parts diagram. i replaced all seals from lazarrs kit. i believe whoever had the jack before me, tried to fix but switched balls, etc, - i just need to know what size balls, if any, springs, if any, and spacers, if any where they go in the main power unit. thanks,

Torin usually does not put out a parts diagram for their power units.
 
To avoid these ads, REGISTER NOW!

Sdavidc

New member
Joined
Jul 1, 2020
Messages
1
Location
Oklahoma
Hiball, I know you are not a fan of the single cylinder "speedy-lift" floor jacks, but I have one that I rebuilt recently (using a variety of aids kluged together, since none of the exploded parts diagrams were quite the same as mine), and it worked a couple of times, then the "speedy-lift" feature quit working. Your re-build thread had 59 pages to go thru, so can you tell me if you ever posted more about adjusting the relief valves on this type of jack? And if so, the approximate date? Man! I wish I could rebuild a bunch of these to completely know what I'm doing!
 
OP
H

Hiball

Well-known member
Joined
Apr 30, 2009
Messages
14,027
Location
Missery
Hiball, I know you are not a fan of the single cylinder "speedy-lift" floor jacks, but I have one that I rebuilt recently (using a variety of aids kluged together, since none of the exploded parts diagrams were quite the same as mine), and it worked a couple of times, then the "speedy-lift" feature quit working. Your re-build thread had 59 pages to go thru, so can you tell me if you ever posted more about adjusting the relief valves on this type of jack? And if so, the approximate date? Man! I wish I could rebuild a bunch of these to completely know what I'm doing!

The speed side is pretty simple, What you are looking for is a setting (seat pressure) that allows the lift arm to raise and hold its own weight/return spring pressure.

1. Make sure the jack has sufficient oil and he been bled.

2. With the lift arm down, Not under load, turn the handle clockwise to full stop and operate the jack. You are looking for the lift arm to raise substantially. If you don’t get the quick lift feature you need to increase seat pressure by tightening the adjustment clockwise, Reset the lift arm and work in 1/4 turns till the lift arm rises and doesn’t fall under its own weight. It’s best to start light and work your way up.

If you overtighten the valve, you stand a chance of damaging the components and rupturing the quick lift tube, too light and it will suffer performance wise.
 
Last edited:

BFBOB

Well-known member
Joined
Sep 20, 2011
Messages
5,073
OK... . . . . . . now what?


But seriously, folks, thanks to Hiball for providing the reference to Hydraulic Parts Supply - returned my call next day, had the right kit on my desk in 3 days!
Now to proceed with the work.
 

Attachments

  • DSCN8334.jpg
    DSCN8334.jpg
    148.2 KB · Views: 87

308guru

Well-known member
Joined
Jun 17, 2017
Messages
459
Tons of great info here everyone. Thanks much to Hiball for all the help.

Just wondering if you could help out with a problem my jack is having.

I've got a craftsman 50145 3.5 ton jack. It's supposed to have the speedy lift which stopped working some time ago. It also now seems to run out of ability to lift the higher I go. It starts lifting ok, but as I get higher the handle just free falls back to a point where it starts lifting again. The higher it gets, the worse it gets. So, when it's almost all the way up, the handle is just moving up and down freely with on the last tiny bit of stroke actually lifting.

Any suggestions on what to look at? I'd really like to resolve the lift issue, but the speedy lift would be nice to have back as well. It's full of oil per the manual. I'm guessing it's from 2000 or 2001ish.

Thanks!
 
OP
H

Hiball

Well-known member
Joined
Apr 30, 2009
Messages
14,027
Location
Missery
Tons of great info here everyone. Thanks much to Hiball for all the help.

Just wondering if you could help out with a problem my jack is having.

I've got a craftsman 50145 3.5 ton jack. It's supposed to have the speedy lift which stopped working some time ago. It also now seems to run out of ability to lift the higher I go. It starts lifting ok, but as I get higher the handle just free falls back to a point where it starts lifting again. The higher it gets, the worse it gets. So, when it's almost all the way up, the handle is just moving up and down freely with on the last tiny bit of stroke actually lifting.

Any suggestions on what to look at? I'd really like to resolve the lift issue, but the speedy lift would be nice to have back as well. It's full of oil per the manual. I'm guessing it's from 2000 or 2001ish.

Thanks!

At 20 years of age, It could be numerous things. I initially was leaning towards a low oil situation, but if it’s full I would pull the oil fill plug and see if gets better on the top end. If the pump seals are weak, it’s possible they can’t overcome the vacuum created at the top end, if it gets better with the plug pulled, you will need new pump seals at Min. Lastly... it could be that the reservoir is full of **** and it’s restricting the intake when the oil gets low.
 

getbent4x4

Well-known member
Joined
Oct 7, 2012
Messages
3,722
I've just joined this site to finally get my hydraulic jack fixed. It's the challenge I've always liked. I've included some photos of what I'm looking for. The cup seal measurements are as follows: OD= 24mm, ID= 16mm,
overall thickness = 9.5mm, plunger is 16mm, the o-ring is 2.5mm thick. I know the o-ring can be gotten easily but the cup seal is the problem. The plastic backup ring seems fine. Any help would be appreciated.

PM sent...
My mid 2000s Cman 3 ton has this same setup I believe. I'm trying to install a 208 Buna-N O-ring 5/8 ID x 7/8 x 1/8 CS in the 2nd groove for the plunger but cannot get it to fit in with the plastic cut washer (o-ring base). Is this the wrong o-ring? I'm trying the second time around with a new o-ring fresh from the freezer. Can I remove this "oring base"; the oring fits in the groove without it.

Where I found the part number:
 
Last edited:

eljay

Well-known member
Joined
Mar 14, 2014
Messages
208
May I get some help on my cheap 1.5ton jack?
It is no longer lifting any weight on it. I went to bleed it and check the hydraulic fluid, but despite searching and seeing many videos, I still don't know where the fill and bleeder are on this one.
The sticker says "here", but there's no screw, just that hole. Do I pump and push down in that hole to bleed?
Is the unmarked screw the place to refill the fluid? On most jacks, both of these screws are marked with "do not adjust", so I don't want to touch it if that's not the refill.

Thank you!
 

Attachments

  • jack - Copy.jpg
    jack - Copy.jpg
    146.3 KB · Views: 74
OP
H

Hiball

Well-known member
Joined
Apr 30, 2009
Messages
14,027
Location
Missery
May I get some help on my cheap 1.5ton jack?
It is no longer lifting any weight on it. I went to bleed it and check the hydraulic fluid, but despite searching and seeing many videos, I still don't know where the fill and bleeder are on this one.
The sticker says "here", but there's no screw, just that hole. Do I pump and push down in that hole to bleed?
Is the unmarked screw the place to refill the fluid? On most jacks, both of these screws are marked with "do not adjust", so I don't want to touch it if that's not the refill.

Thank you!

That “hole” is a rubber plug that needs to be removed to check/add fluid.

Do not remove either of the valve plugs to add oil or in a attempt to bleed. Once you have checked/added the oil, with the handle in the release position, pump the Jack handle 6-10 times, check the oil level and reinstall the plug and check the operation of the jack.
 

eljay

Well-known member
Joined
Mar 14, 2014
Messages
208
That “hole” is a rubber plug that needs to be removed to check/add fluid.


Do not remove either of the valve plugs to add oil or in a attempt to bleed. Once you have checked/added the oil, with the handle in the release position, pump the Jack handle 6-10 times, check the oil level and reinstall the plug and check the operation of the jack.
Thank you!
Now, the challenge will be removing that plug without damaging it. I can't believe that's all that is holding the fluid pressure in there.
 

ajchien

Well-known member
Joined
Sep 3, 2010
Messages
2,649
Location
Los Angeles, stuck on the 60 freeway.
Thank you!
Now, the challenge will be removing that plug without damaging it. I can't believe that's all that is holding the fluid pressure in there.

The rubber plug is not as fragile as you think. The type you have with the “hole” in the middle, I use needle nose pliers, stick one jaw into the hole and grip the outside of the plug with the other jaw and pull! Even if you break it, you can find a 24 pack of replacements on Amazon for $7: https://www.amazon.com/dp/B08KZPNDHF/?tag=atomicindus08-20

There’s not much pressure in the tank reservoir. It builds some vacuum when you pump up the lift arm, and it prevents oil from spitting out of the hole when you release (yes, some air pressure may build up inside when you release). Some of the more expensive jacks have an air vent instead of a plug there.
 
Last edited:

eljay

Well-known member
Joined
Mar 14, 2014
Messages
208
The rubber plug is not as fragile as you think. The type you have with the “hole” in the middle, I use needle nose pliers, stick one jaw into the hole and grip the outside of the plug with the other jaw and pull! Even if you break it, you can find a 24 pack of replacements on Amazon for $7: https://www.amazon.com/dp/B08KZPNDHF/?tag=atomicindus08-20

There’s not much pressure in the tank reservoir. It builds some vacuum when you pump up the lift arm, and it prevents oil from spitting out of the hole when you release (yes, some air pressure may build up inside when you release). Some of the more expensive jacks have an air vent instead of a plug there.
OK, I see where I was going astray. That raised silver thingy is the actual plug! Because they sprayed it over with paint, I thought it was a metal part of the body, but it's the actual plug.
OK, I've removed it and pumped the handle several times. I see some fluid washed over the cylinder, but it's not to the top of the body. Should I top it up to full?
Also, I cannot get the plug back after I've removed it! I've tried even hammering on it (not directly) lightly and it won't go back in. I guess that's a good sign that the seals are holding, but a pain.
 
OP
H

Hiball

Well-known member
Joined
Apr 30, 2009
Messages
14,027
Location
Missery
OK, I see where I was going astray. That raised silver thingy is the actual plug! Because they sprayed it over with paint, I thought it was a metal part of the body, but it's the actual plug.
OK, I've removed it and pumped the handle several times. I see some fluid washed over the cylinder, but it's not to the top of the body. Should I top it up to full?
Also, I cannot get the plug back after I've removed it! I've tried even hammering on it (not directly) lightly and it won't go back in. I guess that's a good sign that the seals are holding, but a pain.


Do not fill the reservoir completely full, the oil should rest just above the inner cylinder when peering thru the hole after being bled. In regards to the reinstalling the plug, Center it on the hole, grab hammer and smack it. If for some reason that doesn’t work, find a “blunt” push tool and work it back into the hole.
 

BFBOB

Well-known member
Joined
Sep 20, 2011
Messages
5,073
First, many thanks to Hiball for getting this thread going. I might not have had the courage to try fixing my jack without it!
My (actually Our) jack was a gift from MOAO's father in the mid '80s, so there's some sentimental value involved here.
It's seen quite a bit of use over the decades and just recently abruptly stopped being able to hold its height. It appears to be identical to the jack Hiball used for his tutorial, so I got an illustrated parts list online, ordered the repair kit and started the teardown. I hit the first snag when trying to remove the cylinder nut. My 24" Crescent wrench lifted the workbench and threatened to break the vise, but couldn't loosen the nut. A trip to my friendly local auto repair shop got it off for less than the cost of a big enough socket for my air wrench.
On to the reassembly. Things went smoothly until I got to the working valve. The gear/stem assembly popped right off, but so far the d-hole washer has resisted all my efforts to remove it. All I've accomplished is tearing up the seal to the point it MUST be replaced.

I've tried rocking it back and forth with a screwdriver, but it's pretty thin and flexes all too easily. It's probably keyed and won't rotate since its whole mission is to prevent the D-shaped valve stem from rotating. And, of course, the exploded parts diagram shows two seals, one above and one below, so it's got to come out to do the rebuild.

Also, since the jack never leaked externally, the failure to hold has to be this valve leaking, since that would be an internal leak. I really need to get it apart!

GOT IT! Looking at this post, the picture of the seal shows it better than I could see IRL - looks like the edges of the seal were forced clear back into the threads. I took a very sharp awl and pried from the outside inward so the awl could get clear into the threads and behind the edge of the seal. Worked fine, and with the seal gone the d-plate popped right out. Same treatment got the bottom seal out easily. Woo hoo!
 

Attachments

  • DSCN7615.jpg
    DSCN7615.jpg
    150.6 KB · Views: 62
  • DSCN7625.jpg
    DSCN7625.jpg
    153.5 KB · Views: 51
  • DSCN8336.jpg
    DSCN8336.jpg
    91.4 KB · Views: 49
  • DSCN8339.jpg
    DSCN8339.jpg
    150.4 KB · Views: 48
  • DSCN8340.jpg
    DSCN8340.jpg
    149.9 KB · Views: 49
Last edited:

BFBOB

Well-known member
Joined
Sep 20, 2011
Messages
5,073
Just in case someone else may find it useful, here's the Illustrated Parts List for my jack, and its name tag:

Well, shoot. I can't post the parts list because it's too big. It's a 3-page (which may kill it right there) PDF that's nearly 10 MB. I don't have any way to split it into 3 individual files, and printing and rescanning gives terrible results.

Here's the name of the file; maybe that will help you track it down on the web:

kmart824102floorjack2ton.pdf

Good luck!


...ANNNNDDDD the latest development is the jack is back together and working! That means I was finally able to get that RR wheel off and fix the damn tire!! No big deal; it was only a 2" ring shank.
 

Attachments

  • DSCN7615.jpg
    DSCN7615.jpg
    150.6 KB · Views: 43
Last edited:

panther5x

New member
Joined
Nov 27, 2020
Messages
4
Location
Bristol, VT
All, my first post so go easy on me! I found this thread a while ago and have read and re-read until I've started to glaze over. I have a Sears 328.12001 floor jack from my late Uncle who probably bought it new in the late 70's. It's been leaking a little by the plunger, so I asked Santa for a rebuild kit. He brought me the HCRCnow LF-215500-RK kit. I think that's the right one. I've got it disassembled and trying to replace the oil seal, back up ring, and O-ring on the plunger. (parts labeled 8-4, 8-2, and 8-3 in the parts list). I have two seals in the kit which are about the same size. See the attached picture. I think the correct oil seal for the plunger is the black one, but I'm looking for confirmation. The other problem is how to get the old oil seal out. See the other attached picture. It almost looks like the old one might have a metal edge around the outside of it, but I can be sure and I don't want to mess it up removing it. I'd welcome your ideas.

The final question is if there doesn't seem to be any other components bad, should I still go ahead and replace whatever I can get to now? I'm hesitant to take out the release valve assembly if it's not bad. I do have the tank nut off and will replace the O-rings and rod seal.

Many thanks in advance as I try to get this back together.

Rick

new-seals.jpg
plunger-seals.JPG
 

jacked_72

Well-known member
Joined
Jul 22, 2012
Messages
1,237
Is the top picture is the cup seal? You can measure the main lifting shaft and the cylinder in which it goes with a caliper to figure out which seal is the one you need. As I recall, the height of the seal was the tougher thing to find, so make sure you pick the one that is the right height as well. Here' I'm talking about the main ram. I'm not sure about the seal in the base of the power unit where all the valves, check balls and springs are. When I did mine, I know I did not remove a seal with a metal flange in the base.

The bottom picture shows an o-ring in the bore. I get those out with a pick. When you put the new one in, you kind of get one side started and slide the the rest of it in. Sometimes the o-ring turns into a figure 8 when doing this, but it will revert back to the right shape when y ou get it in the groove. And I'm talking about the ring that is about 3/8" down the bore. I can't tell what is at the top of the bore. My suspicion is that if it is a seal, its a dust seal and that the o-ring does the sealing for the hydraulic fluid.

I would not personally mess with the valves in the base of the power unit unless you've got a leak. The conventional wisdom is that you don't want to lose a spring or check ball or have to worry about setting the lifting tonnage.
 

panther5x

New member
Joined
Nov 27, 2020
Messages
4
Location
Bristol, VT
The top picture shows the two seals that have the right ID for the plunger shaft. You can see the plunger kind of in the second picture in the background. That's where I have the leak. There very well might not be any metal around that seal but I'm checking before I make a pile of scrap! The new seals definitely don't have any metal around the outside. I probably just need to be careful getting it out.

I've got a pick to get the bottom O-ring out, but I'm trying to go in order so I have a fighting chance!

And 10-4 on the "don't mess with it" part. Good advice. Many thanks for all this.
 

paulsomlo

Well-known member
Joined
Jul 16, 2013
Messages
3,866
Location
Northern Colorado
All, my first post so go easy on me! I found this thread a while ago and have read and re-read until I've started to glaze over. I have a Sears 328.12001 floor jack from my late Uncle who probably bought it new in the late 70's. It's been leaking a little by the plunger, so I asked Santa for a rebuild kit. He brought me the HCRCnow LF-215500-RK kit. I think that's the right one. I've got it disassembled and trying to replace the oil seal, back up ring, and O-ring on the plunger. (parts labeled 8-4, 8-2, and 8-3 in the parts list). I have two seals in the kit which are about the same size. See the attached picture. I think the correct oil seal for the plunger is the black one, but I'm looking for confirmation. The other problem is how to get the old oil seal out. See the other attached picture. It almost looks like the old one might have a metal edge around the outside of it, but I can be sure and I don't want to mess it up removing it. I'd welcome your ideas.

The final question is if there doesn't seem to be any other components bad, should I still go ahead and replace whatever I can get to now? I'm hesitant to take out the release valve assembly if it's not bad. I do have the tank nut off and will replace the O-rings and rod seal.

Many thanks in advance as I try to get this back together.

Rick

These should help: https://www.hcrcnow.com/uploads/drawings/sears328seriesjacks.pdf


And yes, it makes sense to replace whatever soft parts you can get to while you're in there, just don't mess with the overload valve.
 
OP
H

Hiball

Well-known member
Joined
Apr 30, 2009
Messages
14,027
Location
Missery
I would pull the upper wiper, it’s as simple as using a flat edge and prying upward, then remove the old Oring with a sharp pick. The backups appear to be the split type, they can removed and reinstalled fairly easily, or left in place and using a dull tipped tool to install the New Oring.

In regards to other components, No way I’m just replacing pump seals/wiper if I have a complete kit. I’m gonna take this opportunity to clean the entire system, replace all seals and valve components, there is nothing complicated about this process and it’s documented over and over in this thread along with others here at GJ.

If you don’t feel comfortable capturing the current overload setting prior to disassembly, leave it alone. It’s unlikely you have new valve components anyways.
 
To avoid these ads, REGISTER NOW!

ajchien

Well-known member
Joined
Sep 3, 2010
Messages
2,649
Location
Los Angeles, stuck on the 60 freeway.
The top picture shows the two seals that have the right ID for the plunger shaft. You can see the plunger kind of in the second picture in the background. That's where I have the leak. There very well might not be any metal around that seal but I'm checking before I make a pile of scrap! The new seals definitely don't have any metal around the outside. I probably just need to be careful getting it out.

I've got a pick to get the bottom O-ring out, but I'm trying to go in order so I have a fighting chance!

And 10-4 on the "don't mess with it" part. Good advice. Many thanks for all this.

Perhaps this video will help you out some:
 

4xdog

Well-known member
Joined
Aug 18, 2012
Messages
5,595
Location
Santa Fe, NM
Here's an old Hollywood Accessories model 649N 2 ton hydraulic floor jack that my father got in the mid-late 1970s and is in the queue to be tackled as after forty years it's not holding pressure. I have the original tags and manual still. Made in Taiwan IIRC.

In case anyone down the road has interest or need, it seemed like archiving some of this info in Hiball's excellent thread might be helpful.

Note that I repainted the jack many years ago -- this isn't the original finish.
i-xVZzw2t-X5.jpg


Click on any of these diagrams to show really large versions.
i-TsNcsSZ.jpg


i-GsnMnWm.jpg


i-hwzt8Jr.jpg
 

ALTEREGO

Well-known member
Joined
May 15, 2018
Messages
420
Location
@HOME
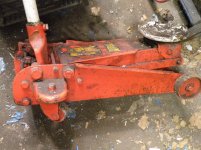
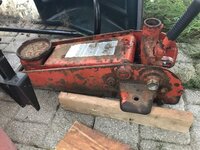
Finally made the time to clean the seat on the valve and the 2 1/4 NORCO jack is now working great, no handle feedback anymore.

It only took a few minutes to do, thanks again everyone and specially Hiball for all the help!

The issue was that the jack would start going down when under load at the same time that the handle would come up.

I bought a long aluminum rod from Ace ($2 or $3 for that), JB weld that I had laying around and valve lapping compound (online, $6 or $7 if I recall correctly?). The ball bearing was around 25 or 50 cents at Ace as well.

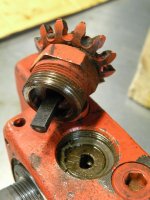
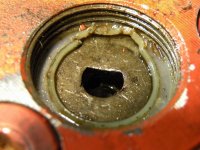
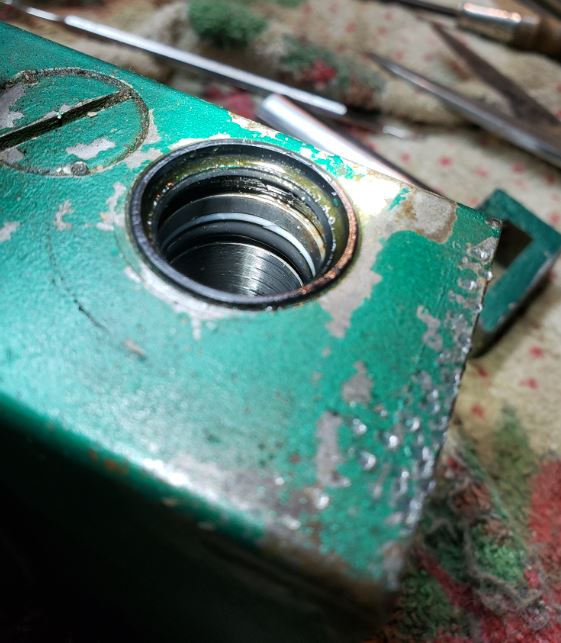
I left the smaller steel ball inside the jack while cleaning the upper seat. As Hiball mentioned, you can clearly feel the “sanding” taking place while you are at it. After I felt the seat was clean enough, I turned the hydraulic unit upside down (being careful to catch the small ball bearing) and forced fluid through the valve in hopes to catch as much debris before it would reach deeper into the system.

Then I emptied the fluid completely and cleaned it up with compressed air.
Replaced the small ball bearing, then the bigger ball bearing on top and gave it a whack with a punch to form the seat. Filled up with clean hydraulic jack fluid, bleed the jack and gave it a go.

EDIT: The handle feedback persists, will try cleaning the seat again and report back.

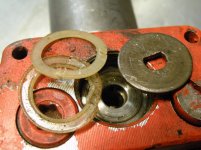
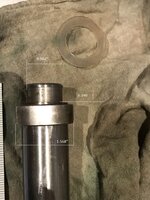
This is what I used to clean the seat:


b90bf40af199a279372c5cb3443b97a3.jpg


I gave cleaning the upper seat on my NORCO jack another go. This time I grabbed a small, thin and long soft metal and cleaned around the seat being very careful not to scratch anything. It looked like there was some gunk on the outer side of the seat so I agitated the gunk, sprayed it with compressed air and then I got a clean rag in there for good measure.

After that, I grabbed a brass pipe brush and cleaned the seat and all around it as much as I could reach. I then turned the cylinder upside down and forced some oil out trough the opening I was cleaning. Turned the cylinder on its side and gave it a go with compressed air and the rag again.
Placed the cylinder up and started lapping the seat by hand and then with a drill in the lowest setting (basically the same speed or lower than by hand but my hands were too tired so I used the drill). Now I did the clean rag first hoping to catch as much lapping compound and metal dust as possible then turned upside down, flush some more oil, compressed air and the rag again.

With the smaller bearing now out of the lower seat, put more oil in the cylinder and flushed it out a couple times. Cleaned the upper seat again with the rag and placed the smaller ball bearing in, then the bigger one and I gave it a good whack with a punch the same size of the ball and a medium sized hammer.

Now here is the crazy part.

I filled the jack with clean hydraulic oil and bled the jack. There was a lot of air at first, lots of pressure build up therefore lots of air hissing out. I took the jack down to the driveway floor (was working on a table) between two cars and went looking for the handle. It took me a while and while I was inside the garage still looking for the handle I heard this loud popping noise coming from the driveway. It sounded like a heavy hard plastic part had fallen from the table or as if a big bubble wrap plastic had popped but I couldn’t find any of those so after a few minutes I gave up looking for the source of the loud sound and started looking for the handle again. It took some time (my garage is a big mess!) but I finally found the jack handle. After I installed the handle I realized there were some drops of oil on the floor, I got really worried because the one good thing about this jack is that it did not leak at all!
I followed the oil trail and the oil leaked from the fill opening. To my surprise, the rubber plug was missing. I looked for it everywhere but couldn’t find it. The only explanation was that there was so much pressure on the jack that made the plug pop out, which would explain the loud noise I heard before. Fearing that the plug had made it into the messy garage, I called the search of for that night.

Before going to bed that night, I lifted one of the cars with the jack to see if the issue with the feedback on the handle had improved and I was delighted to find that there was no visible feedback at all. I left the jack under load for the night to see if the feedback was so small that was imperceptible in a short period of time.
The next morning the car had not lowered at all, no handle feedback whatsoever! I enlisted the help of my 3 1/2 year old daughter to look for the rubber plug. After spending enough time briefing her on the specs of the plug and the scope of the mission we went out to look for the plug and she went straight to... play on the front yard! I looked by my own for the tiny plug everywhere. After a while I finally gave up looking for it and went to get my daughter to go inside the house. I was walking to her looking down on the floor when I found the rubber plug more than 20 ft away from where the jack was! I couldn’t believe my eyes!

I cleaned the plug, installed it and bled the jack again. Put the car under load and... no handle feedback! I’m so happy!

Has anyone had a oil fill plug pop up like that before? Could a leak on the plunger seal cause air to leak in and build that kind of pressure?
 

Attachments

  • b90bf40af199a279372c5cb3443b97a3.jpg
    b90bf40af199a279372c5cb3443b97a3.jpg
    219.7 KB · Views: 41
Last edited:

panther5x

New member
Joined
Nov 27, 2020
Messages
4
Location
Bristol, VT
As promised, here's the finished Sears 328.12001 rebuild ready for another 35 years of service (hopefully). I replaced all the seals and O-rings, got it reassembled, and filled up with new jack oil. And it still works! Many thanks to HiBall and everyone else on here who helped me out. Much appreciated.

Rick
 

Attachments

  • FloorJack.jpg
    FloorJack.jpg
    85.8 KB · Views: 74

Plowboy72

New member
Joined
Nov 19, 2017
Messages
2
Quick question on the wiper ring (the topmost one) on the plunger piston, is it a regular o-ring, or a d-wiper, or a double/single lip oil seal?
 
OP
H

Hiball

Well-known member
Joined
Apr 30, 2009
Messages
14,027
Location
Missery
@Alterego

When bleeding a jack with a non vented fill port, remove the plug or give it a push sideways to allow pressurized air to escape while bleeding and afterwards.
 
OP
H

Hiball

Well-known member
Joined
Apr 30, 2009
Messages
14,027
Location
Missery
Quick question on the wiper ring (the topmost one) on the plunger piston, is it a regular o-ring, or a d-wiper, or a double/single lip oil seal?

I’ve seen some that are both a seal and a wiper. What are you working on? Can you see the current profile of the older part?
 

Plowboy72

New member
Joined
Nov 19, 2017
Messages
2
3 ton floor jack, no identifying marks on it, so not sure of manufacture. Basic single piston jack, no speed lift, 3 ton is an estimate, but its bigger and heavier than the 2 or 2.5 tons ive used before. Basically fluid comes out of hole that plunger piston strokes in and out of. Backup split washer seems fine, I put in a dash 210 oring under it, but thinking 209 might fit better, the wiper ring was replaced by a generic oring several months ago in one of those "only choice we got" moments. Gotta bottle jack thats giving me fits but thats for another day lol.
 

dhally

Active member
Joined
Jan 26, 2021
Messages
34
Location
Kennewick, WA
I was able to rebuild my cheap floor jack using advice on this forum. Got my parts from Lazzar's, who was quite helpful as well. Anyhow it works OK but still leaks from the tank seals. Those are rectangular section rubber and can be seen at the base of the cylinder in the picture.

Anybody have an idea where to source these seals, or can I just use some gasket maker here?
 

Attachments

  • 20210125_171311_Film2.jpg
    20210125_171311_Film2.jpg
    350.6 KB · Views: 62
OP
H

Hiball

Well-known member
Joined
Apr 30, 2009
Messages
14,027
Location
Missery
What parts did you replace? Are you sure it’s leaking at the base of the reservoir and not out the top end and running down? I only ask because generally even a worn tank seal will hold the static pressure assuming you have the tank nut tightened enough.
 

dhally

Active member
Joined
Jan 26, 2021
Messages
34
Location
Kennewick, WA
What parts did you replace? Are you sure it’s leaking at the base of the reservoir and not out the top end and running down? I only ask because generally even a worn tank seal will hold the static pressure assuming you have the tank nut tightened enough.
I replaced all the seals except the two tank seals. Since the jack works OK I am assuming the leak is from one of the tank seals, not sure which one. I did take it apart and torque down the tank nut with my biggest pipe wrench. It only leaks a bit while stored. Nothing obvious while using it.
 
OP
H

Hiball

Well-known member
Joined
Apr 30, 2009
Messages
14,027
Location
Missery
I’d probably try to get a little more torque on it by adding some leverage to the wrench. If that doesn’t work, You can try removing the seals and use some loctite 518 or similar product. I guess thinking about it... might want to make sure you have the threads to take up the slack.
I replaced all the seals except the two tank seals. Since the jack works OK I am assuming the leak is from one of the tank seals, not sure which one. I did take it apart and torque down the tank nut with my biggest pipe wrench. It only leaks a bit while stored. Nothing obvious while using it.
 

ALTEREGO

Well-known member
Joined
May 15, 2018
Messages
420
Location
@HOME
I’d probably try to get a little more torque on it by adding some leverage to the wrench. If that doesn’t work, You can try removing the seals and use some loctite 518 or similar product. I guess thinking about it... might want to make sure you have the threads to take up the slack.
Hello Hiball,

Have you ever used Shellac as a sealant when rebuilding an hydraulic jack? Someone that works on transmissions recommended Shellac to me but I'm not sure if that product poses any contamination risks for hydraulic jacks.
 
OP
H

Hiball

Well-known member
Joined
Apr 30, 2009
Messages
14,027
Location
Missery
Hello Hiball,

Have you ever used Shellac as a sealant when rebuilding an hydraulic jack? Someone that works on transmissions recommended Shellac to me but I'm not sure if that product poses any contamination risks for hydraulic jacks.
I can’t say that I have.. I’m not a big fan of bandaids, I’ve always leaned towards fixing the issue at hand.
 

ALTEREGO

Well-known member
Joined
May 15, 2018
Messages
420
Location
@HOME
I can’t say that I have.. I’m not a big fan of bandaids, I’ve always leaned towards fixing the issue at hand.
Hi Hiball,

I didn't mean using the Shellac as a "bandaid" but using it while properly replacing the seals of a jack only for the metal to metal surfaces instead of the loctite 518 or a similar product.
 
Last edited:
OP
H

Hiball

Well-known member
Joined
Apr 30, 2009
Messages
14,027
Location
Missery
Hi Hiball,

I didn't mean using the Shellac as a "bandaid" but using it while properly replacing the seals of a jack only for the metal to metal surfaces instead of the loctite 518 or a similar product.
When I think of shellac, in particular it’s properties. I honestly can’t see why you would use it for metal to metal contact versus a good anaerobic sealer. I’ve seen some funky stuff come in over the years, I have a jack apart right now where the customer used no less than 1 tube of blue rtv to try and seal the base of his reservoir. I think he literally went around the entire circumference with a 3/8 bead and then smoothed it out with his finger. I guess i shouldnt discourage the use of shellac, but it’s not on my shopping list.
 
Last edited:

zequ

Member
Joined
Aug 3, 2021
Messages
8
trying to remove the cylinder nut. My 24" Crescent wrench lifted the workbench and threatened to break the vise, but couldn't loosen the nut. A trip to my friendly local auto repair shop got it off for less than the cost of a big enough socket for my air wrench.

I had to put the rising part jammed under my shed and hit that nut with a 5 inch pipe wrench and using a 6 foot 2" pipe for leverage! Sucker wouldn't budge!
 
OP
H

Hiball

Well-known member
Joined
Apr 30, 2009
Messages
14,027
Location
Missery
Wow this thread is still alive! Here's one from Canada. Canadian Tire 09-1041-8.

I've posted a lot of pictures in this thread. https://www.garagejournal.com/forum/threads/vintage-jack-id-canadian-tire-09-1041-8.484651/

Wondering what size U-Cup I can use for this?

Well.. if the old cup is 24x40 x8 (based off your other thread) I’d say that is a good start, the only other option is upsizing the thickness if possible. It’s possible that a 10mm might fit, you will just have to measure the distance between washer and the end.

Yes.. Blue Urethane is fine, just make sure it’s a Piston Ucup or a Hybrid.
 
To avoid these ads, REGISTER NOW!
Top Bottom