To avoid these ads, REGISTER NOW!

Plomb tool picture thread - show your stuff!

To avoid these ads, REGISTER NOW!

Ticotiger14

Well-known member
Joined
Feb 1, 2019
Messages
53
Location
Texas
My meager few pieces
 

Attachments

  • 0A4DA08C-5E22-49E5-A696-668184CE213F.jpg
    0A4DA08C-5E22-49E5-A696-668184CE213F.jpg
    124.6 KB · Views: 18
  • 15FC5863-D25F-4465-A8EB-E2871CD39318.jpg
    15FC5863-D25F-4465-A8EB-E2871CD39318.jpg
    154.7 KB · Views: 18

Private Lugnutz

Well-known member
Joined
Mar 30, 2012
Messages
30,488
Location
The Authentic Jersey Shore
So, I just went through a strange little rigmarole I thought I would document it in case it helps anyone else.

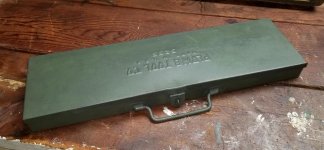
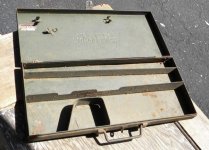
After I showed my recently acquired 3/8-inch drive Cub box (5295) and my Cub collection and the few pieces I still needed upthread, Don (d42jeep) alerted me to an issue he observed with Cub speeders. Namely, that they are not all the same. And, more specifically, that a chrome-plated (and probably post-war era) 5280 he has will not fit in a pre-/early war box (PLOMB, no "5295" on lid, pre-1943 handle holders) that he has.

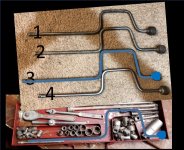
Here's a very telling photo he sent me.

attachment.php


The 5281 (14" long) at the very bottom can be ignored. Look at the two 5280's, though. The OAL (18") is the same, but the shape of the swing and the length of the shank between the end of the knob and the first bend in the swing are much different. One can look at that and think about the extra tray in a Plomb Cub box and see how the one in the middle might be a problem fitting.

attachment.php


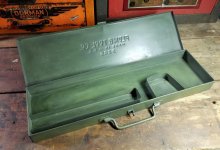
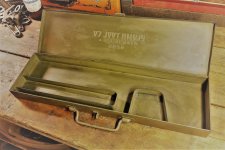
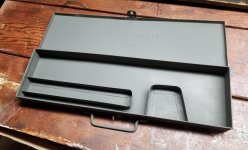
I was worried about the opposite problem, though. My box is clearly postwar. (It was originally red.) I believe it is the same exact box as the mid- to late-war box, as it has the same shape, layout, and handle as the 5295's shown in all the catalogs between 1943 and 1948, and it has the same exact dimensions. And Don informed me that his wartime era 5280's will fit in a postwar (red) 5295 box he has. But I was still feeling a little squirrely.

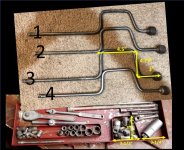
So I texted tin medic, gave him a quick sitrep on the speeders-and-box issue, sent him my critical 5295 box measurements, and asked him to measure the WF-23 he has for me. Turns out - in typical tin medic fashion - that he has four (4) of them. :lol: 
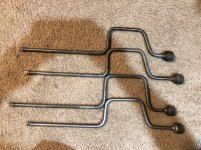
And, lo and behold, they are not even close to being exactly the same shape, either!

attachment.php


One can clearly see that the swings are not the same, and two of them have a longer shank between the knob and the first bend in the swing.

According to tin medic, the second and fourth speeder will not fit in a 5295 box. At least not in my 5295 box, which has 3-1/8" of clearance between the corner of the box and the corner of the swivels tray.

attachment.php


So, I am opting for WF-23 #3. I size-matched his speeders image and my box image, proportionally, using the OAL of the box (18-1/2") and his speeder (18"), and then did some outline formfitting. WF-23 #1 may have also fit, but I think WF-23 #3 will fit best.

attachment.php


I am guessing that all these variations are due to multiple factories and loose specs (at least where the first bend and the shape of the swing arm is concerned). I wonder how many times a soldier or ground crew airman cursed when his replacement speeder didn’t fit in his box? :)
 

Attachments

  • Plomb 3-8 5295 Box_Cat 19A (1943).jpg
    Plomb 3-8 5295 Box_Cat 19A (1943).jpg
    81.4 KB · Views: 134
  • Plomb 3-8 Box & Speeder Measurements_3.jpg
    Plomb 3-8 Box & Speeder Measurements_3.jpg
    147 KB · Views: 131
  • Plomb 3-8 Box & Speeder Measurements_2.jpg
    Plomb 3-8 Box & Speeder Measurements_2.jpg
    147.5 KB · Views: 132
  • Plomb 3-8 WF-23 speeders_tm.jpg
    Plomb 3-8 WF-23 speeders_tm.jpg
    161.3 KB · Views: 131
  • Plomb 3-8 52xx speeders_Don.jpg
    Plomb 3-8 52xx speeders_Don.jpg
    62.3 KB · Views: 134
Last edited:

Private Lugnutz

Well-known member
Joined
Mar 30, 2012
Messages
30,488
Location
The Authentic Jersey Shore
I stripped the box and gave it two base coats today. If you recall from my 5400-AB set write-up, I use RUSTOLEUM Camouflage 1919 Deep Forest Green. You can see how flat it is, but it makes a great undercoat. The techniques layer (a stain made with RUSTOLEUM 284986 Satin Eden darkened up with RUSTOLEUM 249127 Flat Black and paint thinner) will add the yellow hue that is in wartime OD and so hard to find in modern OD paint, as well as a little sheen.

Scroll up for the BEFORE condition. Pic 1 & 2 with the base coats, and Pic 3 is the 5400-AB set again for objective look and comparison.
 

Attachments

  • 20190205_164806.jpg
    20190205_164806.jpg
    129.8 KB · Views: 23
  • 20190205_164842.jpg
    20190205_164842.jpg
    147.7 KB · Views: 19
  • 20180722_132649.jpg
    20180722_132649.jpg
    47.8 KB · Views: 27

Smokeshow69

Well-known member
Joined
Dec 7, 2012
Messages
8,366
Location
Pacific Northwest
I stripped the box and gave it two base coats today. If you recall from my 5400-AB set write-up, I use RUSTOLEUM Camouflage 1919 Deep Forest Green. You can see how flat it is, but it makes a great undercoat. The techniques layer (a stain made with RUSTOLEUM 284986 Satin Eden darkened up with RUSTOLEUM 249127 Flat Black and paint thinner) will add the yellow hue that is in wartime OD and so hard to find in modern OD paint, as well as a little sheen.


Scroll up for the BEFORE condition. Pic 1 & 2 with the base coats, and Pic 3 is the 5400-AB set again for objective look and comparison.


That sure came out nice ! What did you use to strip it ? Wire wheel ?


Sent from my iPhone using The Garage Journal mobile app
 

Private Lugnutz

Well-known member
Joined
Mar 30, 2012
Messages
30,488
Location
The Authentic Jersey Shore
Looks great
Thanks.

That sure came out nice ! What did you use to strip it ? Wire wheel ?
Zip-Strip gel applied with a brush, a putty knife to scrape the goop off, steel wool on the stubborn patches, and a wire brush and pick for the corners. It went up to 66*F here today so I worked outside. It's a messy job, and tedious, especially around the trays and the clasp and handle. I find it helps after that first round to just let the goopy remains in the hard to get places just dry up, then scrape it up with the putty knife or pick.
 

Smokeshow69

Well-known member
Joined
Dec 7, 2012
Messages
8,366
Location
Pacific Northwest
Thanks.


Zip-Strip gel applied with a brush, a putty knife to scrape the goop off, steel wool on the stubborn patches, and a wire brush and pick for the corners. It went up to 66*F here today so I worked outside. It's a messy job, and tedious, especially around the trays and the clasp and handle. I find it helps after that first round to just let the goopy remains in the hard to get places just dry up, then scrape it up with the putty knife or pick.


Roger that. I have a craftsman lower roller that is getting stripped and may just try this !


Sent from my iPhone using The Garage Journal mobile app
 

drivesitfar

Well-known member
Joined
Oct 23, 2013
Messages
35,999
Location
Pacific Northwest
ALL: over on the vise repair thread Shiftless (a member in California) found a discarded working crock pot without a lid and he heated up Simple Green in it and set in a Wilton bullet vise in it and it stripped the paint clean.

i wonder if heated simple green will remove original paint cause even cold SG removes new paint that wasn't prepped very well?
 

Private Lugnutz

Well-known member
Joined
Mar 30, 2012
Messages
30,488
Location
The Authentic Jersey Shore
drivesitfar: Boiling water will strip paint. And, as you alluded to, SG at room temperature will at least fade paint if left on long enough. I'm not familiar enough with the chemical composition of SG to think through the proposition of the chemicals being heated either accelerating the process or making it somehow stronger. Frankly, it sounds a little wonky to me. I would want to see a test of SG at room temp and hot SG before I believed it had any effect. My main problem with boiling anything to strip paint is location. There is no way in hell I would do it in the house and I don't have an oven in the garage.

Roger that. I have a craftsman lower roller that is getting stripped and may just try this !
If you mean Zip-Strip, it is the strongest, fastest method there is. Literally, it will liquify paint within seconds. Note that it is definitely NOT "green". This is a gloves and outside or well-ventilated area product. It will burn your skin on contact. I have tried products touting 'LESS FUMES' / 'NO TOXIC CHEMICALS'. Unfortunately, they just don't work. In my opinion, nothing works like Zip-Strip or a blow torch, which I still use on really stubborn or tough spots (cracks, corners, etc) if I have to.
 

Smokeshow69

Well-known member
Joined
Dec 7, 2012
Messages
8,366
Location
Pacific Northwest
drivesitfar: Boiling water will strip paint. And, as you alluded to, SG at room temperature will at least fade paint if left on long enough. I'm not familiar enough with the chemical composition of SG to think through the proposition of the chemicals being heated either accelerating the process or making it somehow stronger. Frankly, it sounds a little wonky to me. I would want to see a test of SG at room temp and hot SG before I believed it had any effect. My main problem with boiling anything to strip paint is location. There is no way in hell I would do it in the house and I don't have an oven in the garage.


If you mean Zip-Strip, it is the strongest, fastest method there is. Literally, it will liquify paint within seconds. Note that it is definitely NOT "green". This is a gloves and outside or well-ventilated area product. It will burn your skin on contact. I have tried products touting 'LESS FUMES' / 'NO TOXIC CHEMICALS'. Unfortunately, they just don't work. In my opinion, nothing works like Zip-Strip or a blow torch, which I still use on really stubborn or tough spots (cracks, corners, etc) if I have to.


Is this stronger than air craft stripper or jasco ?


Sent from my iPhone using The Garage Journal mobile app
 

Private Lugnutz

Well-known member
Joined
Mar 30, 2012
Messages
30,488
Location
The Authentic Jersey Shore
I finished the box today, but I am not entirely happy with it. I am going to re-do it with more Eden (yellow) in the mix.

Pics 1 & 4 are base coat. Pics 2 & 5 are with the techniques coat. Pics 3 & 7 are the box with digital effects. That may be too olive, but I'd like to get closer to that.
 

Attachments

  • 20190206_180411.jpg
    20190206_180411.jpg
    142.6 KB · Views: 23
  • 20190206_180415.jpg
    20190206_180415.jpg
    149 KB · Views: 21
  • 20190205_164842.jpg
    20190205_164842.jpg
    147.7 KB · Views: 22
  • 20190206_180207.jpg
    20190206_180207.jpg
    145.1 KB · Views: 22
  • 20190206_175622.jpg
    20190206_175622.jpg
    145.1 KB · Views: 20
  • 20190205_164806.jpg
    20190205_164806.jpg
    129.8 KB · Views: 18
Last edited:

d42jeep

Well-known member
Joined
Oct 22, 2014
Messages
16,505
Location
Northern California
Pretty much any color you end up with you’ll be close to one of these.
-Don
 

Attachments

  • 0CD28555-D456-4582-9111-FB03585ACDEF.jpg
    0CD28555-D456-4582-9111-FB03585ACDEF.jpg
    148.1 KB · Views: 30
  • 83172B36-2395-4A26-825A-51C4403587DD.jpg
    83172B36-2395-4A26-825A-51C4403587DD.jpg
    154.1 KB · Views: 17
  • 706522AD-F0A8-4286-BE87-3FC2C21A1D5A.jpg
    706522AD-F0A8-4286-BE87-3FC2C21A1D5A.jpg
    147.6 KB · Views: 17
  • B40FD5AE-4DD9-4DD2-B646-D38A492AD66C.jpg
    B40FD5AE-4DD9-4DD2-B646-D38A492AD66C.jpg
    153.6 KB · Views: 14
  • 06D472A8-9523-4502-A3D4-B3553218B7D8.jpg
    06D472A8-9523-4502-A3D4-B3553218B7D8.jpg
    74.2 KB · Views: 16
  • BA1513B1-1A27-41FE-A7FA-0690743E8822.jpg
    BA1513B1-1A27-41FE-A7FA-0690743E8822.jpg
    150.7 KB · Views: 9
Last edited:

Private Lugnutz

Well-known member
Joined
Mar 30, 2012
Messages
30,488
Location
The Authentic Jersey Shore
It will end up somewhere between Pics 2/5 and Pics 3/6 in my post above, Don. Or close to your Pic 4. I've got a couple dozen WWII boxes to use as models. The variety of OD, as you know, is staggering. Especially over time. Like jeeps, I favor a little more yellow in it than blue.
 

Smokeshow69

Well-known member
Joined
Dec 7, 2012
Messages
8,366
Location
Pacific Northwest
It will end up somewhere between Pics 2/5 and Pics 3/6 in my post above, Don. Or close to your Pic 4. I've got a couple dozen WWII boxes to use as models. The variety of OD, as you know, is staggering. Especially over time. Like jeeps, I favor a little more yellow in it than blue.


Are you particular to that shade on your Jerry cans or is this a tool box only? 🤣 nice job on the restoration either way !


Sent from my iPhone using The Garage Journal mobile app
 

Private Lugnutz

Well-known member
Joined
Mar 30, 2012
Messages
30,488
Location
The Authentic Jersey Shore
Are you particular to that shade on your Jerry cans or is this a tool box only? 🤣 nice job on the restoration either way !
Uh-oh, GS thread crossover and deja vu all over again! HAHA! Thanks, I am stopping with this. Next time you guys see this box, it will have the tools back in it, but I am waiting for the WF-23 and a few other goodies.
 

Attachments

  • 20190206_212029.jpg
    20190206_212029.jpg
    147.1 KB · Views: 22
  • 20190206_212135.jpg
    20190206_212135.jpg
    150.3 KB · Views: 26
To avoid these ads, REGISTER NOW!

drivesitfar

Well-known member
Joined
Oct 23, 2013
Messages
35,999
Location
Pacific Northwest
LUG: are you applying the Army green color with a paint brush or rag or do tell? looks a lot better than the two tone red/green you started with that is for certain.

keep up the great work!!

BTW Simple green will REMOVE PAINT and not just fade it if you are trying to remove a color that was sprayed over the original color. the original paint not so much, but this heating it in the crock pot seemed to remove original.

also if you check Shiftless' post last week (or maybe the week before) he mentions there is an odor, but he's a retired chemistry teacher and didn't mention fumes being dangerous and the original paint on his old Wilton was removed.

i'm not a fan of the stripper's smell at all or the idea of scraping and i'm guessing if you do use that even if outside you should be wearing a good mask.

keep up the great work!!
 

Private Lugnutz

Well-known member
Joined
Mar 30, 2012
Messages
30,488
Location
The Authentic Jersey Shore
Watching progress with interest.. Looking good so far! J.
Big laughs on me, but now it's looking too yellow to me in the daylight! :lol: I should've known better! :eek: The nice thing about my method and my objective, though, is you can just wipe it off or go right over the top. I am going to go just a skosh darker on the Eden/Black mix today. I won't be posting any more photos though. Back to regular programming!

LUG: are you applying the Army green color with a paint brush or rag or do tell?
A rag. This is my third box. I discussed my process and materials in more detail for the previous two projects (WWII Hamilton Metal Products GMTK toolbox and WWII Plomb 5400-AB socket set case), with lots of photos, linked here.

The solution is basically a stain (some paint, lots of paint thinner) and the technique is the same as what is used by pros and ambitious amateurs on interior walls of old houses for faux antique looks. (I did my entire house myself abuot 10 years ago, and that's what gave me the idea a few years ago.)

First I sprayed on the base coats (I used 'Deep Forest Green' in the Rustoleum Camouflage line this time). In a pan I mixed up the "Army green" stain (lots of Rustoleum Satin Eden and some Rustoeum Flat Black), and then I dip and dab, wipe, dapple etc the stain over the top of the base coats with a rag. The stain immediately interacts with the base coat and dries very quickly because it's so thin. if I don't like the way it looks, I immediately just re-dip and re-dab, re-wipe, re-dapple, etc.

I am basically faking a fairly well-preserved (faded, discolored, worn, used, but no rust) original "barn find" look. (Perfect finishes bother me on toolboxes for the same reason they bother me on jeeps! Unless the tools inside it are in NOS factory finish condition, it's very odd/incongruous looking, and, it also implies that they never left the depot! How do you do a living history display with a jeep or a toolbox and tools that look like they never got in the fight!?)

drivesitfar said:
BTW Simple green will REMOVE PAINT and not just fade it if you are trying to remove a color that was sprayed over the original color.
I was referring to original paint.

drivesitfar said:
also if you check Shiftless' post last week (or maybe the week before) he mentions there is an odor, but he's a retired chemistry teacher and didn't mention fumes being dangerous and the original paint on his old Wilton was removed.
I wouldn't be worried about toxic fumes from the SG. Boiling non-toxic substances (e.g., SG) won't make them toxic. What it will make them however is even more highly dispersable in vaporized form than they are in liquid form. SG has a strong odor. So strong that when I even so much as spritz a little SG on something in the basement, forgetting that the CINC-HOUSE is home, I am reminded she is home within minutes. 'What are you doing down there? It stinks!' :lol: I can imagine what boiling it in the kitchen would do! Also, the boiling paint IS toxic, and those fumes are also being dispersed in the air. I'm open to alternatives, just not that one. I prefer Zip-Strip outside over the idea of cooking off paint inside my house with either boiling water or boiling SG.
 

gpw_42

Well-known member
Joined
Apr 24, 2017
Messages
717
Location
NC Sandhills, USA
Is there a consensus on when Plvmb used crinkle paint, and when they used regular paint on the different boxes?

When it's in good condition, I LOVE the appearance of their OD crinkle and its satin finish.
 

drivesitfar

Well-known member
Joined
Oct 23, 2013
Messages
35,999
Location
Pacific Northwest
LUG: I'm not certain that there is a consensus that heating SIMPLE GREEN is TOXIC so maybe we can start a thread on it to see. I hear you on the smell and from what SHIFTLESS said the smell does get a bit worse when heated probably similar to BLO.

sounds like you have a good system that works for you so that's what counts and keep up the good work cleaning up some of these old tools and stuff.

GPW: I also love the old CRINKLE flat PLVMB painted boxes. a few of the guys figured out how to put a wrinkle surface on their newly painted vises which really pops too in case you might want to try and duplicate the WRINKLE/CRINKLE finish.

here's what one of our member uses to achieve his wrinkle finish on his vises.
 

Attachments

  • IMG_20161122_163931.jpg
    IMG_20161122_163931.jpg
    86.2 KB · Views: 27
  • IMG_20150823_153448.jpg
    IMG_20150823_153448.jpg
    75.7 KB · Views: 23
  • IMG_20150804_085036.jpg
    IMG_20150804_085036.jpg
    79.6 KB · Views: 27
  • DSC00614.jpg
    DSC00614.jpg
    93.4 KB · Views: 23
Last edited:

gpw_42

Well-known member
Joined
Apr 24, 2017
Messages
717
Location
NC Sandhills, USA
GPW: I also love the old CRINKLE flat PLVMB painted boxes. a few of the guys figured out how to put a wrinkle surface on their newly painted vises which really pops too in case you might want to try and duplicate the WRINKLE/CRINKLE finish.

here's what one of our member uses to achieve his wrinkle finish on his vises.

Drives, thanks for posting the vise pics. I have a Starrett vise which I need to clean and TLC, and then I may use some of that black VHT on....the Rock Island you posted is really nice looking!

I've been thinking that some crinkle, covered by Lugz ' techniques would be the way I'd want to approach restoring a box, if I had one which needed it. I have one Plvmb 9989 toolbox, which was not a "you ****" price, but the original OD satin crinkle paint is in nice condition.
 

bmwrd0

Well-known member
Joined
Nov 7, 2010
Messages
5,437
Location
Beaver Fever Oregon
Drives

Putting a crinkled finish isn't too hard, you just have to experiment with it. Most spray paint cans will say that to put a second coat, either do it in the first 15 minutes or wait 24 hours. Well, I messed up once while painting and did a second coat after about 2 hours. Crinkle City, but not in a cool way. So if you were to experiment then you could get the process down.
 

drivesitfar

Well-known member
Joined
Oct 23, 2013
Messages
35,999
Location
Pacific Northwest
BMW: I used to love the more expensive HAMMERED spray paint, but I think the WRINKLE FINISH is a step above that.

GPW: you are welcome and best of luck with your project.
 

tshusker

Active member
Joined
Jun 20, 2018
Messages
27
Location
DFW, TX
Recently picked up, cleaned, and oiled this 8 inch Plomb/Plvmb 708S adjustable wrench from 1947 (date code V-11-7). Always a pushover for the Plvmb logo with the inverted triangle! Understand the “S” suffix to the model number indicates an industrial finish.
 

Attachments

  • c008.jpg
    c008.jpg
    106.4 KB · Views: 17
  • c006.jpg
    c006.jpg
    114.4 KB · Views: 20
  • c005.jpg
    c005.jpg
    121.8 KB · Views: 24
  • c004.jpg
    c004.jpg
    148.1 KB · Views: 30
  • c002.jpg
    c002.jpg
    141.1 KB · Views: 29
  • c001.jpg
    c001.jpg
    107.6 KB · Views: 25
Last edited:

tym

Well-known member
Joined
Mar 5, 2016
Messages
2,429
Location
MA
First Plomb find of the year, an abused caulking tool marked "Plomb Tool Mfg. Co.," which Alloy Artifacts tells me is 1927 or earlier. It looks like the tip was reground, but I believe it should be flat, correct? I might have a go at dressing the mushroomed end.
 

Attachments

  • 20190209_163837.jpg
    20190209_163837.jpg
    80.7 KB · Views: 16

d42jeep

Well-known member
Joined
Oct 22, 2014
Messages
16,505
Location
Northern California
With some help from Username, I believe that this 1945 set is complete. I was missing the smallest sockets.
-Don
 

Attachments

  • 53973DF4-1D04-42C1-B601-CFA96B79E7F1.jpg
    53973DF4-1D04-42C1-B601-CFA96B79E7F1.jpg
    151.2 KB · Views: 25
  • F37CDD00-CA92-42CC-A3AE-6106BD023F1C.jpg
    F37CDD00-CA92-42CC-A3AE-6106BD023F1C.jpg
    152.3 KB · Views: 34
  • 3F2AA837-1FC2-4B01-9524-1927DA8C644A.jpg
    3F2AA837-1FC2-4B01-9524-1927DA8C644A.jpg
    138 KB · Views: 28
Last edited:

RubiconJK

Well-known member
Joined
May 15, 2016
Messages
1,380
Location
"I'm bad, I'm Nationwide"
Here is a midget ignition set with roll I recently found online. Plomb catalog 18A shows this as set 3200D which originally would have consisted of 3210, 11, 15, 16, 20, 21, 25, 26 and #235 pliers. The old tool roll is in rough shape and I have to handle it with great care. The PO had made some changes to the content of this set which included a 1212 and 3025 and the pliers are Indestro 3411. I've shown my Plomb #235 which will replace the Indestro pliers and I am missing 3220 & 3225. I'll try to remember and show the set again once I get everything cleaned and complete.
 

Attachments

  • p3.jpg
    p3.jpg
    124.1 KB · Views: 19
  • p2.jpg
    p2.jpg
    145 KB · Views: 26
  • p1.jpg
    p1.jpg
    122.2 KB · Views: 17

r_olson_06

Well-known member
Joined
Feb 12, 2012
Messages
4,076
Location
SD
Here is a midget ignition set with roll I recently found online. Plomb catalog 18A shows this as set 3200D which originally would have consisted of 3210, 11, 15, 16, 20, 21, 25, 26 and #235 pliers. The old tool roll is in rough shape and I have to handle it with great care. The PO had made some changes to the content of this set which included a 1212 and 3025 and the pliers are Indestro 3411. I've shown my Plomb #235 which will replace the Indestro pliers and I am missing 3220 & 3225. I'll try to remember and show the set again once I get everything cleaned and complete.
Checked my stash and don't have any spares of the 3. I don't even have 2 of them myself.

Looking for the following Plomb Pebbles Wrenches 3061, 3070,
 

d42jeep

Well-known member
Joined
Oct 22, 2014
Messages
16,505
Location
Northern California
Here is a midget ignition set with roll I recently found online. Plomb catalog 18A shows this as set 3200D which originally would have consisted of 3210, 11, 15, 16, 20, 21, 25, 26 and #235 pliers. The old tool roll is in rough shape and I have to handle it with great care. The PO had made some changes to the content of this set which included a 1212 and 3025 and the pliers are Indestro 3411. I've shown my Plomb #235 which will replace the Indestro pliers and I am missing 3220 & 3225. I'll try to remember and show the set again once I get everything cleaned and complete.

I only have a couple but I’ll check mine too.
Here is a DBE I picked up last Friday.
-Don
 

Attachments

  • 74FD69F8-044D-4DAC-801A-16BB46EF249E.jpg
    74FD69F8-044D-4DAC-801A-16BB46EF249E.jpg
    149.8 KB · Views: 20
To avoid these ads, REGISTER NOW!
Top Bottom