To avoid these ads, REGISTER NOW!

"Pre-Block" Grinders--Where's the Love?

DDOPWD23

Well-known member
Joined
Jul 8, 2024
Messages
146
Location
Glen Rock, NJ
Correct.

I have a vintage Woodward lamp mounted to the table. I added a snap-in female outlet to the back side of the center band on the grinder. It's wired into the grinder switch so the lamp turns on when the grinder is turned on. It really works great.


very nice and it does look like it serves its purpose well. Looks like you have it all mounted to a side mount table for an Emerson DP not sure what generation guessing 3 or 4.
 
To avoid these ads, REGISTER NOW!

DDOPWD23

Well-known member
Joined
Jul 8, 2024
Messages
146
Location
Glen Rock, NJ
Here is my grandfather’s 1/3 HP 1961. The last of the Packard built. You can see how it looked when I got it and that was all its years of service. I cleaned it up gave it new bearings and power cord and found the tool rests for it. You can see I changed the color to the current gold and brown. I will make another post for the 1/4 HP that I use for buffing and polishing. You can also see a 1/2 HP in the background as well but I have not restored that one yet.
 

Attachments

  • IMG_5516.jpeg
    IMG_5516.jpeg
    744.2 KB · Views: 83
  • IMG_7846.jpeg
    IMG_7846.jpeg
    831.5 KB · Views: 55
  • IMG_7845.jpeg
    IMG_7845.jpeg
    754.3 KB · Views: 39
  • IMG_7844.jpeg
    IMG_7844.jpeg
    732 KB · Views: 36
  • IMG_7843.jpeg
    IMG_7843.jpeg
    740 KB · Views: 35
  • IMG_7354.jpeg
    IMG_7354.jpeg
    616.7 KB · Views: 34
  • IMG_7353.jpeg
    IMG_7353.jpeg
    517.6 KB · Views: 32
  • IMG_5739.jpeg
    IMG_5739.jpeg
    872.2 KB · Views: 33
  • IMG_5524.jpeg
    IMG_5524.jpeg
    847.4 KB · Views: 31
  • IMG_5519.jpeg
    IMG_5519.jpeg
    692.2 KB · Views: 41

DDOPWD23

Well-known member
Joined
Jul 8, 2024
Messages
146
Location
Glen Rock, NJ
Well finally got some time to restore this new to me 1957 1/2 HP grinder. It needed bearings really bad. I turned it on once to test it out and shut it right away. Someone also ground down a lot of the tool rests and I tried my best to put back what was taken away. All in all it’s a beast that I am glad I don’t have to lift anymore. That completes my collection restoration of those tools. I now have to move onto 5 CM DP two of them are 100 series and 2 are 150 series and the 5th one is a 1939 that I will be restoring as a wedding gift. Since guys usually don’t get tools put on the registry.
 

Attachments

  • IMG_8692.jpeg
    IMG_8692.jpeg
    605.9 KB · Views: 32
  • IMG_8688.jpeg
    IMG_8688.jpeg
    508.7 KB · Views: 31
  • IMG_8679.jpeg
    IMG_8679.jpeg
    780 KB · Views: 28
  • IMG_8678.jpeg
    IMG_8678.jpeg
    737.2 KB · Views: 27
  • IMG_8659.jpeg
    IMG_8659.jpeg
    725.5 KB · Views: 25
  • IMG_8656.jpeg
    IMG_8656.jpeg
    915.3 KB · Views: 26
  • IMG_7291.jpeg
    IMG_7291.jpeg
    698.1 KB · Views: 25
  • IMG_7289.jpeg
    IMG_7289.jpeg
    667.1 KB · Views: 25
  • IMG_7287.jpeg
    IMG_7287.jpeg
    1.1 MB · Views: 25
  • IMG_7284.jpeg
    IMG_7284.jpeg
    907.6 KB · Views: 31

Hanniballs

New member
Joined
Aug 29, 2024
Messages
4
Anyone have wiring info for 115.7397?

Damaged switch and frayed cord so I’ve never run it.

As received the neutral was switched and connected to black. Hot line in was connected to red. Capacitor was connected to red and white.
 

Attachments

  • IMG_4104.jpeg
    IMG_4104.jpeg
    372.4 KB · Views: 26
  • IMG_4108.jpeg
    IMG_4108.jpeg
    1,022.7 KB · Views: 24
  • IMG_4114.jpeg
    IMG_4114.jpeg
    761.1 KB · Views: 26

FrankLee

Well-known member
Joined
Sep 13, 2010
Messages
3,551
Location
seMI, 48317
Anyone have wiring info for 115.7397?

Damaged switch and frayed cord so I’ve never run it.

As received the neutral was switched and connected to black. Hot line in was connected to red. Capacitor was connected to red and white.
The photos below are from a 115.6965; a '48 version of your model. Maybe you can make sense of them.

When re-wiring two-prong plugs on old motors and grinders with new grounded cords, I always connect hot directly to the switch.

IMG_9105.JPG IMG_9163.JPG
 

Hanniballs

New member
Joined
Aug 29, 2024
Messages
4
The photos below are from a 115.6965; a '48 version of your model. Maybe you can make sense of them.

When re-wiring two-prong plugs on old motors and grinders with new grounded cords, I always connect hot directly to the switch.

IMG_9105.JPG IMG_9163.JPG
Awesome, thank you! Your pics confirmed what I was seeing when I disconnected my wires. I wasn’t sure if it was correct as received.

My grinder is now running, although needs new bearings.
 

Attachments

  • IMG_4164.jpeg
    IMG_4164.jpeg
    817.9 KB · Views: 16
  • IMG_4159.jpeg
    IMG_4159.jpeg
    1,013.8 KB · Views: 24

FrankLee

Well-known member
Joined
Sep 13, 2010
Messages
3,551
Location
seMI, 48317
I saw this photo in an estate sale ad. I saw that the left guard was broken off and went to check it out. It's a great parts machine if the price is right.
ba00c09a-9f74-46ca-98a3-d4a44300c8f0.jpg
It was marked $30, but was day 2 of the sale and I snagged it for $20. I did find the broken left-side guard with a good left cover and discovered that the Vimco lamp shade was fubar.

I walked around some more and found the grinder pedestal stand. Ah... it's a no-brainer that the grinder broke when it fell over on the stand. It was very obvious that it was a long time since the grinder was on that stand. The stand came home with me too.

This will likely be a parts machine soon.

More pics after I got them home. It runs good and the rotor/arbor shaft is straight.
IMG_6487.JPG IMG_6498.JPG IMG_6491.JPG
IMG_6494.JPG IMG_6488.JPG

IMG_6489.JPG IMG_6499.JPGIMG_6490.JPG
 
Last edited:

Old Radar

Well-known member
Joined
Apr 17, 2019
Messages
2,754
Location
San Antonio, TX
I walked around some more and found the grinder pedestal stand. Ah... it's a no-brainer that the grinder broke when it fell over on the stand.
You should have claimed the stand was obviously unbalanced--citing all the damage to the grinder--and gotten a further discount on it, too! Still, $35 for the pair is outstanding--you ****!
 

FrankLee

Well-known member
Joined
Sep 13, 2010
Messages
3,551
Location
seMI, 48317
I bought another 115.7575 today. This one has a couple issues, but with parts from yesterday's buy, I'll have a very nice refurb.

464370972_1628185291440988_4351376077163600243_n.jpg
 

DDOPWD23

Well-known member
Joined
Jul 8, 2024
Messages
146
Location
Glen Rock, NJ
I bought another 115.7575 today. This one has a couple issues, but with parts from yesterday's buy, I'll have a very nice refurb.

464370972_1628185291440988_4351376077163600243_n.jpg
Nice! I used the 1957 one I restored to sharpen a lawn mower blade just to test it out and it was a joy to use. My grandfathers 1/3 HP will always be my favorite but man that 1/2 HP is a beast.
 

FrankLee

Well-known member
Joined
Sep 13, 2010
Messages
3,551
Location
seMI, 48317
Is anyone 3D printing these shades?

Or found an acceptable substitute?

IMG_6679.JPG
 

Attachments

  • IMG_6680.JPG
    IMG_6680.JPG
    818.6 KB · Views: 19

FrankLee

Well-known member
Joined
Sep 13, 2010
Messages
3,551
Location
seMI, 48317

Attachments

  • 1766406544092.png
    1766406544092.png
    1.2 MB · Views: 1
Last edited:

DDOPWD23

Well-known member
Joined
Jul 8, 2024
Messages
146
Location
Glen Rock, NJ
Finally got a pedestal. The price and location were just right $50 and 15 minutes away. I’ll just have to clean it up and paint it to match all the others. The Delco just free to place on it.
 

Attachments

  • IMG_1925.jpeg
    IMG_1925.jpeg
    652.5 KB · Views: 24

ching0n

Well-known member
Joined
Jul 21, 2016
Messages
1,496
May I suggest a 'nomenclature' change from pre-block/block/mailbox/tombstone? I think '115's' and '397's' may be a better identifier for users. I don't think there's any cast iron 397's and 397 round and flat tops are all aluminum AFAIK.
Basically:
115
397 RT
397 FT

Moving on, I picked up a 1/4 115, it's got a centrifugal switch and noticed it came w/o finger washer beneath the guards. Unlike other cast 115's, it also came w/o the double stamped washer or felt dust shield. Is this normal for the 1/4? 115.19500

I was hearing a scraping spinning it by hand so tore it apart thinking a wire was rubbing against the rotor but may have been the centrifugal switch itself. I don't hear the switch clicking off on speed down so that's got me a bit concerned.
 

FrankLee

Well-known member
Joined
Sep 13, 2010
Messages
3,551
Location
seMI, 48317
May I suggest a 'nomenclature' change from pre-block/block/mailbox/tombstone? I think '115's' and '397's' may be a better identifier for users. I don't think there's any cast iron 397's and 397 round and flat tops are all aluminum AFAIK.
Basically:
115
397 RT
397 FT
I think something was tried before to eliminate that other term, but it failed. Unfortunately, I think we're stuck with it. I just don't use it myself.

I believe there was a 397 cast iron model.

Moving on, I picked up a 1/4 115, it's got a centrifugal switch and noticed it came w/o finger washer beneath the guards. Unlike other cast 115's, it also came w/o the double stamped washer or felt dust shield. Is this normal for the 1/4? 115.19500.
It should have a spring washer and end caps (#12 in the parts diagram), but no felt washers.

I was hearing a scraping spinning it by hand so tore it apart thinking a wire was rubbing against the rotor but may have been the centrifugal switch itself.
The scraping sound is very likely the cent switch.

I don't hear the switch clicking off on speed down so that's got me a bit concerned.
It should click. Were both springs (#25) present on the governor assembly?
 
Last edited:

Old Radar

Well-known member
Joined
Apr 17, 2019
Messages
2,754
Location
San Antonio, TX
May I suggest a 'nomenclature' change from pre-block/block/mailbox/tombstone? I think '115's' and '397's' may be a better identifier for users.
Welcome to the thread and to the debate. You are hardly the first and won't be the last to bring up this topic or suggest alternative nomenclature. Peruse the previous pages in the thread--it's a popular subject--one episode starts in the middle of page 6 and goes on for a bit.
Not to dismiss your suggestion out of hand (you're free to identify them as you wish) but most humans tend to rely on visual cues and assign common-place names to inert objects to serve as memory clues to identify objects--even if not always clear-cut or accurate. The use of model numbers is less common unless you are talking about R2D2 or C-3PO.
 

ching0n

Well-known member
Joined
Jul 21, 2016
Messages
1,496
I think something was tried before to eliminate that other term, but it failed. Unfortunately, I think we're stuck with it. I just don't use it myself.

I believe there was a 397 cast iron model.


It should have a spring washer and end caps (#12 in the parts diagram), but no felt washers.


The scraping sound is very likely the cent switch.


It should click. Were both springs (#25) present on the governor assembly?
I think there's also a 267 or 257 model so I may have the round head aluminums pegged wrong.

I found a single bearing spring washer though don't recall which side it was on (likely the correct one). Both springs are there on the governor, lots of white oxide on the I'm guessing galvanized body (hopefully not cadmium). Perhaps the switch isn't as audible as in newer grinders? I'll take some resistance measurements of the start winding but it had no trouble starting.

I also might've confused surface rust on the cast iron w/factory 'rust brown' paintjob for lack of a better name. The center sheet piece was pitted to hell so figured the cast was also rusted. Upon closer inspection, there is some but looks like it's mostly oxidized painted finish. Makes sense to offer if anticipating damp environments like a farm.
 

ching0n

Well-known member
Joined
Jul 21, 2016
Messages
1,496
Welcome to the thread and to the debate. You are hardly the first and won't be the last to bring up this topic or suggest alternative nomenclature. Peruse the previous pages in the thread--it's a popular subject--one episode starts in the middle of page 6 and goes on for a bit.
Not to dismiss your suggestion out of hand (you're free to identify them as you wish) but most humans tend to rely on visual cues and assign common-place names to inert objects to serve as memory clues to identify objects--even if not always clear-cut or accurate. The use of model numbers is less common unless you are talking about R2D2 or C-3PO.
I'm mostly coming at it from chassis codes in vehicles but dunno if the differences are such to make this method foolproof.
 
To avoid these ads, REGISTER NOW!

DDOPWD23

Well-known member
Joined
Jul 8, 2024
Messages
146
Location
Glen Rock, NJ
I would agree on the nomenclature to identify them but I am also new here. Franklee is right, when Deleco took over from Packard electric in 1962 they used cast iron construction for the 1962 & 1963 model years. Those years used the craftsman crown for the first time on the stator band for the bench grinders and continued the brown and gold color scheme. Then went to the cast aluminum and the gray on gray color scheme in 1964.

Feel free to correct me if I am wrong since I wasn’t even alive then and it’s just my own research that I have done.
 

ching0n

Well-known member
Joined
Jul 21, 2016
Messages
1,496
I would agree on the nomenclature to identify them but I am also new here. Franklee is right, when Deleco took over from Packard electric in 1962 they used cast iron construction for the 1962 & 1963 model years. Those years used the craftsman crown for the first time on the stator band for the bench grinders and continued the brown and gold color scheme. Then went to the cast aluminum and the gray on gray color scheme in 1964.

Feel free to correct me if I am wrong since I wasn’t even alive then and it’s just my own research that I have done.
I went back a few pages and found that indeed there's a few iron block 397's from the 60's. They appear to be rated lower amperage but believe these were relay start so wonder if the centrifugal switch eats up some of the efficiency in the earlier models, causing the added amp draw? Would need to convert one to relay start and measure amp draws I guess.
 

DDOPWD23

Well-known member
Joined
Jul 8, 2024
Messages
146
Location
Glen Rock, NJ
Yes you are correct, when Delco took over they got rid of the centrifugal switch and used a sensing relay. You are right there is a big difference in amp draw. I had both 1/2 HP grinders and the Packard one would draw 7 amps and the Delco would draw 4.4 amps. Doing the math for the 7 amp draw that would work out to be a 49% efficiency which I find it hard to believe. Unless they were just under rating the true power of the motors.
 

ching0n

Well-known member
Joined
Jul 21, 2016
Messages
1,496
what fits through the factory grommet 14/3 or 16/3? For the 1/4 hp
 

ching0n

Well-known member
Joined
Jul 21, 2016
Messages
1,496
Either will work. I used 14/3 though and I like the power cords to be long. I went with this from Amazon and I used it for 1/4, 1/3, and 1/2 HP builds.

https://a.co/d/hJkD6Wj
I got impatient so used a fairly thick jacketed 9' 18/3 from a PC PSU. A bit thin gauge but ampacity's enough for this, I usually worry more about the overall thickness being too small. Runs fairly smooth w/o the stones but a bit wobbly w/them installed (I can see the stones spins in a bit of an orbit for some reason. I'll probably tear into it again to grease the contacts, locktite a few things, repack the bearings (anyone have a how-to?, manual says it's doable) & maybe paint the center sheet metal. I like the rat-rod look right now.

I can hear the centrifugal switch now but maybe was expecting it at higher RPM when I was listening for it before. Is it normal for these or is it sticking?

1736184140543.png1736184402371.png1736184423312.png1736184546876.png
 
Last edited:

DDOPWD23

Well-known member
Joined
Jul 8, 2024
Messages
146
Location
Glen Rock, NJ
You might have to dress the wheels but I would buy new ones since you can’t really trust the used ones from the previous owner.
 

ching0n

Well-known member
Joined
Jul 21, 2016
Messages
1,496
You might have to dress the wheels but I would buy new ones since you can’t really trust the used ones from the previous owner.
yeah, it's what I figured...I just didn't think the wheels would be so out of round given they wear as they spin. I ordered a unitized fiber wheel as well as a burnishing wheel. Might pick up a wire wheel and stone @ HF tomorrow.

.... I'll probably tear into it again to grease the contacts, locktite a few things, repack the bearings (anyone have a how-to?, manual says it's doable)
on repacking:
 

ching0n

Well-known member
Joined
Jul 21, 2016
Messages
1,496
yeah, it's what I figured...I just didn't think the wheels would be so out of round given they wear as they spin. I ordered a unitized fiber wheel as well as a burnishing wheel. Might pick up a wire wheel and stone @ HF tomorrow.


on repacking:
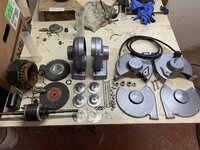
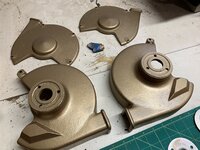
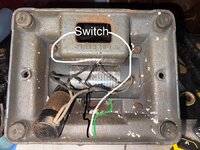
Tore it apart again and I couldn't figure out how to take off the grease shields (different design than above).

Here's what I did:
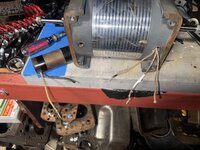
There is a tiny gap between the inner race and the shield (towards motor side). Take off bearings, shoot some carb cleaner into that gap and/or soak bearings in gasoline (per manual) so you can dissolve the old grease. Dry out, using grease in a tube (or syringe or grease gun with needle injector) press and use pressure to inject into the gap, repeat until dry noise when spinning disappears and you get some drag from the grease. I'm pretty sure mine had a larger gap than the one below (check yours before using solvent to remove old grease). You could bypass the cleaning and just add more grease and/or maybe drop a few drops of synthetic oil in there to re-soak the binder that could be dry.

1736278053895.png

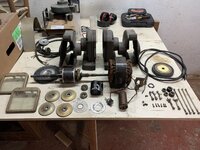
Also, in my model, there's a spring washer on the left side behind the shield & an end cap that I'm fairly certain sets a pre-load. Manual says that when removing the shields, one must run these end caps bolted down.

Lastly, despite being held together by 4 bolts, it is possible to bolt together w/a mild twist, to avoid this, perform final bolt down with grinder sitting on a flat surface, preferably without the bottom cover/feet in place. Once I was done, I ended up w/a tiny transient induction hum similar to an oscillating fan swinging by. I can't remember if it was there before but it's possible a lack of torque or induced twist when bolting the whole thing together is the culprit. I had already applied thread lock & tightened the nuts so fixed the twist w/a mallet & could hear the noise change as I did it. Maybe next tear down I'll look into it, I was not liking how easily the lacquered cloth covered wiring was fraying so that may be the next 'upgrade'.
 

DDOPWD23

Well-known member
Joined
Jul 8, 2024
Messages
146
Location
Glen Rock, NJ
I would agree with Franklee. I have all three HP grinders, each one set up for a different task. 1/4 is for polishing and buffing. 1/3 has a wire wheel and a 180 grit fiber wheel and the 1/2 has 34 grit and 100 grid grinding wheels. If I had to choose HP grinder and get three of them it would be the 1/3. Just is a well rounded grinder and has all the power you will need to get any job done that a garage hobbits.
 
Last edited:

FrankLee

Well-known member
Joined
Sep 13, 2010
Messages
3,551
Location
seMI, 48317
I bought another 115.7575 today. This one has a couple issues, but with parts from yesterday's buy, I'll have a very nice refurb.

464370972_1628185291440988_4351376077163600243_n.jpg


I've got a bit of work to do yet on the eye shields, but wanted to post a video of the grinder running. It is SO smooth!

I generally don't reinstall the original stones, but they rang nicely.


DDOPWD23

Well-known member
Joined
Jul 8, 2024
Messages
146
Location
Glen Rock, NJ
Looking and sounds just like mine. Did you repaint that with the ACE hardware gray paint or the Kyrlon matte dark Pearl?
 

DDOPWD23

Well-known member
Joined
Jul 8, 2024
Messages
146
Location
Glen Rock, NJ
Awesome, I’m going to order some now. That looks just like the craftsman blue gray. I can’t order the ACE hardware color online. I have to go to the store and there isn’t any near where I live. I can order the krlyon and get it deliver.
That is the Krylon Matte Dark Pearl.
 

ching0n

Well-known member
Joined
Jul 21, 2016
Messages
1,496
did the old iron blocks come w/vitrified aluminum oxide or carborundum stones? My tags are FUBAR.
 
Last edited:

ching0n

Well-known member
Joined
Jul 21, 2016
Messages
1,496
I picked up a 6" 1/2hp aluminum block grinder for a song. It needs some love but wheel guards look swappable w/the iron blocks. If yours are damaged or lost, it might get you spark guards, eye guards, and tool rests....I'll confirm later today. Stator looks about the same size as my iron block 1/4 hp.

I think it would be a good idea to take some resistance readings & gauge size of the windings and start keeping track of them, might help figure out which is "best".

FWIW, it weighs about half as much despite "being double the power" but runs very smooth. I think the amp draw is on the same ballpark (tag is sun damaged) but that's not the whole story as I suspect there's some efficiency gain not having to spin a centrifugal switch around.
Here's a ballpark of the size for 1/4hp iron block and 1/2hp aluminum block, roughly same volume:
1736990282078.png

aluminum guard casting is same left or right, bolt pattern is same w/added benefit of 3 extra holes (6 total) allowing for more angle options:

1736990375839.png

The end cover clearance is an issue though (if you want to use), you need about 1/4" more which can be easily resolved by shimming the guard's 3 bolts w/some bushings/nuts/washers:

1736990466586.png
 
To avoid these ads, REGISTER NOW!
Top Bottom