
Old Radar
Well-known member
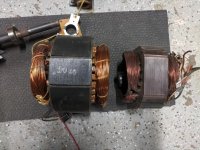
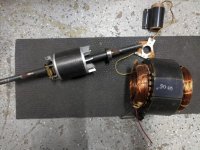
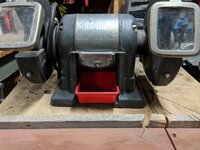
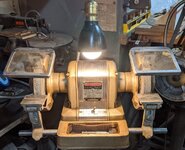
I finished my 1959 ½ hp Pre-Block grinder restoration the other day. Still working on the home-built stand that came with it.
Thanks to everyone who provided suggestions, advice and guidance—your help made the project much easier. The grinder needed a basic restoration—cleaning and rust removal, new power cord, new rubber feet, rewiring the lamp and on/off switch, painting and replacing several mismatched screws, and of course switching out the 6-inch stone and wire brush for 7-inch versions.
The grinder vibrated a good bit initially, with the major source being a pair of 2 inch washers on the left arbor, inboard of the old wire brush. They had ¾ inch holes while the arbor is 5/8 inch. See my post above relating to the goofy combination of grinding stone and wire wheel “washer” that was on the right arbor. Once all the PO’s gear was removed from the arbors, the vibration cleared right up.
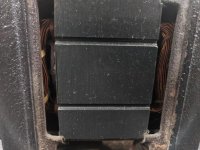
I checked the bearings and found them to be sealed with plastic seals that had a stretchy collar that contacted the inner bearing ring. Since the grinder ran fairly smoothly and there were no scary noises emanating from the bearings, I decided to let them continue their good work. I popped the outer plastic cover off each bearing, carefully removed what dried grease there was and repacked them with fresh grease. I thought the spin down time would increase after the repack but strangely, it went from about 25 seconds to about 17. During the first few test runs with nothing on the arbors, a little of the new grease was forced out of the bearings. I wiped that up until it stopped—it didn’t amount to much leakage.
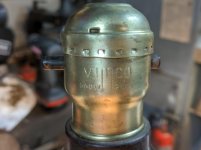
The power switch was a mess. It was not original—in fact it was a three position switch: off-on-off, but was wired up incorrectly so it did nothing in the first two positions and started the grinder when switched to the far right “Off” position. I wired in a new two position toggle switch and used the original label.
After clearing out all the Mud-dauber nests and about two pounds of old slag, I degreased all the parts and put all the rusty parts into a vinegar bath for about 24 hours. I rinsed and scrubbed everything with 3M pads, used my heat gun to make sure all the water was dried in all the little nooks and crannies and primed them in preparation for painting.
I looked at all the different color combinations from previous restorations and decided to go with a dark bronze overall. For the accents I intended to use X-O Rust Bronze as suggested byPendragon1998 in his very detailed restoration of this same model grinder. https://www.garagejournal.com/forum/showthread.php?t=262651
Turns out Dark Bronze wasn’t really what I was looking for so I went with Rust-Oleum Antique Copper. Of course, the only TrueValue hardware store left in San Antonio doesn’t stock X-O Rust Bronze so I used Krylon Champagne Nouveau Satin for the center panel and the accents. I decided not to paint the lamp cover. It’s Bakelite and I like the look and feel of it on its own.
I also used Pendragon’s suggested rubber feet that worked out very well with only minor modifications. My grinder didn’t have the spark arrestors so I fabricated them out of some aluminum stock I had on hand. I moved the cracked eye shield over to the wire wheel until I can find a replacement.
I ordered two 1 inch diameter, ¼ inch wide aluminum spacers with 5/8 inch centers from McMaster-Carr to use with the wire brush so I don’t have to contend with washers. And instead of using the plastic bushings that came with my new grinding wheels, I ordered a couple of 1 inch bronze sleeve bearings with 5/8 inch centers. BTW, after running with the wheels on for about an hour the spin down time was 32 seconds.
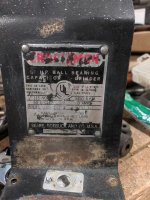
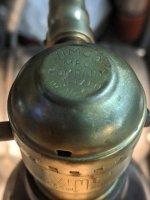
If there is one suggestion I can offer for people restoring their old equipment it’s this: Be very gentle with labels printed on aluminum—the printing is unbelievably delicate. The only sour spot in this whole project was me ruining the grinder’s label within about 10 seconds using no more than a soft nylon brush and de-greaser. Before I knew it, the degreaser had completely obliterated the red Craftsman logo and was well on its way to removing the black printing. I was shocked and devastated because my label was in pretty decent shape—I thought I was just giving it a good cleaning. I’ve requested the Photoshop file Pendragon created for his label but he has been absent from the forum for the last month so I haven’t heard back from him. Does anyone know of any other ways to recover from this mistake? I’d appreciate any suggestions.
.jpg")


Thanks to everyone who provided suggestions, advice and guidance—your help made the project much easier. The grinder needed a basic restoration—cleaning and rust removal, new power cord, new rubber feet, rewiring the lamp and on/off switch, painting and replacing several mismatched screws, and of course switching out the 6-inch stone and wire brush for 7-inch versions.
The grinder vibrated a good bit initially, with the major source being a pair of 2 inch washers on the left arbor, inboard of the old wire brush. They had ¾ inch holes while the arbor is 5/8 inch. See my post above relating to the goofy combination of grinding stone and wire wheel “washer” that was on the right arbor. Once all the PO’s gear was removed from the arbors, the vibration cleared right up.
I checked the bearings and found them to be sealed with plastic seals that had a stretchy collar that contacted the inner bearing ring. Since the grinder ran fairly smoothly and there were no scary noises emanating from the bearings, I decided to let them continue their good work. I popped the outer plastic cover off each bearing, carefully removed what dried grease there was and repacked them with fresh grease. I thought the spin down time would increase after the repack but strangely, it went from about 25 seconds to about 17. During the first few test runs with nothing on the arbors, a little of the new grease was forced out of the bearings. I wiped that up until it stopped—it didn’t amount to much leakage.
The power switch was a mess. It was not original—in fact it was a three position switch: off-on-off, but was wired up incorrectly so it did nothing in the first two positions and started the grinder when switched to the far right “Off” position. I wired in a new two position toggle switch and used the original label.
After clearing out all the Mud-dauber nests and about two pounds of old slag, I degreased all the parts and put all the rusty parts into a vinegar bath for about 24 hours. I rinsed and scrubbed everything with 3M pads, used my heat gun to make sure all the water was dried in all the little nooks and crannies and primed them in preparation for painting.
I looked at all the different color combinations from previous restorations and decided to go with a dark bronze overall. For the accents I intended to use X-O Rust Bronze as suggested byPendragon1998 in his very detailed restoration of this same model grinder. https://www.garagejournal.com/forum/showthread.php?t=262651
Turns out Dark Bronze wasn’t really what I was looking for so I went with Rust-Oleum Antique Copper. Of course, the only TrueValue hardware store left in San Antonio doesn’t stock X-O Rust Bronze so I used Krylon Champagne Nouveau Satin for the center panel and the accents. I decided not to paint the lamp cover. It’s Bakelite and I like the look and feel of it on its own.
I also used Pendragon’s suggested rubber feet that worked out very well with only minor modifications. My grinder didn’t have the spark arrestors so I fabricated them out of some aluminum stock I had on hand. I moved the cracked eye shield over to the wire wheel until I can find a replacement.
I ordered two 1 inch diameter, ¼ inch wide aluminum spacers with 5/8 inch centers from McMaster-Carr to use with the wire brush so I don’t have to contend with washers. And instead of using the plastic bushings that came with my new grinding wheels, I ordered a couple of 1 inch bronze sleeve bearings with 5/8 inch centers. BTW, after running with the wheels on for about an hour the spin down time was 32 seconds.
If there is one suggestion I can offer for people restoring their old equipment it’s this: Be very gentle with labels printed on aluminum—the printing is unbelievably delicate. The only sour spot in this whole project was me ruining the grinder’s label within about 10 seconds using no more than a soft nylon brush and de-greaser. Before I knew it, the degreaser had completely obliterated the red Craftsman logo and was well on its way to removing the black printing. I was shocked and devastated because my label was in pretty decent shape—I thought I was just giving it a good cleaning. I’ve requested the Photoshop file Pendragon created for his label but he has been absent from the forum for the last month so I haven’t heard back from him. Does anyone know of any other ways to recover from this mistake? I’d appreciate any suggestions.


 I thought something screwy about codes that didn't read right?


 Trying to collect less...lol