To avoid these ads, REGISTER NOW!

Project Flintstone - '87 Olds Cutlass Rebuild

To avoid these ads, REGISTER NOW!

CoogarXR

Well-known member
Joined
Jan 11, 2016
Messages
6,871
Location
Ohio
Looking good!
Your booger welded patch panel is definitely an improvement over the fibreglass and drywall patchs!
As a non-welder I'll ask the question- If you're embarrassed of your welds, couldn't you have just ground the boogers flat before painting them? Not trying to be a ****, it's an actual question, lol. I wonder that all the time about booger welds. Why not just grind them down?
 

NYBODYMAN

Well-known member
Joined
Sep 10, 2013
Messages
4,901
Location
NY
As a non-welder I'll ask the question- If you're embarrassed of your welds, couldn't you have just ground the boogers flat before painting them? Not trying to be a ****, it's an actual question, lol. I wonder that all the time about booger welds. Why not just grind them down?
Unfortunately, it looks like the welds are "boogerish." Basically, there's no penetration and the weld is just sitting on top of the metal. If you grind it down there will be nothing to hold it together which at this point is sketchy at best. OP, I would work on practicing on some scrap metal prior to welding on the car. Feel free to ask questions or check out the million and one MIG welding threads in here. Other than that keep plugging along.
 
OP
J

jmdirk

Well-known member
Joined
May 4, 2015
Messages
711
As a non-welder I'll ask the question- If you're embarrassed of your welds, couldn't you have just ground the boogers flat before painting them? Not trying to be a ****, it's an actual question, lol. I wonder that all the time about booger welds. Why not just grind them down?

Well, frankly because that's a lot of work for something that's going to get boxed in anyway and may never again see the light of day. Especially a recessed area like that.

Unfortunately, it looks like the welds are "boogerish." Basically, there's no penetration and the weld is just sitting on top of the metal. If you grind it down there will be nothing to hold it together which at this point is sketchy at best. OP, I would work on practicing on some scrap metal prior to welding on the car. Feel free to ask questions or check out the million and one MIG welding threads in here. Other than that keep plugging along.

Agreed. What is not shown is the other side. That was ground down flat. One, because the access on the other side was much easier. It wasn't in a recessed area and two, the rear quarter will go on top of the other side. So having all those booger protruding would cause issues with fitment.

So this on the back side was partially giving some meat to the material so that when welding on the other side, it wouldn't completely blow through.

I've probably read through half of those million and one MIG welding tips and tutorials. You practice on something and it feels like it's going fine so you go for it on your project and either the fit up is not good enough, the metal is a bit thinner because of corrosion, you hold the trigger just a bit too long or whatever. To me the art of becoming a really good welder is partly in having the discipline to do the proper prep but also in being able to recognize the subtle difference in how the puddle and the arc is behaving as you're welding. And that second part (and even the first admittedly) is where I lack the experience.

One of the main reasons I'm starting with the floors and interior stuff is hopefully it improves before I start on exterior sheet metal. At times it goes well, and other times stuff seems to start to go poorly and then just snowballs.
 
OP
J

jmdirk

Well-known member
Joined
May 4, 2015
Messages
711
I tend to jump around a lot to different areas when working on this. Sometimes I just get bored, or frustrated.

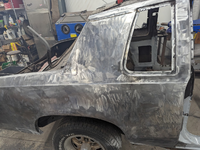
Back when I first got this, I had started stripping some exterior paint on the passenger rear quarter, partially just to see what was there. It's probably been about 2 years since I touched that part of the car. With the exposed bare metal, it was starting to get some surface rust and I was getting tired of staring at it. So over that last while I've been working on that.

This is how it's been looking. A pretty good sized rust spot in the corner where the roof and trunk meet, another around the corner marker. As well as some along the bottom edge both fore and aft of the wheel well.
1678112286100.png

Fully stripped down

1678112429715.png

Close up of the pitting where the roof and trunk meet. This is where the landau top terminated. The opposite side was quite a bit worse with rust (more on that later). This was pretty minor and is pretty flat, so other than cutting the patch to match, should be a pretty straightforward repair.

1678112469988.png

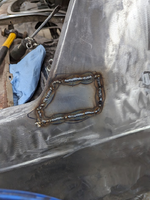
Tacked in

1678112556823.png

Welds dressed and cleaned up
1678112610008.png
 
OP
J

jmdirk

Well-known member
Joined
May 4, 2015
Messages
711
Next is the lower section. you can see the pitting around the rear marker light. It's pitted but solid. Debating on doing the right thing and replacing all that, or just cleaning out all the rust and letting some glazing putty do the hard work. But for now I want to deal with the lower section. You can easily see an old patch job that someone did.

1678113501686.png

I cut out the rust in to sections. Not really sure why I didn't so it all in one big section. The lower flange on the rear section is still in good shape. Whereas the front section did have to have that flange cut out. I wasn't completely finished cutting at this point. The whole patch did come out along with the bottom flange. This section is all open to the trunk interior.

1678113656402.png

that old patch will literally just a piece of steel placed over the rust hole that was there, spot welded every 1/4" and then paved over with bondo

1678113772704.png

And with both of my patched welded in and cleaned up.

1678113813593.png

The section ahead of the wheel well was also in bad shape. Easily visible without any cleaning up required. Again, had been previously repaired, but that repair didn't last

1678113943911.png

Cut away the outer skin. Rusted right though the inner rocker on the right as well as part of the inner fender liner there on the left.

1678114005717.png

This section was just STUFFED with filler. This is the piece of the outer skin that was cut off and the chunk of filler that was bonded to it is just massive.

1678114352657.png

Cut out the worst of it and made a replacement piece for the inner rocker.

1678114075712.png

The inner fender part was a bit more complicated to shape for me. But it ended up fitting fairly well.

1678114175720.png

I still need to make the patch for the outer skin, but it's coming along.
 

AldeanFan

Well-known member
Joined
Sep 9, 2014
Messages
2,589
Location
Niagara on the Lake
You’re getting good at this patching and welding stuff! That patch on the sail panel looked great.

On the bottom of the quarter it would have been easier to make one long horizontal cut. That also makes it easier to finish and less likely to warp in a weird way because you’re only welding horizontal, not in two directions.

One more tip, some will disagree but I find that making patches with radiuses corners makes it easier to weld in without warping and makes it easier to finish and blend.
I’d rather make a round patch than a square patch any day.
 
OP
J

jmdirk

Well-known member
Joined
May 4, 2015
Messages
711
Work has continued on this project, despite the lack of updates. Frankly, I'm **** at taking pictures regularly - so I'll have to miss out on making a living as a social media influencer.

Update on the floors.

There was fair bit of rot on the lower firewall flange. When I had pulled the parts from the junkyard wagon, I had cut out that section of firewall as well. (Sorry for the poor focus)

1680705777425.png

Replacement part welded in

1680705838372.png

For the door sill areas, the drivers side one from the junkyard wagon was pretty decent and only required a small patch. the passenger side, as previously stated was in quite a bit worse shape. I'm previously shown some of the work that went into repairing the forward body mount area and the sill itself. While I started on repair that sill, upon further inspection I decided that it wasn't worth trying to salvage. Too much of the sheet metal was rusted away. And I also noticed a design difference between the '79 wagon and what came out of my '87. The sheet metal skin on them is pretty much exactly the same. However, the bracing underneath on the 87 is quite a bit more substantial. While the 79 had a metal brace under the skin pretty much only where the body mount is and a separate on for the seat belt mount, the 87 is pretty much a nearly full length braces extending from the where it meets up with the forward body mount piece all the way back to past the seatbelt mount as a single unit.

The below is the piece as pulled from my 87. The square in red is the only spot where the under brace is on the 79. That and the seatbelt mount. Whereas this entire section is basically made up of a 16 ga braced and then skinned with 22 ga.
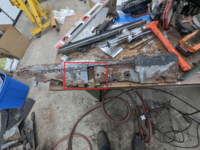
1680706381790.png

I stripped the skin off the brace from my 87 cleaned it up and got it in primer. There was a couple parts where in folds down along the back where I did have to patch and replace with some 16 ga. For the skin, rather than trying to restore multiple different sections, which would have been a ton of cutting, welding and grinding. I decided to make the entire piece. I did a simple, straight fold along the back edge on the brake. For the other edge, I marked out the contour flat and then used the tipping die on the bead roller to start the bend along that contour. A bit of hammering to get the edge going and then using the brace that goes underneath it as a buck, I hammered most of the rest of the skin into shape. I did have to use the shrinker and stretcher in a few spots to tune the shape. In the end, it doesn't have quite the detail of the factory piece, but it should be fine for the floor. Skin was drilled in multiple spots and then spot welded to the brace.

1680706620966.png

While I don't have any pictures of it, These sill parts along with the forward body mount areas were welding into the main body. One of the things I had to make sure of was to get the position and alignment of the body mounts correct. So I lined up the body on the frame using what existing body mounts were left, and lined up these pieces appropriately so that once the body goes on the frame, all the bolts will still line up.

With all the forward supporting structure now back in place, the floor pieces were ready to go back in. The floor is something that is available new and I was able to find a local guy who sold them at a fairly reasonable price. Much cheaper in the end than ordering out of the US and having to pay for shipping. Floor panels were full length halves. I decided to go with that rather than the 1 piece just to make it more manageable to handle on my own.

I got the two halves in the passenger compartment and lined them up with each other along the transmission tunnel seam, clamped them together to get it as flat and flush as possible and then spot welded every few inches along that seam. Followed with locating the now one piece floor, along the front firewall, clamped the flanges together. After checking how it fits along both sill, the floor was welded into place at the firewall flange.

1680707425431.png

At this point, it's as far as I've got. but the floor, while not done, is permanently attached to the body. Still need to fully weld the center seam and spot weld both side along the sill pieces. Also going to have to do some cutting and shaping near the back of the floor to get it to match up properly. There's two things there. One is the typical inconsistency of aftermarket replacement panels. The second is that technically these floor sections are for an El Camino, not a Cutlass. Since the El Camino has no back seat, the section where it rises up at the back is a bit different. And of course, as obvious by the gaping hole, the back seat area needs to be addressed too. But there's along braces and seat mounts that need to go in as well as another brace that goes under the back seat.

Having a floor back in it feels like a major milestone, but there's still a ton of stuff left to do.
 

NYBODYMAN

Well-known member
Joined
Sep 10, 2013
Messages
4,901
Location
NY
You are definitely progressing and the patches and welds are getting much better. Keep at it!
 
OP
J

jmdirk

Well-known member
Joined
May 4, 2015
Messages
711
You are definitely progressing and the patches and welds are getting much better. Keep at it!
Yeah, half my problem with burning through seems to be trying to weld to metal I shouldn't be welding to :)
 

NYBODYMAN

Well-known member
Joined
Sep 10, 2013
Messages
4,901
Location
NY
Yeah, half my problem with burning through seems to be trying to weld to metal I shouldn't be welding to :)
You are learning my friend. Clean metal, good ground, correct wire speed and amperage. Takes a lot of practice.
 

jjeffries

Well-known member
Joined
Sep 7, 2013
Messages
91
The Olds Cutlass was - I’m pretty sure - the best selling car in the US in 1986-87. But the world changed and GM didn’t/ chose not to keep up. This is a cool project and I admire you for not recycling it once the true state of horrors became evident.

John
 
OP
J

jmdirk

Well-known member
Joined
May 4, 2015
Messages
711
The Olds Cutlass was - I’m pretty sure - the best selling car in the US in 1986-87. But the world changed and GM didn’t/ chose not to keep up. This is a cool project and I admire you for not recycling it once the true state of horrors became evident.

John
Was the best selling car from '78-'81 inclusive selling ~ 500,000 units per year and again in '83.

I'd be lying if I didn't think of abandoning this thing several times after seeing the amount of work involved. And frankly, had I been able to find a better specimen at a reasonable price, I probably would have gone that direct. But COVID pricing went into effect on these cars and prices for a decent specimen have at least doubled or tripled.
 
To avoid these ads, REGISTER NOW!

no704

Well-known member
Joined
Apr 27, 2016
Messages
5,232
Not sure what you are using, but I find that straight CO2 works better on dirty metal than trimix.
 
OP
J

jmdirk

Well-known member
Joined
May 4, 2015
Messages
711
Any progress
Not much.

Between a 2 week work trip, a bunch of yard cleanup from an ice storm and then just normal spring time yard chores etc., I haven't had a whole lot of time to work on it.

I've been able to finish fully welding the seam between the two floor pan halves. I'm hoping to be able to get back to it a bit. I want to finsh up with the last crossmember that goes under the rear seats.

Still quite a way to go.
 

rust in the eye

Well-known member
Joined
Oct 2, 2017
Messages
2,816
Location
Chicagoland
WOW! I'd have run from this thing faster than Usain Bolt.
I admire your tenacity, good luck I hope the results will be great.
A long time ago I owned an '84(?), also black. It was a very nice driving car but the V-6 mine had was a wheezer.
Just so you know a big block Chevy will bolt in almost as if it grew there. Just a thought.
 

545_days

Well-known member
Joined
Oct 30, 2016
Messages
587
Location
Texas
Wow, that is as bad as the old Italian cars I work on. Keep up the good work!

I am about the same level of skill as you are, **** going much slower.
 
OP
J

jmdirk

Well-known member
Joined
May 4, 2015
Messages
711
Well, a couple posts here today had prompted me to put a bit of an update on here. It's only been about 7 months :)

Been able to get some work done on it here and there. Summers are tough what with all the outdoor yardwork and projects, BBQs with friends and plus a do a reasonable amount of travel for work. But nonetheless, I have made soem progress.

The last time I updated this thread, I was hoping to make some progress on getting the floors fully fitted and welded in place. And I've made a bit of progress towards that end. But also got distracted into working on other parts too.

So part of getting the floor in place, was in repairing the underfloor seat brace which had rotted out on the ends. There is actually a replacement aftermarket piece for this, but it's seems rather expense for what it is, especially with shipping to Canada. And a lot of the places seemed back ordered on it.

Repairing the outer part of it is a pretty straight forward profile, not too hard reproduce on the brake. These were made long so that I could fit it in place and then trim to fit.

1703534928987.png

There's also an extra reinforcing part where the body mounts attach. Shape was easy enough to trace out and put an extra lip on there with the bead roller.

1703535075966.png

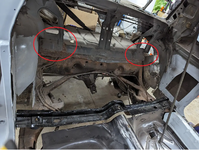
The brace was trimmed to fit, bolted to the frame along with the body so that it could located properly. The floors themselves are from an El Camino, so where the rise up to the rear seat area isn't correct and still will need to be dealt with. But the circles area in red, there are some reinforcing braces there and perforations through the sheet metal in the trunk area.

1703535169500.png

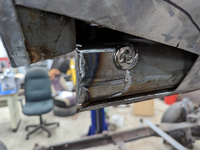
This is one of the brace areas that's been cut out

1703535379725.png

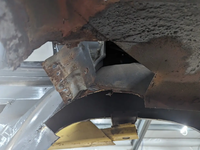
This is where that piece came from. Also required a bit more remediation on the lower part of the wheel well in this area.

1703535440582.png

In progress shot of that, and you can see just a bit of the replacement piece where the brace was cut out

1703535497597.png

Some of these shot do give a better idea of how much rust is being dealt with.

As I had started working on some of the trunk area, I kind of got distracted in dealing with a lot more patches back there too. Unfortunately not many pictures of that work in progress, but did get most of it buttoned up and in epoxy primer. All the areas below in red were replaced with new sheet metal.

1703535726464.png
 
OP
J

jmdirk

Well-known member
Joined
May 4, 2015
Messages
711
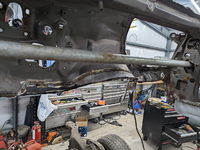
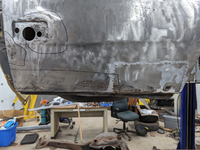
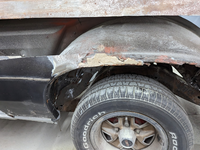
I've also started digging a bit more into the left rear quarter panel which was in pretty bad shape. This area looks like the whole rear quarter was replaced once before, and then had further rust repair done on it, at least twice. There's evidence of patches being spot welded in on the wheel lip, and then further repair again with just bondo. Not very effective overall.

You can see here all the bondo that was used to repair the wheel lip

1703536069010.png

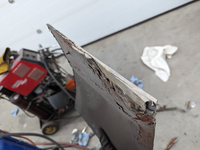
Part of the panel cut away and you can get an idea of the thickness of bondo that's been applied. I'm not going to claim that this will be free of filler when I'm done with it. But I sure hope I'm at minimum making an improvement over what was done previously.

1703536200184.png

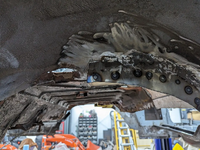
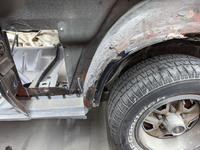
The rest of that quarter panel cut away. You can see that the wheel well needs a fair bit of attention too. Which I've started on, but no pictures of that, yet.

1703536312303.png

Hopefully through the remainder of the winter I'll get a chance to progress more on it.
 
OP
J

jmdirk

Well-known member
Joined
May 4, 2015
Messages
711
WOW! I'd have run from this thing faster than Usain Bolt.
I admire your tenacity, good luck I hope the results will be great.
A long time ago I owned an '84(?), also black. It was a very nice driving car but the V-6 mine had was a wheezer.
Just so you know a big block Chevy will bolt in almost as if it grew there. Just a thought.

I'd be lying if there weren't days that I didn't think of giving up and just cutting my losses. There's a ton of stuff that still needs doing. I'm not nearly as good at this as some people here, but hopefully I'm improving.

Engine wise, I'm mostly leaning LS based. Probably 5.3 or 6.0. Also thinking along the lines of some of these high revving 4 and 6 cylinder Japanese engines - that would probably make a bunch of heads explode :)
 

NYBODYMAN

Well-known member
Joined
Sep 10, 2013
Messages
4,901
Location
NY
Any progress is progress. Believe me I'm 2.5 years into a resto on a 1991 NYSP SSP Fox body, and it's taking FOREVER. I just don't have a lot of time to dedicate to it. You're doing great and have inspired me to get some work done this week.
 

msharley

Well-known member
Joined
Sep 20, 2021
Messages
14,164
Location
Central Pennsylvania
I'd be lying if there weren't days that I didn't think of giving up and just cutting my losses. There's a ton of stuff that still needs doing. I'm not nearly as good at this as some people here, but hopefully I'm improving.

Engine wise, I'm mostly leaning LS based. Probably 5.3 or 6.0. Also thinking along the lines of some of these high revving 4 and 6 cylinder Japanese engines - that would probably make a bunch of heads explode :)
1703630856390.png
 

rust in the eye

Well-known member
Joined
Oct 2, 2017
Messages
2,816
Location
Chicagoland
No doubt the LS is a great engine but a bit pedestrian these days. I have a soft spot for the BBC and had actually built one for my Cutlass all those years ago but never made the swap.
ANOTHER thought is the 500" Cadillac. So much torque it doesn't matter what gear you are in and docile as a sleepy puppy.
 

86turbodsl

Well-known member
Joined
Jul 1, 2005
Messages
6,558
Location
Michigan
About 20 years ago, i had a buddy drop a 455 into a 85ish Buick g body. The thing was ridiculous and perfect. Power sofa for front seat with tire shred on command. Keep up the great work.
 

ambenz

Well-known member
Joined
Dec 12, 2010
Messages
4,237
Location
NW Chicago Suburbs
Nice winter project... for the year, rust is better than a 99 Chevy Intregue I had.
Man, the rockers were rusted along with a stress cracks in the frame.
Looks like your going the extra mile to spy all the potental rust areas and doing what you can to make it right.
Good luck in your venture with the Oldsmobile, it going to be nice to cruise in when you get it road worthy.
 
To avoid these ads, REGISTER NOW!
Top Bottom