To avoid these ads, REGISTER NOW!

Projects from The Compound

OP
M

mistervelocity

Well-known member
Joined
Feb 9, 2014
Messages
301
Location
Nowhere any normal person would want to live
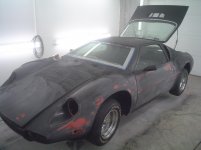
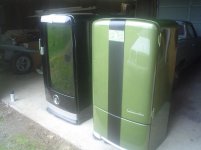
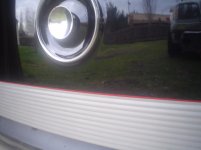
While I was working on his Bricklin, my dad picked this up. It's called a Fierro (not Fiero :lol: ) and is supposed to be one of only 7 completed cars. This particular car was built about 30 years ago and had been in a couple magazines back in the early '80s. It used to be red with gold Enkei 5 spoke wheels. The kit utilized a Vega rear hatch along with Pinto doors and windshield. The taillights are 280ZX and the markers are some other Datsun. They had a clear Plexiglass cover over the "sugar scoops" at one time. It's ridiculously low and the roof is only about waist high on me. I didn't have much involvement in this project.

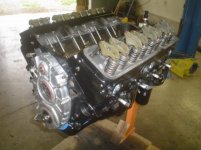
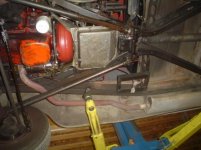
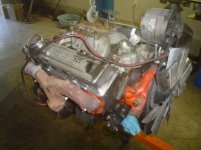
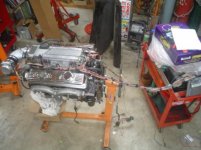
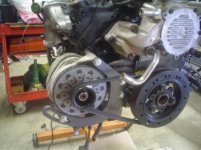
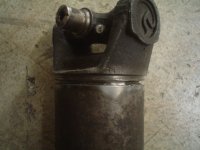
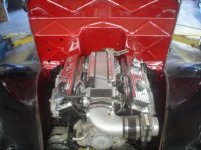
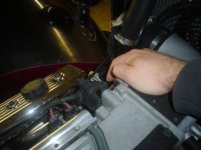
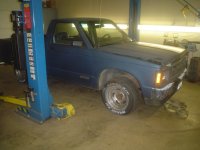
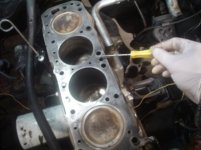
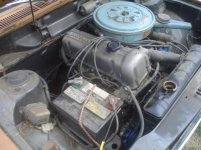
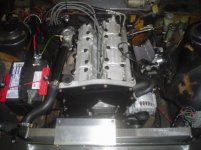
My dad moved his car in and started disassembly. He picked up a rebuilt engine and installed it but it required different exhaust to clear the body.
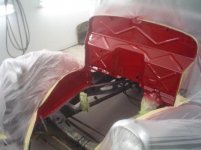
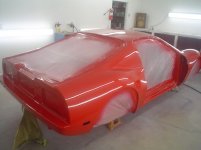
Once it was driven into the booth he put it on jackstands and started stripping it down and sanding. Here's where the tedious stuff happens. The front and rear hatches are removed.
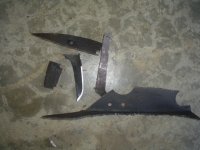
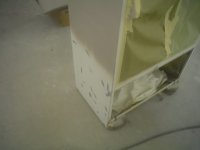
Then it's time to repair cracks with some AutoMix. There are at least 20 spots on the car that need attention. Since the doors are steel (Pinto), all the side trim holes will be welded before they're smoothed out.
 

Attachments

  • 006.jpg
    006.jpg
    142.7 KB · Views: 71
  • 010.jpg
    010.jpg
    141.2 KB · Views: 52
  • 007.jpg
    007.jpg
    132.9 KB · Views: 54
  • 003.jpg
    003.jpg
    139.7 KB · Views: 51
  • 001.jpg
    001.jpg
    141 KB · Views: 56
  • 002.jpg
    002.jpg
    140.4 KB · Views: 69
Last edited:
To avoid these ads, REGISTER NOW!
OP
M

mistervelocity

Well-known member
Joined
Feb 9, 2014
Messages
301
Location
Nowhere any normal person would want to live
Primed, blocked, and painted with leftover paint from the '68 El Camino (Bolero Red). The previous owner wanted to keep the seats so a new pair were sourced then the reat of the interior was redone.
He's actually been driving it around pretty regularly. Again, says it gets lots of attention. He still has this one but it's for sale. It has the wire baskets in the wheels too. Looks much better.
 

Attachments

  • 009.jpg
    009.jpg
    130.9 KB · Views: 57
  • 002.jpg
    002.jpg
    139.4 KB · Views: 48
  • 010.jpg
    010.jpg
    133 KB · Views: 53
  • 00606_2UH50XpwmWE_600x450.jpg
    00606_2UH50XpwmWE_600x450.jpg
    33.4 KB · Views: 99
  • 00P0P_446cNSGbZel_600x450.jpg
    00P0P_446cNSGbZel_600x450.jpg
    34.9 KB · Views: 77
Last edited:
OP
M

mistervelocity

Well-known member
Joined
Feb 9, 2014
Messages
301
Location
Nowhere any normal person would want to live
Nothing really **** here. This little guy was abandoned at the shop where I work because the customer didn't want to spend the money on a fuel pump. I got it for less than scrap value. I did a new fuel pump, changed all the fluids, used alternator, and general cleanup. 4cyl, 5-speed, under 100k miles and never been wrecked.
Took it through DEQ and passed with room to spare. Next, I pulled the grille and bumpers. Cleaned, sanded and painted the bumpers semi-gloss black then taped off the grille to paint the bowtie red. Then moved the truck to the paint shop so it can wait for my brother to do some buffer magic.
After he got the polish done I started driving it back and forth to work. Sure is an improvement over how I brought it home.
Once the title showed up I sold it and used some of the profit to pick up a Hobart Handler 210 MIG and matching plasma cutter. Even picked up a new cart, gloves and helmet. Still have a little money left over too. Ironically, the kid who bought it lives 20 yards from where it was abandoned. Small world.
 

Attachments

  • 003.jpg
    003.jpg
    143.9 KB · Views: 103
  • 002.jpg
    002.jpg
    140 KB · Views: 64
  • 004.jpg
    004.jpg
    146.9 KB · Views: 64
  • 001.jpg
    001.jpg
    133.2 KB · Views: 67
  • S-10.jpg
    S-10.jpg
    139.2 KB · Views: 74
  • 0002.jpg
    0002.jpg
    134.1 KB · Views: 69
Last edited:

gasgas17

Well-known member
Joined
Nov 7, 2009
Messages
443
Location
Nova Scotia, Canada
I had a 91 chevy S-10 Durango 2WD, 5 spd, 4 cyl. It was maroon in color. Thanks for the flash back. I loved that truck. We put 260000 kms on that one.
 
OP
M

mistervelocity

Well-known member
Joined
Feb 9, 2014
Messages
301
Location
Nowhere any normal person would want to live
These two old refrigerators had been sitting in the corner of the paint shop for a few years so I thought I'd finally just dig in.
The one on the left is a 1941 (Nash) Kelvinator that was given to me by my buddy Jerod. It sat on his grandparents back porch in Eastern Oregon for decades. When they died and the family was cleaning out the farm he grabbed it for me, along with another for himself. I love the art-deco details. The one on the right is a 1946(?) Frigidaire that used to live right next to my Cutlass in my grandpas garage. I brought it home after he died a couple years ago.

Started by dragging out the hose and some cleaning products and scrubbing out the insides. I followed that with a good scouring with hot water and a Scotch-brite pad on the outside.
Once I got them into the booth it was time to start the initial sanding just so I could get a handle on how much body work will be needed.
It was in the low 40s when I got started. Fired up the heater and in about 30 minutes the booth was a comfy 65 degrees.
Stripped the door and trim off the Kelvinator and started in on it:
I'm not great at body work and absolutely hate it. HATE IT! Anyway, both of them are roughed in and actually would probably be straight enough for white paint. I think I'll just let my brother do the finish work since he makes it look so easy. He'll be back in town Monday.
Just for educational purposes, I thought it was interesting how they used such different means of insulation when I disassembled the doors. Frigidaire had very heavy fiber insulation. Reminds me of carpet jute used in '30s and '40s cars. The Kelvinator just used stacks of corrugated cardboard. Huh? I wonder if that's what's used throughout the whole thing. It's probably all asbestos based.:wtf:
 

Attachments

  • 008.jpg
    008.jpg
    18.6 KB · Views: 39
  • 001.jpg
    001.jpg
    27.6 KB · Views: 45
  • 004.jpg
    004.jpg
    23.4 KB · Views: 39
  • 005.jpg
    005.jpg
    32.4 KB · Views: 41
  • 006.JPG
    006.JPG
    143.9 KB · Views: 47
  • 002.JPG
    002.JPG
    138.8 KB · Views: 41
Last edited:
OP
M

mistervelocity

Well-known member
Joined
Feb 9, 2014
Messages
301
Location
Nowhere any normal person would want to live
My brother stopped by and we (mostly he) worked on the Kelvinator for a couple hours.
Body work is done. I cleaned the booth, masked and staged everything. My brother was going to stop by on his way home from work and shoot the primer. Never showed - never called. That's really nothing new. I had to go out of town but when I checked the booth the next morning I got all excited because I saw fresh primer but that was pretty short lived. Not sure hat happened but for some reason the job was only half done.

Okay, here's what went down with the primer. He had a small amount left in the bottom of a can and decided to use it. It wasn't enough to cover everything but did cover all the actual bodywork. Since we were going to use a sealer coat between primer and base the unprimed sections weren't really a concern. So, I was given instructions to sand it one more time to feather everything in and knock the peel off of the primer. My brother came over and shot the sealer, then the silver/gold, taped it off, and shot the first 2 coats of black base. We went in the booth to look it over before he laid down a wet 3rd base coat and saw some horrible scratches popping through. Not sure how, but it looks like I got something in the paper when I was sanding. It didn't really show up until that point. We put on the brakes and decided it's time to back up a couple steps. Here's how it looked:
I went out later and sanded it down a little and then we rebase it and continued from there. I know it's just a beer fridge but I'd still like it to look nice. I just knew if I don't at least try to fix the scratches they'd drive me crazy every time I look at it.
 

Attachments

  • 005.JPG
    005.JPG
    144.8 KB · Views: 38
  • 00001.jpg
    00001.jpg
    23 KB · Views: 53
  • 0001.JPG
    0001.JPG
    142 KB · Views: 43
  • 001.JPG
    001.JPG
    146.1 KB · Views: 39
Last edited:
OP
M

mistervelocity

Well-known member
Joined
Feb 9, 2014
Messages
301
Location
Nowhere any normal person would want to live
Mystery black from an unmarked can. Very light subtle metallic in it. The other color is Harley Davidson Pewter Silver.
The green is leftover paint from the Datsun pickup. Flat black stripes on the raised portions. I think the flat black on the gloss green makes a nice contrast. Kinda reminds me of a fat guy in a bowling shirt.
 

Attachments

  • 00002.jpg
    00002.jpg
    145.7 KB · Views: 59
  • 001.jpg
    001.jpg
    139.4 KB · Views: 40
  • 0001.jpg
    0001.jpg
    19.9 KB · Views: 35
  • 0002.jpg
    0002.jpg
    25.6 KB · Views: 36
Last edited:
OP
M

mistervelocity

Well-known member
Joined
Feb 9, 2014
Messages
301
Location
Nowhere any normal person would want to live
Mostly put back together, I finally put on the emblems. From an Escalade grille IIRC.
On the Kelvinator, I tried doing a wrap with some suede. Not sure I'm in love with it but it looks okay and is something a little different. The door handle will need some repair before I wrap it. A previous owner kind of butchered it in an attempt to put it back together. It's pretty much the only thing left to do. Used Automix and a couple nails inside the cavity to make it one piece again. Since it still had the holes I wrapped it again. I double wrapped every 7th loop to give it a uniform finger relief look. Came out alright, I guess.
Then I was finally able to put it all back together. Only thing left to do is get the door pinstriped and figure out a spot for it to live.

Got the Frigidaire moved upstairs and put it into party duty. Kept everything nice and cold.
Plenty of Brawndo left but not sure where all the beer went :wink: .
 

Attachments

  • 003.jpg
    003.jpg
    136.8 KB · Views: 75
  • 008.jpg
    008.jpg
    148 KB · Views: 72
  • 012.jpg
    012.jpg
    135.5 KB · Views: 65
  • 004.jpg
    004.jpg
    142.1 KB · Views: 74
  • 005.jpg
    005.jpg
    145.3 KB · Views: 68
  • 001.jpg
    001.jpg
    145.7 KB · Views: 76
Last edited:
OP
M

mistervelocity

Well-known member
Joined
Feb 9, 2014
Messages
301
Location
Nowhere any normal person would want to live
Glad you like it.

A couple other quickies that came and went...
Harley FatBob getting gloss black in place of the original "denim" (flat black):

'41 Stude. Owner scraped the fender pulling it out of his garage.
 

Attachments

  • 002.jpg
    002.jpg
    136.8 KB · Views: 32
  • 001.jpg
    001.jpg
    133 KB · Views: 28
Last edited:
OP
M

mistervelocity

Well-known member
Joined
Feb 9, 2014
Messages
301
Location
Nowhere any normal person would want to live
My '72 510 daily driver. Rather than a huge writeup I'll just hit the main points and post some pics. Feel free to ask any questions.

Came from an auction with a blown head gasket. Don't know why a previous owner had the lowering blocks in the rear and raised rallye springs in the front. I got it running, cut down the strut housings for MR2 inserts, swapped out springs, replaced the 4-speed with a 5-speed, replaced the wheels and tires and drove it that way for about a year.
 

Attachments

  • 004.jpg
    004.jpg
    34.3 KB · Views: 43
  • 001 (2).jpg
    001 (2).jpg
    48 KB · Views: 32
  • 001 (3).jpg
    001 (3).jpg
    46.4 KB · Views: 33
  • 002.jpg
    002.jpg
    32.6 KB · Views: 32
  • 001.jpg
    001.jpg
    24.9 KB · Views: 35
  • 006.jpg
    006.jpg
    53.2 KB · Views: 46
Last edited:
OP
M

mistervelocity

Well-known member
Joined
Feb 9, 2014
Messages
301
Location
Nowhere any normal person would want to live
Stage 2 was an engine upgrade. GM 2.4 Twincam (AKA Quad4) modified for RWD. I made an adapter plate to mate it to the Nissan 5-speed. Obviously, the harness was heavily altered and a custom tune had to be done on the ECM. The end result was almost twice the original power of the L16 and mid-30s mpg. Starts easily in any weather and keeps up with traffic.
 

Attachments

  • 001.jpg
    001.jpg
    52.5 KB · Views: 49
  • 006.jpg
    006.jpg
    35.7 KB · Views: 51
  • 0001.jpg
    0001.jpg
    32.4 KB · Views: 48
  • 00001.jpg
    00001.jpg
    41.8 KB · Views: 51
  • 013.jpg
    013.jpg
    36.6 KB · Views: 45
  • 0002.jpg
    0002.jpg
    37.1 KB · Views: 46
Last edited:
OP
M

mistervelocity

Well-known member
Joined
Feb 9, 2014
Messages
301
Location
Nowhere any normal person would want to live
Stage 3 was focused on handling. Borrowed some wheels from my brother and ordered up some Falkens. Stole the stacked swaybar idea from a Volvo forum. Was able to use a 3rd front swaybar on the rear.

I also threw together a cargo rack. And new gauges.

Last pic is from Napa race day at Woodburn Dragstrip. My boss is in the Cobra.
 

Attachments

  • 012.jpg
    012.jpg
    54.8 KB · Views: 59
  • 014.jpg
    014.jpg
    43.1 KB · Views: 68
  • Race Day 014.jpg
    Race Day 014.jpg
    140.2 KB · Views: 64
  • 006.jpg
    006.jpg
    28.5 KB · Views: 56
  • 005.jpg
    005.jpg
    39.1 KB · Views: 60
  • 008.jpg
    008.jpg
    39.9 KB · Views: 52
  • 002.jpg
    002.jpg
    145.1 KB · Views: 65
Last edited:
OP
M

mistervelocity

Well-known member
Joined
Feb 9, 2014
Messages
301
Location
Nowhere any normal person would want to live
Another pasted minithread within a thread...
Preface, First some history; In 1956 my grandfather bought a mildly customized 1935 Ford pickup. Hot flathead, juice brakes, chopped top, bobbed '40 rear fenders (that I still have :D 
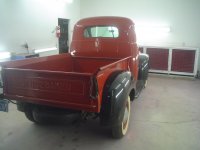
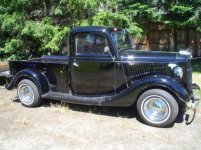
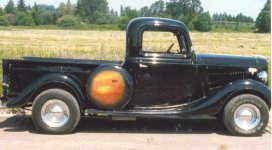
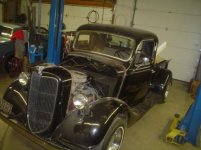
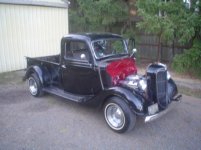
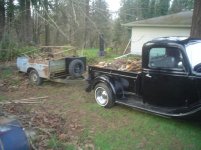
), heavily louvered custom hood, Olds flipper hubcaps, dual chrome exhaust stacks, etc. It was his driver until my dad and uncle graduated high school. My uncle got the '35 (still has it), my dad got a '62 Impala. A few years later in the early '70s, after getting married, buying a house and settling into a good job, my dad went on the hunt for a '35/'36 pickup of his own. My grandpa was actually the one who located it as a relative stocker with a bad flathead. Once he got it home, my dad replaced it with a 283 and ran it for a few years until an axle failure prompted him to do an upgrade. At that point it received a 350hp 327, TH350, 9" rearend and front disc brakes. First pic circa 1985.
It remained much the same for almost 20 years and was rotated in and out of daily driver status. In 1996 my brother received it as a graduation present. It's been driven occasionally during summer months but over the last 3 decades has just plain mechanically worn out and has become a bit untrustworthy. Through a semi-complicated three-way labor/cash/parts trade involving my brother, our dad and myself, I'll be performing a mechanical refresh. My brother will be doing the body and paint work on my '35 pickup. These were taken in 2005 but it looks exactly the same today -- just has a thick layer of dust from sitting in the garage.

Chapter 1, Teardown:
The engine is a '96 LT1 pulled from a Fleetwood that was wrecked in 1997 with 5000miles on the clock. I originally swapped the engine/trans into my dad's '64 El Camino in '98. A couple years later he added a Paxton supercharger. He quickly found out that boost+cheap gas+high compression+a ****** Street & Performance tune = piston failure. I swapped in dished pistons as insurance and got a better tune. Found out that S&P adds tons of timing but reverts to speed density. With no MAF, the pistons never stood a chance. He ran it for several more years and had no additional problems and racked up close to 50k miles. He got a deal on another low miler and decided to do a build in another direction so this engine was pulled. I tore it down yesterday with the intention of getting some stock flat tops put back in and maybe having the rotating assembly balanced. Found a few surprises along the way. More chain stretch than I expected. Some suspicious discolorations around several exhaust valves. Looks like it'll probably need a touch-up grind. Here's the craziest thing. The cap had become deformed and pushed against the rotor so hard that they were rubbing. Usually an LT1 cap is pretty flat in the epoxied area. This thing was seriously dished. Surprisingly enough it made no noise and ran well. I wonder how much the timing was effected by that twisted rotor?

We're in decision mode right now. I'm leaning toward slapping new bearings in it, pistons and rings, new chain, cap and rotor, quick valve grind and run it. Since I'm just doing the labor they may decide to go deeper. More to come...
 

Attachments

  • 004.jpg
    004.jpg
    32.6 KB · Views: 35
  • 002.jpg
    002.jpg
    34.5 KB · Views: 37
  • 003.jpg
    003.jpg
    36.4 KB · Views: 32
  • 007.jpg
    007.jpg
    33.6 KB · Views: 32
  • DSC00383.jpg
    DSC00383.jpg
    61.2 KB · Views: 30
  • pickup1985.jpg
    pickup1985.jpg
    54.1 KB · Views: 30
Last edited:
OP
M

mistervelocity

Well-known member
Joined
Feb 9, 2014
Messages
301
Location
Nowhere any normal person would want to live
Chapter 2, Reassembly:
Well, all my goodies showed up. Rockauto provided gaskets, timing parts, and bearings.
Mahle hypereutectic pistons (same as OE) and rings from ebay. Fresh from the machine shop along with the heads.
Ball hone in the cylinders and assemble the shortblock. Replace the cap and rotor. All buttoned up with sweet swapmeet chrome valve covers. The exhaust manifolds are just sitting there to keep dust out. It'll get the rams horns from the 327 when it goes in. Back in the corner until my brother can get a broken tractor out of the way of his pickup. Maybe by next weekend I'll have it at my shop.
 

Attachments

  • 012.jpg
    012.jpg
    37.9 KB · Views: 26
  • 014.jpg
    014.jpg
    41.7 KB · Views: 27
  • 008.jpg
    008.jpg
    35 KB · Views: 21
  • 009.jpg
    009.jpg
    40.7 KB · Views: 24
  • 010.jpg
    010.jpg
    25.5 KB · Views: 22
  • 016.jpg
    016.jpg
    45.8 KB · Views: 28
  • 019.jpg
    019.jpg
    32.7 KB · Views: 23
Last edited:
OP
M

mistervelocity

Well-known member
Joined
Feb 9, 2014
Messages
301
Location
Nowhere any normal person would want to live
Chapter 3, Engine removal:
Finally got it dug out to tow it to my house. So it begins...

Once everything was pulled I did a compression test, just for curiosity's sake. All over the board between 60-175psi. Found coolant on 2 plugs too. I think it's time to retire it.
So next step is to set the LT1 in and get ready to notch out the frame for the transmission. The firewall is gonna get cleaned up too.
 

Attachments

  • 001.jpg
    001.jpg
    40.1 KB · Views: 29
  • 008.jpg
    008.jpg
    43.1 KB · Views: 25
  • 011.jpg
    011.jpg
    44.7 KB · Views: 24
  • 014.jpg
    014.jpg
    40.5 KB · Views: 28
Last edited:
OP
M

mistervelocity

Well-known member
Joined
Feb 9, 2014
Messages
301
Location
Nowhere any normal person would want to live
Chapter 4, Trial fit:
Made some time to fit the engine an transmission in today. Started by checking the fit of the freshly blasted and painted manifolds. Found that there are 4 nubs in the casting on the passenger side that need to be ground a bit to make room at the valve cover rail. No big deal. Installed new motor mounts and set it in place.
Since the 4L60E that is replacing the old TH350 is a little bulkier, I needed to trim out the X rails in a couple spots.
-Raise the transmission.
-Mark the frame where it interferes.
-Drop transmission.
-Trim.
-Repeat, repeat, repeat.
It actually fit way easier than I expected. Most of the portions I trimmed out has been torch cut decades ago so I was really making it prettier at the same time. Win-win! Finally got it fit in place. The shift linkage was even really close and required very little massaging. Took some measurements for the alternator relocation to a spot low on the passenger side. Looks like there's more trimming and welding to do.
The next step is to pull the engine so my brother can fill some unnecessary holes and give it a fresh coat of shiny. In the meantime I'll order up some parts.
 

Attachments

  • 009.jpg
    009.jpg
    46.9 KB · Views: 26
  • 008.JPG
    008.JPG
    145.5 KB · Views: 30
  • 007.jpg
    007.jpg
    32.6 KB · Views: 27
  • 003.jpg
    003.jpg
    38.2 KB · Views: 27
Last edited:
To avoid these ads, REGISTER NOW!
OP
M

mistervelocity

Well-known member
Joined
Feb 9, 2014
Messages
301
Location
Nowhere any normal person would want to live
Chapter 5, Wiring harness rehab:

The engine is back on the stand. Starting with a factory ('95 Caprice?) engine harness.
Lay it on the engine.
Start with one of these...
...and 3 pages of this...
...and start removing any irrelevant circuits. The ECM plugs are hanging from the hook on the far left. At this point I'm about 4 hours into it. I've extracted all the ABS, AIR, AC, PS, EVAP, etc. from the main harness and isolated all my B+ and ignition power feeds and grounds along with the ALDL wires. I'm going to utilize the OE fuel pump and cooling fan relays. All those wires will be run through the firewall just behind the EGR. The one thing I don't like is the location of the ECM. It would be behind the driver's side headlight in the donor car. I'm going to have to extend/shorten various wires to change the orientation of that portion of the harness. That should keep the top of the engine from being obscured by a wrist-sized bundle of wires. I plan to run it into the cab near the steering column and locate the ECM on the inside.
 

Attachments

  • 001.jpg
    001.jpg
    38.9 KB · Views: 23
  • 003.jpg
    003.jpg
    36.4 KB · Views: 23
  • 004.jpg
    004.jpg
    16.1 KB · Views: 23
  • 005.jpg
    005.jpg
    27.2 KB · Views: 25
  • 006.jpg
    006.jpg
    47.1 KB · Views: 23
Last edited:
OP
M

mistervelocity

Well-known member
Joined
Feb 9, 2014
Messages
301
Location
Nowhere any normal person would want to live
More wiring. VATS simulator. I actually bought this for my Quad4 wagon but it didn't work. Should be fine for this though. ECM rerouted to the rear. Still in the midst of lengthening and shortening circuits. In fact, I cannibalized another harness I had so I could keep the proper wire color coding on the wires I needed to make longer. All connections are soldered and shrink-wrapped. It just takes time but the end product is cleaner and more reliable:
This is my current stopping point. Next I'll be putting power to it and cranking it over. That should let me check for spark, injector pulse, DTCs, etc. before I finish taping the harness up. Total harness time is between 8 and 10 hours.

I gotta get a new camera. My pics really ****.
 

Attachments

  • 005.jpg
    005.jpg
    44.8 KB · Views: 36
  • 003.jpg
    003.jpg
    24.3 KB · Views: 25
  • 002.jpg
    002.jpg
    38.5 KB · Views: 24
Last edited:
OP
M

mistervelocity

Well-known member
Joined
Feb 9, 2014
Messages
301
Location
Nowhere any normal person would want to live
Chapter 5, Getting ready:
My brother slipped in while I wasn't looking and started the firewall. He said he welded up 31 holes before starting the body work. Here's a little tip/trick you guys may or may not have seen before. We use the knock-outs from breaker panels to weld up larger holes. They come in various sizes and are similar gauge as factory firewall sheet metal. My buddy's dad is a county electrical inspector so I occasionally come home to a hand full of presents he's left on my doorstep.
Still not 100% decided on what the finished product will look like. We discussed all the typical firewall treatments like white, black with pinstriping, checkered flag look, and even some non-traditional twists like lace or large airbrushed engine turning. At this point he's leaning toward a dark red. Officially, it's TBD.
 

Attachments

  • 001.jpg
    001.jpg
    32.7 KB · Views: 29
  • 002.JPG
    002.JPG
    140.5 KB · Views: 21
Last edited:
OP
M

mistervelocity

Well-known member
Joined
Feb 9, 2014
Messages
301
Location
Nowhere any normal person would want to live
Did a test fit the low-mount alternator kit and took some measurments. Looks like I'll be notching the front crossmember just as anticipated. Might even be into the framerail a bit.

Also hooked up the spark tester, noid light and scanner to see if I could verify spark and fuel. Looks good on the stand. Hopefully I can just hook up the dozen or so wires when I drop the engine in and be good to go. We shall see.
 

Attachments

  • 002.jpg
    002.jpg
    43 KB · Views: 24
  • 003.jpg
    003.jpg
    23.1 KB · Views: 23
Last edited:
OP
M

mistervelocity

Well-known member
Joined
Feb 9, 2014
Messages
301
Location
Nowhere any normal person would want to live
Shortened the driveline. I didn't really take any other pics. Just this one after I had shortened the tube and hammered the end back into the tube before being welded.

My brother came by last night and shot the firewall and inner fenders. My camera really ***** but it's kind of a blood red shade in person.

Hope to do the crossmember notch and get the engine in this weekend.
 

Attachments

  • 007.JPG
    007.JPG
    145.8 KB · Views: 19
  • 008.jpg
    008.jpg
    31.4 KB · Views: 26
Last edited:
OP
M

mistervelocity

Well-known member
Joined
Feb 9, 2014
Messages
301
Location
Nowhere any normal person would want to live
Chapter 6, Dropping it in and hooking it up:
Firewall and inner fenders painted. Made room for the alternator and reinforced the crossmember. Slipped the engine back in it's home.

Still need to get the transmission reinstalled then begin the real time consuming stuff. My feet and back are tired so I'm calling it a day. I've set a deadline of September 26th. Seem like a lot of work to do in 10 days. Wish me luck.
 

Attachments

  • 001.jpg
    001.jpg
    35 KB · Views: 27
  • 002.jpg
    002.jpg
    32.1 KB · Views: 25
  • 003.jpg
    003.jpg
    41.4 KB · Views: 32
Last edited:
OP
M

mistervelocity

Well-known member
Joined
Feb 9, 2014
Messages
301
Location
Nowhere any normal person would want to live
Just finished up the fuel systeml. Planning to focus on wiring tomorrow. Got a call late Friday that they need me to fill in at one of my shops on Monday and Tuesday. That's going to mess with my Wednesday pm deadline. Still have a good chance but it'll make my evenings less relaxing.
So here's the skinny on the last week. There was a couple projects on the truck that my brother wanted to handle. The major one was the radiator and fan mounts. He got busy with work. I got busy with work. There was an impromptu camping trip. Anyway, we decided that we wouldn't have it done for the show without working late nights and taking shortcuts. The decision was made to just take our time and do it right. Here's where it's at now. The engine harness is installed on the engine.
The PCM and fuse panels are mounted on the inside of the firewall. I glued an piece of 3/4" OSB to the upper LH side directly behind the gauges using Automix. That gave me a solid surface to screw them too without making holes in the newly painted and filled firewall. Please ignore the old wiring at the ignition switch. That's the reason for the complete rewiring job.
Started the chassis wiring. Anyone else hungry for spaghetti?
Mocked up of the radiator and fan mounts:
As of last night the wiring is 75% done and the radiator assy is ready for installation. Hoping to dedicate a couple hours today. I have job on Saturday but if I get a chance to get back to it I hope to have it fired by Sunday night.
 

Attachments

  • 003.jpg
    003.jpg
    43.2 KB · Views: 21
  • 001.JPG
    001.JPG
    140 KB · Views: 19
  • 006.jpg
    006.jpg
    30.4 KB · Views: 20
  • 008.jpg
    008.jpg
    41.4 KB · Views: 21
  • 009.jpg
    009.jpg
    53.2 KB · Views: 21
  • 007.jpg
    007.jpg
    45 KB · Views: 19
Last edited:
OP
M

mistervelocity

Well-known member
Joined
Feb 9, 2014
Messages
301
Location
Nowhere any normal person would want to live
Chapter 7, The fire-up.
So we finished the plumbing yesterday and fired it up so we could shake it down. Topped off the ATF and let it run for a while to make sure that the thermostat was opening. It sounded great and had perfect oil pressure. I wanted to get it hot enough to verify the fan operation. I was using a temp probe at various locations to check it against the gauge. The PCM should turn the fan on at 225*. The temp was up to 222* at the ECT sensor (245* on the temp gauge) so I decided to run the rpms up to get it a little hotter and force it on. I reached over the passenger fender to grab the throttle body.
After about 5 seconds at 2500rpms the hose blew off at the coupler right next to my knuckles and scalded the **** out of my hand along with spraying 3 gallons of coolant and steam all over the shop including the 18' ceiling and my Cutlass. Oh well, the shop floor and cars needed to be washed anyway.
Hurt pretty bad last night but much better this morning. It's still swollen and there are 8-10 small blisters but it feels waaay better.
 

Attachments

  • 001.jpg
    001.jpg
    39.4 KB · Views: 25
  • 002.jpg
    002.jpg
    32.5 KB · Views: 26
  • 003.jpg
    003.jpg
    22.2 KB · Views: 34
Last edited:
OP
M

mistervelocity

Well-known member
Joined
Feb 9, 2014
Messages
301
Location
Nowhere any normal person would want to live
Chapter 8, Shakedown.
We had to put in a few late nights to tie up some loose ends. Got it done Wednesday night so he could drive it to work Thursday (the last forecast dry day of the summer). Here's how it looked after it's first real trip. Note the high-end Burnett's gin bottle overflow and lack of air filter. We're still trying to agree on acceptable solutions for those two details.
The official report is that it ran really strong and stayed cool. It still needs a permanent PCM that's flashed specifically for his combination but at least it's mobile for now. Even as it is "traction is an issue". He stopped by my house to borrow my lawn mower. This thing actually does get used as a truck hauling wood, gravel and dirt bikes on a regular basis along with occasionally pulling trailers.
Picked up a crusty PCM.
I hooked it up to my dad's El Camino yesterday while he was here working on the bus. Fired right up and ran fine so it's off to the tuner for a custom flash. It'll be calibrated for the rearend ratio, firm up the shifts, tweak the fuel and timing along with deleting some of the emissions and other accessories that are no longer present. Probably won't get it back for about a month but it's rainy season anyway. No big rush for the next 6 months.
 

Attachments

  • 007.jpg
    007.jpg
    46.1 KB · Views: 43
  • 006.jpg
    006.jpg
    37.8 KB · Views: 53
  • 011.jpg
    011.jpg
    19.8 KB · Views: 40
Last edited:
OP
M

mistervelocity

Well-known member
Joined
Feb 9, 2014
Messages
301
Location
Nowhere any normal person would want to live
Tying up the loose ends:
The new computer is in and it runs great. We had a short stretch of dry weather so my brother drove it around for a few days. He LOVES the new power. Burnouts for days! There's still some loose ends like mounting the horn and coming up with a speedo cable and hooking up the tach.

I cut up some firewood for him this afternoon. Just to prove she can still do some work:
Seems like old times. I can't even count how many loads of wood that thing hauled when I was a kid. We got really good at stacking but probably grumbled the whole time.
Traded cars last week with my brother so I could work on his pickup during my down time at work.
-Adjusted the super sloppy steering box.
-Bled the brakes.
-Added a check engine light.
-Made a couple custom length plug wires to get away from the hot exhaust.
The last thing I did was figure out which wire at the coil to tap in to for a tach. I didn't have any black wire to make the run so I just told my brother which one and he said he'd do it if he got bored at work the next day. He drove it through the rest of the sunny week until yesterday and it would die as soon as he took it out of park. Then it would start in neutral but die when it went into any other gear. While trying to restart it would backfire. Come to find out the tach wire insulation was chafed inside the gauge housing (which is mounted on the column) and would intermittently short to ground when the shifter was moved. That solves the mystery about why the old 327 was so finicky sometimes and eventually wouldn't start. We had attributed it to a combination of bad wiring, old gas, weak compression and a failing head gasket. All of those things were problems -- but not the problem.

We reinstalled the aOOgah horn inside the bottom of the grill shell pointed to the right. Scares the holy hell out of hipsters on fixies. :evil:
We also installed the CableX speedo drive under the seat and measured for a custom speedometer cable. The last thing we did was try to pinpoint the source of a vibration in the rear. Looks like he has a bent axle on the driver's side. Now we're thinking about some suspension work. Given the list of needs; new brake lines, master cylinder, front pads, kingpins, rear brakes, and a replacement axle -- it almost makes more sense to upgrade than repair. Seriously considering Mustang II up front and Jag in the rear. Likely bagging it too. We'll see.

Anyway, he's put quite a few miles on it his summer. So far the only hiccups have been a bad U-joint and some suspicious RR tire wear.
 

Attachments

  • 002.jpg
    002.jpg
    136.7 KB · Views: 56
  • 001.jpg
    001.jpg
    142.7 KB · Views: 49
Last edited:

billscamaros

Well-known member
Joined
Jun 4, 2007
Messages
74
Location
Charles Town, WV
Wow.

Yep, you know how the picture part of GJ works. What an awesome collection of projects and it's so cool that so much of that is family related for you.

Cars, trucks boats and refridgerators. This is a great thread.

I got to ask ..... you were hit by a "cute 19 year old in a Neon" and later on you mention how your wife loves her Neon and that it's been wrecked several times. Coincidence?
 
OP
M

mistervelocity

Well-known member
Joined
Feb 9, 2014
Messages
301
Location
Nowhere any normal person would want to live
Now, for an actual shop feature. I picked this up this furnace a couple weeks ago. The boss bought a new furnace for the main shop at work and I bought the old one from him. Why is it awesome? Free fuel. Not shown is the 250 gallon tank that came with it. More pics when I finally get this heavy ******* up in the air and plumbed in. I need to do a good cleanup of the whole facility then maybe I'll take some new pics and post them up. Most of what you've seen so far is several years old.
 

Attachments

  • 005.jpg
    005.jpg
    141.1 KB · Views: 24
  • 006.jpg
    006.jpg
    139 KB · Views: 23
Last edited:
OP
M

mistervelocity

Well-known member
Joined
Feb 9, 2014
Messages
301
Location
Nowhere any normal person would want to live
Glad you stuck with it. It does seem like a lot but it's the group effort of 3 guys over several years. Honestly, I'm pretty bad about documenting what goes on here so lots of quick jobs fall through the cracks. There's also a bunch of pretty boring stuff that no one would really care about. For example, my brother is out in the paint shop as we speak putting the trim back on a late-model Suburban that sideswiped a garbage truck. He saved both doors and the quarter. Plus, it's black. To someone like me who doesn't really do bodywork it's a pretty impressive feat -- but it's just a Suburban, so who cares?
I actually worked out of my shop for a few years but most of it was far from exciting. Hard to feel cool while doing brake jobs on Explores or timing belts on Accords. Now I'm working for someone else and have most of my tools there. I haven't been doing much work for other people here. The wrecked '35 pickup is my current project. I'll get some info posted on that soon.
 

Kevin54

MEMBER EMERITUS
Joined
Jan 12, 2005
Messages
29,341
Location
Urbana, Ohio
Good Lord man......When I said we liked pics, you delivered and then some, and then some more. :rocker:

Fantastic work, and I love the ElC's!!!!! It looks like you and your brother has quite a bit of work to keep you occupied, and all of the cars are just over the top. From the paint to the detailing, it all looks fantastic. :thumbup::thumbup:

I sure hope you decide to hang around on Garage Journal, and keep us informed with all of the projects you have going on. I'm sure it will be a great incentive for others to tackle something. I've spent the last hour looking through and reading, and I know with this thread, I need to go back and start from the beginning again, just to make sure I didn't miss anything. And if you were next door, I'd be hanging out just to see what new projects you were starting on. :thumbup::thumbup::thumbup:
 

Flatland Dave

Well-known member
Joined
Jan 1, 2010
Messages
1,363
Location
SoDak
Great thread! Reading all that wore me out! The pics of all the air cooled VW's reminded me of working on them while growing up just down the road in Salem.
 

jbdaya

Well-known member
Joined
Mar 10, 2013
Messages
48
Location
St-ferdinand Q.C Canada
I like your home made paint booth !!!!:thumbup: I did think much of build a home made but I opt for a true paint booth in my garage home.... !!! it's wonderfull to do all at home ...
 
To avoid these ads, REGISTER NOW!
Top Bottom