
You are using an out of date browser. It may not display this or other websites correctly.
You should upgrade or use an alternative browser.
You should upgrade or use an alternative browser.
quadrcr87's garage projects
- Thread starter quadrcr87
- Start date
If your on GJ, the odds are good that you love tools and so do I. Bikes require a lot of specialty tools which is both good and bad. Great excuse to buy more tools but also very frustrating when a project is held up when I don’t have the tool I need.
I started out with the basic maintenance tools and started expanding to the point that I could assemble a new bike from the frame up. I still have not fully dove into suspension tuning but I am sure I am headed there.
I have really shifted from MX racing to mountain biking the past few years. I decided to change my old portable Craftsman box to match. The MX tools found a new home in the US General box below.

Although time consuming and not the most compact storage, I do love kaizen foam in the right application. If I go on a big bike trip, I can bring the box with me knowing it will all stay in place. Several pro bike mechanics build out Pelican cases with stacked levels of foam. I don't think they would be as easy to work out of in the home garage.

I am not brand loyal on tools. I buy a little bit from each company based on reviews and friend’s feedback.

I have spoke wrenches and a spoke tension gauge, but I still need the wheel truing stand to build a wheel from scratch. For maintenance I true the wheel on the bike using a zip tie on the frame for reference. A stand would be easier.

The last drawer has the bulky tools for cutting down steering stems and handlebars as well as the big derailer alignment tool.

My latest tool is this WERA 2-6 nm torque driver. I have to be honest; I don't like it. I did not realize how much force it would take to hit 6 Nm with a straight driver. My hand slips on the grip and when it reaches torque, the snap hurts my wrist. I need to look into a T handle style.

I am about out of room... Time for a new toolbox?
I started out with the basic maintenance tools and started expanding to the point that I could assemble a new bike from the frame up. I still have not fully dove into suspension tuning but I am sure I am headed there.
I have really shifted from MX racing to mountain biking the past few years. I decided to change my old portable Craftsman box to match. The MX tools found a new home in the US General box below.
Although time consuming and not the most compact storage, I do love kaizen foam in the right application. If I go on a big bike trip, I can bring the box with me knowing it will all stay in place. Several pro bike mechanics build out Pelican cases with stacked levels of foam. I don't think they would be as easy to work out of in the home garage.
I am not brand loyal on tools. I buy a little bit from each company based on reviews and friend’s feedback.
I have spoke wrenches and a spoke tension gauge, but I still need the wheel truing stand to build a wheel from scratch. For maintenance I true the wheel on the bike using a zip tie on the frame for reference. A stand would be easier.
The last drawer has the bulky tools for cutting down steering stems and handlebars as well as the big derailer alignment tool.
My latest tool is this WERA 2-6 nm torque driver. I have to be honest; I don't like it. I did not realize how much force it would take to hit 6 Nm with a straight driver. My hand slips on the grip and when it reaches torque, the snap hurts my wrist. I need to look into a T handle style.
I am about out of room... Time for a new toolbox?
Last edited:
I had a chance to put my bike tools to good use recently building up my friends new bike. He sold a few bikes to fund a high end carbon fiber Specialized Stumpjumper Evo build.
He doesn’t have a lot of mechanical experience so I built the bike and was able to show him a few things to help him next time he works on it.

He also bought the new $1k SRAM wireless transmission. It’s a pretty nice system that allows you to shift while pedaling under load. The risk of derailing or braking the chain is almost eliminated.

This was the last picture I took of the build. We built it up over 3 days after work. I’ll have to get a better picture next time we go on a ride. We took it out last weekend and I was pleasantly surprised that he didn’t need any adjustments and nothing came loose.

He doesn’t have a lot of mechanical experience so I built the bike and was able to show him a few things to help him next time he works on it.
He also bought the new $1k SRAM wireless transmission. It’s a pretty nice system that allows you to shift while pedaling under load. The risk of derailing or braking the chain is almost eliminated.
This was the last picture I took of the build. We built it up over 3 days after work. I’ll have to get a better picture next time we go on a ride. We took it out last weekend and I was pleasantly surprised that he didn’t need any adjustments and nothing came loose.
Last edited:
That bike looks rad! My first mtn bike was a rockhopper, loved that bike!
As I'm on a late call in my office, I see my Kona, Big Kahuna, its embarrassing how long its been since I've ridden Maybe this fall when it cools down I can get back into it
As I'm on a late call in my office, I see my Kona, Big Kahuna, its embarrassing how long its been since I've ridden
Maybe this fall when it cools down I can get back into itA couple weeks ago I finished up one of those projects that has been bothering me for a while. Shortly before moving to SC, our 12 yr old Border Collie Ash developed a back problem related to a degenerative disk disease. This meant that he could no longer run and play hard and stair use needed to be limited.
Ash:

Our deck has a small section of stairs onto the lawn and it’s really hard to slow down an excited dog. I have even seen him jump from the deck and miss the stairs completely. If the neighbor comes outside or a bunny runs into the yard, Ash can’t help himself.

The temporary solution was sliding over our deck storage box. This worked to block Ash, but it was always in my way. It was not easy to move with your hands full of tools and I’m sure it was hard on the deck boards. It also partially blocked the garage door, and I couldn’t allow that.

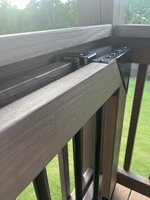
The solution was a sliding gate. I found a kit online for less than $100 that included all of the necessary hardware. I also picked up some kiln dried treated lumber and aluminum spindles from Home Depot. I had plenty of stain left over from the deck so it’s a perfect match. It looks like it has always been there and that was the goal. We decided not to install the latch kit on the house and Ash hasn't messed with it.

Here you can also see the aluminum stair treads I installed a couple years ago. Ash was slipping on the smooth TREX. It helps alot when the deck is wet as well.

The only challenge was the attachment to the existing deck rail. With the top cap and wood spindles, the rollers wouldn't work. I ended up having to install a top and bottom rail spaced off the existing railing with just enough space for the rollers to clear. If you were building a new deck, you could plan for this.

Overall, I am very happy how it turned out. It was money and an afternoon well spent. Several friends and neighbors want one on their decks too after seeing it.
Ash:
Our deck has a small section of stairs onto the lawn and it’s really hard to slow down an excited dog. I have even seen him jump from the deck and miss the stairs completely. If the neighbor comes outside or a bunny runs into the yard, Ash can’t help himself.
The temporary solution was sliding over our deck storage box. This worked to block Ash, but it was always in my way. It was not easy to move with your hands full of tools and I’m sure it was hard on the deck boards. It also partially blocked the garage door, and I couldn’t allow that.
The solution was a sliding gate. I found a kit online for less than $100 that included all of the necessary hardware. I also picked up some kiln dried treated lumber and aluminum spindles from Home Depot. I had plenty of stain left over from the deck so it’s a perfect match. It looks like it has always been there and that was the goal. We decided not to install the latch kit on the house and Ash hasn't messed with it.
Here you can also see the aluminum stair treads I installed a couple years ago. Ash was slipping on the smooth TREX. It helps alot when the deck is wet as well.
The only challenge was the attachment to the existing deck rail. With the top cap and wood spindles, the rollers wouldn't work. I ended up having to install a top and bottom rail spaced off the existing railing with just enough space for the rollers to clear. If you were building a new deck, you could plan for this.
Overall, I am very happy how it turned out. It was money and an afternoon well spent. Several friends and neighbors want one on their decks too after seeing it.
Attachments


Last edited:
Although I don't care for the heat and humidity of summer in SC, the lawn and garden seem to love it! I've been working hard on the landscaping over the past couple of years so I thought I would share some progress. I mowed the lawn yesterday after returning from a week of vacation in Michigan and I think this is the best the grass has ever looked. Even the dog piss spots turned green.
I still hate Bermuda grass, but I can't deny that it looks good for the few months that it is growing. One more year of aerating and sanding will make it even happier. I still have a few high spots that scalp with the mower set at 2".

The grass around the rock wall recovered well. I am a little surprised because I had stomped all over it. The plants are starting to fill in and mature as well. I even had to trim a couple of them back already.


The BOSS is doing well with her garden this year. Strawberries, peppers, zucchini, tomatoes, basil & carrots. I sure hope she enjoys it more than the shed that I planned to build there!


I picked some fresh basil from the garden yesterday for pizza night. It made some delicious pesto and garnish.

Thanks for following along!
I still hate Bermuda grass, but I can't deny that it looks good for the few months that it is growing. One more year of aerating and sanding will make it even happier. I still have a few high spots that scalp with the mower set at 2".
The grass around the rock wall recovered well. I am a little surprised because I had stomped all over it. The plants are starting to fill in and mature as well. I even had to trim a couple of them back already.
The BOSS is doing well with her garden this year. Strawberries, peppers, zucchini, tomatoes, basil & carrots. I sure hope she enjoys it more than the shed that I planned to build there!
I picked some fresh basil from the garden yesterday for pizza night. It made some delicious pesto and garnish.
Thanks for following along!
Last edited:
jhn9840
Well-known member
You have a very nice home and yard!
jhn9840
John
jhn9840
John
I’ve had a several projects going on in the garage this week so I’ll start with the fun stuff. I was strolling FB market place when a vintage bike ad caught my eye. They were listed at $100 each so I sent an inquiry on size and condition. Seller said I’ll check and get back to you. I kind of forgot about until 2 weeks later I get a message that said new price $0 come and get them! I quickly loaded and made the 1hr drive to Asheville, NC. The BOSS thinks I am crazy but how do you argue with free?
I was pleasantly surprised how clean and complete they both were. With a little grease, a few basic parts and several hours of polishing these things should be ready to ride! From what I can tell both were made in England. A little research indicates that Raleigh likely built both bikes around 1967.

The Bronze Green Raleigh Sports is the one that had caught my eye. Unfortunately, it is a ladies model but both the gents and ladies models were released with 21" frames in 1967. We will see when it is complete but I think I can comfortably ride it, initial feel is similar to the Schwinn tandem.

Style and elegance at its finest

The crank set is in desperate need of some polish but appears to be in good shape.

Internal 3 speed hub. It should be fun learning how this works. The small chain for actuating is interesting.

Next up we have red speedster, a AMF Hercules 10 speed. I am not sure on the year yet but I believe it was built in Nottingham, England in the mid to late 1960s. The drop handlebars are very narrow and will take some getting used to. I am not a road biker. It also has larger 27" wheels vs. the 26" found on a lot of these vintage bikes. I read that the brakes are pretty weak on these so at least a new set of pads are in the plans.

The head badge is not quite as elegant as the Raliegh, but I still like it.

Nice 2 piece crank that will require some attention. The derailers move free so that's a positive.

Pretty standard rear derailer with a 5-speed cassette. Just needs some lubrication and adjustment.

I'll provide some updates as I start the restorations. Thanks for following along!
I was pleasantly surprised how clean and complete they both were. With a little grease, a few basic parts and several hours of polishing these things should be ready to ride! From what I can tell both were made in England. A little research indicates that Raleigh likely built both bikes around 1967.
The Bronze Green Raleigh Sports is the one that had caught my eye. Unfortunately, it is a ladies model but both the gents and ladies models were released with 21" frames in 1967. We will see when it is complete but I think I can comfortably ride it, initial feel is similar to the Schwinn tandem.
Style and elegance at its finest
The crank set is in desperate need of some polish but appears to be in good shape.
Internal 3 speed hub. It should be fun learning how this works. The small chain for actuating is interesting.
Next up we have red speedster, a AMF Hercules 10 speed. I am not sure on the year yet but I believe it was built in Nottingham, England in the mid to late 1960s. The drop handlebars are very narrow and will take some getting used to. I am not a road biker. It also has larger 27" wheels vs. the 26" found on a lot of these vintage bikes. I read that the brakes are pretty weak on these so at least a new set of pads are in the plans.
The head badge is not quite as elegant as the Raliegh, but I still like it.
Nice 2 piece crank that will require some attention. The derailers move free so that's a positive.
Pretty standard rear derailer with a 5-speed cassette. Just needs some lubrication and adjustment.
I'll provide some updates as I start the restorations. Thanks for following along!
Last edited:
With the high heat this summer it was time to insulate the garage door. Too soon to tell how big of a difference it made but it definitely quieted down the door rattles.
I started with the reflective window tint as there was better access before the insulation.
First time I have installed tint and it certainly isn’t perfect. It came pretty scratched up too. I am glad it’s in the garage and not the house.


I started the insulation from the bottom after installing miles of double-sided tape. I also had to clean every rail with alcohol before I started.

It was pretty easy to install but there were a lot of cuts around brackets. Wrestling a full width roll solo was fun too.

When I made it up to the window panel, I stopped to come up with a plan. It was pretty straight forward up to this point.

There was a pretty significant depth difference from the windows to the door braces. The large top brace would need to be removed as well.

I ended up removing every other screw on each window frame and installing some gorilla clear tape to attach to the frames.

With a plan forward and the windows prepped, I installed the last panel the same as the first 3. It was now 12:30am and the stopping point on a work night.

I started with the reflective window tint as there was better access before the insulation.
First time I have installed tint and it certainly isn’t perfect. It came pretty scratched up too. I am glad it’s in the garage and not the house.
I started the insulation from the bottom after installing miles of double-sided tape. I also had to clean every rail with alcohol before I started.
It was pretty easy to install but there were a lot of cuts around brackets. Wrestling a full width roll solo was fun too.
When I made it up to the window panel, I stopped to come up with a plan. It was pretty straight forward up to this point.
There was a pretty significant depth difference from the windows to the door braces. The large top brace would need to be removed as well.
I ended up removing every other screw on each window frame and installing some gorilla clear tape to attach to the frames.
With a plan forward and the windows prepped, I installed the last panel the same as the first 3. It was now 12:30am and the stopping point on a work night.
Last edited:
The next day I finished the insulation by cutting in the window openings. I would say they turned out good from far but far from good. The four IPAs may have had something to do with it as I finished at 1am after a night out with friends. I had to get it done to make the garage door usable as the upper support was still removed and the lift was disconnected.
Step one involved rough cutting the opening to relieve some tension from the insulation.

I was then able to push the material down to attach to the tape surrounding the frames. Finding the screw holes was a little tedious but it worked out pretty well. Then a final trim to fit the windows. This is where I wish I was a little more careful to maintain a straight line. I just freehanded it.

A little finishing detail around the brackets.

Overall, the project turned out pretty well. At first glance it looks like it came this way and that is the look I was going for. I am sure there are more effective options like pink foam board or fiberglass insulation, but I think this looks more finished.

Now to do this all over again in the second garage.... I think I'll wait until fall when it's cooler.
Thanks for following along!
Step one involved rough cutting the opening to relieve some tension from the insulation.
I was then able to push the material down to attach to the tape surrounding the frames. Finding the screw holes was a little tedious but it worked out pretty well. Then a final trim to fit the windows. This is where I wish I was a little more careful to maintain a straight line. I just freehanded it.
A little finishing detail around the brackets.
Overall, the project turned out pretty well. At first glance it looks like it came this way and that is the look I was going for. I am sure there are more effective options like pink foam board or fiberglass insulation, but I think this looks more finished.
Now to do this all over again in the second garage.... I think I'll wait until fall when it's cooler.
Thanks for following along!
Last edited:
With the recent acquisition of vintage bikes, our total count is up to 7. The BOSS thinks it’s a bit excessive so is is time to give one away. My MIL in Michigan loves riding and she is due for an upgrade. We happen to have the perfect bike in our crawl space.
My mom’s old Specialized Crossroads hybrid. It was a little too small for the BOSS but perfect for her 5’ tall mom.

The bike was a little rough and neglected. It spent most of its life on the back of an RV driving from MI to FL in all weather conditions. Covered in salt and road grime and put away wet. We have had it for about a year, and it's only been ridden once or twice in that time.

The problem with a white frame is that it shows everything. Most of this is bike rack damage. My dad doesn't exactly care for bikes the same way I do. It has very low riding miles but many highway miles.


After a couple hours of cleanup, it was looking fresh again. Goof Off worked wonders on the white frame. I gave it a quick tune up and drivetrain service while I was at it. This included running the chain through the ultrasonic cleaner, lubing everything and adjusting the cables.

Polishing the bell was mandatory as it was the worst looking part according to the BOSS. I gave the rest of the chrome and aluminum a quick polish as well. I even replaced the battery in the computer. The goal is for it to feel like a new bike for my MIL because it basically is.

A successful test ride.


After all the bike work, I had to strip the bike down, wrap the frame and box it up for shipping. The key here is to get a free bike box and materials from a local bike shop. I also took a few pictures and labeled some parts to help with the assembly on the other end.

It was a very tight fit, but the wheels fit on either side of the frame.

The plan is for my brother-in-law to build the bike when it arrives in MI. He is a gear head but not a bicycle enthusiast.
All was going according to plan until I went to UPS… I would have never guessed it costs over $300 USD to ship a 41 lb bike 600 miles. That is higher than the bike’s current value, so it definitely was not an option.
Changing to plan B. The BOSS is flying to her parents in a couple of weeks to help her dad after a back surgery. She is now checking the bike as luggage and hand delivering it! After some research, I think it will be $0-50 as it fits the airlines sports equipment limits. Her first checked bag is free, so fingers crossed they just take it with no charge.
Thanks for following along!
My mom’s old Specialized Crossroads hybrid. It was a little too small for the BOSS but perfect for her 5’ tall mom.
The bike was a little rough and neglected. It spent most of its life on the back of an RV driving from MI to FL in all weather conditions. Covered in salt and road grime and put away wet. We have had it for about a year, and it's only been ridden once or twice in that time.
The problem with a white frame is that it shows everything. Most of this is bike rack damage. My dad doesn't exactly care for bikes the same way I do. It has very low riding miles but many highway miles.
After a couple hours of cleanup, it was looking fresh again. Goof Off worked wonders on the white frame. I gave it a quick tune up and drivetrain service while I was at it. This included running the chain through the ultrasonic cleaner, lubing everything and adjusting the cables.
Polishing the bell was mandatory as it was the worst looking part according to the BOSS. I gave the rest of the chrome and aluminum a quick polish as well. I even replaced the battery in the computer. The goal is for it to feel like a new bike for my MIL because it basically is.
A successful test ride.
After all the bike work, I had to strip the bike down, wrap the frame and box it up for shipping. The key here is to get a free bike box and materials from a local bike shop. I also took a few pictures and labeled some parts to help with the assembly on the other end.
It was a very tight fit, but the wheels fit on either side of the frame.
The plan is for my brother-in-law to build the bike when it arrives in MI. He is a gear head but not a bicycle enthusiast.
All was going according to plan until I went to UPS… I would have never guessed it costs over $300 USD to ship a 41 lb bike 600 miles. That is higher than the bike’s current value, so it definitely was not an option.
Changing to plan B. The BOSS is flying to her parents in a couple of weeks to help her dad after a back surgery. She is now checking the bike as luggage and hand delivering it! After some research, I think it will be $0-50 as it fits the airlines sports equipment limits. Her first checked bag is free, so fingers crossed they just take it with no charge.
Thanks for following along!
Last edited:
My wife made it safe to Michigan with the bike. That meant I had a few days of the the bachelor life.
Day 1: Big epic bike ride. I think 24 mi. is the longest MTB ride I have taken. It was a great experience and showed that my endurance is improving. I felt pretty good, even on the climbs.

The Dupont State Forest is a beautiful place. I feel fortunate to live so close to the trails.

Day 2: Late start to the day, feeling pretty lazy and maybe a little hung over. I mowed the lawn, ran some errands and picked up some steel from Metal Supermarkets for the next project.
Before heading to dinner with friends, I hit the HF parking lot sale and picked up a couple Icon ratchets (40% off) and some hardware bins. I spent the rest of the evening organizing hardware and relabeling.


The decision has been made that this is the max bin allocation for the garage….. Don’t worry, a couple of these are still empty. We have a little room to grow. I am designing the new cabinet based on this stack so I will be forced to exercise some restraint and not hoard every rusty nut and bolt I find.
How many times have you found stripped out, cheap, **** hardware in your spares? It happens too often for me. It’s a disease I plan to cure.

Cleaned up for the night. Ready to start the real mess tomorrow.

Day 1: Big epic bike ride. I think 24 mi. is the longest MTB ride I have taken. It was a great experience and showed that my endurance is improving. I felt pretty good, even on the climbs.
The Dupont State Forest is a beautiful place. I feel fortunate to live so close to the trails.
Day 2: Late start to the day, feeling pretty lazy and maybe a little hung over. I mowed the lawn, ran some errands and picked up some steel from Metal Supermarkets for the next project.
Before heading to dinner with friends, I hit the HF parking lot sale and picked up a couple Icon ratchets (40% off) and some hardware bins. I spent the rest of the evening organizing hardware and relabeling.
The decision has been made that this is the max bin allocation for the garage….. Don’t worry, a couple of these are still empty. We have a little room to grow. I am designing the new cabinet based on this stack so I will be forced to exercise some restraint and not hoard every rusty nut and bolt I find.
How many times have you found stripped out, cheap, **** hardware in your spares? It happens too often for me. It’s a disease I plan to cure.
Cleaned up for the night. Ready to start the real mess tomorrow.
Last edited:
I can’t believe it’s already been 2 weeks since I started this project. Life and work have been going 100mph lately, but I am managing to maintain my sanity a couple of hours at a time in the garage.
After the hardware bins were organized, the plan started taking shape. After multiple measurements and designs I landed on a 72x30” surface with 16 HF bins, 2 pull out shelves, a drawer and open storage for a couple of machines.
The sketch doesn't match the final plan but close enough.

With the dimensions set, I started cutting steel. First the 1” tube frame for the base. I wanted a solid base for the casters, and I prefer to keep the wood a little further off the concrete.

Making sure everything is fitting square.

Next was the (32) 1” angle iron rails to support the HF bins. I should have just made these out of wood, but I guess I like to suffer. Alot of tedious cutting and grinding.

Having the portable band saw and combo sander has made metal work much faster and easier.

I used a couple of wood blocks to check the layout and finalize the hole pattern. This method ended up not being accurate enough for the actual welding.

Marked and ready to drill.

I put Grandpa’s old drill press to work drilling all the mounting holes to attach to the cabinet box.

Everything was going smooth at this point until I started welding. When I did a quick fit check with the bins, I realized I forgot to space the rails off of the mounting strap. This caused the bins to hit the straps as they slide in. It also requires the rails to be spaced too far apart and with little support of the bin. Time to cut it apart. At least I only welded the tops on 1 full section.

After the hardware bins were organized, the plan started taking shape. After multiple measurements and designs I landed on a 72x30” surface with 16 HF bins, 2 pull out shelves, a drawer and open storage for a couple of machines.
The sketch doesn't match the final plan but close enough.
With the dimensions set, I started cutting steel. First the 1” tube frame for the base. I wanted a solid base for the casters, and I prefer to keep the wood a little further off the concrete.
Making sure everything is fitting square.
Next was the (32) 1” angle iron rails to support the HF bins. I should have just made these out of wood, but I guess I like to suffer. Alot of tedious cutting and grinding.
Having the portable band saw and combo sander has made metal work much faster and easier.
I used a couple of wood blocks to check the layout and finalize the hole pattern. This method ended up not being accurate enough for the actual welding.
Marked and ready to drill.
I put Grandpa’s old drill press to work drilling all the mounting holes to attach to the cabinet box.
Everything was going smooth at this point until I started welding. When I did a quick fit check with the bins, I realized I forgot to space the rails off of the mounting strap. This caused the bins to hit the straps as they slide in. It also requires the rails to be spaced too far apart and with little support of the bin. Time to cut it apart. At least I only welded the tops on 1 full section.
Last edited:
After the mistake I made on the bin rails, I needed a break and more material. I shifted back over to the frame to make some progress.

I made the 4 caster plates from an $8 piece of 1/4 plate I picked out of the drop pile at the metal supply. I was impressed how well the band saw cut through it.
Back to the drill press. I had planned to drill and tap these 1/4-20, but I broke my tap off in the first hole. I think these plates may have been hardened because I drilled with a #7 bit and had a sharp tap. I decided to just nut and bolt them. It's not like I’m planning to remove them often.

With the plates and 10 mounting tabs for the cabinet made, I was almost ready to weld it up.

I decided it would be easier to cap off the end of the tubes before welding the frame up.
I was able to get a nice tight fit on all 4 ends. It took a like hammer tap to fit them, so I didn't even need a magnet to hold them in place.


To be continued…
I made the 4 caster plates from an $8 piece of 1/4 plate I picked out of the drop pile at the metal supply. I was impressed how well the band saw cut through it.
Back to the drill press. I had planned to drill and tap these 1/4-20, but I broke my tap off in the first hole. I think these plates may have been hardened because I drilled with a #7 bit and had a sharp tap. I decided to just nut and bolt them. It's not like I’m planning to remove them often.
With the plates and 10 mounting tabs for the cabinet made, I was almost ready to weld it up.
I decided it would be easier to cap off the end of the tubes before welding the frame up.
I was able to get a nice tight fit on all 4 ends. It took a like hammer tap to fit them, so I didn't even need a magnet to hold them in place.
To be continued…
Attachments

Last edited:
With everything prepped the frame welding went pretty smooth. The fireball tools squares make building large frames on the floor accurately much easier.

My back and knees yearn for a large fab table. I just don’t have the space with the amount of other hobbies I use the garage for.

By the end of this project I felt like I was starting to weld decent again. I just don’t weld often enough to stay in practice.

Once the frame was solid, I raised it up on sawhorses to finish weld and install the mounting tabs and caster plates. I made sure to keep this flush with the frame where it will meet the bottom of the wood cabinet.

My Lincoln 140 MiG struggled to get enough heat in the 1/4” thick plates. I was running .030 solid core with the amps maxed out. I could have switched to flux core wire to maximize the machine's output, but I decided it wasn’t really needed in this application. They are not falling off any time soon.

At this point the frame was ready to be cleaned up and painted.

Thanks for following along!
Remember, if the women don’t find you handsome, they should at least find you handy.
My back and knees yearn for a large fab table. I just don’t have the space with the amount of other hobbies I use the garage for.
By the end of this project I felt like I was starting to weld decent again. I just don’t weld often enough to stay in practice.
Once the frame was solid, I raised it up on sawhorses to finish weld and install the mounting tabs and caster plates. I made sure to keep this flush with the frame where it will meet the bottom of the wood cabinet.
My Lincoln 140 MiG struggled to get enough heat in the 1/4” thick plates. I was running .030 solid core with the amps maxed out. I could have switched to flux core wire to maximize the machine's output, but I decided it wasn’t really needed in this application. They are not falling off any time soon.
At this point the frame was ready to be cleaned up and painted.
Thanks for following along!
Remember, if the women don’t find you handsome, they should at least find you handy.
Last edited:
I went to Metal Supermarket in Lyman. It was my first time in there and they were easy to work with. I called my order in ahead, so they had it all cut and ready for pickup later that day. Alot of material comes in 20' lengths so I had them cut to 10'.Where are you sourcing your steel?
Perfect! Glad you found them, I use them for everything now, used to use onlinemetals.com, but just like you said, you can all in an order and its usually ready quickly. They are also good if you just show up and need to look around.I went to Metal Supermarket in Lyman. It was my first time in there and they were easy to work with. I called my order in ahead, so they had it all cut and ready for pickup later that day. Alot of material comes in 20' lengths so I had them cut to 10'.
One other place, that is closer to you is Ideal Surplus over by where Swamp Rabbit Cafe is, its just a surplus yard, but there are some good treasure to be found there.
Same! Its dangerous, last time I was there I almost bought an old fire hydrant....why, no clue, but steel was like $0.30/lb or somethingThanks for the tip fouckhest, I can always find something I like in a surplus yard.
I never enjoy going back to fix a mistake, but it’s necessary. To finish the bin supports I picked up 1.5”x1”x.125” metal to make some spacers. I started by running ran all 64 pieces through the portable band saw cut to 1”.
Then it was onto welding 2 onto the back of each piece of angle iron.

I made a simple wood jig to speed up the assembly weld process and improve accuracy. A little crude but it worked.

I screwed the mounting straps to the board to keep them straight. I was then able to clamp each rail down before welding. The wood spacers I cut on the table saw were wide enough to keep everything square.
Welds not great but not bad.


With the fab work done I was able to get started on the paint. 1 coat of self-etching primer and 2 coats of Rustoleum hammered black.


I picked up some birch ply wood from a local lumber yard on my lunch break and then bad things happened. The forecast looked clear but the skies opened up around 4 pm and soaked $300 worth of wood. Needless to say but I had a very stressed and frustrated drive home from work. It didn’t end up too bad in the end and I am glad I had the cheap 1/4” sheet on the top offering some protection for the (5) 3/4” sheets.

I am headed to Charlotte for the weekend to watch the first Super Motocross race so the cabinet build will have to wait. The good news is wood has a while to dry out. Haha
Thanks for following along!
Then it was onto welding 2 onto the back of each piece of angle iron.
I made a simple wood jig to speed up the assembly weld process and improve accuracy. A little crude but it worked.
I screwed the mounting straps to the board to keep them straight. I was then able to clamp each rail down before welding. The wood spacers I cut on the table saw were wide enough to keep everything square.
Welds not great but not bad.
With the fab work done I was able to get started on the paint. 1 coat of self-etching primer and 2 coats of Rustoleum hammered black.
I picked up some birch ply wood from a local lumber yard on my lunch break and then bad things happened. The forecast looked clear but the skies opened up around 4 pm and soaked $300 worth of wood. Needless to say but I had a very stressed and frustrated drive home from work. It didn’t end up too bad in the end and I am glad I had the cheap 1/4” sheet on the top offering some protection for the (5) 3/4” sheets.
I am headed to Charlotte for the weekend to watch the first Super Motocross race so the cabinet build will have to wait. The good news is wood has a while to dry out. Haha
Thanks for following along!
Attachments

Last edited:
Last weekend was a much needed break from the daily routine. It started out with a couple days with my brother and nephew at the first SMX playoff race at Zmax Dragway in Charlotte.

Both the racing and the fan fest were awesome. It’s pretty impressive how they can build a motocross track on top of a 4 lane NHRA drag strip. It’s been a while since I have had a chance to walk through the pro pits as the races in Detroit and Indiana have closed pits due to the winter weather.

After a weekend with the boys I headed to Boone, NC to meet my wife at a VRBO. We planned ahead and booked a reservation at Grandfather Mountain State Park. We missed out on our last visit and really wanted to hike to the top.
You can get to a pretty good view and this swinging bridge by car. From there, the real fun starts.

The Grandfather trail is pretty intense. It’s a combination of bouldering and ladder climbing to the top. There are guide wires to assist in the steepest sections but you are not clipped in.


Very high exposure in some sections, don’t slip!

Now back to the garage to finish this cabinet!
Both the racing and the fan fest were awesome. It’s pretty impressive how they can build a motocross track on top of a 4 lane NHRA drag strip. It’s been a while since I have had a chance to walk through the pro pits as the races in Detroit and Indiana have closed pits due to the winter weather.
After a weekend with the boys I headed to Boone, NC to meet my wife at a VRBO. We planned ahead and booked a reservation at Grandfather Mountain State Park. We missed out on our last visit and really wanted to hike to the top.
You can get to a pretty good view and this swinging bridge by car. From there, the real fun starts.
The Grandfather trail is pretty intense. It’s a combination of bouldering and ladder climbing to the top. There are guide wires to assist in the steepest sections but you are not clipped in.
Very high exposure in some sections, don’t slip!
Now back to the garage to finish this cabinet!
Last edited:
As I got back into the cabinet build, I quickly remembered how poorly I am set up to handle full size sheets of plywood. I had a friend come over to help me run 5 sheets through my Dewalt contractor saw. It was a struggle to say the least. The saw fence adjusts to 24” but the table is very small making it difficult to keep things straight. With a planned 30” tabletop width, I had to set the saw at 18” and hope for the best. The cabinet box is 24" deep so ripping each sheet exactly in the middle was critical.
In the end, I had mostly straight cuts other than the spots where my buddy pushed me out of alignment. At one point he almost stalled the saw as he tried to wedge himself between a sawhorse and the sheet I was running through the saw.
As I started the crosscuts, I remembered how much I hate my saw guide. It requires C clamps to hold it in place which is near impossible to get right with a sheet lying flat. My solution was notching a foam board to clear the clamps. As you can imagine this system doesn't adapt well to different widths.

Eventually I ended up with 2 sheets for the top that were ready for glue up. Don't worry, I spread the glue off camera.

Relatively flat. I added a few screws in the center for insurance.

Planning ahead, I cut 1 piece oversized and used a router template bit to trim flush.

After a morning of frustration, I headed to ACE and bought a Kreg Accu-cut at lunch. It’s no track saw but it is 100% better than my old straight edge. I can now get a decently accurate cut without clamps. Way easier to align and cut on foam board. $80 I should have spent a long time ago. I still want a track saw, but I can't justify one until I have more demand.
What a mess cutting through the plastic chip guide the first time.

With my new straight…er edges, it was time to try my hand at edge banding. Definitely a learning curve to this process, and that's why I chose a garage cabinet to learn on. Someday I aspire to produce a cabinet so beautiful that the Boss deems it worthy of going inside the house.
A new skill is also a good justification to buy new tools. Fastcap banding cutter and big rubber roller.

No. 1 lesson learned: pick up the shaving as you go. Do not wait until the end of the day or you will spend a while with a razor blade scraping the floor. This photo was after I swept the garage.

It only took about 40’ to start getting the results I was looking for. In the beginning, I was pushing down too hard on the cutter and trying to make it flush in one pass. To get the best results, I took one lighter pass to trim the excess and then sanded it flush. Again, I am glad this project is for the garage.

The trials and tribulations of building my first cabinet are to be continued soon.
In the end, I had mostly straight cuts other than the spots where my buddy pushed me out of alignment. At one point he almost stalled the saw as he tried to wedge himself between a sawhorse and the sheet I was running through the saw.
As I started the crosscuts, I remembered how much I hate my saw guide. It requires C clamps to hold it in place which is near impossible to get right with a sheet lying flat. My solution was notching a foam board to clear the clamps. As you can imagine this system doesn't adapt well to different widths.
Eventually I ended up with 2 sheets for the top that were ready for glue up. Don't worry, I spread the glue off camera.
Relatively flat. I added a few screws in the center for insurance.
Planning ahead, I cut 1 piece oversized and used a router template bit to trim flush.
After a morning of frustration, I headed to ACE and bought a Kreg Accu-cut at lunch. It’s no track saw but it is 100% better than my old straight edge. I can now get a decently accurate cut without clamps. Way easier to align and cut on foam board. $80 I should have spent a long time ago. I still want a track saw, but I can't justify one until I have more demand.
What a mess cutting through the plastic chip guide the first time.
With my new straight…er edges, it was time to try my hand at edge banding. Definitely a learning curve to this process, and that's why I chose a garage cabinet to learn on. Someday I aspire to produce a cabinet so beautiful that the Boss deems it worthy of going inside the house.
A new skill is also a good justification to buy new tools. Fastcap banding cutter and big rubber roller.
No. 1 lesson learned: pick up the shaving as you go. Do not wait until the end of the day or you will spend a while with a razor blade scraping the floor. This photo was after I swept the garage.
It only took about 40’ to start getting the results I was looking for. In the beginning, I was pushing down too hard on the cutter and trying to make it flush in one pass. To get the best results, I took one lighter pass to trim the excess and then sanded it flush. Again, I am glad this project is for the garage.
The trials and tribulations of building my first cabinet are to be continued soon.
Last edited:
For the cabinet box, I decided to add a rabbit to the bottom of both side panels. This was my first time with this type of joinery and garage furniture is a great opportunity to learn. I didn’t have the right type of blade in my table saw but I managed to make it work with a little chisel cleanup. I’ll have to pick up a flat tooth blade or dado stack next time.
The first step was clamping a sacrificial board to the fence. This is necessary to run the blade right to the edge of the workpiece. The metal clamps were a little sketchy, but I survived. Note to self, next time use aluminum or plastic clamps.

After making the first pass at 3/4” from the end, I made several more passes to clear the material. The result was a fairly tight joint with 1/2” overlap. You can see the gaps created by not having a flat blade profile. The edge banding will hide that. It will look a little nicer on the outside of the cabinet not seeing a **** joint.

I brushed on a little glue and ran in some trim screws to hold it in place. I don’t have 6’ clamps so the screws were necessary. There are many tools you need to acquire to build cabinets like the pros. When you see a shop with 100 clamps on the wall you may think its excessive. When you start doing this type of work it really isn't.

Things were going so smooth; I decided to glue and screw the top on. About an hour later I realized the box was way out of square. I think the warped plywood threw me off along with building on two sawhorses. Both the top and bottom boards had a bow making it difficult to check square accurately. Corner to corner measurement confirmed I was way off. I was pretty frustrated and closed the garage for the night.
The next morning, I decided my only option was to cut the top off. With a precise alignment of my new track guide I was able to save it.

I barely touched the top panel and shaved only a hair over a blade width off the side panels.

I set the top aside and moved onto the vertical supports. For some added strength, I made the supports between the bins 1.5” thick by gluing up a panel. This will also add some strength below the heavy drill press. I edge banded the face of both pieces before gluing. Some 1.5" edge banding would have been ideal here but I didn't plan that far ahead.

While the glue was drying, I moved onto to trimming the face of the top work surface. I tried to go fancy with some 1/4” thick 2" wide mahogany I picked up for $8. I carefully mitering the corners, glued and nailing it on. Then I fired up the router with a flush trim bit to trim it fit the top. After about 4’ of progress the bit caught the grain and ripped a large chip out. Not good.

I took a deep breath and moved to the other side, it caught the grain and chipped again. It was beyond repair at this point and the glue had not fully setup. I grabbed a hammer and a pry bar and ripped it all off. I didn't get a picture of it installed but you can see what is left of it on the floor. I then trimmed off all of the 18ga. nails and pounded them in with a nail set.

Time to take a break from the top and come up with plan B…..
I spent the remainder of the afternoon edge banding the vertical supports and assembling the cabinet box. In an effort to not repeat my mistakes, I assembled in a different order this time. I squared the sides and installed the back panel first. Then the vertical supports followed by the top of the cabinet box. Thankfully it went relatively smooth. At this point, I needed the win.

I finished the weekend off with a quick mockup with the bin rails. I still have a lot to finish but I can finally see some real progress. The open space on the right is plenty big for storage. I plan to add a 4" deep drawer at the top to store bandsaw blades and sanding belts. I have never made a wood drawer so that will be a good learning experience as well.
Any concerns with sag in the middle? Once the steel frame and top are secured to the cabinet, I think it will be pretty solid. There is a lot of weight with the hardware, drill press, band saw and sander. It would be pretty easy to add an adjustable floor lock in the middle if needed.

 www.mcmaster.com

The first step was clamping a sacrificial board to the fence. This is necessary to run the blade right to the edge of the workpiece. The metal clamps were a little sketchy, but I survived. Note to self, next time use aluminum or plastic clamps.
After making the first pass at 3/4” from the end, I made several more passes to clear the material. The result was a fairly tight joint with 1/2” overlap. You can see the gaps created by not having a flat blade profile. The edge banding will hide that. It will look a little nicer on the outside of the cabinet not seeing a **** joint.
I brushed on a little glue and ran in some trim screws to hold it in place. I don’t have 6’ clamps so the screws were necessary. There are many tools you need to acquire to build cabinets like the pros. When you see a shop with 100 clamps on the wall you may think its excessive. When you start doing this type of work it really isn't.
Things were going so smooth; I decided to glue and screw the top on. About an hour later I realized the box was way out of square. I think the warped plywood threw me off along with building on two sawhorses. Both the top and bottom boards had a bow making it difficult to check square accurately. Corner to corner measurement confirmed I was way off. I was pretty frustrated and closed the garage for the night.
The next morning, I decided my only option was to cut the top off. With a precise alignment of my new track guide I was able to save it.
I barely touched the top panel and shaved only a hair over a blade width off the side panels.
I set the top aside and moved onto the vertical supports. For some added strength, I made the supports between the bins 1.5” thick by gluing up a panel. This will also add some strength below the heavy drill press. I edge banded the face of both pieces before gluing. Some 1.5" edge banding would have been ideal here but I didn't plan that far ahead.
While the glue was drying, I moved onto to trimming the face of the top work surface. I tried to go fancy with some 1/4” thick 2" wide mahogany I picked up for $8. I carefully mitering the corners, glued and nailing it on. Then I fired up the router with a flush trim bit to trim it fit the top. After about 4’ of progress the bit caught the grain and ripped a large chip out. Not good.
I took a deep breath and moved to the other side, it caught the grain and chipped again. It was beyond repair at this point and the glue had not fully setup. I grabbed a hammer and a pry bar and ripped it all off. I didn't get a picture of it installed but you can see what is left of it on the floor. I then trimmed off all of the 18ga. nails and pounded them in with a nail set.
Time to take a break from the top and come up with plan B…..
I spent the remainder of the afternoon edge banding the vertical supports and assembling the cabinet box. In an effort to not repeat my mistakes, I assembled in a different order this time. I squared the sides and installed the back panel first. Then the vertical supports followed by the top of the cabinet box. Thankfully it went relatively smooth. At this point, I needed the win.
I finished the weekend off with a quick mockup with the bin rails. I still have a lot to finish but I can finally see some real progress. The open space on the right is plenty big for storage. I plan to add a 4" deep drawer at the top to store bandsaw blades and sanding belts. I have never made a wood drawer so that will be a good learning experience as well.
Any concerns with sag in the middle? Once the steel frame and top are secured to the cabinet, I think it will be pretty solid. There is a lot of weight with the hardware, drill press, band saw and sander. It would be pretty easy to add an adjustable floor lock in the middle if needed.
McMaster-Carr
McMaster-Carr is the complete source for your plant with over 595,000 products. 98% of products ordered ship from stock and deliver same or next day.
Last edited:
I had a satisfying night in the garage last night. The first coat of finish has been applied. I decided on a Minwax Ebony stain. I have used it on a few garage shelves in the past and I like the dark look. I am likely going to apply a wipe on satin poly for the topcoat. It will certainly be the easiest.
Plan B for the work surface is satin black Formica on the sides and the top. I have never applied Formica before, but it is time to learn. Any tips or tricks are appreciated.
-score a line with a carbide tipped tool and break the 4x8 sheet down to size
-apply contact cement to the sheet and the plywood and allow to tack up
-lay sheet on dowels or wood strips, pull them out one at a time starting on one end, use a rubber roller to press it down
-final trim to size with a router template bit
-laminate sides first and then the top

I stained everything inside and out. A little overkill but it went on fast.


Plan B for the work surface is satin black Formica on the sides and the top. I have never applied Formica before, but it is time to learn. Any tips or tricks are appreciated.
-score a line with a carbide tipped tool and break the 4x8 sheet down to size
-apply contact cement to the sheet and the plywood and allow to tack up
-lay sheet on dowels or wood strips, pull them out one at a time starting on one end, use a rubber roller to press it down
-final trim to size with a router template bit
-laminate sides first and then the top
I stained everything inside and out. A little overkill but it went on fast.
Attachments

Last edited:
Thanks fouchest. With the heavy drill press on top, I don't expect to move it around much. I think the key to keeping it uncluttered is going to be the storage below. I need to come up with something for all the drilling fluids and bits that always surround the drill press as well.Nice work, that is going to be a super handy storage/work space, hopefully being on wheels will keep the top from becoming a catch all!
I was able to apply two coats of wipe on poly after work this week. This set me up to start assembly tonight.

The 1” steel frame aligned well with the cabinet box. The frame was 1/16” longer but the width was perfect. I am sure I lost some accuracy while chiseling the corner joints. I also didn’t account for the slightly undersized ply. I screwed the base on with 3/4” pan head screws. I then set the overhangs on the 1.5” thick plywood top, and secured it to the cabinet box with 1-1/2” GRK screws.

I aligned the bin rails with the screw holes drilled during mockup and secured them with the same 3/4” screws I used on the frame. They feel very solid and laid flush with the cabinet as the screws were ran in. The little bit of bow in the 1” strap from welding disappeared.

You can see why I had to add the extra 1/8” spacers to clear the cabinet sides. It honestly could have used 3/16 or more. Options were limited at the hardware store.

Overall height landed at 36”. I know a lot of guys build all of their workbenches the same height but mine are all over the place. That makes it hard when you want to span long material across them.
Note for future self:
Steel workbench- 40”
Oil change cart - 35” (36.5”) with wood top
Welding table- 32”
Router table…?
Table saw?
This height feels very comfortable standing at the belt sander and bandsaw. I expect the drill press to feel the same. It’s so heavy I’m not moving it over until the laminate is installed. You can see the height difference side by side with the old stand.

I still need to make and laminate the pull out shelves. There is just enough space to clear the 2” tall slides. I need to figure out drawer pulls as well. Tentative plan is making them out of 2”x1” aluminum angle.

They are 22” deep so the shelves will fit bins sideways too. It will also be nice to have the extra counter space when I am running the drill press. We all know how the tools and parts pile around the base of the press during a project.


Cheers to a fun and productive weekend ahead! Thanks for following along.
The 1” steel frame aligned well with the cabinet box. The frame was 1/16” longer but the width was perfect. I am sure I lost some accuracy while chiseling the corner joints. I also didn’t account for the slightly undersized ply. I screwed the base on with 3/4” pan head screws. I then set the overhangs on the 1.5” thick plywood top, and secured it to the cabinet box with 1-1/2” GRK screws.
I aligned the bin rails with the screw holes drilled during mockup and secured them with the same 3/4” screws I used on the frame. They feel very solid and laid flush with the cabinet as the screws were ran in. The little bit of bow in the 1” strap from welding disappeared.
You can see why I had to add the extra 1/8” spacers to clear the cabinet sides. It honestly could have used 3/16 or more. Options were limited at the hardware store.
Overall height landed at 36”. I know a lot of guys build all of their workbenches the same height but mine are all over the place. That makes it hard when you want to span long material across them.
Note for future self:
Steel workbench- 40”
Oil change cart - 35” (36.5”) with wood top
Welding table- 32”
Router table…?
Table saw?
This height feels very comfortable standing at the belt sander and bandsaw. I expect the drill press to feel the same. It’s so heavy I’m not moving it over until the laminate is installed. You can see the height difference side by side with the old stand.
I still need to make and laminate the pull out shelves. There is just enough space to clear the 2” tall slides. I need to figure out drawer pulls as well. Tentative plan is making them out of 2”x1” aluminum angle.
They are 22” deep so the shelves will fit bins sideways too. It will also be nice to have the extra counter space when I am running the drill press. We all know how the tools and parts pile around the base of the press during a project.
Cheers to a fun and productive weekend ahead! Thanks for following along.
Last edited:
Well I survived my first laminate job and learned some things along the way.
First off this carbide scoring tool worked fantastic. Just run it a few times along a straight edge and the laminate breaks clean. I did this to break down all of the pieces before glue up.


I laminated the four sides first. I wanted the top piece to overlap them and reduce the risk of them catching and ripping off as I slide items off the top.

Then it was time to glue up the top.

An on old low nap roller did a great job spreading it even. I was surprised how easily contact glue rolls out like paint.

After the 20 min wait period, the Boss helped he flip over the sheet and line it up with the top.

I trimmed to fit with a Bosch flush trim bit. Not sure what I did wrong here but it actually scuffed the side pieces in several places. My guess is that it was caused by the glue built up on the bit. I cleaned glue stuck on the cutters and bearing several times. I was pretty bummed with the damage because the edges and fitment looked great.


After a quick cleanup of the machines, I loaded the cabinet up and rolled it into place. The drill press had developed a lot of surface rust in the past 3 years of life in SC. The rest of the garage is a wreck, but this was a great way to end the afternoon in the garage.


I finished off my Saturday at a Celtic music festival at the local park and watching the SMX finals. Hoping to finish the drawer and shelves tomorrow.
First off this carbide scoring tool worked fantastic. Just run it a few times along a straight edge and the laminate breaks clean. I did this to break down all of the pieces before glue up.
I laminated the four sides first. I wanted the top piece to overlap them and reduce the risk of them catching and ripping off as I slide items off the top.
Then it was time to glue up the top.
An on old low nap roller did a great job spreading it even. I was surprised how easily contact glue rolls out like paint.
After the 20 min wait period, the Boss helped he flip over the sheet and line it up with the top.
I trimmed to fit with a Bosch flush trim bit. Not sure what I did wrong here but it actually scuffed the side pieces in several places. My guess is that it was caused by the glue built up on the bit. I cleaned glue stuck on the cutters and bearing several times. I was pretty bummed with the damage because the edges and fitment looked great.
After a quick cleanup of the machines, I loaded the cabinet up and rolled it into place. The drill press had developed a lot of surface rust in the past 3 years of life in SC. The rest of the garage is a wreck, but this was a great way to end the afternoon in the garage.
I finished off my Saturday at a Celtic music festival at the local park and watching the SMX finals. Hoping to finish the drawer and shelves tomorrow.
Last edited:
Progress continued on Sunday. I’m getting down to the finishing details.
I needed a stop for the bins to prevent them from falling off the back of the rails. I had a 8’ piece of 1.5”x3/4” pine left over from another project that worked perfect. I cut it to 24” lengths and counter sunk five holes to screw it into the cabinet. A quick stain to match and they were finished.
This was a good opportunity to try the drill press out at its new height, I like it.


In hindsight, I probably should have welded stops on like I did for my service cart. This was an easy fix though.

I have successfully built my first wood drawer. The only other drawer I have ever made was the sheet metal one in my workbench a few years ago. The exterior dimension is 30x 22x 4”. I would have liked more depth, but I needed to leave enough room to clear the bandsaw when stored below it. It is going to be so nice having a dedicated place for sandpaper, sanding belts and bandsaw blades. They are always a mess stored in my cabinets.

I router a 1/2” dado a 1/4” from the bottom using my router table. I had to do it in 2 passes with a 1/4” bit as the ply was undersized. The bottom fit perfectly but I still glued it in place during assembly. I kept the corner joints very basic with glue and some pin nails. If I find myself building drawers a lot in the future, I would like to get a dovetail jig. I borrowed one from my dad before and really liked it.

I made the front face out of the same 3/4” ply and laminated it on 5 sides to match the countertop. Time consuming but worth it. The trim bit in the router table was easier for these small parts.

I was also able to complete the two pull out shelves. They are 16”x22” and were laminated on top and the front face. I considered making a front panel to hide the drawer slides, but I took the easy way out. They will be pretty hidden under the counter anyways.

Now I just need to get everything installed on the cabinet and decide on drawer pulls. I am leaning towards black tab pulls so they blend in.
Thanks for following along!
I needed a stop for the bins to prevent them from falling off the back of the rails. I had a 8’ piece of 1.5”x3/4” pine left over from another project that worked perfect. I cut it to 24” lengths and counter sunk five holes to screw it into the cabinet. A quick stain to match and they were finished.
This was a good opportunity to try the drill press out at its new height, I like it.
In hindsight, I probably should have welded stops on like I did for my service cart. This was an easy fix though.
I have successfully built my first wood drawer. The only other drawer I have ever made was the sheet metal one in my workbench a few years ago. The exterior dimension is 30x 22x 4”. I would have liked more depth, but I needed to leave enough room to clear the bandsaw when stored below it. It is going to be so nice having a dedicated place for sandpaper, sanding belts and bandsaw blades. They are always a mess stored in my cabinets.
I router a 1/2” dado a 1/4” from the bottom using my router table. I had to do it in 2 passes with a 1/4” bit as the ply was undersized. The bottom fit perfectly but I still glued it in place during assembly. I kept the corner joints very basic with glue and some pin nails. If I find myself building drawers a lot in the future, I would like to get a dovetail jig. I borrowed one from my dad before and really liked it.
I made the front face out of the same 3/4” ply and laminated it on 5 sides to match the countertop. Time consuming but worth it. The trim bit in the router table was easier for these small parts.
I was also able to complete the two pull out shelves. They are 16”x22” and were laminated on top and the front face. I considered making a front panel to hide the drawer slides, but I took the easy way out. They will be pretty hidden under the counter anyways.
Now I just need to get everything installed on the cabinet and decide on drawer pulls. I am leaning towards black tab pulls so they blend in.
Thanks for following along!
Last edited:
Slow but steady progress. Last night I rounded the top edges of the drawer and put a single coat of wipe on poly on the sides. After a little cure time, I mounted the slides and fit it to the cabinet.
I used the card trick I learned from Bourbon Moth on YouTube to mount the drawer face. 11 cards on top and 9 on each side and some 2-sided tape to hold it in alignment before I ran in screws. I set the top gap at 1/8” to make sure I had clearance for the tab pulls I ordered.

The gaps turned out nice and even. This thing was actually square!
Why didn't anyone warn me that matte black laminate was a bad idea? The grease from the drawer slides made fingerprints everywhere. A quick wipe with 409 left streaks all over. The woodchips and dust clean up easy, but I will have to figure out what product doesn't streak. The drilling fluid is going to be a mess. I wonder if there is some type of surface coating I could apply to help.

So much storage potential in this one drawer. I still need to wipe on some poly before I fill it up. In the future I have the option of filling the space below with drawers as well. For now, I need a place to store the machines.

Next, I mounted the slide out shelves. They both fit well, as I mounted them flush with the top of the slides. No more searching for a clear counter space to sort out bins. I am also hoping this prevents me from dumping a bin on the ground. That tends to happen when I open them haphazardly around the shop. The number 1 offender is balancing on the top of my shop stool.

I like having the option to put the bins sideways on the shelf. It would have been great to have all the bins on drawer slides, but this was the next best alternative. At $33/ pair for quality slides, it would have been $500+ for all 16 bins.

Project Cost- $893
5 Sheets Plywood- $300
Steel- $100
Formica- $60
Contact Cement- $20
Birch Edge Banding - $35
3 pair of slides- $100
Casters- $70
Drawer Pulls- $10
10 Small HF Bins- $100
6 Large HF Bins- $78
Hardware & Misc-$20
New Tools & Skills Gained- Priceless

The cost was higher than I expected when I designed it. I figured around $500. The hardware and finishing details add up quick. I have been accumulating the HF bins over the past 10 years, so I didn't really factor those in. For a cabinet I will use and enjoy for many years to come, I would say it was worth it. The function will improve the way I work and keep me more organized.
Thanks for following along!
I used the card trick I learned from Bourbon Moth on YouTube to mount the drawer face. 11 cards on top and 9 on each side and some 2-sided tape to hold it in alignment before I ran in screws. I set the top gap at 1/8” to make sure I had clearance for the tab pulls I ordered.
The gaps turned out nice and even. This thing was actually square!
Why didn't anyone warn me that matte black laminate was a bad idea? The grease from the drawer slides made fingerprints everywhere. A quick wipe with 409 left streaks all over. The woodchips and dust clean up easy, but I will have to figure out what product doesn't streak. The drilling fluid is going to be a mess. I wonder if there is some type of surface coating I could apply to help.
So much storage potential in this one drawer. I still need to wipe on some poly before I fill it up. In the future I have the option of filling the space below with drawers as well. For now, I need a place to store the machines.
Next, I mounted the slide out shelves. They both fit well, as I mounted them flush with the top of the slides. No more searching for a clear counter space to sort out bins. I am also hoping this prevents me from dumping a bin on the ground. That tends to happen when I open them haphazardly around the shop. The number 1 offender is balancing on the top of my shop stool.
I like having the option to put the bins sideways on the shelf. It would have been great to have all the bins on drawer slides, but this was the next best alternative. At $33/ pair for quality slides, it would have been $500+ for all 16 bins.
Project Cost- $893
5 Sheets Plywood- $300
Steel- $100
Formica- $60
Contact Cement- $20
Birch Edge Banding - $35
3 pair of slides- $100
Casters- $70
Drawer Pulls- $10
10 Small HF Bins- $100
6 Large HF Bins- $78
Hardware & Misc-$20
New Tools & Skills Gained- Priceless
The cost was higher than I expected when I designed it. I figured around $500. The hardware and finishing details add up quick. I have been accumulating the HF bins over the past 10 years, so I didn't really factor those in. For a cabinet I will use and enjoy for many years to come, I would say it was worth it. The function will improve the way I work and keep me more organized.
Thanks for following along!
Last edited:
The drawer pulls arrived yesterday, and I was able to finish up the cabinet. I want to work with it for a little while before I add anything else, but I eventually plan to add a power strip as well as some thread inserts in the top to secure the drill press and the bandsaw. They both slide pretty easy on the Formica.

I face mounted all 3 of the pulls so they match and have the same depth. It feels very intuitive to reach under the counter to catch them and at 10" wide, it's hard to miss. Being black against a dark cabinet they blend right it.

They fit the 3/4" shelves like they were made for them. I considered making these myself but why bother when I got a set of 3 for $10. They appear to be anodized aluminum and were finished very nice.


I bought the drill press a housewarming gift to help it settle into its new place. I was looking for an old cam action press but wasn't having any luck. I ended up ordering a new 4" Wilton model 1204 from Acme tools. The paint finish is pretty poor but it's going to be covered in grease and oil soon anyway.

I went with the 4" model due to the relatively small table size on the press.

With the bench done, I shifted focus to cleanup and rearranging. I am sure I will be moving things around again but it's a start. I am considering mounting both grinders back-to-back on the cast pedestal to reduce the footprint. I could even make a wider base with casters. The area just feels crowded, and it won't be easy to work on long stock like this. What do you guys think?
I was glad to get my truck back in the garage in time for the torrential rains headed our way. We are expecting over 15" of rain in my area with hurricane Helene hitting the east coast.

Thanks for following along!
I face mounted all 3 of the pulls so they match and have the same depth. It feels very intuitive to reach under the counter to catch them and at 10" wide, it's hard to miss. Being black against a dark cabinet they blend right it.
They fit the 3/4" shelves like they were made for them. I considered making these myself but why bother when I got a set of 3 for $10. They appear to be anodized aluminum and were finished very nice.
I bought the drill press a housewarming gift to help it settle into its new place. I was looking for an old cam action press but wasn't having any luck. I ended up ordering a new 4" Wilton model 1204 from Acme tools. The paint finish is pretty poor but it's going to be covered in grease and oil soon anyway.
I went with the 4" model due to the relatively small table size on the press.
With the bench done, I shifted focus to cleanup and rearranging. I am sure I will be moving things around again but it's a start. I am considering mounting both grinders back-to-back on the cast pedestal to reduce the footprint. I could even make a wider base with casters. The area just feels crowded, and it won't be easy to work on long stock like this. What do you guys think?
I was glad to get my truck back in the garage in time for the torrential rains headed our way. We are expecting over 15" of rain in my area with hurricane Helene hitting the east coast.
Thanks for following along!
Attachments

Last edited:
Hurricane Helene hit our area hard Friday morning. The storm shifted east further than expected overnight and we woke to a very scary situation.
The blue dot here is our neighborhood. Right in the direct path.

We were very fortunate to have sustained minimal damage. Many of our friends and neighbors saw much worse. A lot of heavy tree damage, leaking roofs, washed out roads, downed power lines, etc.


The swale behind our house was about 15’ wide at the peak. I can’t believe none of those trees came down.

We only had a couple of issues. The worst is the power outage that started Friday morning. I won’t be surprised if this takes several days to restore. We have a generator but it was running a little rough the first few hours. Time for a carb cleaning. 30 minutes later we were in business.


I sucked at least 100 gallons of water out of the crawl space, and several hundred more out of the neighbors. Thankfully it was all near the entrance door.

One fence post almost let go. I was able to straighten it back out and put in a temporary brace.

Fuel, food and a Blackstone is all we need. Trying to survive as long as it takes restore power.

For anyone else affected by this storm, I’ll be thinking about you. I know many people were not so fortunate. The city of Asheville, NC is still under water and people can’t get out.
Stay safe!
The blue dot here is our neighborhood. Right in the direct path.
We were very fortunate to have sustained minimal damage. Many of our friends and neighbors saw much worse. A lot of heavy tree damage, leaking roofs, washed out roads, downed power lines, etc.
The swale behind our house was about 15’ wide at the peak. I can’t believe none of those trees came down.
We only had a couple of issues. The worst is the power outage that started Friday morning. I won’t be surprised if this takes several days to restore. We have a generator but it was running a little rough the first few hours. Time for a carb cleaning. 30 minutes later we were in business.
I sucked at least 100 gallons of water out of the crawl space, and several hundred more out of the neighbors. Thankfully it was all near the entrance door.
One fence post almost let go. I was able to straighten it back out and put in a temporary brace.
Fuel, food and a Blackstone is all we need. Trying to survive as long as it takes restore power.
For anyone else affected by this storm, I’ll be thinking about you. I know many people were not so fortunate. The city of Asheville, NC is still under water and people can’t get out.
Stay safe!
Last edited:
Power came back on Monday night along with the internet. Unfortunately internet went down again Tuesday mid day and it’s still off. I can barely even make a phone call from my house.
With internet down it was a good time to finish cleaning up the crawl space. I pulled everything away from the back wall to check for additional water. It wasn’t bad at all.

I pealed the plastic back and ran fans for a few hours to take care of a little moisture.

Once the plastic was dry and clay was firm again I was ready to get organized. I have the typical pile of holiday decorations.

I cut up 2 old fence panels I had to make a small raised platform. The hope is that it allows the area to breathe and prevents my storage racks from sinking in. I would have used pallets if I had them to get a little more height.

I setup the plastic and metal racks I had and stacked the bins. There is always risk that we get another 1000 year rain and it floods again. At least now it will dry out once the water is drained.

I also cut up my rubber garage mat to cover more of the vapor barrier plastic. I didn’t have the rubber in front of my tool wall before and was afraid I would tear the plastic. If I ever need to remove the mats again, it will be much easier as 3 pieces. I won’t have to deal with a full 20’ x 8’ sheet.

Groceries are still a bit of a problem. The produce section was an ugly scene at Walmart yesterday. The key is to go to several stores to get one complete cart of groceries.

With internet down it was a good time to finish cleaning up the crawl space. I pulled everything away from the back wall to check for additional water. It wasn’t bad at all.
I pealed the plastic back and ran fans for a few hours to take care of a little moisture.
Once the plastic was dry and clay was firm again I was ready to get organized. I have the typical pile of holiday decorations.
I cut up 2 old fence panels I had to make a small raised platform. The hope is that it allows the area to breathe and prevents my storage racks from sinking in. I would have used pallets if I had them to get a little more height.
I setup the plastic and metal racks I had and stacked the bins. There is always risk that we get another 1000 year rain and it floods again. At least now it will dry out once the water is drained.
I also cut up my rubber garage mat to cover more of the vapor barrier plastic. I didn’t have the rubber in front of my tool wall before and was afraid I would tear the plastic. If I ever need to remove the mats again, it will be much easier as 3 pieces. I won’t have to deal with a full 20’ x 8’ sheet.
Groceries are still a bit of a problem. The produce section was an ugly scene at Walmart yesterday. The key is to go to several stores to get one complete cart of groceries.
Last edited:
That grocery store photo is wild!!
The ingles by me I've been told is only letting people in via single file line....I wondered why until last night I saw an ariel shot of the distribution center in Hendersonville that is under water....super sad
The ingles by me I've been told is only letting people in via single file line....I wondered why until last night I saw an ariel shot of the distribution center in Hendersonville that is under water....super sad