To avoid these ads, REGISTER NOW!

Radiant Tubing Layout

Friartuck

Well-known member
Joined
Apr 13, 2007
Messages
123
Location
Monmouth County, NJ
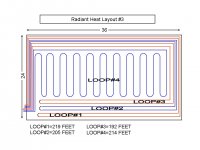
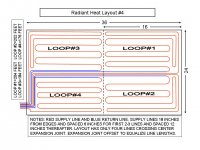
I have two designs for laying out the pex tubing for a 24 X 36 slab.
In Layout #1 the loops are evenly spaced and their lengths are fairley equal. Layout #2 the loops are closer together around the perimeter to provide a higher concentration of heat where the heat loss is greater and larger spacing towards the center where heat loss is much less. The assumption is full 2 inch foam under the slab and around the inside perimter of the foundation.

Ignore the sharp bends on the graphics. Powerpoint doesn't do curves that easy.

Any comments on either??

Chris
 

Attachments

  • Slide1.JPG
    Slide1.JPG
    119.9 KB · Views: 332
  • Slide2.JPG
    Slide2.JPG
    110.1 KB · Views: 303
To avoid these ads, REGISTER NOW!

TurboNuke

Member
Joined
Oct 27, 2009
Messages
21
I just laid my tubing and it didn't turn out like I thought at all. The tubing is very stiff and is hard to lay down uniformly. I just winged it and it came out fine. :)
 

hansen1

Well-known member
Joined
Jul 26, 2008
Messages
86
Location
Colorado
What about breaking it up into quadrants maybe like tic tac toe. Then start the supply side towards the outside of each square. This way you get the hot towards the outside of each square but by the time it cools, you run another loop.

I did this for a 36x48 and ended up with 8 loops/squares and each loop was around 270'. I did approx 9" spacing.
 

Jess

Well-known member
Joined
Oct 22, 2006
Messages
430
Location
Vancouver Island, BC Canada
There are lots of opinions on how to lay out the tubes. On my installion 32'x 40', we used 1/2 Uponor heatpex in six 250' loops. The areas closest to the walls and overhead door are 6" apart, with the balance of the floor at 12". One of the things that we ended up doing was folding the loops back on themselves so that the inlet and outlet run side by side to the end of the loops. The reasoning was that this keeps the floor more even as the water cools along the run. By alternating supply and return, the coolest water comes back past the incoming water. I don't have a sketch to post and can't find the techincla reference but if you do some research, you should be able to figure out this method. I wasn't easy to lay out but does work very well. Good luck. Jess
 

egads74

Well-known member
Joined
Sep 1, 2008
Messages
87
May want to do the tic-tac-toe diagram as the cement cuts are represented in your floor. 2 cuts dividing the 36' and 1 cut dividing the 24' gives you 6 squares of 12' x 12'. The try to lay design minimizing number of joint crosses...

Overall rule of thumb: length of pex loops to be within 10%.
Diagram 1: flow for loop 4 should start against the outside wall.
 
To avoid these ads, REGISTER NOW!

jklingel

Well-known member
Joined
Nov 29, 2007
Messages
441
Location
Frbnks, AK
It would not cost much, I don't imagine, to get a GOOD professional to design your layout. I am not a pro, but I have read enough horror stories and spoken w/ enough guys who try to fix failed layouts that I know this should not be taken lightly or left to T&E. Yes, you may wing it in there, but what if you miss? Have you done a heat loss analysis to see how much heat you need? That is #1, and will determine how much PEX, water temp and speed, spacing, etc. In general, 1/2" PEX can run 300', 5/8" up to 450. Tighter loops on the outside, blah, blah. BUT, it's gotta be right the first time. Good luck.
 

custom1

Well-known member
Joined
Jan 8, 2008
Messages
307
Location
Pa
I like design #1. Its simple to lay out and has even length loops. IMO the whole thing about making the tubes closer at the walls is over rated in a garage. Why would you want to put more heat at the area of most heat loss? I just want the inside of the building to be warmer than the outside. Maybe in a house where even heat is more important it would make sense. Also most people have benches, cabinets and tool boxes along the walls anyway.
How are you fastening the pex? 6" wire mesh makes it easy to figure out on graph paper. I think insulation is the most important thing and it looks like you have that covered. Here is a pic of my layout. It's 28x35 outside.

View media item 1301
I will qualify my post by saying this is the only time I've done this and I don't have a boiler yet, so I don't know how well it will work. One thing I did like is there are only 8 180* turns in the whole floor. I'm sure you've searched around and may have already seen it but if not here is a link to my pex layout thread.

http://www.garagejournal.com/forum/showthread.php?t=40137


John
 
OP
F

Friartuck

Well-known member
Joined
Apr 13, 2007
Messages
123
Location
Monmouth County, NJ
Ding Ding......Ding Ding......Thank you for playing the final round of Radiant Heat Layout. We have a winner, I think. :bounce:

Based on some of the comments, we have the attached designed:
1. Apparently it is a valid design consideration to put the first two or three lengths closer (on the supply side) to the outside perimeter spaced 6 inches apart, the first one staying 18 inches off the edge. After that second or third length, then 12 inch spacing is fine. This point was verified by several credible sources.

2. Minimize the number of crossings over the expansion joint. Any Pex tubing crossing the joint should move freely inside a sleeve.

John (Custom1) design was the basis for mine design. I just hugged the outside a little more and serpinteened versus John's spiral.
 

Attachments

  • RadiantLayout#4.jpg
    RadiantLayout#4.jpg
    123.3 KB · Views: 309

tatra

Well-known member
Joined
Dec 2, 2007
Messages
4,785
Location
pirate contest city
don't see any allowances for hoist anchor points, etc...........now's the time to preplan for that...........coupla recievers in the floor and pulling pots?.............french drain?.........just some food for thought............
 

custom1

Well-known member
Joined
Jan 8, 2008
Messages
307
Location
Pa
Loop three and four are still a little short. I moved two of my loops a little past center to make them longer and the far loops a little shorter. You would have to move your joint too though. Can you handle the sections of floor being out of balance?:lol_hitti


tatra has a point about the lift anchor points. I didn't think I would ever want a two post lift. I planned on a four post that I could move around. But in the last 3 months I've seen a few two posts on CL fairly cheap. Oh well.
 
To avoid these ads, REGISTER NOW!
Top Bottom