To avoid these ads, REGISTER NOW!

rattle_snake's random shop projects v0.1

OP
R

rattle_snake

Well-known member
Joined
Jun 25, 2015
Messages
5,194
Location
Chandler, AZ
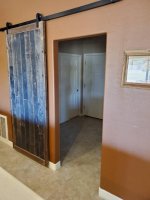
Barn door mostly done and hung. Made all the track hardware like the cabinet bypass doors in the shop. V rollers and 3/16 flat bar. Painted the fasteners. Used shims to get straight track on crooked wall. Door is all oak so quite heavy.

Wouldn't do this core design again and would use a different adhesive other than liquid nails. Used same water based polycrylic sealer out of spray bottle like other furniture pieces.

Next step is to remove door frame/casing and replace with drywall, w/ arch at the top to match others.

20200405_141842.jpg
 
Last edited:
To avoid these ads, REGISTER NOW!

royce

Well-known member
Joined
Jun 22, 2014
Messages
3,103
Location
fairbanks ak
Nice work Justin.
Does Mrs rattle understand that this should come with a get out of doghouse free card or some other form of treat!
Well done

Royce
 
OP
R

rattle_snake

Well-known member
Joined
Jun 25, 2015
Messages
5,194
Location
Chandler, AZ
Nice work Justin.
Does Mrs rattle understand that this should come with a get out of doghouse free card or some other form of treat!
Well done

Royce

Thanks Royce. wish it did, but I was late on delivery a few years. Now she has to give me a hard time about something else
:)

Great job on the 72' and that door looks amazing :beer:

thanks. Not looking forward to drywall and bullnose but want it taken to next step. I want to move the door opening as well, but trying to do in reasonable stages.

That door is nice!! Glad my bride doesn’t look at this forum.
Thanks. Yes, sharing of this type of information can lead to unintended consequences and tasks. Once it spreads in the 'wife network' we all have more to do.
 
OP
R

rattle_snake

Well-known member
Joined
Jun 25, 2015
Messages
5,194
Location
Chandler, AZ
I really like your barn door. Would like to see some pics that show how you made the hardware.

Thanks. Sorry no pics of the hardware, but I can explain.
The v-roller have a 3/16 groove, so used 3/16 x 2 flat bar for track. Cut some 2" spacers to space off wall. 6" 3/8 lag bolts into studs.
hangers are single sheer, 1.5 x 3/16. Really need 2 bolts in door to keep them vertical when moving door. Did only one in shop door and they won't stay tight. Cut down the v roller bearing sleeve for nice fit, greased them. 3/8 bolts throughout.
 
OP
R

rattle_snake

Well-known member
Joined
Jun 25, 2015
Messages
5,194
Location
Chandler, AZ
....72 exhaust system. Decided to go with L&L 'shorty' headers that allow starter access and clear the tires. The fenderwell type would rub the tire at full lock and bump. They are designed to have both pipes on the right, so not to interfere with the front driveshaft, transfer case and traction bar. Used a V-band to make a short piece removable, so the system can be removed for maintenance.
They have 1.75 primaries and nice thick flanges. Came with complete, decent hardware. I turd polished flanges and repainted. For this motor and application, bigger headers or piping provide little to no benefit, IMO. Muffler is a Jones max flow stainless straight through design. Reversed to get twin 2.5 in and 3" out, case is 20" which is their 'medium' size. The muffler also provides a bank balancing (H/X pipe). I put the muffler far enough back to be under the bed and not the cab. 3" tube is about a 20% less area/flow than twin 2.5", but is lighter weight. Tail pipe is only about 3.5'

I cut and fit the system back to muffler. Upon fitment of the right side, it just didn't seem right. the collector exits at a strange angle. Looked more at cab, and realized the collector was likely designed to clear the cab floor. So cut it all out and started over with the pipe straight out of collector and down below frame rail.
I finish welded the left side then realized that the system couldn't be removed with cab on. So I chopped it back up and moved the V band back behind the cross member. This allows the system to drop down before moving back. I noticed if I worked late enough, I could just get back to where I was the day before.
:rolleyes:
WgeMhOLcOZLunE6KoH32EFY7h1eqVwoawObxsOyJW0pw=w1200.jpg

OAmWXwGYdd2dGxCrSesK_zr_2dn6RGus1kWAaaE1MzJw=w1200.jpg

4ZEs3skXHk-gc8JQSkYl8U_97PxRf4bfedv8GDQz7hhw=w1200.jpg
 
OP
R

rattle_snake

Well-known member
Joined
Jun 25, 2015
Messages
5,194
Location
Chandler, AZ
Finished up the welding on the exhaust. Used 3 'j' bends from summit racing. The cross sectional shape is not a perfect circle so weld joints aren't perfect looking but strong enough. Half *** ground the welds and hosed some header paint on it. Too cheap for stainless.
2iWRrnkVwGvftFhJcP9hoz_RlRLf5ZMCc06b3yaoEP-A=w1200.jpg

Tail pipe exists under fuel tank, it's tight to clear axle. Plan to add a tip to extend further and add some bling.
xHt2s5MZfjVa05IRsAbsuj4OKHeQtJUwHn_Y95OyTwKQ=w1200.jpg

Qdp-ZQTvHuK8kBVexPEDRjKJLEz4M0omCPrE_kOs6zRw=w1200.jpg

Used ford style rubber hangers.
4CwJTFs8njSQf3U9IH-00fHPyqGtIC9xbhYrleZYVacg=w1200.jpg

V-band location works well now.
u-S2xBNu5YZEzSEfizPtY1YoZSJo8se9D7VMkBT_g3fQ=w1200.jpg
t-case is rusting, oh no!
 

OutlawDrifter

Well-known member
Joined
Jan 20, 2015
Messages
3,876
Location
KS
Nice work on the exhaust Justin. Unless you're living on the rev limiter all the time, you'll never notice the difference going bigger than 3". That will help keep the temp up, improve flow and scavenging effects where the engine spends most of it's time.

I have used Rust-Oleum high temp paint on my aluminized exhausts and welds for a lot of years, holds up well here in the Midwest.

Only difference between that Jones and a Magnaflow, is the Jones doesn't have Magnaflow stamped on the case. I've got one on the F150(5x8x24).
 
OP
R

rattle_snake

Well-known member
Joined
Jun 25, 2015
Messages
5,194
Location
Chandler, AZ
Thank you for the clarification. That pic really helps me understand what you did. I like the roller stop.

Your welcome Jeff. The roller stops are the cut-offs from the exhaust hangers. Seemed like a good use of junk/scrap.

Link to shop cabinet doors. aka train tracks on ceiling.
https://www.garagejournal.com/forum/showpost.php?p=6888402&postcount=506

Nice work on the exhaust Justin. Unless you're living on the rev limiter all the time, you'll never notice the difference going bigger than 3". That will help keep the temp up, improve flow and scavenging effects where the engine spends most of it's time.

I have used Rust-Oleum high temp paint on my aluminized exhausts and welds for a lot of years, holds up well here in the Midwest.

Only difference between that Jones and a Magnaflow, is the Jones doesn't have Magnaflow stamped on the case. I've got one on the F150(5x8x24).

I think the sizing is a good fit for the intended use, which is getting the 40s rolling. The 2000 stall converter should allow motor to make close to 500 ftlbs off the line and exhaust sizing should complement at those RPMs like you say.

I've painted the exhaust on many vehicles over the years with decent results. Easy to touch up or make modifications. Still need to put 02 into the system.

Jones muffer has better weld quality for 1/2 price, and made in USA. I had 2 flavors of MFs on the cobra to compare. Flow master makes a non-chambered MF copy, but reviews are poor.

Nice work on the exhaust Justin. L&L makes a nice header, good thick flanges and well made.
Yes good quality and made in USA. All summit pipe is made in USA too. Whole system is 'Merican!
Note resemblance to your Jeep's exhaust, great minds think alike...
 

Ben W

Well-known member
Joined
Oct 20, 2008
Messages
67
Location
NY
u-S2xBNu5YZEzSEfizPtY1YoZSJo8se9D7VMkBT_g3fQ=w1200.jpg
t-case is rusting, oh no!

I'm not an engine builder, but have plans for the future ... if the t-case externals are rusting like they are, could your engine internals be doing the same? I'm assuming that you haven't run any oil through the engine yet.
 
OP
R

rattle_snake

Well-known member
Joined
Jun 25, 2015
Messages
5,194
Location
Chandler, AZ
I'm not an engine builder, but have plans for the future ... if the t-case externals are rusting like they are, could your engine internals be doing the same? I'm assuming that you haven't run any oil through the engine yet.

Sure, even in hot dry AZ climate things eventually rust. For the engine, TC, axles and so on, I coated everything on the inside in the proper fluid to protect, and painted the outside. I knew it would be a LONG time before fluid fill and use. Creeping up on a year for some of the items. It was a pain to do porous items like inside of block, and not contaminate with rag lint. Used disposable gloves instead.

Not sure how I have allowed the transfer case to go with missing paint so long. With unnecessary turd polishing abundant on this project, I can still acknowledge and procrastinate daily.
:beer:
 
OP
R

rattle_snake

Well-known member
Joined
Jun 25, 2015
Messages
5,194
Location
Chandler, AZ
Had been avoiding the rear (and front) bump stop, as I didn't have a good plan for them. I wanted something simple so I can make another to change height/offset easy enough. I cut out the factory reinforcements and added some transverse braces instead of a boxing like the others. The bend in the lower portion made boxing odd, and hence unattractive. My fuel filter plans also seemed to conflict. Made them curvy, well, because.
hN4A4OP9gPSisrQzWGYllHazLIdEbnymZhQW8yKkxWbQ=w1200.jpg

Made some simple spacers. Don't know 'ideal' height so used calcs and made them 1.5" taller for bump stop compression and fudge-factor. Stops are from Daystar. Probably change blocks so lower stop point may change too.
oTGuGybk5RPzI-PVcVBCqxROp6t1NZqXjwNhB-tjemYg=w1200.jpg

Good enough for now.
oM7xAT9LZEZ4Sa9CaWNV9eSxHRuQSbcsKt-SfLJlZ5cw=w1200.jpg
 
OP
R

rattle_snake

Well-known member
Joined
Jun 25, 2015
Messages
5,194
Location
Chandler, AZ
With bump stops both out of the way and in the way, I started on fuel plumbing. AN6 line chopped up and put in place. Fuel filter mounted, I wanted it on cross member but solution wasn't good enough to over complicate.
moepm-vdDMSZ7SXeCTQLX77QIl8Xoz1fSdulopT417Hg=w1200.jpg

Hard lines to up front. Wasted time welding up the last of the holes in front wheel wells, as it was last chance for that ****...
zcQ-4bxuXC4madmzURFIvWsIMTzBjlr8hWqrRBc43fWQ=w1200.jpg
MF'ing tube isn't perfectly straight...
Unrolling works better over a radius, I used a 40" tire.

Ran up to right side of motor by alternator. Contemplated many options. Left side has brakes and electrical. so went right side w/ trans lines.
Had some extra fitting came up with this. Hard to plan what will work best, so waste money on extra parts for good measure.
9BDG0PCqbqBmI64Fm_1nGT4yWDMkM_2HSIA95d-qL96w=w1200.jpg

the Holley plumbed up for 700hp of fuel. Won't use that much, unfortunately. Can easily tap in to add nitrous fuel support in the future.
jI0wAHvxCXWZ69WRrySpBGmyIk0tplR26uz4kYKgDtSg=w1200.jpg
 

OutlawDrifter

Well-known member
Joined
Jan 20, 2015
Messages
3,876
Location
KS
Room for growth is always good. I guess you could add a 6-71 and turn it up a little more....think about that off idle torque!

Fuel lines turned out very nice Justin!
 
To avoid these ads, REGISTER NOW!

nsula_country

Well-known member
Joined
May 23, 2013
Messages
1,534
Location
Northwestern Louisiana
This thread has made me realize that I'm not as attention oriented as I once thought.

Once done, this Ford should be on the cover of a magazine! Or 2 or 3.

Very nice work...

CT
 
OP
R

rattle_snake

Well-known member
Joined
Jun 25, 2015
Messages
5,194
Location
Chandler, AZ
Room for growth is always good. I guess you could add a 6-71 and turn it up a little more....think about that off idle torque!

Fuel lines turned out very nice Justin!

Thanks. I put in cheap cast pistons so boost isn't planned, but a whiff of nitrous will be OK. Next step is the fuel hat/pickup assembly, gauge sender and so on.


This thread has made me realize that I'm not as attention oriented as I once thought.

Once done, this Ford should be on the cover of a magazine! Or 2 or 3.

Very nice work...

CT
Maybe that is a good thing, you get stuff done faster.
:beer:
 
OP
R

rattle_snake

Well-known member
Joined
Jun 25, 2015
Messages
5,194
Location
Chandler, AZ
You do such good work.

Thanks. It's a fine line, like your signature. Since the truck is a toy I can go all in on perfectionism, but other times it is a curse.

Electrical Engineer
Working on quashing perfectionism. Sometimes.

Went to work on the brake lines. Bent all new hard lines into crooked shapes. I broke down and bought a Rigid 345 flare tool on my last project and it is very nice to use compared to the sad POS I had. I couldn't find much info on extended brake lines (length, fitting types, etc) and some of the available one were just pieces together AN setups. So I just made my own line assemblies based on AN3 stainless lines. These Areoquip hoses are 28" and were only about $12. Found a nice tee block, and added a spacer to get some more clearance for line wrench.
ejqGnpOydB2B0zcWBl3tHlq73nTNlLTDC6rD9-SI_0aQ=w1200.jpg

Cut out the factory rear upper bracket and made a similar one moved forward to clear the bump stop bracing. Made the rear line a single piece up to the distribution block.
OjaGONWTqmPI2UqQ69mv5bIO_KGRThJ1EBSIoZojzaZg=w1200.jpg

Cleaned up the factory distribution block and accumulator tee. I believe in 73 these got combined. They don't leak but I may get new o-rings for them as they are cheap and time to do it is now. The tee block has a diaphragm/spring setup to add a delay to the front brake pressure application, to balance timing as the drums are slower than discs. I actually put the distribution block in factory location with the original bracket.
Considering using AN lines for master cylinder connection.
HvSNgGtmMlL9va-kAfFJK78G_1cfzuKt6hVCw2ntoisA=w1200.jpg

I waffled on front brake line routing for a few weeks trying to determine the best setup. I went with this configuration, like a stock superduty. Note suspension is sitting almost at full droop. Used 15* banjo to AN3 fitting on the calipers. If there is a better way please suggest.
3egg3v61gWm0t8ZkYpzUqZkc6PLpyhomIyhpHoaFmX4g=w1200.jpg
 

Bigblue&Goldie

Well-known member
Joined
Mar 12, 2009
Messages
10,678
Location
AZ
I keep saying I'm going to avoid this thread, but I can't! Looks awesome dude!
 
Last edited:
OP
R

rattle_snake

Well-known member
Joined
Jun 25, 2015
Messages
5,194
Location
Chandler, AZ
Thanks guys. Getting dangerously close to considering putting cab back on. Lots of other pieces and parts to work on before fire up. I made a list, it is long.
 

PhantomEB

Well-known member
Joined
Feb 6, 2006
Messages
6,765
Location
Medicine Hat, AB, Canuckistan
Summit for the brake lines? I have over 17” of travel in mine and I been thinking how do I want to run the brake lines, similar to yours or down the links for maximum protection as well flex.
 
OP
R

rattle_snake

Well-known member
Joined
Jun 25, 2015
Messages
5,194
Location
Chandler, AZ
I can only imagine the list.

Devil is in the details!

Did you make a Gantt Chart? Use Microsoft Project?

CT

No, I avoid MS project at all costs. Every schedule I have made, management didn't like completion date so far out. So they got a 'project manager' who knew nothing about industry, product, technology or history to make one that fit in the unreasonable time frame. They all failed, as expected.
Since I sit in front of a screen for a day job I try to avoid using technology in my play time.

Summit for the brake lines? I have over 17” of travel in mine and I been thinking how do I want to run the brake lines, similar to yours or down the links for maximum protection as well flex.

A friend suggested the 'down the link' method, which is probably a better route. Needs 2 hoses per side, so more connections, complexity, line length, cost, work and so on.
:)
Once it's driveable, I can asses how it works and go from there.
 

Bears Fan

Well-known member
Joined
Jan 26, 2012
Messages
3,438
Location
Indiana
Damn! I'm thinking weld a couple of brackets on that frame, mount a seat and drive that chassis around like it is, because its way to purdy to cover it up with a cab and bed :lol: :pimpflash
 
OP
R

rattle_snake

Well-known member
Joined
Jun 25, 2015
Messages
5,194
Location
Chandler, AZ
Chassis is shaping up man !
It's getting there. Just add $!

Damn! I'm thinking weld a couple of brackets on that frame, mount a seat and drive that chassis around like it is, because its way to purdy to cover it up with a cab and bed :lol: :pimpflash

Actually those thoughts have crossed my mind. Build a cage and call it a day.

But a tube frame buggy has drawbacks for how I want to use it. Needs A/C to be able to enjoy 12 months a year. Sealed up cab with nice tunes.
:beer:
 
OP
R

rattle_snake

Well-known member
Joined
Jun 25, 2015
Messages
5,194
Location
Chandler, AZ
Barn door project compete. Ripped out the door jam and dry-walled the opening. Bullnose and texture came out OK. I try to avoid this type of work but I seem to get plenty of opportunities to hone my skills. Had to redo the base and add the goofy corners to match the rest of the house.

attachment.php
 

Attachments

  • 20200422_125851.jpg
    20200422_125851.jpg
    64.8 KB · Views: 324
Last edited:
OP
R

rattle_snake

Well-known member
Joined
Jun 25, 2015
Messages
5,194
Location
Chandler, AZ
Decided to paint the fuel tank black to help hide it from view. It's plated with Ni-terne, but I went ahead a painted anyhow. Hit it with scotchbrite and dish soap to remove all the waxy grease it is coated in and scuff the surface.

Got the 340 lph fuel pump installed. I was able to disassemble the connectors by making a special tool, and get a crimp pin off of the existing wiring. The Holley pump has larger wire and while it fits the resulting connection would not be as robust. Lower impedance yes but given where is is I choose reliability. So I spliced into the existing wiring and covered in heat shrink. Not sure how the heat shrink will do in fuel, but even if it dissolves it should not short out to anything. The pump assembly sits in a baffled compartment in the tank.

I started to swap in a ford fuel level sender but was not able to get reliable readings from it, even though it is only a few years old and functional. Although possible to physically get it to fit, I doubt the accuracy of the gauge would be very good. It wasn't even in the ford tank. So instead of spending a bunch of time retrofitting the pot, fabing a new arm, testing, calibrating and so on I left the Chebby sender alone. I think it will be more robust anyhow. I will solve at the cluster end, which is not submersed in fuel. There are a few ways to solve the problem.
Pvqpwdhu80MJ4cxOXZxan-4yumpPxX5qunfCTV05lhuA=w1200.jpg

All hooked up. All wiring and hoses long enough to drop tank out/in with bed on.
00BTUbDLoVrINChXzYvx32cHqElMwSSbPxFun6x9E70g=w1200.jpg

I added some closed cell foam to snuggle the tank into the mounts. There is also foam in between the 2x4 tube and tank to center it in the opening. Overall the tank setup worked out well.
LzkiXI-taKALD4OfFEdjWCgvWzlrTSHw0geq0pqw9TSw=w1200.jpg
 

nsula_country

Well-known member
Joined
May 23, 2013
Messages
1,534
Location
Northwestern Louisiana
Speechless... Painted the new fuel tank.

All I accomplished this week was removing PS pressure hose. Got ATF EVERYWHERE. Had some issues finding a competent parts house to make a hose. (story will come out in my thread) Did not want aftermarket BS. Replaced said hose and return for good measure. Bleed and it is now awesome.

Anyway. Using a Chevy fuel sender. What is the difference between GM and Ford resistance values? Ford is 10-72? GM is ?-? Going to use some resistors or other wizardry at the instrument end? I'm curious, for a friend.

CT
 
Last edited:
OP
R

rattle_snake

Well-known member
Joined
Jun 25, 2015
Messages
5,194
Location
Chandler, AZ
The GM is about the same range but opposite direction. The Ford one is non-linear also. Can solve the gain/offset with 2 resistors, but still leaves the other two issues.

The ford gauges are current/heat based and use a lot of current.
One option is to graft in an appropriate GM style gauge into cluster. While in there convert ammeter to voltmeter or trans temp. Perhaps upgrade the oil pressure and water temp to something newer that I can trust so I don't have to have an aftermarket one in addition. After spending big bucks on new motor, I don't trust the fragile cluster I have already fixed several times.

Another option is to build a converter with a op amp and FET, with provisions for calibration.
 

zmotorsports

ALLIANCE MEMBER
Joined
Oct 20, 2009
Messages
21,382
Location
Northern Utah
Nice job on the tank install Justin, and nice thinking to allow enough wiring and hose to drop the tank. That's one of my biggest pet peeves about dropping tanks.
 

OutlawDrifter

Well-known member
Joined
Jan 20, 2015
Messages
3,876
Location
KS
Nice work on the tank/sender.

Any reason not to upgrade the cluster all together? Dakota Digital makes 2 or 3 setups for that era of Ford, including ones that look analog. New Vintage USA makes an insert also, I believe. If I were going to drive it "often", and it I was spending your money, I'd spring for and updated cluster!
 
OP
R

rattle_snake

Well-known member
Joined
Jun 25, 2015
Messages
5,194
Location
Chandler, AZ
Nice job on the tank install Justin, and nice thinking to allow enough wiring and hose to drop the tank. That's one of my biggest pet peeves about dropping tanks.

Thanks. I bet I know who will have remove it next...

Nice work on the tank/sender.

Any reason not to upgrade the cluster all together? Dakota Digital makes 2 or 3 setups for that era of Ford, including ones that look analog. New Vintage USA makes an insert also, I believe. If I were going to drive it "often", and it I was spending your money, I'd spring for and updated cluster!

One of the things I like about the 67-72 generation is the dash and instrument cluster, so trying to keep it as original as possible. Not really a fan of the F600 round gauge style that some swap in, or similar aftermarket gauges installed in a flat panel.
Dakota makes one style that is is fairly close, but it is $800. Will work with either sender type. So an good option in the future if I want to spend that type of $.
The cluster, A/C, bumpers and some of the other systems will be the follow-on projects once I can get the truck running and driving.
 
To avoid these ads, REGISTER NOW!
Top Bottom