
You are using an out of date browser. It may not display this or other websites correctly.
You should upgrade or use an alternative browser.
You should upgrade or use an alternative browser.
Above 1200 Sq/FT Re-Purposed Machine Shop
- Thread starter hoyt
- Start date
Wokspaces above 1200 squarefeet.

Still on "vacation" recovering from triple bypass surgery and shoulder replacement surgery, hoping to start some light work in the shop next week and back to normal things after the New Year.
In the meantime, I have been watching a lot of TV, so I upgraded my Tivo from a 368GB hard drive to a 2TB hard drive so I can record many more car shows and WW2 stuff. An Amazon Firestick keeps me in movies.

I sold my first Logan 400 lathe over the summer and got the second one assembled just before my shoulder surgery, but quickly determined that the headstock bearings needed replacement. Since none of the headstock components are too heavy for my new shoulder, I'll order new bearings and have them replaced soon.

I also have new bearings for the Atlas drill press, but working with my arms up that high might need to wait.

In the meantime, I have been watching a lot of TV, so I upgraded my Tivo from a 368GB hard drive to a 2TB hard drive so I can record many more car shows and WW2 stuff. An Amazon Firestick keeps me in movies.
I sold my first Logan 400 lathe over the summer and got the second one assembled just before my shoulder surgery, but quickly determined that the headstock bearings needed replacement. Since none of the headstock components are too heavy for my new shoulder, I'll order new bearings and have them replaced soon.
I also have new bearings for the Atlas drill press, but working with my arms up that high might need to wait.
Attachments


gasgas17
Well-known member
I had open heart surgery last January. I feel some of your pain. I still have to hold my diaphragm when I sneeze.
Seagoon
Well-known member
I just found your thread today and have read it all. Nice shop and interesting projects .
Just one question - did the TR3 ever get off for stripping and back for reassembly or is it still waiting?
Just one question - did the TR3 ever get off for stripping and back for reassembly or is it still waiting?
I just found your thread today and have read it all. Nice shop and interesting projects .
Just one question - did the TR3 ever get off for stripping and back for reassembly or is it still waiting?
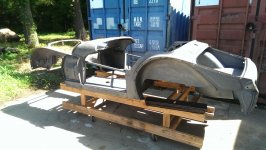
All stripped and awaiting some serious metal bumping. Notice the crappy patch panel son the rockers, held on with pop rivets and slathered in Bondo. The front inner fender are all beat to hell.
Attachments
Seagoon
Well-known member
It's amazing how people will bodge repairs on nice cars. Pop rivets on an old beater maybe but not on a roadster that needs all the torsional stiffness that it can find.
What's worse is that the repairs were done by a professional who can paint well, but cannot do repairs properly. I have replacement rockers, a few of the available patch panels and some rudimentary skill at actual metal repair. I just need to be cleared by my doctors to begin the work, hopefully within a month, and am eagerly looking forward to it.
Finally, some progress on the workshop!
I have given away two pieces of "antique" furniture that me wife and daughter have stored here for several years and no longer have any interest in "restoring". As well, I've tossed a few things that are broken (I'll probably find a use for them next month.)
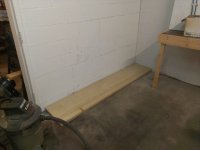
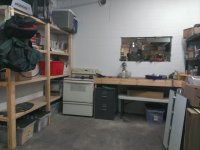
I salvaged some shelving from when we sold the family business and I just needed to shorten the 96" shelves by 6" to fit the new location.

I also need to shorten the workbench to accommodate a range I'll use for powder coating.


This room is not color-coded like my other rooms and I might need to add a stripe, maybe orange or purple, or maybe not.
I have given away two pieces of "antique" furniture that me wife and daughter have stored here for several years and no longer have any interest in "restoring". As well, I've tossed a few things that are broken (I'll probably find a use for them next month.)
I salvaged some shelving from when we sold the family business and I just needed to shorten the 96" shelves by 6" to fit the new location.
I also need to shorten the workbench to accommodate a range I'll use for powder coating.
This room is not color-coded like my other rooms and I might need to add a stripe, maybe orange or purple, or maybe not.
Attachments


I'm replacing the spindle bearings on my Atlas No.64 drill press today.
A parts sheets for the Drill Press is at http://www.vintagemachinery.org/pubs/51/10550.pdf
This discussion was helpful, but I ran into a few problems because one of the previous owners had disassembled the machine and messed a few things up (bent spindle and a retaining pin missing). I've fixed those and will have it back together today.


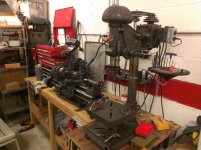
I came down with a bad cold lasting almost a week, so I only today finished replacing the bearings on mt Atlas No.64 drill press and adding speed reduction pulleys and oiling everything. It now runs quiet and true. Next up: replacing the headstock bearings on the Logan 400 lathe.


Also, Thanks to member JZiggy for making the speed reducer! Nice work!
Also, Thanks to member JZiggy for making the speed reducer! Nice work!
Attachments


Last edited:

Thanks for the shoutout, glad that the pulley is working out for you! I'm glad we decided to make one with a "lift kit" so that you can run the head casting at full height.
I had to be careful adjusting the belt tension. V-belts like to run a little loose and at first I over-tightened the belts and got a little deflection on the "lift kit" shaft, so I backed off a little and the system works just fine. A little slip under heavy load or binding is a good thing for operator safety.

Good to see you back out in the garage having fun! Don't over do it, but I'm sure your wife has already told you 
The drill press looks like the same year as my Craftsman, I do believe my Craftsman was made by Atlas.
Nice job on getting the Lathe back together
The drill press looks like the same year as my Craftsman, I do believe my Craftsman was made by Atlas.
Nice job on getting the Lathe back together
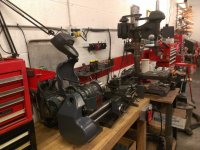
New Addition to the Shop
There's a new addition to the workshop, a 1973 Bridgeport 2J mill. I acquired it in an auction from a local business that is being "consolidated" and they were selling off the equipment. Ill be able to transport it to my shop by the end of the week and can give it a quick clean-up and get it under power (it's 240V, 3-Phase and I have that service) and "make some chips" with the limited tooling I have on hand (a few cheap endmills). Of course, buying the machine (only $1,000 delivered) is just the down payment on the thousands of dollars in tooling that will be acquired along the way.


There's a new addition to the workshop, a 1973 Bridgeport 2J mill. I acquired it in an auction from a local business that is being "consolidated" and they were selling off the equipment. Ill be able to transport it to my shop by the end of the week and can give it a quick clean-up and get it under power (it's 240V, 3-Phase and I have that service) and "make some chips" with the limited tooling I have on hand (a few cheap endmills). Of course, buying the machine (only $1,000 delivered) is just the down payment on the thousands of dollars in tooling that will be acquired along the way.
Bridgeport Mill Update
Some cleanup on the mill. I need to disassemble it to get it into the room it will live in, so as I take it apart, I'll check it over. I've noticed a few problems already: the ram is stuck, the turret is stuck and the collet alignment screw is missing/broken. Two tough problems, one easy problem.
The table cleaned up well so far using a razor blade and diesel fuel for lubricant. I'm not concerned about the horrible paint job, so using Purple Power degreaser is OK since I don't care that it is softening the paint.
I have 220V 3 phase power in the workshop, but I'll need to run it to the machine. I'll use 12AWG, 3 conductors plus a neutral (for single phase 120V for any future power feeds) and ground (for safety). I have the wire, and just need to buy the conduit.
Last edited:
Bridgeport Mill Update
I've made some progress. The ram now moves back and forth, The turret spins around. The quill lock is cleaned and lubricated meaning the quill will now move up and down. Someone welded the quill lock handle to the quill lock bolt so it could not be removed and a little grinding fixed that problem, but I'll need a new handle.
I'll need to remove the table to move the machine into the room it will live in and I'll clean the table, saddle and knee at that time and re-work the oiler. It seems the DPO (damn previous owner) welded the Y-axis handle on, so I'll need to carefully grind that weld off. (sigh . . .)
Last edited:
bugnut
ALLIANCE MEMBER
Hoyt, on the mill they make a quill lock with an adjustable handle. I got one off ebay and found it works better for my fat fingers.
Hoyt, on the mill they make a quill lock with an adjustable handle. I got one off ebay and found it works better for my fat fingers.
This one?
https://www.ebay.com/itm/1X-Milling...-Brass-Sleeve-Vertical-Mill-Tool/184223163190

bugnut
ALLIANCE MEMBER
This is the link https://www.ebay.com/c/1419382036
looks like this, uses the tapered brass nut pieces you have, and the handle is spring loaded so you can move to the most convenient location.

looks like this, uses the tapered brass nut pieces you have, and the handle is spring loaded so you can move to the most convenient location.
Last edited:
This is the link https://www.ebay.com/c/1419382036
looks like this, uses the tapered brass nut pieces you have, and the handle is spring loaded so you can move to the most convenient location.
Nice. One is on its way . . .
The previous owner welded the handle to the lock and, of course, it had to be damaged to remove it (the quill lock was stuck), so this will be a nice replacement. Thanks for the recommendation!
Last edited:
Milling Vise
This is the milling vise that came with the mill. I scraped over two pounds of swarf, rusty ****, dirt and oil off of it.
There are no markings on it, but it appears to be a Kurt clone. I'll clean it up and indicate it to see if it will be usable on the mill. Otherwise, it could end up as a drill press vise.
bugnut
ALLIANCE MEMBER
Good on the handle, hope you like it. Vise looks like it has done a lot of work. A swivel base is nice they come up for sale when shops close. Bases are NOT interchangable, don't ask how I know.
Jaytree
Well-known member
Nice. One is on its way . . .
The previous owner welded the handle to the lock and, of course, it had to be damaged to remove it (the quill lock was stuck), so this will be a nice replacement. Thanks for the recommendation!
Waiting to see if the quill lock works on your BP. If it does I will pull the trigger on one for my J1 that is lacking one. The Ebay listing says it "Fits most importing mills from Taiwan or China" so one would surmise it would fit an actual Bridgeport.
I like the spring loaded handle position option.
Jaytree
Bridgeport Quill Lock Fix
When inspecting the Bridgeport head for the first time, I noticed that the quill would not move up and down. After a little investigation, I determined that the brass quill lock sleeves were stuck in place. No problem, I thought, just back out the quill lock bolt in steps and, using a soft-faced hammer, gently tap the threaded sleeve out and then use a brass punch to tap the un-threaded sleeve out, clean, lubricate and re-assemble. Problem solved?


What I quickly discovered was that the lock handle had been welded to the bolt and I needed to use a die grinder to grind out the weld. Oddly, the threads on the handle were undamaged and could have been held in the bolt with some blue Loctite. Why was it welded? I am puzzled, but there is evidence of other such repairs.

Here, you can see that the Y-axis ballcrank has been welded in place. That will take some finesse with a Dremel and some diamond burrs.
Since I needed to order some new parts, I did a few Internet searches and could see that the quill lock was the subject of many modifications since the original design has some issues.
Member Bugnut suggested this replacement
https://www.ebay.com/c/1419382036
and I ordered one. It arrived today.
It was easy to install. It just needed to be disassembled first.


One of the complaints about the lock is that gravity works against you, always pulling the handle down towards the lock position. Once loosened, the handle can be re-positioned straight up and out of the way.

This quill lock works as advertised and overcomes the deficiencies in the original design. If only all problems were this easy to resolve . . .
When inspecting the Bridgeport head for the first time, I noticed that the quill would not move up and down. After a little investigation, I determined that the brass quill lock sleeves were stuck in place. No problem, I thought, just back out the quill lock bolt in steps and, using a soft-faced hammer, gently tap the threaded sleeve out and then use a brass punch to tap the un-threaded sleeve out, clean, lubricate and re-assemble. Problem solved?
What I quickly discovered was that the lock handle had been welded to the bolt and I needed to use a die grinder to grind out the weld. Oddly, the threads on the handle were undamaged and could have been held in the bolt with some blue Loctite. Why was it welded? I am puzzled, but there is evidence of other such repairs.
Here, you can see that the Y-axis ballcrank has been welded in place. That will take some finesse with a Dremel and some diamond burrs.
Since I needed to order some new parts, I did a few Internet searches and could see that the quill lock was the subject of many modifications since the original design has some issues.
Member Bugnut suggested this replacement
https://www.ebay.com/c/1419382036
and I ordered one. It arrived today.
It was easy to install. It just needed to be disassembled first.
One of the complaints about the lock is that gravity works against you, always pulling the handle down towards the lock position. Once loosened, the handle can be re-positioned straight up and out of the way.
This quill lock works as advertised and overcomes the deficiencies in the original design. If only all problems were this easy to resolve . . .
Last edited:

scooterbum46
Well-known member
 Would I get cross thread points if I asked what kind of wood you planned on milling? Great thread, I've read it all... looking forward to more.
A router could be considered a wood mill and I also have a router table. I claim ligneous skills as well.
A planer gauge was designed to set the height on metal planers. Now it's used an as inside gauge to set the height of any tool.
Last edited:
Kurt Clone Vise Done!
The Kurt clone milling vise is as cleaned up as it's going to be.
You'll notice and extra removable jaw on this 65-pound vise. There was a trough worn in front of the fixed jaw. I could have had the vise body precision ground and mostly eliminated it (it would not allow a parallel to sit level as it was), but rather than that, I just sistered a second, new jaw to it. Problem solved for $37 and I now have a nice surface to indicate to. If I need better precision than this offers, I'll spent the $650+ to get a real Kurt vise.
Since it's not a Kurt, I chose to paint it Baby Seal Black (Benjamin-Moore High Gloss Metal, Wood Enamel, Oil Base (Alkyd), Deep Base C-133 3B, Color ID. 2119-30, Color Name: Baby Seal Black, Color Book 133, the OEM color of Logan Lathes, since I already had a quart of that) rather than the bright blue Kurt uses.
Last edited:
ODIS
Well-known member

Very nice looking machine!During transport of my mill, we swung the head unit to it’s lowest position and lost some oil or grease from the head. Do you know what weight oil/grease lubicates the head unit?
Thank you.
Odis.
These lubricants are used in the Bridgeport:
https://www.icai-online.com/Lubriplate-B-105-Grease.html
https://www.icai-online.com/mobil-ep-1-grease.html
https://www.icai-online.com/Bridgeport-Spindle-Oil-Quart.html
https://www.icai-online.com/Bridgeport-Way-Lube-Quart.html
And a manual can be found at http://www.truetex.com/bridgeport-manual.pdf.
Chapter 3 deals with lubrication.
Only the spindle oil has low enough viscosity to leak out like that. A properly lubed BP will always leak some small amount of oil.
Last edited:
ODIS
Well-known member
Wonderful! Thank you!
Heat Load Reduction
I have two 36x36 skylights in my workshop that can really heat up the workshop on sunny days. I sprayed a translucent coat of white paint on the inside, and saw a 10 degree drop in temp just under the skylight.

painted

un-painted
I still get some natural light from them and it has made a significant difference in how hot the interior gets. Why didn't i do this 9 years ago when I moved in comma dammit?
I have two 36x36 skylights in my workshop that can really heat up the workshop on sunny days. I sprayed a translucent coat of white paint on the inside, and saw a 10 degree drop in temp just under the skylight.
painted
un-painted
I still get some natural light from them and it has made a significant difference in how hot the interior gets. Why didn't i do this 9 years ago when I moved in comma dammit?
Last edited: