To avoid these ads, REGISTER NOW!

Redneck HotTub Build Thread

OP
F

ForceFed70

Well-known member
Joined
Apr 27, 2010
Messages
3,441
Location
BC, Canada
I'm stuck and could use your guy's advice.

I'd like to build a step/bench into the tub. Something that the kids can sit on and keep their heads above water comfortably and can also do double duty as a step for entering the tub.

It'll also have the benefit of displacing some of the water in the tub making it easier to heat and fill.

Problem is that I have no idea how to accomplish this. I'm thinking maybe I could build a step out of wood/plywood then cover in fiberglass? Is this something that someone with no fiberglass experience could do? It doesn't need to be pretty but I don't want it looking horrible or being rough and uncomfortable to sit/stand on.

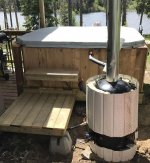
Here's a pic, I'm thinking about making something that would rest on the 1st ridge up and cover maybe 1/4 of the tub bottom? The grey line indicates approximately where I'd like the step to be.
attachment.php
 

Attachments

  • Empty Tub2 - step marked.jpg
    Empty Tub2 - step marked.jpg
    100.7 KB · Views: 987
To avoid these ads, REGISTER NOW!

Shiftless

Well-known member
Joined
Mar 9, 2014
Messages
14,464
Location
East Bay SFO
Good idea to have a bench.
But if you make it out of fiberglassed plywood and sealed to displace water as you described, it will have an upward force due to buoyancy of about 200 pounds.
Too bad you can't find an old fiberglass spa with a broken pump on Craiglist in the free section.

Since you are going "redneck" how about finding some 2 gallon plastic buckets with lids. Prepare them for seat duty by filling them about half way with concrete. Voila! Moveable seats!
 
Last edited:
OP
F

ForceFed70

Well-known member
Joined
Apr 27, 2010
Messages
3,441
Location
BC, Canada
Good idea to have a bench.
But if you make it out of fiberglassed plywood and sealed to displace water as you described, it will have an upward force due to buoyancy of about 200 pounds.
Too bad you can't find an old fiberglass spa with a broken pump on Craiglist in the free section.


Are you sure? I think it'll be no different than if the tub was molded with a step in it. Wouldn't it only become buoyant if I allow the water to get "under" it? How is this not a problem in every hot tub/spa?
 

Brian_WK

Well-known member
Joined
Jun 30, 2015
Messages
1,177
Location
NE South Dakota
I wouldn't go with wood and fiberglass if you seal it to the tank the weight of the water or any warping of the tank is going to break the bond to the seat and water will get behind it in it etc. Most plastics are very hard to get adhesion to unless you are using some sort of thermal bond.
You could build a form made of plastic and then fill with concrete. Possibly expanding foam then fiberglass and have it mechanically pinned to the tub.

Brian
 
OP
F

ForceFed70

Well-known member
Joined
Apr 27, 2010
Messages
3,441
Location
BC, Canada
I wouldn't go with wood and fiberglass if you seal it to the tank the weight of the water or any warping of the tank is going to break the bond to the seat and water will get behind it in it etc. Most plastics are very hard to get adhesion to unless you are using some sort of thermal bond.
You could build a form made of plastic and then fill with concrete. Possibly expanding foam then fiberglass and have it mechanically pinned to the tub.

Brian

Thank-you! :beer:

Yes, I was afraid of that. And I'm not liking the idea of putting a bunch of concrete into the tub. I have to carry this tub across a lake in a small fishing boat. Perhaps I won't put a step in. It is only 24" deep after all.
 
Last edited:
OP
F

ForceFed70

Well-known member
Joined
Apr 27, 2010
Messages
3,441
Location
BC, Canada
Since you are going "redneck" how about finding some 2 gallon plastic buckets with lids. Prepare them for seat duty by filling them about half way with concrete. Voila! Moveable seats!

Good idea. I'm thinking it's a little too redneck tho.

What do you think about cutting the legs off of those cheap outdoor plastic chairs? Won't displace any water, but I think they'd be close to neutral buoyancy, look better, and be a lot more comfortable.
 

TractorJeff

Well-known member
Joined
Dec 8, 2013
Messages
3,309
Location
Elkhorn, WI
You guys are over thinking this steam issue on a thermosiphon! Look up old/antique one cylinder engines which were very often thermosiphon! You'll find that you are all over engineering a simple design!
 

Muzzy

Well-known member
Joined
Jun 20, 2015
Messages
335
Location
Northeast PA
As a seat, maybe one of those kid sized plastic picnic table benches?
You see them all the while at garage sales.
Fill it with sand when you get it to the cabin.
 
Last edited:
OP
F

ForceFed70

Well-known member
Joined
Apr 27, 2010
Messages
3,441
Location
BC, Canada
Why not a couple of cedar planks cut to fit the half moon shape?

You guys are over thinking this steam issue on a thermosiphon! Look up old/antique one cylinder engines which were very often thermosiphon! You'll find that you are all over engineering a simple design!

Cedar will float, I'd need to weight it down somehow. Tho I may end up doing something like this. It doesn't end up displacing the water I'd like it too, but at least I'd have the step/bench.

I hope I'm overthinking it. I looked at a lot of working examples out there via google and I can't see why mine won't work if there's did.

I wonder if expanding foam would be sticky enough to stay stuck on the bottom rather than floating to the top?
 

Shiftless

Well-known member
Joined
Mar 9, 2014
Messages
14,464
Location
East Bay SFO
Good idea with the plastic chairs. They will probably float but would be easy enough to tuck underneath your **** to sit on. You could upgrade by bolting a salmon weight or something similiar to each shortened leg if you need it to sink.
I agree with Brian that gluing on a plywood box is a bad idea. It is almost bound to leak and the last thing you want is a wooden box partially filled with bacteria laden water oozing in and out into your "bath" water. Those Rubbermaid tanks are flexible. I use the smaller version here for a home made biological fish pond filter. I wouldn't bet on being able to glue anything to the inside under water. Even epoxy might crack off.

Have you found those 2 piece plastic bulkheads for making plumbing connections through the tank wall? I use one for my pond filter outflow. You can probably make use of the built in drain plug fitting that came pre installed with your stock tank, right?

Think about it...There is a big difference in a commercially molded one piece fiberglass shell with the seats formed in and your wooden box idea. The tub shell is molded in one piece..nothing to break loose. Then the shell is dropped into a big wooden enclosure and in most cases completely back filled with expanding foam insulation.
 
Last edited:

Shiftless

Well-known member
Joined
Mar 9, 2014
Messages
14,464
Location
East Bay SFO
creativecars:
Another good idea for seating. If the pipes were open, buoyancy wouldn't be a problem.

BTW, I recently needed to bend some Sched.40 PVC. I found that by capping off one end and filling the pipe with hot dry sand (350 degrees) is was easy to bend to whatever shape you need. The sand keeps it from kinking. Make sure to wear gloves and just let it cool down before you pour out the sand and cut off the cap. Use a metal funnel to add the sand.
 
Last edited:

sean Buick 76

Well-known member
Joined
May 7, 2013
Messages
3,221
Location
Edmonton Alberta
Can you use "hardiplank"??? for the benches? When I was a kid we had a 8 foot round cedar hot tub with steel bands holding it together. No sealant just custom cut wood and it sealed as the wood swelled up. It had an aluminum fireplace built into it with a wooden lattice fence so no one ever got burned... Was a COOL setup! I will try to find pics if you want... I know it is not what you are doing but along the same lines.

By the way I love the project this is cool!!! More pics of the cabin and area?? I am from BC and miss it a lot!
 
Last edited:
OP
F

ForceFed70

Well-known member
Joined
Apr 27, 2010
Messages
3,441
Location
BC, Canada
Picked up the materials for the skirting/surround today.

Couple sheets of plywood, some pressure treated 2x4's and 1x6's, and 3" sheet of foam board.

I'm going to pre-build and assemble as much as possible.
attachment.php
 

Attachments

  • SkirtingMaterials.jpg
    SkirtingMaterials.jpg
    96.7 KB · Views: 801
OP
F

ForceFed70

Well-known member
Joined
Apr 27, 2010
Messages
3,441
Location
BC, Canada
For those of you wanting more pictures of the cabin.

Added a bedroom last year. Mostly finished in this picture but stills needs trim and soffit.
attachment.php


Here's a view from the deck in the winter. Kids love the chuckwagon sleigh and the ATV with tracks pulls it really well.
attachment.php
 

Attachments

  • Cabin2.jpg
    Cabin2.jpg
    122.4 KB · Views: 804
  • ATVandChuckwagon.jpg
    ATVandChuckwagon.jpg
    149 KB · Views: 1,231
OP
F

ForceFed70

Well-known member
Joined
Apr 27, 2010
Messages
3,441
Location
BC, Canada
Here's where I'm at today.

Tub framing is done, along with foamboard and layer of plywood cut to size beneath the tub.

I'm building it such that the tub framing can easily come apart in 4 pieces for transport to the cabin. I'm hoping to pre-build as much as possible at home.

attachment.php
 

Attachments

  • Tub Framed.jpg
    Tub Framed.jpg
    101.5 KB · Views: 742
OP
F

ForceFed70

Well-known member
Joined
Apr 27, 2010
Messages
3,441
Location
BC, Canada
I plan to put a layer of plywood down for the top surface.

What should I use to cover/protect the plywood? I'll have a cover overtop, and I suspect I'll wrap the whole tub in a tarp between trips. But it still needs to be able to handle a wet environment.

I've ruled out Tile. I **** at tiling, every single tile would need to be cut, and I'd need to do all of that work up at the cabin.

My next choice was to apply a layer of melamine. However, I didn't realize how flexible it is. I'm not confident I can cut and fit it nicely. Plus - wow is it expensive to buy!

Currently my best idea is to use some of that "Roll on decking" material. Basically a thick durable paint.
 
To avoid these ads, REGISTER NOW!
OP
F

ForceFed70

Well-known member
Joined
Apr 27, 2010
Messages
3,441
Location
BC, Canada
I would use some cedar or even just pressure treated decking. No need to use plywood at all.

Thanks. I was thinking the same thing except I should have mentioned that I want to keep it dry in there. I'll be filling the inside with insulation and don't want mold or critters growing in there.
 

Shiftless

Well-known member
Joined
Mar 9, 2014
Messages
14,464
Location
East Bay SFO
Don't forget that once you fill it up with water it will weigh over 2,000 pounds. Is the bottom just going to rest on the dirt?
Have you considered putting it up on a frame of PT 2x4s which would sit up on concrete pier blocks? These are what I used for my latest ground level deck build. Two by lumber slides right in to the slots. The center hole is sized for a 4x4 post.
As I said before, the most important place to use insulation is on the top. Plus, consider the need for sealing off air flow between the edges of your tub and the cold outside air. Hot steamy air will want to escape upward. Maybe some foam spaghetti kiddie pool floats would be appropriate.
 

Attachments

  • image.jpg
    image.jpg
    118.9 KB · Views: 43
Last edited:
OP
F

ForceFed70

Well-known member
Joined
Apr 27, 2010
Messages
3,441
Location
BC, Canada
Don't forget that once you fill it up with water it will weigh over 2,000 pounds. Is the bottom just going to rest on the dirt?
Have you considered putting it up on a frame of PT 2x4s which would sit up on concrete pier blocks? These are what I used for my latest ground level deck build. Two by lumber slides right in to the slots. The center hole is sized for a 4x4 post.
As I said before, the most important place to use insulation is on the top. Plus, consider the need for sealing off air flow between the edges of your tub and the cold outside air. Hot steamy air will want to escape upward. Maybe some foam spaghetti kiddie pool floats would be appropriate.

Thanks!

Additional decking resting on deck blocks is exactly what I plan to do. The boiler needs to sit at least 12" lower than the tub so the decking will allow for that while keeping the tub off the dirt. Tho I'll go with heavier framing than 2x4's as I think the weight will be closer to 3000lbs. Thinking 2x8 outer edge with 2x6 stringers.

The edges of tub will be insulated with roxul batt insulation, I figure I can fit about R20 or so in there.

For the top I'm hoping to find a regular used hot-tub cover for a decent price.
 
OP
F

ForceFed70

Well-known member
Joined
Apr 27, 2010
Messages
3,441
Location
BC, Canada
Final update before spring.

Got as much done in the shop as I can. Now I need to wait until the snow is gone and I can start hauling material.

Here's a pic of the tub pre-assembled. In this pic everything is just barely held together with only 1 out of 4 fasteners used. It needs to all come apart for transport to the cabin.

The plywood on top will be covered with a roll on decking material. I've already applied a 1st coat (not pictured) the 2nd coat will be applied during final assembly at the cabin.

Still looking for a used hot-tub cover that I can modify to fit my redneck tub.

attachment.php
 

Attachments

  • Tub Pre-assembled.jpg
    Tub Pre-assembled.jpg
    136.3 KB · Views: 857

couch67

Well-known member
Joined
Mar 18, 2016
Messages
1,400
Location
Ontario Canada
Great project, I will be watching this with interest. Seeing your stove, it reminded me of my days growing up with outdoor saunas at our home, cottage, and hunt camp (my grandparents were Finn). The saunas were wood-burning, and had hot water tanks heated with a coil in the stove. The tanks were in the 40-50 gallon range, and took only a few hours to heat to a rumbling boil with a good fire going. The stoves, built by my father, had only a single loop coil in the stove. Your design will have much more water heating capability with those coils.

You might want to consider a remote temperature sensor so you can keep an eye on things while its heating up (and so you can close the stove damper / take the cover off when it gets too hot!).

Good luck with the rest of your build.

couch

And I couldn't resist - the ultimate red-neck hot tub:http://www.modelcarsmag.com/forums/topic/41292-fort-mcmurray-hot-tub/
 
OP
F

ForceFed70

Well-known member
Joined
Apr 27, 2010
Messages
3,441
Location
BC, Canada
Thanks couch!

A remote temp sensor is a great idea. I was planning to use a floating thermometer (and still will) but the remote sensor should prevent a lot of opening the lid.

Thanks for the link! Didn't realize what type of forum it was or read any text. Just started looking through the pics. Took way too long before I realized! Great skill there!
 

forAK

Well-known member
Joined
Nov 11, 2015
Messages
380
Location
Peters Creek AK
Great build! Looks like a good time to be had out at the lake.

Just curious - Why not haul it out in the winter via sled/snowmobile? I've seen bigger items hauled out in the winter which is easier than summer.
 
OP
F

ForceFed70

Well-known member
Joined
Apr 27, 2010
Messages
3,441
Location
BC, Canada
Great build! Looks like a good time to be had out at the lake.

Just curious - Why not haul it out in the winter via sled/snowmobile? I've seen bigger items hauled out in the winter which is easier than summer.

Thanks!

Great question. Sledding it in is a good idea and I have the machine to do it. I've done it in the past. But I prefer to transfer material in the summer with the boat.

The reason is the road up to the lake. It's nothing crazy you don't need 4wd in the summer, but it's also not a road most people would attempt in a car. In the winter tho, it gets a lot more challenging. It's sorta plowed, but often very icy/rutted and not wide enough to pass a vehicle coming the other way except in key spots. Plus, I need to drag a trailer up with me as the machine takes up the box of the truck leaving no room for material. When I do make it to the lake, turning around and unloading with a trailer is a challenge as the area isn't plowed and 4' deep snow this time of year.

I've found I'm better off in the summer using the boat although it's a lot more physical work (loading/unloading and packing up from the lake) than sledding it across.
 
OP
F

ForceFed70

Well-known member
Joined
Apr 27, 2010
Messages
3,441
Location
BC, Canada
Spring has finally sprung! Spent a few days on the project.

1st step was building the water system for the cabin. The idea being that it would be this same system that's used to fill the tub. Everything worked out great. The design is pretty simple. Oldschool gas powered briggs and stratton water pump, 1.5" water line, and a 50 gallon barrel on the roof (sorta). There is a T in the line that will be used to fill the tub. Very pleased with the results, gravity fed water is ample flow (careful consideration into fixtures and plumbing used to maximize flow with low pressure) and the barrel fills in only a few minutes.

attachment.php
 

Attachments

  • Water System.jpg
    Water System.jpg
    155.5 KB · Views: 630
OP
F

ForceFed70

Well-known member
Joined
Apr 27, 2010
Messages
3,441
Location
BC, Canada
Here's a pic of the pump. Well, not really, it's a pic of the pump enclosure with the lines running to/from the pump. Forgot to snap a pic with the cover removed.

It's just some pressure treated lumber and a rubermaid tub as a cover.

attachment.php
 

Attachments

  • Water Pump.jpg
    Water Pump.jpg
    159.2 KB · Views: 647
OP
F

ForceFed70

Well-known member
Joined
Apr 27, 2010
Messages
3,441
Location
BC, Canada
Also got the decking built. Nothing fancy here. Pressure treated lumber and lots of deck blocks to handle the weight.

Smallest shop foreman and SWMBO approved!

attachment.php
 

Attachments

  • Tub decking.jpg
    Tub decking.jpg
    150.2 KB · Views: 651

Jackfre

Well-known member
Joined
Dec 26, 2010
Messages
4,406
Location
N CA
I'm late to this one. A lot of work and a nice build. The next time you need to roll that soft copper fill it with a fine sand and bend the ends closed. It will retain its shape and you simply cut of the bent ends when formed. I used to heat hot tubs by running a coil of copper on the sides of the tubs at the bottom. I did a bunch of these with solar thermo-syphoning to the tub as well. Depending upon orientation and grade it may be a way to heat the tub through the day as use will primarily be at days end, yes?
As to making a bomb, you have two ball valves there. Should they be closed and a fire in the burner you have created the closed loop. I used to do a lot of wood fired hydronic heating and I'd line up relief valves so I could sleep at night. I'd probably remove the handles on the valves and put them where you know where they are, so some well intentioned meathead doesn't create a problem for you and themselves.
Out of curiosity, how are you heating your hot water?
 
OP
F

ForceFed70

Well-known member
Joined
Apr 27, 2010
Messages
3,441
Location
BC, Canada
Thanks for the info and suggestions! The pipe only slightly deformed when bending so I wouldn't bother filling with sand if I was going to do it again although I did hear of that method and will give it a try if I do run into problems in future projects.

With both valves closed there is still an open path to atmosphere via the "surge tank". There is no way to create a pressure situation. My biggest concern is some sort of a steam flash in a situation where the boiler was lit without water inside, then water is added later resulting in instant boiling/steam. Removing the handles is a good idea - I think I'll use that suggestion. Thanks!

Not sure I understand your last question. I'd say wood heat/boiler but it's obvious you've seen the previous posts showing the build of the boiler already. Lots of firewood onsite. Mostly pine, spruce, and fir.
 

Shiftless

Well-known member
Joined
Mar 9, 2014
Messages
14,464
Location
East Bay SFO
FF:
Thanks for the update. Congrats on the fine progress you have made. You certainly had some challenges but you seem to have handled them fine. :beer:
 
OP
F

ForceFed70

Well-known member
Joined
Apr 27, 2010
Messages
3,441
Location
BC, Canada
Well, time for some end of season updates. Finished building the tub in May, and worked out the final kinks in June. Been using it all season with great success.

Here's a pic of the tub partially assembled at the cabin. This pic shows the insulation well. 3" of Styrofoam under the tub, rockwool insulation around the sides.


attachment.php
 

Attachments

  • HotTub w insulation.jpg
    HotTub w insulation.jpg
    119.4 KB · Views: 495
Last edited:
OP
F

ForceFed70

Well-known member
Joined
Apr 27, 2010
Messages
3,441
Location
BC, Canada
Insulation all done and moisture barrier (6mil poly) installed.

attachment.php
 

Attachments

  • HotTub w vapor barrier.jpg
    HotTub w vapor barrier.jpg
    71.9 KB · Views: 488
OP
F

ForceFed70

Well-known member
Joined
Apr 27, 2010
Messages
3,441
Location
BC, Canada
Finished tub and boiler.

In this pic you can see that I wrapped the boiler in fireproof insulation to improve efficiency and safety around the kids.

attachment.php
 

Attachments

  • HotTub finished.jpg
    HotTub finished.jpg
    85.4 KB · Views: 488
Last edited:
OP
F

ForceFed70

Well-known member
Joined
Apr 27, 2010
Messages
3,441
Location
BC, Canada
And the family enjoying their 1st dip!

I'm happy to say that the tub works very well! Takes about 1hr to raise the temp 10*F. 50* water from the lake is at 100* after 5 hrs.

I did have 1 problem that needed fixing. Turns out the hot water coming out of the boiler was too hot for PVC and softened the PVC enough to cause a failure after having the boiler at full output for a few hours. Problem was resolved by a combination of 3 things:
- Switched to galvanized steel as much as possible for hot side.
- Removed pipe insulation on remaining hot side PVC.
- Switched remaining PVC piping (had to have some remain) to thicker (schedule 40?) pipe and fittings.

attachment.php
 

Attachments

  • HotTub 1st use.jpg
    HotTub 1st use.jpg
    68 KB · Views: 502
To avoid these ads, REGISTER NOW!
Top Bottom