To avoid these ads, REGISTER NOW!

Reorganization, it's like a renovation.

Status
Not open for further replies.

Red Leader

Well-known member
Joined
May 15, 2011
Messages
2,689
Location
Denver, CO
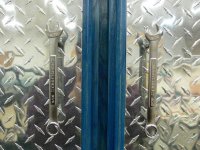
I like the flat wrenches for handles. If you can drill holes in the straight part and get some spaces to pull them out from the flat part of the drawer face, that would look awesome. The bent box end wrench idea is cool too, but if you use the box ends for the bolts to hold it on, you loose a little bit of the design of the wrench.

EDIT: wait, your making metal drawers, right? Scratch that. Either would be awesome:thumbup:

ps - thanks for the addition pictures of the press brake in action. I needed them:lol:

-RL
 
To avoid these ads, REGISTER NOW!
OP
G

GirlnAgarage

Well-known member
Joined
Jan 21, 2011
Messages
4,669
Location
Texas
I like the flat wrenches for handles. If you can drill holes in the straight part and get some spaces to pull them out from the flat part of the drawer face, that would look awesome. The bent box end wrench idea is cool too, but if you use the box ends for the bolts to hold it on, you loose a little bit of the design of the wrench.

EDIT: wait, your making metal drawers, right? Scratch that. Either would be awesome:thumbup:

ps - thanks for the addition pictures of the press brake in action. I needed them:lol:

-RL

Yessir, metal drawers. Didja see the video too?? :bounce: Did it just for you.
 

rickairmedic

Well-known member
Joined
May 31, 2005
Messages
4,165
Location
louisville ,Ky
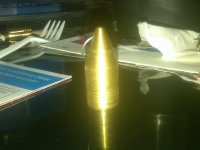
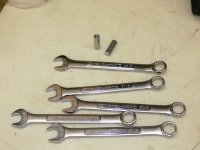
Ok so something kinda like this then :D yes I have been making more flashlights :D.


Rick
 

Attachments

  • 002.jpg
    002.jpg
    158.8 KB · Views: 166
  • 003.jpg
    003.jpg
    137.9 KB · Views: 180
  • 004.jpg
    004.jpg
    146.2 KB · Views: 162

mdbeck1

Well-known member
Joined
Mar 7, 2010
Messages
2,297
Location
Norman, OK
I like the flat wrenches for handles. If you can drill holes in the straight part and get some spaces to pull them out from the flat part of the drawer face, that would look awesome. ...

I was thinking about doing this for drawers in my shop. I was going to use some 1/4" drive sockets for spacers. I've got a whole drawer full of cheap china stuff.

Oh, and on the wrenches. Drill and TAP the holes. Put the screws in from the back so you don't see the heads. Or I guess you could weld coupler nuts onto the backs of the wrenches.

I don't have a welder so I'm kinda stuck using the drill and tap method.


....and since you sold all of the spares... You can use that as an excuse to go to the pawn shop and look at wrenches and sockets. :thumbup:
 

rickairmedic

Well-known member
Joined
May 31, 2005
Messages
4,165
Location
louisville ,Ky
I was thinking about doing this for drawers in my shop. I was going to use some 1/4" drive sockets for spacers. I've got a whole drawer full of cheap china stuff.

Oh, and on the wrenches. Drill and TAP the holes. Put the screws in from the back so you don't see the heads. Or I guess you could weld coupler nuts onto the backs of the wrenches.

I don't have a welder so I'm kinda stuck using the drill and tap method.


....and since you sold all of the spares... You can use that as an excuse to go to the pawn shop and look at wrenches and sockets. :thumbup:


Or if you had oh I dont know a watchmakers lathe you could make spacers out of aluminum round bar :D.


Rick
 

mdbeck1

Well-known member
Joined
Mar 7, 2010
Messages
2,297
Location
Norman, OK
Or if you had oh I dont know a watchmakers lathe you could make spacers out of aluminum round bar :D.


Rick

hmmmm.... I just MIGHT know where to find one of those. ...but I really was thinking hard about using those old sockets for spacers. Of course they are not all the same height so I would probably have to cut them down.... ....with say a real small metal lathe....:bounce:
 
OP
G

GirlnAgarage

Well-known member
Joined
Jan 21, 2011
Messages
4,669
Location
Texas
Pawn shop here I come!

The other thing I figured was just some round stock cut to length and tacked on. Not too worried about discoloration. It's welding, it happens.
 

rickairmedic

Well-known member
Joined
May 31, 2005
Messages
4,165
Location
louisville ,Ky
Well if we were going to just weld things together then the open ended wrenches with nuts welded into them from the backside . Then the screws could be run from inside the drawers through spacers into the nuts in the wrenches :D.


Rick
 

mdbeck1

Well-known member
Joined
Mar 7, 2010
Messages
2,297
Location
Norman, OK
Pawn shop here I come!

The other thing I figured was just some round stock cut to length and tacked on. Not too worried about discoloration. It's welding, it happens.

...but if you EVER wanted to take those handles off it would be a REAL pain.
 
OP
G

GirlnAgarage

Well-known member
Joined
Jan 21, 2011
Messages
4,669
Location
Texas
Well if we were going to just weld things together then the open ended wrenches with nuts welded into them from the backside . Then the screws could be run from inside the drawers through spacers into the nuts in the wrenches :D.


Rick


Ohhhh!! That would make for a neato visual.
 

ddrewyor

Well-known member
Joined
Dec 23, 2007
Messages
250
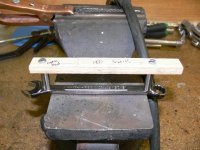
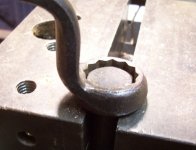
For handles I used bar stock that was cut to length and then threaded. I welded it to the backs of the Craftsman wrenches (made a jig for consistency) and then screwed it from behind to the cabinet door. Worked out pretty decent.

Dave
 

Attachments

  • 08.jpg
    08.jpg
    147.4 KB · Views: 391
  • 07.jpg
    07.jpg
    147 KB · Views: 346
  • 06.jpg
    06.jpg
    141.5 KB · Views: 352
  • 05.jpg
    05.jpg
    150.3 KB · Views: 278
  • 04.JPG
    04.JPG
    125.4 KB · Views: 280
OP
G

GirlnAgarage

Well-known member
Joined
Jan 21, 2011
Messages
4,669
Location
Texas
For handles I used bar stock that was cut to length and then threaded. I welded it to the backs of the Craftsman wrenches (made a jig for consistency) and then screwed it from behind to the cabinet door. Worked out pretty decent.

Dave

:bowdown: Dave those came out beautiful. I think they represent the idea perfectly when I picture the wrench handles.
 

mdbeck1

Well-known member
Joined
Mar 7, 2010
Messages
2,297
Location
Norman, OK
For handles I used bar stock that was cut to length and then threaded. I welded it to the backs of the Craftsman wrenches (made a jig for consistency) and then screwed it from behind to the cabinet door. Worked out pretty decent.

Dave

That's a pretty neat idea. I don't remember Girl having a lathe though. How about using coupler nuts welded on? ....or welding some allthread to the backs of the wrenches (and then put nuts on the insides of the drawer)?
 
OP
G

GirlnAgarage

Well-known member
Joined
Jan 21, 2011
Messages
4,669
Location
Texas
That's a pretty neat idea. I don't remember Girl having a lathe though. How about using coupler nuts welded on? ....or welding some allthread to the backs of the wrenches (and then put nuts on the insides of the drawer)?

I'd have to get Rick to do them for me. Then I'd owe him some pizza or something. :D


It would probably help to have a drill press to make holes in the stock. Then tap each.

The coupler nuts could work I think.


Wonder if instead of the bar stock, use threaded rod. Just cut it to length, tackit to the wrench, install jam nut then stick the ends through holes in the drawer. Secure with lock washer and cap nuts...acorn nuts...forget what they're called.
 
Last edited:

rickairmedic

Well-known member
Joined
May 31, 2005
Messages
4,165
Location
louisville ,Ky
The threade rod would work as well ( you just have to weld it outside as threaded rod is usually galvanised ) . How many drawers we talkin about again wouldnt be that hard for me to cut ,drill and tap a small pile of spacers in an evening on the lathe .


Rick
 
OP
G

GirlnAgarage

Well-known member
Joined
Jan 21, 2011
Messages
4,669
Location
Texas
I've got 10 total drawers. I'm halfway kicking around the idea of braiding up some leather handles. I know I'm crazy for thinking that. Braiding leather with one hand is a trip yall.

We'll see though. I like all the suggestions being thrown into the ring. Guess I'll have to think on it and narrow them down. :thumbup:
 
To avoid these ads, REGISTER NOW!

rickairmedic

Well-known member
Joined
May 31, 2005
Messages
4,165
Location
louisville ,Ky
Ok well then thats 20 spacers assuming one handle per drawer soooooooooo if you decide to go the wrench route just let me know and I will knock out the spacers .:D


Rick
 
OP
G

GirlnAgarage

Well-known member
Joined
Jan 21, 2011
Messages
4,669
Location
Texas
Ok well then thats 20 spacers assuming one handle per drawer soooooooooo if you decide to go the wrench route just let me know and I will knock out the spacers .:D


Rick


Mighty kind offer Rick. Thank you. I'd owe you so have your price in mind. Will let you know. :)
 

Outlawmws

Well-known member
Joined
Aug 9, 2011
Messages
39,297
Location
The Badlands
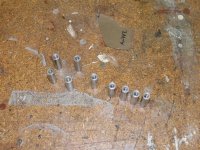
You can get threaded spacers already made up. They are hex on the outside and available in most thread sizes. They are called "couplers" as in all thread couplers. I'd guess 1/4" couplers would be about right without any cutting. Found either in the nuts and bolts isle, or wherever they stock all thread. A pic of some I had on hand; way too big but smaller are available.

attachment.php


Had another idea on the double box end. Get the correct bolt for the head and place it like this, and weld from the bottom. Grind flush and you're there. Probably better for a heavy door or gate, but you get the idea.

attachment.php
 

Attachments

  • Couplers.jpg
    Couplers.jpg
    68.8 KB · Views: 2,514
  • Box.jpg
    Box.jpg
    98.5 KB · Views: 2,518

Outlawmws

Well-known member
Joined
Aug 9, 2011
Messages
39,297
Location
The Badlands
That's a pretty neat idea. I don't remember Girl having a lathe though. How about using coupler nuts welded on? ....or welding some allthread to the backs of the wrenches (and then put nuts on the insides of the drawer)?

Didn't mean to steal your thunder mdbeck, I just noticed the All thread, reference, but not the coupler... :beer:
 
OP
G

GirlnAgarage

Well-known member
Joined
Jan 21, 2011
Messages
4,669
Location
Texas
If we got several brains thinking the same idea, might be a good idea :)


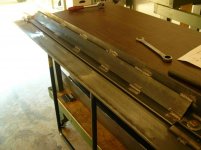
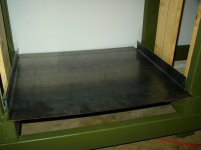
Ok, spent a few minutes in the garage. I ran 120 and 240 with my orbital. I hand wiped some 320 but don't think it was necessary. Didn't take down to completely mirror or shiny metal finish. The goal was to knock off the lumpy scale. This achieved that. Metal slides nicely over it.


While I was looking underneath, I got an idea :scared: I know right? Outlaw, this one is the exact same concept as your spring and cup idea except there is no cup. Essentially I would make the bolt hole bigger on the bottom plate. Big enough to accommodate a compression spring that slips over the bolt. The spring will sit between the bottom of the top plate and rest on the bench top (through the bottom plate enlarged hole). When I tighten the nut & bolt the spring will compress down into the 1/4" space afforded by the thickness of the bottom plate. When I loosen the nut and bolt the spring will decompress and lift the top plate as bolt tension reduces.
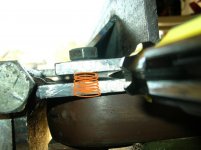
My concerns:

- Will I be able to tighten my top plate as tight as I need to snug it down?
- Will the larger hole make the bottom plate less stable on the bench top?
- Are there springs to fit those specs?


What do yall think?
 

Attachments

  • smoother bender.jpg
    smoother bender.jpg
    68 KB · Views: 268
  • spring idea.jpg
    spring idea.jpg
    66.2 KB · Views: 294

Outlawmws

Well-known member
Joined
Aug 9, 2011
Messages
39,297
Location
The Badlands
SNIPWhile I was looking underneath, I got an idea :scared: I know right? Outlaw, this one is the exact same concept as your spring and cup idea except there is no cup. Essentially I would make the bolt hole bigger on the bottom plate. Big enough to accommodate a compression spring that slips over the bolt. The spring will sit between the bottom of the top plate and rest on the bench top (through the bottom plate enlarged hole). When I tighten the nut & bolt the spring will compress down into the 1/4" space afforded by the thickness of the bottom plate. When I loosen the nut and bolt the spring will decompress and lift the top plate as bolt tension reduces.
My concerns:

- Will I be able to tighten my top plate as tight as I need to snug it down?
- Will the larger hole make the bottom plate less stable on the bench top?
- Are there springs to fit those specs?


What do yall think?

Good deal on the smoothing of the bender bar.

On the springs, that is a great idea, IF the spring can be found. you might get a little more spring latitude for overall length, by counter boring the bench top a little also. That hole has to be flat bottomed however. you can get it started with a std drill, then finish with a spade or better a Forstner bit (both these types need something to center them...)

I'd keep that to no more than 1/2 or better, 3/8's of an inch. a washer under the spring would also be a good idea so it doesn't wear its own hole...

That short of a spring will probably be tough to find, or need to be cut down (Doable with your Dremel cut off). I'll look in my collection too. Those bolts are 1/2" right?
 

shopnut

Well-known member
Joined
Feb 22, 2006
Messages
4,237
Location
Florida
Yup, using Lucas White Lithium grease. I'll swap that out. Next time I run out I'll grab some moly grease. Any particular brand over another?
Sorry - didn't see this question until now...

No particular preference for me, just whatever is on sale. I think the last tube I bought for the gun was Valvoline Synthetic. Just look for "moly" or "molybdenum disulfide" and "EP" or "extreme pressure" in the description and you will be fine. Don't be surprised if you also see lithium in the moly greases, it is different than the white stuff.
 

Outlawmws

Well-known member
Joined
Aug 9, 2011
Messages
39,297
Location
The Badlands
Hmmm, if springs need to be longer than you have height for, instead of the leveler washers welded to the nuts, make up a 2x2 plate, drill it for the bolt hole; drill 4 mounting holes; and screw it to the bottom of the bench top. Then you can core as deep as you want in the top, even all the way through!
 
OP
G

GirlnAgarage

Well-known member
Joined
Jan 21, 2011
Messages
4,669
Location
Texas
Good deal on the smoothing of the bender bar.

On the springs, that is a great idea, IF the spring can be found. you might get a little more spring latitude for overall length, by counter boring the bench top a little also. That hole has to be flat bottomed however. you can get it started with a std drill, then finish with a spade or better a Forstner bit (both these types need something to center them...)

I'd keep that to no more than 1/2 or better, 3/8's of an inch. a washer under the spring would also be a good idea so it doesn't wear its own hole...

That short of a spring will probably be tough to find, or need to be cut down (Doable with your Dremel cut off). I'll look in my collection too. Those bolts are 1/2" right?


That's correct, bolts are 1/2".

By cutting down a spring doesn't that change the spring tension. I think in the case of shortening a spring it increases the tension needed since there are less coil to compress? That might not be a bad characteristic in this case.

I will have to purchase a bigger bit as 1/2" is the largest I have.
 

Outlawmws

Well-known member
Joined
Aug 9, 2011
Messages
39,297
Location
The Badlands
OK, of the spring I have that might fit, 1/4" is definitely not enough space. Unloaded mine are about 1-1/4" tall. You would want about 1" height "loaded' with space for the metal to e set up, and completely compressed mine stop at about 3/4". any shorter springs were either too strong, or too weak.
 
OP
G

GirlnAgarage

Well-known member
Joined
Jan 21, 2011
Messages
4,669
Location
Texas
Hmmm, if springs need to be longer than you have height for, instead of the leveler washers welded to the nuts, make up a 2x2 plate, drill it for the bolt hole; drill 4 mounting holes; and screw it to the bottom of the bench top. Then you can core as deep as you want in the top, even all the way through!

I have some 2"x3"x3/16" strap ends I cut off the 4' piece for the top. But funny you mention that. I just put some big square washers underneath bench top to add more area to disperse the stress. They measure out 1-7/8" x 1-7/8" x 1/4".


Sorry - didn't see this question until now...

No particular preference for me, just whatever is on sale. I think the last tube I bought for the gun was Valvoline Synthetic. Just look for "moly" or "molybdenum disulfide" and "EP" or "extreme pressure" in the description and you will be fine. Don't be surprised if you also see lithium in the moly greases, it is different than the white stuff.

No worries - thanks for the followup :)
 
OP
G

GirlnAgarage

Well-known member
Joined
Jan 21, 2011
Messages
4,669
Location
Texas
OK, of the spring I have that might fit, 1/4" is definitely not enough space. Unloaded mine are about 1-1/4" tall. You would want about 1" height "loaded' with space for the metal to e set up, and completely compressed mine stop at about 3/4". any shorter springs were either too strong, or too weak.

Thanks for checking on that. I'll check around myself. McMasterCar often has the hardware I need. I'll start there and poke around to other sources. I'd rather not drill the hole larger in the bench top. It's not a great distance from the edge so I don't want to weaken that lip any more than I have to.

We'll work on this idea a little bit. Let it simmer. We just might have it if I can find the spring. :thumbup:


Edit: look here http://www.mcmaster.com/#springs/=e9f9xk
 
Last edited:

rickairmedic

Well-known member
Joined
May 31, 2005
Messages
4,165
Location
louisville ,Ky
I know this is a crazy thought but what about valve springs :D. Easy enough to get from a local junkyard . No sense in buying a full set from the autoparts store when you could most likely get 2 of them from a junkyard :D.

Rick
 

Outlawmws

Well-known member
Joined
Aug 9, 2011
Messages
39,297
Location
The Badlands
Both links go to a generic spring page, so what would the specs be?

With only 1/4" of space we might need to get creative here.

Hmm, all we need is a lift of less than 1/16"

What if you found an O-Ring about 3/8 thick, or even 1/4" and shimmed it with a washer? drill the holes in the bar larger than the O-ring so it has room to squish out? the ID of the O-ring would need to be 1/2" or better; overall if 1/4" thick 1" Dia overall? Something close?

EDIT: Valve springs are way too big in this application. Even lift strength might be too much.
 
OP
G

GirlnAgarage

Well-known member
Joined
Jan 21, 2011
Messages
4,669
Location
Texas
I went out and tootled around. Measured up on of the big drawers, cut the corners and did a little folding. This brake is awesome. Smoothing the bender face made a real nice difference. And I need a reminder to set my parking brake on the workbench :tard:

This drawer fits in nice with bends 1 & 2 which are the priority in my mind (only the 19" bend). If those aren't right, I'm afraid the drawers will bind. I'm taking my sweet time on these things. I want to get them to fit as good as I can. Bends 3 & 4 are the 26" bends. I'll have to get creative on these, but it'll get done.

I wanted to show the bend again. That last 30" piece I showed a more exaggerated radius. It looks like securing a full sized piece of sheet makes for a nice bend afterall.
 

Attachments

  • drawer1.jpg
    drawer1.jpg
    49.9 KB · Views: 351
  • drawerbend.jpg
    drawerbend.jpg
    48.8 KB · Views: 395

rickairmedic

Well-known member
Joined
May 31, 2005
Messages
4,165
Location
louisville ,Ky
Very nice :D. Now for your next tool purchase your going to need a handbrake to get the last little bit on the other 2 bends . A finger brake would solve this problem but I dont think I have ever ever seen a home made finger brake :D.


Rick
 

Outlawmws

Well-known member
Joined
Aug 9, 2011
Messages
39,297
Location
The Badlands
SNIP
I wanted to show the bend again. That last 30" piece I showed a more exaggerated radius. It looks like securing a full sized piece of sheet makes for a nice bend afterall.

Looks great Girl! :thumbup: I'm thinking the smoother bend bar also helps tighten the Bend Radius.

You will be able to get part of the bend on the bender for the front and rear, once a bend is started, it gets easier to complete.

You might try two cut to length angle (Actually only one needs to be cut to length) with a welded cheater bar to complete the bend. C clamp the angles on either side.

It's basically a giant cobbled up set of sheet metal tongs. Keep a lot of downward pressure on the angle (Stand on it?) while you complete the bends. Have the drawer edge up on a 2x4 or 4x4 for initial clearance.
 

Outlawmws

Well-known member
Joined
Aug 9, 2011
Messages
39,297
Location
The Badlands
Very nice :D. Now for your next tool purchase your going to need a handbrake to get the last little bit on the other 2 bends . A finger brake would solve this problem but I dont think I have ever ever seen a home made finger brake :D.


Rick

I have, but that was not something cobbled up out of structural iron... :eyecrazy:
 
OP
G

GirlnAgarage

Well-known member
Joined
Jan 21, 2011
Messages
4,669
Location
Texas
Hmm yeah, I have to make a sheetmetal sandwich.

I'm thinking I'll get two lengths of threaded rod and put them in place of my bolts so they stick up a good few inches off the table. I'll install a nut on each rod to snug down the bottom plate to the table. Next slide the drawer in place nd line it up. On my fold line I'll use a piece of ?something? I have around here (with the square edge), of course cut to fit the length inside the drawer. Next I'll put my top plate on top of that, sliding it down on the threaded rods. Then I'll install a nut to snug down the top plate.


The something will have to have a decent square edge. It has to have a flat top and bottom so the top plate sits nice and flat. I've got a couple things around the garage that might work. Got some rectangular tubing from legs of an old desk. Also got a piece of 4x6 pressure treated lumber that use to be the backbone for a swing set. That has nice square edges.

At any rate I'll bend all my sides so I know they're good. Then switch the setup for the fronts and backs.

I also have shim materials that I'll need to bend the sides a hint past 90* (as the bender face with then contact the sides of the drawer and not allow it to go past 90*. The shim will fit inside the sides against the bender face as a spacer to press the front or back past 90*.

Ok, time for me to catch some Zzzss. Goodnight yall.
 
Last edited:
Status
Not open for further replies.
To avoid these ads, REGISTER NOW!
Top Bottom