
You are using an out of date browser. It may not display this or other websites correctly.
You should upgrade or use an alternative browser.
You should upgrade or use an alternative browser.
Above 1200 Sq/FT Restored 1930's Auto Shop
- Thread starter BB767
- Start date
Wokspaces above 1200 squarefeet.
First off I must apologize for randomly skipping around on this post. I started out with just a few pictures in mind so it wasn't very organized. Then it seems there was as much interest in the before pictures as the afters so I'll do my best to post those as I can scan them in. You'll see pretty uneven picture quality. Almost all the before shots were done with a point and shoot 35mm camera so they not the best but they do give a general idea. Also the interior shots had very, very poor lighting plus the inside was pretty dark from all the welding and blacksmith smoke. I make no claim to being a photographer, obviously!! So with that said here goes some more.
There are three basic areas to the shop. The original building which I now refer to as the fab room, the lift room done in 1962 and the 1958 addition to the original building. This was built to the north of the original shop so I just refer to it as the north room. The shop first started as a blacksmith/welding shop so that's in the original shop or fab room. I've already posted the anvil he used.
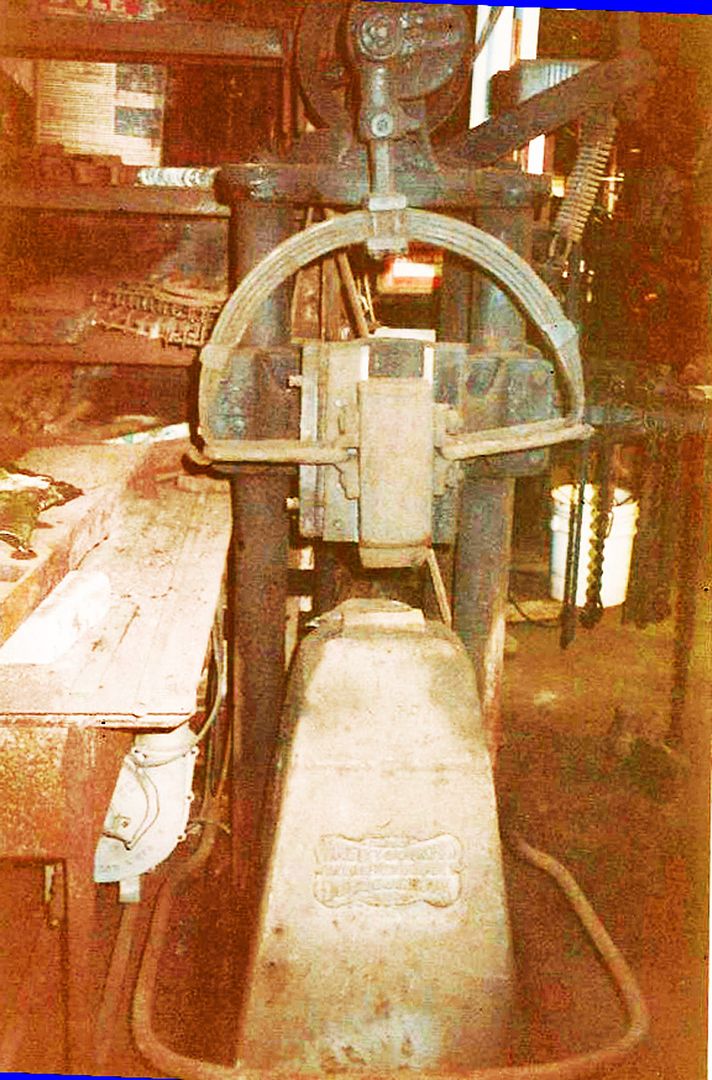
He had an overhead line shaft that he used to power via a wide flat belt, a trip hammer shown here and a line shaft driven drill press. The line shaft was driven by vee belts and an electric motor mounted in the rafters and a large 3' flywheel. To energize the trip hammer you step on the metal bar which surrounds the base. That engages the clutch. To the left you can see part of his forge which is 90 degrees to the photo. The blower for it is toward the bottom left, looks like an automotive turbo housing. It's a pretty crummy picture I'm afraid. I think I have better ones which I'll post as I come across them.

Here's a side view with the trip hammer to the left. You can see the clutch mechanism that operated the line shaft. That's the spring you see in the middle. Everything operates perfectly and I must say when you engaged the trip hammer it shakes the floor a bunch! Note the ladle hanging overhead for the forge. Also seen out of focus(!) in the foreground is a tubing bender. I still have all these components except the tubing bender.

A Willy's flat head 4 cylinder engine on the floor. It has the valve clearance specifications cast into the head so you can set them without having to get the shop manual out. Never seen that done before! Still have the engine but I can't use it. That's one I'll sell off if there are any takers. See the wooden wagon wheel hub ( slightly red) on the bench. Being a blacksmith, he made iron outside rims (tires?) for the wood wheels and repair work on them in general. Several of the wheels were hanging in the rafters. Another crummy quality picture. Sorry!!

That's his welding bench. Look hard and you can make out the vice on the lower left. If you're really good you'll see in the upper left distant background part of the sign in the lift room " parts and labor CASH"

Back of the Pepsi machine. Note the bottle cases because they're in the next picture. It cost a dime for a bottle. Machine still had change in it.
 .
.
The Pepsi machine chills to 38 degrees and is a Vendo 57 I think, holds 7 in a row, top to bottom. 20 miles from us is a store that stocks over 50 different kinds of soda in bottles. I keep it stocked full and is adjusted so that you don't have to pay anything.

A view of some of the rafters. Some areas were packed.

His parts washer. Right next to it are his bulk oil tanks, 30 gallon with pump handles and spouts on top. See the next picture below on the right to get a better view.

This is my parts washer. Those are his bulk oil tanks, not yet restored. I put them right back next to the parts washer which is also where the old one sat. I also have the glass bottles that this oil was dispensed in. If he were to magically come back to the shop he would find many things familiar I think.

His South Bend lathe. It sat right under a major leak in the roof. When it rained water just cascaded on top of it, a once precision machine!

My 1948 South Bend lathe, a still precise machine! The one in the shop truly was way too far gone to save. Mine belonged to my father and I didn't even try to save the other one. Such a shame really. I have more to come, bear with me!
Thomas
There are three basic areas to the shop. The original building which I now refer to as the fab room, the lift room done in 1962 and the 1958 addition to the original building. This was built to the north of the original shop so I just refer to it as the north room. The shop first started as a blacksmith/welding shop so that's in the original shop or fab room. I've already posted the anvil he used.
He had an overhead line shaft that he used to power via a wide flat belt, a trip hammer shown here and a line shaft driven drill press. The line shaft was driven by vee belts and an electric motor mounted in the rafters and a large 3' flywheel. To energize the trip hammer you step on the metal bar which surrounds the base. That engages the clutch. To the left you can see part of his forge which is 90 degrees to the photo. The blower for it is toward the bottom left, looks like an automotive turbo housing. It's a pretty crummy picture I'm afraid. I think I have better ones which I'll post as I come across them.
Here's a side view with the trip hammer to the left. You can see the clutch mechanism that operated the line shaft. That's the spring you see in the middle. Everything operates perfectly and I must say when you engaged the trip hammer it shakes the floor a bunch! Note the ladle hanging overhead for the forge. Also seen out of focus(!) in the foreground is a tubing bender. I still have all these components except the tubing bender.
A Willy's flat head 4 cylinder engine on the floor. It has the valve clearance specifications cast into the head so you can set them without having to get the shop manual out. Never seen that done before! Still have the engine but I can't use it. That's one I'll sell off if there are any takers. See the wooden wagon wheel hub ( slightly red) on the bench. Being a blacksmith, he made iron outside rims (tires?) for the wood wheels and repair work on them in general. Several of the wheels were hanging in the rafters. Another crummy quality picture. Sorry!!
That's his welding bench. Look hard and you can make out the vice on the lower left. If you're really good you'll see in the upper left distant background part of the sign in the lift room " parts and labor CASH"
Back of the Pepsi machine. Note the bottle cases because they're in the next picture. It cost a dime for a bottle. Machine still had change in it.
The Pepsi machine chills to 38 degrees and is a Vendo 57 I think, holds 7 in a row, top to bottom. 20 miles from us is a store that stocks over 50 different kinds of soda in bottles. I keep it stocked full and is adjusted so that you don't have to pay anything.
A view of some of the rafters. Some areas were packed.
His parts washer. Right next to it are his bulk oil tanks, 30 gallon with pump handles and spouts on top. See the next picture below on the right to get a better view.
This is my parts washer. Those are his bulk oil tanks, not yet restored. I put them right back next to the parts washer which is also where the old one sat. I also have the glass bottles that this oil was dispensed in. If he were to magically come back to the shop he would find many things familiar I think.
His South Bend lathe. It sat right under a major leak in the roof. When it rained water just cascaded on top of it, a once precision machine!
My 1948 South Bend lathe, a still precise machine! The one in the shop truly was way too far gone to save. Mine belonged to my father and I didn't even try to save the other one. Such a shame really. I have more to come, bear with me!
Thomas
Last edited:
Crizzle
Well-known member
This may be the coolest thread I have ever seen. Anywhere.
eborcim
Well-known member
This thread sure beats running statistics this morning!
Fueler
Well-known member
I am pleased that I am not losing my mind. I just knew I had seen this place in it's original form...somewhere.
Nice to know that it is in the center of the Universe, only a few miles from me.
That makes me off center I suppose.
Nice to know that it is in the center of the Universe, only a few miles from me.
That makes me off center I suppose.
Last edited:
ZRX61
Well-known member
His South Bend lathe. It sat right under a major leak in the roof. When it rained water just cascaded on top of it, a once precision machine!
ARRGGGHH!!! I would have bought the bracket thingie that supports the power switch!! (& the switch) Been looking for one for THREE years...

gonzoengineer
Well-known member
This thread was inspiring. I love how you not only saved a building, but also captured it's history and brought it into your life to build the history around you. Beautiful.
I'd of gladly paid scrap value for that lump! The guts may not have been salvageable but there would of been good parts for restoring another device that could of been nabbed. I hope to find a South Bend lathe, similar to your operational one some day. I don't see many of that vintage pop up though.
I'd of gladly paid scrap value for that lump! The guts may not have been salvageable but there would of been good parts for restoring another device that could of been nabbed. I hope to find a South Bend lathe, similar to your operational one some day. I don't see many of that vintage pop up though.
Some more interior pictures

This was taken in the lift room. Small engine repairs were done here also. You can see the two NOS Clinton engine gas tanks hanging up. Also a Sun Engine Analyzer to the right behind the radio.
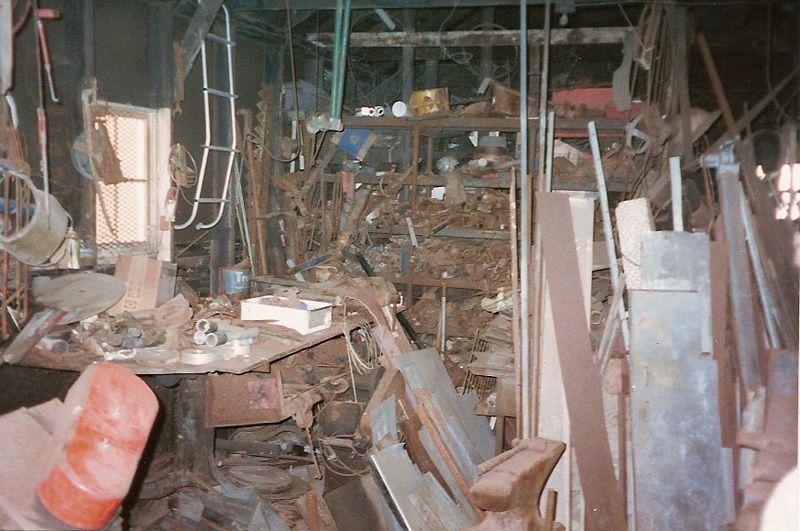
This is in the fab room, anvil bottom center. The orange item on the left is the cover of a Wilton horizontal band saw which was left behind with a box of new blades. I made a wheeled stand for that so it's easily movable and have used it extensively. Behind it, hidden under a large pile of material is a bench that is completely made of cast iron, top and stand. Weights over a 1,000lbs and I can only move it with two floor jacks, one under each end.

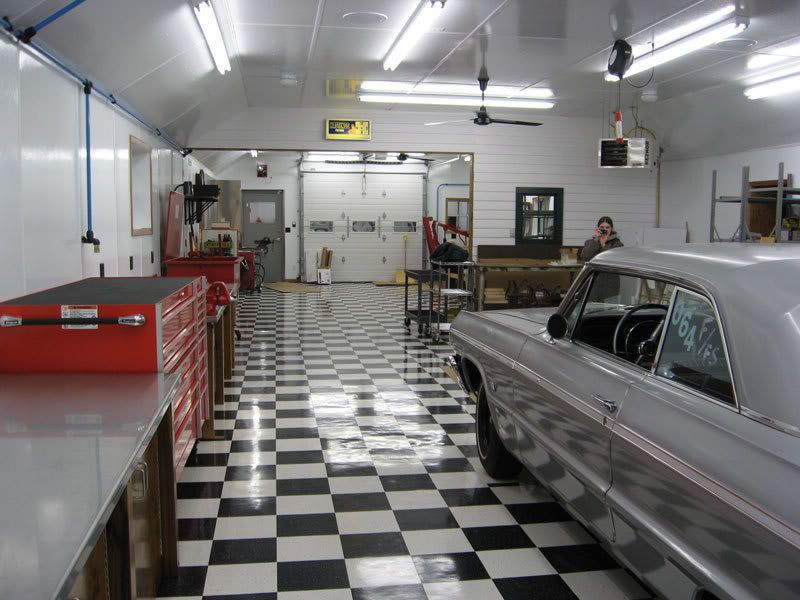
Here is the same room shot from just about the same place only cleaned up. Now you can see the cast iron bench. The top on it tilts. It's an old welders bench. It has a Milton swivel vice bolted on it that was all rusted up. I soaked it in fuel oil and made two new faces for the jaws and it's ready to go to work for another 50 years. Still need to powder coat it. The shelving behind and to the right of the bench contained all of the short steel stock. The wall behind the bench, you can see the studs and window, was one of the wood outside walls that were removed and replaced with block. I'll have a series of pictures of that in another post.

Here's the saw as I now use it. Cosmetic restoration yet to go, but fully functional as is.

Here's a view of the north room. This addition was done in 1958. Note the clapboard siding in the background behind the stacked 55 gallon drums. That's the outside wall of the original shop. I left the clapboard on just as I did in the lift room. That's the orange cover of the Wilton band saw on the left. I moved the saw into this room while the walls were being replaced in the fab room.
You can see the clap board and window in the wall in the background.

Here's the reverse angle of the same room. In the center is a little orange of the band saw cover. Look outside the overhead door in the distance. You can make out a blue 1957 Chevy, no wheels, sitting in the dirt. There was hardly anything left usable on that car. Had the title, put it on eBay, no bidders so it was scrapped. Trust me, it was hacked up, picked over and long gone.

Yes this is the same room, same corner, same view, out the north overhead door now equipped with a car port. The wall panels I used are OSB covered with fiberglass, don't know that it has a specific name. Available at lumber yards. You can get it 7/16" up to 3/4" in 8',9' and 10' lengths. It's smooth, bright glossy white, with great light reflectivity. Once it's installed no other finish work is involved. Since it's backed with OSB you have material you can screw to. I used 1/2 " X 8' sheets. Hard on saw blades but it's biggest down side is cost. Over $70 per sheet with 220 sheets in the building. But once done it's durable, water proof, stain resistant, looks and works great! Kind of a front loaded cost. Expensive up front but then you're done. Easily lasts a lifetime.
See how the ceiling angles above the air compressor. The original rafters bottoms were at 8' and completely open to the bottom of the roof decking. Since I was putting in a ceiling and the length of the building was 70' I thought 8' would seem too low. So we shorten the bottom of the rafters to 10' which then gave me a 10' interior ceiling. Really seem to open the shop up. The angle we used still provided room in the attic to get in 12" bats of pink insulation and have ventilation space above. I blew in R38 insulation in the flat areas.

Just another bench in the north room and more "stuff" for me to go through. When I mentioned earlier that I didn't try to savage the South Bend lathe, it wasn't scraped. One of the sons asked for it as it would run. I just didn't think it would ever be precise again so I didn't want to spend any time working on it. Restoring old cars over the years has taught me to salvage as much as possible and what you don't want, pass on to others as they may have a need.
Still more to come! Hope you're enjoying this as much as I am. Great positive feedback Thank you all!
Thomas
This was taken in the lift room. Small engine repairs were done here also. You can see the two NOS Clinton engine gas tanks hanging up. Also a Sun Engine Analyzer to the right behind the radio.
This is in the fab room, anvil bottom center. The orange item on the left is the cover of a Wilton horizontal band saw which was left behind with a box of new blades. I made a wheeled stand for that so it's easily movable and have used it extensively. Behind it, hidden under a large pile of material is a bench that is completely made of cast iron, top and stand. Weights over a 1,000lbs and I can only move it with two floor jacks, one under each end.
Here is the same room shot from just about the same place only cleaned up. Now you can see the cast iron bench. The top on it tilts. It's an old welders bench. It has a Milton swivel vice bolted on it that was all rusted up. I soaked it in fuel oil and made two new faces for the jaws and it's ready to go to work for another 50 years. Still need to powder coat it. The shelving behind and to the right of the bench contained all of the short steel stock. The wall behind the bench, you can see the studs and window, was one of the wood outside walls that were removed and replaced with block. I'll have a series of pictures of that in another post.
Here's the saw as I now use it. Cosmetic restoration yet to go, but fully functional as is.
Here's a view of the north room. This addition was done in 1958. Note the clapboard siding in the background behind the stacked 55 gallon drums. That's the outside wall of the original shop. I left the clapboard on just as I did in the lift room. That's the orange cover of the Wilton band saw on the left. I moved the saw into this room while the walls were being replaced in the fab room.
You can see the clap board and window in the wall in the background.
Here's the reverse angle of the same room. In the center is a little orange of the band saw cover. Look outside the overhead door in the distance. You can make out a blue 1957 Chevy, no wheels, sitting in the dirt. There was hardly anything left usable on that car. Had the title, put it on eBay, no bidders so it was scrapped. Trust me, it was hacked up, picked over and long gone.
Yes this is the same room, same corner, same view, out the north overhead door now equipped with a car port. The wall panels I used are OSB covered with fiberglass, don't know that it has a specific name. Available at lumber yards. You can get it 7/16" up to 3/4" in 8',9' and 10' lengths. It's smooth, bright glossy white, with great light reflectivity. Once it's installed no other finish work is involved. Since it's backed with OSB you have material you can screw to. I used 1/2 " X 8' sheets. Hard on saw blades but it's biggest down side is cost. Over $70 per sheet with 220 sheets in the building. But once done it's durable, water proof, stain resistant, looks and works great! Kind of a front loaded cost. Expensive up front but then you're done. Easily lasts a lifetime.
See how the ceiling angles above the air compressor. The original rafters bottoms were at 8' and completely open to the bottom of the roof decking. Since I was putting in a ceiling and the length of the building was 70' I thought 8' would seem too low. So we shorten the bottom of the rafters to 10' which then gave me a 10' interior ceiling. Really seem to open the shop up. The angle we used still provided room in the attic to get in 12" bats of pink insulation and have ventilation space above. I blew in R38 insulation in the flat areas.
Just another bench in the north room and more "stuff" for me to go through. When I mentioned earlier that I didn't try to savage the South Bend lathe, it wasn't scraped. One of the sons asked for it as it would run. I just didn't think it would ever be precise again so I didn't want to spend any time working on it. Restoring old cars over the years has taught me to salvage as much as possible and what you don't want, pass on to others as they may have a need.
Still more to come! Hope you're enjoying this as much as I am. Great positive feedback Thank you all!
Thomas
Last edited:
WhatThaFrig
Well-known member
- Joined
- Dec 7, 2006
- Messages
- 152
Still in awe of the time warp and great work you put into that place. Makese think if I ever had a chance to go through my grandpa's garage, that's about what it would be like. He restored old furniture and had some old tools and gear that would of been nice to have.
Kevin54
MEMBER EMERITUS
I am just speechless
tdkkart
Well-known member
I wanna see a picture of the pile of stuff you saved.........
How long did this process take??
How long did this process take??
Boosted1
Well-known member
BB767.
Wow! This is a fantastic thread as all others have said. I also just had another cup
of coffee while reading your latest update. I applaud your work.
I have a question about the Glossy White Panels you used to finish the walls.
Do you know if you can also write on them with Dry Erase Markers? I am guessing yes.
This would mean you could use any of your walls for a White Board.
I also didn't know you could purchase these at a lumber yard. Very interesting.
jwitt
Well-known member
Outstanding!
06colorado
Member
I'd give my first born to have a working garage like that. Plenty of tools and floor-space and a lift. Crawling on the cold concrete driveway in winter isn't fun.
Crizzle
Well-known member
Keeps getting better and better. 48T of scrap metal. Wow, just wow.
46HudsonPU
New member
Very, very nice! Keep pictures & descriptions coming...
bje31
Well-known member
Wow!!!!...you deserve a Huge Tony The Tiger....GREEEEEEEEEEEEEAAAAAAAAAT !!!
bayou985
Well-known member
"Magnifique" I see Y'all used tools that are'nt menitioned here very often...Respect and Dignity...Thanks
To fill out what was done on the wood wall replacement, here are some pictures to show how it was done. As you have seen the the wall across the front of the original shop was wood as was part of the west side. It was concrete block the rest of the way around the building. I decided since the wood wall was in such poor condition to replace it.The block also made the shop more secure and was better to prevent wind infiltration and keep heating costs down.

To start, temporary braces had to be fabricated to prop up the roof once the wood wall studs were removed. I had plenty of material on hand to make the bracing with! Seen here is that fabrication and note the old Lincoln welder in the background as well as the welding bench. None of the old welding rod left was suitable for the Lincoln welder so I used a modern one. I have since purchased good rod and the old Lincoln still works perfectly. For heavy metal it's hard to beat an old arc welder for good penetration.

This is the fab room mostly cleared out ready to remove the wall. See the grinder build into the wall on the right driven by a belt and old electric motor? I had plastic over the man door to prevent wind from coming in . This work was done in January and it was freezing most days!

The exterior clapboard has been removed leaving the wall studs. In the shadows you can see the cast iron welders bench and the trip hammer. They were just too heavy to move so they were left and we worked around them. It turned out to be a pretty neat picture with the old tools silhouetted like that I think. One of my favorites from the hundreds I took.

Here a clear picture showing the two walls that were replaced. The lean to that steel was stored in has been removed from the side of the building. New roof is in place, dry inside for the first time in years!!

Where the block juts out was a small 8' X 8' room that was where he stored his coal for the forge. Extending beyond that was the 1958 room addition. Also seen are the Terraplane with the tree growing through the steering wheel and beyond that the blue '57 Chevy and an early '60's red Ford pickup. Foreground left is part of the steel storage rack.

Here's the steel storage rack. Weighed several hundred pounds and we used a backhoe to move. Took a torch and cut it up for scrap.

Here the west wall clapboard is gone. We dug down to check how deep the footings on the original building were. They were good so block was laid on them. The brick mason was friend of mine for the last 30 years and really knows his stuff.

I eliminated the three windows on the west side and put one in on the south side. The shop sits on a small hill with a terrific view to the south. Those trees by the steel rack are hedge apple. They were planted all over the Midwest in the 1930's during the dust bowl to prevent wind erosion. Mine are are old but healthy. You don't don't see hedge rows much anymore. Period trees for a period building I think.


One of the reasons I thought the building could be saved was the concrete block on it was all solid. No cracks anywhere and straight as a string. I later found out that the fellow who laid them in both 1958 and 1962 ( same guy ) was old school. He'd soak each block in water before he laid it so the the block wouldn't soak up moisture from the joint too fast. Made for a better joint. It took time but it paid off. If the walls were all cracked and the joints in bad condition I'm not so sure I would have restored it. The roof was pretty bad but we only needed to replace a few deck boards. I caught it right at the turning point. Much longer and it would have been too expensive to repair. I do have more so stay tuned!
Thomas
To start, temporary braces had to be fabricated to prop up the roof once the wood wall studs were removed. I had plenty of material on hand to make the bracing with! Seen here is that fabrication and note the old Lincoln welder in the background as well as the welding bench. None of the old welding rod left was suitable for the Lincoln welder so I used a modern one. I have since purchased good rod and the old Lincoln still works perfectly. For heavy metal it's hard to beat an old arc welder for good penetration.
This is the fab room mostly cleared out ready to remove the wall. See the grinder build into the wall on the right driven by a belt and old electric motor? I had plastic over the man door to prevent wind from coming in . This work was done in January and it was freezing most days!
The exterior clapboard has been removed leaving the wall studs. In the shadows you can see the cast iron welders bench and the trip hammer. They were just too heavy to move so they were left and we worked around them. It turned out to be a pretty neat picture with the old tools silhouetted like that I think. One of my favorites from the hundreds I took.
Here a clear picture showing the two walls that were replaced. The lean to that steel was stored in has been removed from the side of the building. New roof is in place, dry inside for the first time in years!!
Where the block juts out was a small 8' X 8' room that was where he stored his coal for the forge. Extending beyond that was the 1958 room addition. Also seen are the Terraplane with the tree growing through the steering wheel and beyond that the blue '57 Chevy and an early '60's red Ford pickup. Foreground left is part of the steel storage rack.
Here's the steel storage rack. Weighed several hundred pounds and we used a backhoe to move. Took a torch and cut it up for scrap.
Here the west wall clapboard is gone. We dug down to check how deep the footings on the original building were. They were good so block was laid on them. The brick mason was friend of mine for the last 30 years and really knows his stuff.
I eliminated the three windows on the west side and put one in on the south side. The shop sits on a small hill with a terrific view to the south. Those trees by the steel rack are hedge apple. They were planted all over the Midwest in the 1930's during the dust bowl to prevent wind erosion. Mine are are old but healthy. You don't don't see hedge rows much anymore. Period trees for a period building I think.
One of the reasons I thought the building could be saved was the concrete block on it was all solid. No cracks anywhere and straight as a string. I later found out that the fellow who laid them in both 1958 and 1962 ( same guy ) was old school. He'd soak each block in water before he laid it so the the block wouldn't soak up moisture from the joint too fast. Made for a better joint. It took time but it paid off. If the walls were all cracked and the joints in bad condition I'm not so sure I would have restored it. The roof was pretty bad but we only needed to replace a few deck boards. I caught it right at the turning point. Much longer and it would have been too expensive to repair. I do have more so stay tuned!
Thomas
Very cool, is that a Porsche or VW engine in picture 8?
Nothing exotic, just a VW.
Thomas
BB767,
I know I've seen your garage transformation on another website a while ago. Where else have you posted it?
Great thread.
Lane
Lane,
There were some pictures on the F.A.S.T. ( Factory Appearing Stock Tire) site last year. If you do any drag racing you might have seen it there.
Thomas
Do you live on or near the property?
I grew up less than a mile away and still live in the same town. There are 5 acres on the site and we'll be building our retirement home there in a couple of years. Hard to beat small town living in the Midwest near a major university, University of Illinois in this case.
Thomas
Curt_pnw
Well-known member
Yes, this is one of my favorites on this forum too. Great job! I agree with the other guys on how quick you turned this one around. Amazing! 
I wanna see a picture of the pile of stuff you saved.........
How long did this process take??
I took title of the property in November of '05. The inside was largely finished by December '06. In order to accomplish it that quickly my son and I spent 12 - 14 hour days, 7 days a week plus a friend helping 8 hours a day 5 days a week. If I wasn't working I was out there. I had a car project to do and wanted it to be the first one done in the new/old shop. I knew if I brought it in before I finished I'd never get the rest of the shop done. I rolled the '66 Chevy II in, Dec 28,'06 to get it ready for the racing season '07.
The outside is 5 acres and that took some time. As you could see it was heavily overgrown and had " stuff " sprinkled throughout. That was largely done by the end of year 3. That will be an ongoing project however as it evolves.
Thomas
BB767.
I have a question about the Glossy White Panels you used to finish the walls.
Do you know if you can also write on them with Dry Erase Markers? I am guessing yes.
This would mean you could use any of your walls for a White Board.
I also didn't know you could purchase these at a lumber yard. Very interesting.
That's a good question, I really don't know. The fiberglass does leave a slight " stranded texture" to the surface which the marker might not erase from. I'll try to get a name of the product. This is was my second application of the product in a building. I built another garage using it in '03 and will use it in our garage when we build our house out there.
Thomas
Yes, this is one of my favorites on this forum too. Great job! I agree with the other guys on how quick you turned this one around. Amazing!
I think when you're passionate about something you can become obsessed with it. Remember as a little kid when you buy a new car model you couldn't wait to get home and start building it, wondering how it will turn out? I'd been thinking about this shop for years and didn't really think I would get the chance to buy it. Once I did I couldn't wait to see how it would turn out. Fortunately I have a job that gives me a lot of time off so I could put a lot of effort out there.
Thomas
Bigpigdave
Well-known member
Great job. I'm sure this was a lot of work but must have been very rewarding. Keep up the great work and I love seeing the before and after pix.
Last edited:
What a great surprise...another cup of coffee and another batch of terrific pics.
+1
Vernmotor
Well-known member
Wow and great job...I been reading for two days now..Was going to post yesterday.But Not sure what to say.Everyone has pretty much cover my thoughts. Very neat..Thank you very much for taking the time to post and share all this ( thumbs up )
bazzateer
Well-known member
What job gives you so much time off?
chader
New member
I have been lurking on this site for a little while. Once I read this thread I had to join, and I suspect I will be visiting often! This is just amazing!!!!!!!
Please keep it going, go into the future plans with the FAST cars and this shop.
Please keep it going, go into the future plans with the FAST cars and this shop.