To avoid these ads, REGISTER NOW!

Setting up the workshop for the 'Middle Aged' among us

To avoid these ads, REGISTER NOW!

RoninB4

Well-known member
Joined
Jul 22, 2020
Messages
3,520
Location
Under My House
Any opinions on general level of usefulness of one of these?

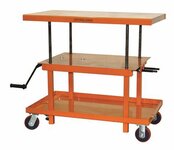
-I've used many types of these in handling smaller stamping dies/molds over the years, they're fairly standard equipment in the mold/die shops. The mechanical chain crank type are safer than the hydraulic type for the most part. Hydraulic seals go bad, even with the more expensive brands, after a few years and seal replacement was spotty back in the 90's. Sourcing hydraulic seals now, with outsourcing, is likely even more questionable. The unit you've attached a link to that weighs 161 lbs. and supports up to 1,000 lbs. is also very questionable. It depends upon how much load you expect it to support. Working on a 200 lb. object at waist high will probably be ok but the flimsy construction would make me concerned about the center of gravity (COG) on anything heavier, especially when rolling it around. Yes the chain crank type are heavier and more expensive but they get used/abused for years in the shop with no problems. Any problems can be easily repaired too. I've bought cheap hydraulic lifting devices (trans jack, floor jack, cherry picker) too, I just don't expect them to last very long and I don't fully trust them either. If you can buy one of these below on the used market (condition important) it would last longer and be safer for loads over 200 lbs. Just my opinion per my experience.
 

Attachments

  • Lift.jpg
    Lift.jpg
    17 KB · Views: 35

rdoty

ALLIANCE MEMBER
Joined
Feb 7, 2018
Messages
639
Location
Massachusetts
1. Organization. "A place for everything and everything in its place." You should be able to visually inspect that all tools have been returned to their known location. Put things back instead of putting them down - retrieving them from the tool chest is faster than looking for them. I even put tools back during the middle of a job - I HATE spending 10 minutes looking for something I just put down.

2. Checklists. Your memory is shot - just deal with it. I really like the book The Checklist Manifesto: How to Get Things Right.

3. A full day is now 4-6 hours. Tools down and walk away when you get tired. If you don't you are prone to expensive and painful events. There is always tomorrow.

4. Think before acting - especially with power tools. With the really dangerous tools like table saws and chainsaws I stop and walk away from the job If I'm getting tired or distracted. Or too comfortable with the tool. I like all of my fingers and limbs in their current functional condition!

5. Try to work on one project at a time and stick with it until it is completely done. Then clean up before the next project. Multiple projects at the same time leads to madness.

6. Light. More light. Followed by More More Light. Plenty of general light plus task specific lighting. And a couple of chargeable magnetic work lights for where you still don't have enough light.

7. A variety of ways to lift, maneuver, and position things, especially heavy things. An engine hoist and a set of ratchet straps are your new best friends.

8. A good worktable or work surface. Something you can spread out a project on. Keep in clean and uncluttered - it is a work surface, not horizontal storage.

9. Environmental control. Cold is colder than it used to be. And hot is hotter than it used to be. A heated and cooled workshop makes jobs much more pleasant. If appropriate install dust control systems - you only have two lungs. And, of course, add more light!

10. Make the shop a place you want to go to. This means different things to different people, but you should enjoy your time in the shop. If you don't, what is the point of having it?
 
OP
R

Ray Bell

Well-known member
Joined
Mar 21, 2023
Messages
87
Location
The Summit, Queensland
All good points...

Some of which I need to begin taking notice of.

As for dust, a chainwire fence separates my workshop/storage space from a small trucking depot. Dust is something that cannot be avoided.
 

Citation

Well-known member
Joined
Jan 20, 2016
Messages
3,213
Location
Indy
I like the discussion of things that make it easier to lift. My first inspiration in that area was years back when I was trying to change the clutch in my fwd car. No garage at the time, just the concrete drive. I spent several hours with the help of my roommate trying to get the transmission to line up with the input shaft and slide back into place. We had a floor jack and our arms to get this thing into place. Lots of frustration as it just wasn't working. I think the biggest issue was the floor jack couldn't pick the transmission up without causing it to tilt. A moment of inspiration hit that evening when I build a quick 2x4 gantry that sat on the sides of the engine bay interior and spanned over the gearbox. Some thin rope created a sling to hold the gearbox and a ratcheting strap served as a hoist. With the gearbox suspended it was easy to make slight adjustments in angle or position and the sling delt with the gearbox not sitting flat on the jack. With that setup it was simple to move the gearbox into place.

More recently I've become a big fan of taking things apart to make them lighter. A few years back I was helping my brother move an 80 gallon compressor. By removing the pump and motor the tank could be carried by two people n it's side. One person could easily walk the tank into position. Once in position the pump and motor could be reinstalled by hand. I used the same thinking to move large furniture and to install a down draft kitchen hood that was a bit to heavy to comfortably lift up and into a hole in the counter. With the blower part removed it was far easier to get things into position.
 

bb29510

Well-known member
Joined
Dec 27, 2022
Messages
1,216
I've never seen anything like that, to be honest...

But I just had a look for similar things available here. For a 227kg one, roughly similar to the one Harbour Freight has for $250, we'd have to pay $AU510 (about $US380), a 350kg one, still not as highly weight-rated as the one you've linked, is $AU1,060 (about $US710).

They certainly look handy, but perhaps not as flexible as my little hand operated forklift. With it I can pick up items to put them on a pallet (I will get around to making pallets that stay straight, by the way, and have a good surface), then back out, pick up the pallet complete and it will go up to a ton. I don't know what that cost the bloke from whom I traded it (swapped a dismantled single car carport plus a little cash), but I know I got very good value.

Here's one available in your land for about $US270:


But I do feel that items like this are a part of what I had in mind starting this thread. Though I do prefer to see innovation, improvisation and putting old junk to a useful purpose to spending too much hard-earned.
i got one of those
 

kaymccampbell

Well-known member
Joined
Feb 27, 2015
Messages
29,506
Location
Upstate New York
I'm in the same boat as many of you, while I am not a big guy, I used to just muscle many large/heavy or awkward objects around. After the hernia operation, I am changing my ways, but I am dithering about buying one of these hydraulic lift carts, mainly due to the floor space it will need. Any opinions on general level of usefulness of one of these?

They're great. We've got one in Judy's studio for lifting huge molds and moving the reclaimer up to the pouring table.
 

paredown

Well-known member
Joined
Jan 12, 2012
Messages
544
Location
Pomona, NY
1. Organization. "A place for everything and everything in its place." You should be able to visually inspect that all tools have been returned to their known location. Put things back instead of putting them down - retrieving them from the tool chest is faster than looking for them. I even put tools back during the middle of a job - I HATE spending 10 minutes looking for something I just put down.

2. Checklists. Your memory is shot - just deal with it. I really like the book The Checklist Manifesto: How to Get Things Right.

3. A full day is now 4-6 hours. Tools down and walk away when you get tired. If you don't you are prone to expensive and painful events. There is always tomorrow.

4. Think before acting - especially with power tools. With the really dangerous tools like table saws and chainsaws I stop and walk away from the job If I'm getting tired or distracted. Or too comfortable with the tool. I like all of my fingers and limbs in their current functional condition!

5. Try to work on one project at a time and stick with it until it is completely done. Then clean up before the next project. Multiple projects at the same time leads to madness.

6. Light. More light. Followed by More More Light. Plenty of general light plus task specific lighting. And a couple of chargeable magnetic work lights for where you still don't have enough light.

7. A variety of ways to lift, maneuver, and position things, especially heavy things. An engine hoist and a set of ratchet straps are your new best friends.

8. A good worktable or work surface. Something you can spread out a project on. Keep in clean and uncluttered - it is a work surface, not horizontal storage.

9. Environmental control. Cold is colder than it used to be. And hot is hotter than it used to be. A heated and cooled workshop makes jobs much more pleasant. If appropriate install dust control systems - you only have two lungs. And, of course, add more light!

10. Make the shop a place you want to go to. This means different things to different people, but you should enjoy your time in the shop. If you don't, what is the point of having it?
This is an excellent list. The two that resonate are 'dangerous tool operation' and 'one project at a time'.

I make a habit to run the chainsaw for the firewood operation only in the mornings when I'm fresh.

The 'one thing at a time' was passed on to me by one of my Habitat workmates-- he's a little older, and more than a little wiser. I haven't quite internalized it yet, but I'm working on it.

The other one I fight with is kind of the countervailing truth -- don't let tunnel vision keep you from stepping back, and deciding that you've had enough of a particular task -- tired, losing concentration etc, and keep you from switching to something that is also important (so long as you remember to go back and finish the first task!)
 

rdoty

ALLIANCE MEMBER
Joined
Feb 7, 2018
Messages
639
Location
Massachusetts
Paredown, good point. "One project at a time" is a bit stringent. Maybe it should be something like "Minimize concurrent projects, ideally to one at a time. Only have one project at a time spread out in the same work area."?

The idea is to avoid "start many, finish none" syndrome.
 

andyvh1959

Well-known member
Joined
Feb 15, 2020
Messages
2,595
Location
Green Bay WI
Lots of good input here. I'm 65 and still very able (can even do a martial arts style foot punch higher than my shoulders, once, maybe three times, then oww). All my shop days have been motorcycle focused, still is, easier to work on. But as of June 30 2024 I'll be fully retired and taking on my 1st ever chassis swap; my 2001 Dakota chassis going under my 56 Dodge C3 pickup, V8 engine, 6-spd auto trans, rebuilt suspension/axle etc. For the build I plan to buy a floor standing a-frame gantry (no interest in a floor mounted lift), and I'll make attachments for my 3-ton fllor jack for the engine/trans etc. Engine hoist for sure, which I can resell after the 56 is on the road. A-frame I can sell after the project is done.
 
OP
R

Ray Bell

Well-known member
Joined
Mar 21, 2023
Messages
87
Location
The Summit, Queensland
I wouldn't do that...

It may be a while, but you'll find another use for these things. And think of how it would be if you needed them and knew you'd sold them off?

Got pics of the Dodge?
 
OP
R

Ray Bell

Well-known member
Joined
Mar 21, 2023
Messages
87
Location
The Summit, Queensland
And now, in view of the fact that I've had no inspiration for this thread for two months, I want to tell a story about a brilliant method of co-operation which was used to great effect by **** Hart.

**** is in Adelaide and has been a long-time member of the Chrysler Restorers' Club. He related this story about he and two other members who were restoring 1929 De Sotos at the same time. I don't remember the names of the other two, so I'll call them Bill and Fred.

One night they were all among the throng at a meeting of the club. Afterwards the three of them got together and **** promoted things by asking Bill and Fred how they were getting along with their restorations. Both answered in the same way, "I don't know," was the kind of reply they each made, "I just don't seem to be getting anywhere with it. I go out to the workshop and don't seem to know where to start, I finish up just looking at it and getting very little done!"

Not the kind of response to satisfy ****. He's a real press-on type, alive with enthusiasm and energy.

"Listen, you blokes," he responded, "this is no good. I've got a plan... Bill, every Monday night Fred and I will go to your place and together we'll get jobs done on your car. Then on Wednesday nights, you and I will go to Fred's place and work on his, your wives can keep us plied with refreshments and we'll put in solid working nights. And Friday nights you blokes come to my place and we'll work together on my car."

And so the plan went into action, three nights a week they would be working together and making progress with each of the cars. So much progress, in fact, that all three were finished in six months.

But there was more making a success of the plan than their joint efforts. For Bill and Fred, their 'free' nights now had direction, and motivation. "I can't let them come back next week and see I've done nothing myself," each of them would be saying to themselves. This was the real key to the success of the plan, that the joint efforts would be the springboard from which the owners would each leap into their own jobs.

So what do you do with three 1929 De Sotos, freshly restored by their proud owners?

They took them for a drive. To Darwin, over 3,000kms (1,865 miles) to the North of Adelaide, most of the journey being through the deserts of Central Australia. Of course, they would have to drive them back again, wouldn't they?

And you wouldn't dare take three freshly-restored 1929 De Sotos on such a voyage without the security of having another vehicle with you, possibly carrying spare parts which might be needed. Would you?

So they enlisted the help of yet another Chrysler Restorers' Club member who drove his 1924 Dodge pickup.
 

paredown

Well-known member
Joined
Jan 12, 2012
Messages
544
Location
Pomona, NY
Good story, Ray. It's a bit like the blitz clean on the house before company comes!

I thought of this thread when I saw this:

From Hemmingway, 'The Old Man and the Sea':
“I may not be as strong as I think, but I know many tricks and I have resolution.”
Words to live by.
 
Last edited:
To avoid these ads, REGISTER NOW!
OP
R

Ray Bell

Well-known member
Joined
Mar 21, 2023
Messages
87
Location
The Summit, Queensland
I started work on a new 'get around a problem' tool today...

As I relax and stay off my feet a bit and give the Territory job I've been working on for a couple of weeks miss for a few days. See if you can work this out:

0623newtool1beginnings.jpg
Raw materials. Some 16mm solid steel bar, a piece of steering column for machining and some Nissan Navara diesel head bolts with long 7/16" UNF threads.

I've been toying with this idea for a long time. Here's an upturned (and empty) Forester block bolted to an upturned Forester gearbox:

0623newtool2location.jpg
The objective. The red circles are the niches where I'm going to anchor the new tool's two pressure-applying parts, the yellow arrows point to where the pressure is going to be applied to overcome recalcitrant dowels and studs which might have corrosion on them.

So what I have to overcome is the problem with corrosion in the dowels and lower block-to-bellhousing fixings, which are studs rather than the bolts found around the higher parts of the joint. As there is no potential for getting any kind of leverage between the two anywhere near the bottom (the crossmember, about 8" wide, is in the way) I'm making a device to enable it to happen easily and, more particularly, nicely.

You see, when I first pulled a Forester engine I had this problem. I phoned a specialist - a neighbor of my nephew - and he told me to get a sharp screwdriver or chisel and drive it into the joint. Lovely! The alloy isn't really all that thick in a lot of spots and it would get bruised anyway. But worse, the only potential places for doing that are around the top of the bellhousing and the problem requiring separating pressure is at the bottom.

So here are the steps I took today:

0623newtool3drilling.jpg
Four holes in the bar. The tool I'm making requires four pieces of this 16mm square bar, each with a hole in one end. Two of the holes are to be tapped for the Navara head bolts.

0623newtool4tapping.jpg
Threads tapped. A simple next step to carry out, and a job for my new tap wrench.

0623newtool5cutting.jpg
Angle grinder engineering. Holding the camera in my left hand to take this pic while I cut the bar with the right hand was tricky, hence the blurring.

0623newtool6shapedandtrialfit.jpg
Shaped and fitted. The niches are a bit tricky, the machined holes next to them mean there's an irregular shape to the casting under there and that had to be catered for in shaping these pieces.

The idea is that these pieces hook into the niches, so they have been undercut to provide a little tab to hold them up once in place. Remember, this is all upside down.

0623newtool7fittingup.jpg
Two pieces in place. I can't go much further with this until I get the bolts onto a lathe and machine the ends. Meantime, I feel it's looking promising.

So the other pieces have been drilled to 8mm, the bolts will be turned down to 5/16" (0.796mm) so they are a neat but not tight fit in there, they should be able to keep the pieces aligned during the course of screwing the bolts in to push the housings apart.

More to come as I advance this little job...
 

Kent_B

Well-known member
Joined
Jul 4, 2013
Messages
1,406
Location
MI
I don't understand how I missed this thread! Having 3 Subarus here, I'm unashamedly borrowing your ideas. I replaced the clutch in my daughter's '11 Forester and used a floor jack under the gearbox to raise it so that it and the engine could be aligned.

Thanks for sharing your knowledge
 
OP
R

Ray Bell

Well-known member
Joined
Mar 21, 2023
Messages
87
Location
The Summit, Queensland
Not a problem...

For more Subaru-specific stuff you could go to my 'journal' in the subaruforester.org forum:


Mine are both 2005/6 models so some specifics won't relate to the 2011 one, take care with the air conditioning compressor clutch, for instance, as I think they moved on to a different design just a couple of years after mine were made.

With regard to the lifting of the gearbox to align the engine, I would also say that it was one of those 'necessity is the mother of invention' things as while you usually can move the engine crane to pull the engine away from the box (once the 'seal' is broken), I was working on grass and the engine crane had to stay still.

I'd set up planks under the car's wheels and rolled it back and forward as needed instead. So a jack wasn't an option, but I reckon my little frame is a better option anyway as it prevents the gearbox rocking. Also, take note of the clutch information in that thread.
 
OP
R

Ray Bell

Well-known member
Joined
Mar 21, 2023
Messages
87
Location
The Summit, Queensland
Continuing to work on the new tool...

I went to the Men's Shed this morning with four of the Navara head bolts in hand, the aim being to turn the ends of the bolts down to 5/16" so they'd be a reasonable, but not tight, fit in the 8mm holes I drilled in the 5/8" square bar seen in the previous post...

0723newtool8turningbolt.jpg
Turning down the bolt. From the threaded 7/16"UNF down to a parallel section of 5/16", I just had to be careful to not take it too far.

...and I wanted to make some washers which would **** up against the end of the threaded section, also some to weld on the end to keep it all in place for handling and storage.

0723newtool9partialpartingwashers.jpg
Washer-making. Why am I making washers rather than just buy them? Because I want them to be a tight fit up close to the threaded section of the bolts and the ones on the end I wanted to make them so they can conveniently weld to the end when it's all assembled.

So by going part-way into the bar (formerly a rusty Valiant steering column) I effectively marked out where the washers will be cut off, I'll do that with an angle grinder and trim them with the same tool.

0723newtool10drilling.jpg
Drilling. The quarter-inch drill went all the way through the centre of the washers, I then put a 5/16" drill in through the first five only.

I don't know exactly how this last part will work out, but watch this space. It won't be long now and I'll have this special tool finished.
 

Attachments

  • 0723newtool10drilling.jpg
    0723newtool10drilling.jpg
    10.2 KB · Views: 13
  • 0723newtool9partialpartingwashers.jpg
    0723newtool9partialpartingwashers.jpg
    10.3 KB · Views: 6
  • 0723newtool8turningbolt.jpg
    0723newtool8turningbolt.jpg
    9.3 KB · Views: 14
OP
R

Ray Bell

Well-known member
Joined
Mar 21, 2023
Messages
87
Location
The Summit, Queensland
And seven months later I finally get around to showing the finished product!

I found that, principally because I wanted a bit more thread travel and more purchase on the end I've turned down, I needed to add to the available metal in the pieces which hook into the block and bellhousing. Even so, it's not really completely finished as I haven't welded the washers on to keep it all in one piece... nevertheless, this shows how it works:

0723newtooldemo.jpg
Demonstrated. Here I've shown one side applying pressure and spreading the castings apart, the other side I've wound back to show how I've welded a piece underneath the gearbox end to hold it up in there as it's being assembled.

A long 10mm Allen key with a ball end is used to screw it up and spread the engine away from the gearbox.

Remember, the whole purpose of this is to avoid damaging the castings and having to shake things about so much the CV joint boots come apart.
 

OccupantRJ

Well-known member
Joined
May 15, 2009
Messages
11,034
Location
Eastern North Carolina
An economical handy helper for loading/unloading from a truck or trailer is to build an outdoor fixed gantry. You can get used utility poles or use 6x6 posts for the project. Dig post holes in the ground between 3 to 4 feet deep, about 10 feet apart. Plant the posts and cut the tops off level at a height to suit. Acquire a piece of steel beam of proper size and attach to the post tops with several lag bolts into the tops of the posts. I had one like this at my former shop and it was a life saver for loads, and also for hoisting the front of a riding mower to service the blades. You will wonder how you ever lived without it.
 

OccupantRJ

Well-known member
Joined
May 15, 2009
Messages
11,034
Location
Eastern North Carolina
I fabricated and installed this lift beam across my present shop. It has two hoists and trolleys running on it to enhance handling long items or two items at once. I recessed it into my ceiling for more overhead. It spans 25 feet end to end.
 

Attachments

  • 499362BB-033F-4267-BCFB-424C3EBC7CD7.jpeg
    499362BB-033F-4267-BCFB-424C3EBC7CD7.jpeg
    514.5 KB · Views: 18
OP
R

Ray Bell

Well-known member
Joined
Mar 21, 2023
Messages
87
Location
The Summit, Queensland
Originally posted by myself
Another job I've had to do to give me more workshop equipment has been to repair an old tap wrench.

This was something which came upon me because I just couldn't resist it. I don't recall now where I got the wrench, but one handle was missing, the one which screws in and out to enable fitment and to hold the taps in place. It was a P & N brand, which used to be a good brand in Australia.

The first thing I did was work out that the reason the handle was missing was because the thread inside the body into which the handle screwed was pretty much all gone, I had access to a similar one at the Men's Shed and saw that the thread was ⅜" UNF, so I ran a 7/16" UNF tap down it and dug up some material from which I could machine a new handle. That was part of an old rusty Valiant steering column and over a couple of sessions at the Men's Shed I got a result:

1021taphandles.jpg
New handles. There are two handles here because I didn't have a left-hand tap to run up inside the handle so the sliding section of the wrench would function as designed.

The thread on the sliding piece is ¼" in diameter, so one of the new handles was drilled to that size, the other was drilled to 3/16" in the hope that one day I'd get a left hand tap and cut the thread. Which we assumed was a UNC thread.

Much later (the handles were turned up in 2021) I obtained a left-hand tap and die nut and over a period I machined up another piece of Valiant steering column to begin the job of making a new sliding piece. The reason for this was that it wasn't a UNC thread at all, being a couple of threads per inch different. Which I had established when the tap and die set arrived from China.

0124lefthandthread.jpg
Left hand thread. Though the thread is already cut here, I set this up to show how I got the die started straight. The threaded section and the sliding insert are made in one piece.

After forming it up thus far I went back to Angle Grinder Engineering and set about turning the round section into a square - or nearly a square - so it would fit into the wrench.

0124formingslidingend.jpg
Forming the right shape. I reasoned that I could get the sides to be 90° to each other if I was careful using this method. It worked.

Eventually, by careful use of the angle grinder and trimming with files I got the job done...

0124formedandfitted.jpg
The finished tool. I was pretty happy to see this done after such a long gestation period. A little adjustment was still to be done, but I'd achieved what I'd set out to do.

And a little closer:

0124formedcloseup.jpg
Closer look. The adjustment mentioned was to allow the handle to screw in further, which this shows it needs. Also shown clearly is the original sliding piece with its odd thread.

A lot of work to restore a tool which someone has essentially thrown out, but satisfying.
 

Attachments

  • 0124formedcloseup.jpg
    0124formedcloseup.jpg
    57.2 KB · Views: 13
  • 0124formedandfitted.jpg
    0124formedandfitted.jpg
    66.5 KB · Views: 1
  • 0124formingslidingend.jpg
    0124formingslidingend.jpg
    92.3 KB · Views: 2
  • 0124lefthandthread.jpg
    0124lefthandthread.jpg
    50.7 KB · Views: 2
  • 1021taphandles.jpg
    1021taphandles.jpg
    33.5 KB · Views: 10
Last edited:
OP
R

Ray Bell

Well-known member
Joined
Mar 21, 2023
Messages
87
Location
The Summit, Queensland
I've been helping a friend over the past few days as he worked on his Clubman racing sports car...

One thing he's done to reduce the difficulty of working on this very low vehicle his to set up trestles...

0224trestles.jpg
Mobile trestles. These effectively raise the car by about 14", reducing the bending over to work on it.

...which support the vehicle at a better working height and also enable it to be easily moved in any direction depending on the needs within the garage at the time. The roll on top of the trestle is a foam rubber material which has now been glued to the top of the horizontal rail to cushion the seating of the chassis on the trestles.

0224trestlesinuse.jpg
In use. The car is put onto the trestles every time it gets home from the track, whatever jobs need to be done are more easily accomplished.

Bob here carries out some adjustments after reinstalling the engine and gearbox, the car's had a thorough rebuild since its last run, the flywheel has been machined and a more powerful clutch acquired, the universal joints on the driveshaft were replaced, the whole of the hydraulic lines to the rear brakes replaced and new flexible lines to the front calipers fitted. All so much easier with the car higher, while the replacement of some rivets in the floor pan was only possible because it was in the air.

0224trestlesdetail.jpg
Simple build, useful ideas. The casters are free-running and allow easy movement, but one on each trestle has the option to be braked. The frames are 100mm x 50mm 1.6mm tubing (4" x 2" 16g near enough) and were quickly welded up.

Perhaps they could have been built a few inches taller, but that might have brought difficulties getting the car up onto them.

At any rate, they are a very useful for the septuagenarian car owner and his slightly older friend who occasionally drops in to give him a hand.
 

nadogail

Well-known member
Joined
Jan 23, 2009
Messages
31,942
Location
Coronado, CA
Instead of a Gantry I purchased a Hydraulic Lift Platform Cart, it easily accommodates my mobility scooter.
Another handy gadget is a strong magnet glued on a length of dowel, I used a broom stick.
The lift cart has an auxiliary top made from 3/4” plywood
 

Attachments

  • 54D53DF0-E151-441C-A96F-F8E5C06156A9.jpeg
    54D53DF0-E151-441C-A96F-F8E5C06156A9.jpeg
    746.4 KB · Views: 18
OP
R

Ray Bell

Well-known member
Joined
Mar 21, 2023
Messages
87
Location
The Summit, Queensland
I bought a parts washer this week...

On the eve of doing a Subaru engine rebuild, I feel it will make doing a better job a bit easier.

1224partswasherbox.jpg
Promise of easier cleaning. Supercheap Auto offer to match price with identical items, three other retailers had the same thing (I checked the pics online) but were all over 100kms further away. I got the price without doing the miles.

1224partswasherassembly.jpg
Assembly easy.Assembly took about an hour, it all fitted together well and there was even one screw, one nut and two washers left over.

1224partswasher.jpg
Ready to get dirty. Well, actually, I've mounted it on a pallet I've modified for the purpose, but it's actually hard to work out where to locate it in the shed.

1224partswasheronforklift.jpg
Palletised. Moving this around won't be easy. With 45 litres of kerosene on board it's top-heavy and likely to splash about. The hand-operated forklift is perfect for the job now I've made this pallet fit it well.

1224partswasherinplace.jpg
In place. Maybe just for now, it's alongside my 12-ton press acquired several months ago.

I've put some fibreglass sheeting under it to reduce the splashed kerosene that gets to the floor.
 
To avoid these ads, REGISTER NOW!
Top Bottom