pepi
Well-known member
twice  This is a neat thread, is taking off nicely
This is a neat thread, is taking off nicely This is a neat thread, is taking off nicely
My day job I work as a internet marketer and this is what I do at nights.
Wow! Very nice work! I take it you haven't spent your entire career as an internet marketer.
You need to set up a Brownie in the back corner for that!")

Now these are my projects. The first one is a pair of Rotor Hats. One set for a member on here and another set for a friend of his. 7075 aluminum, which I really like the machining properties of.

This is just one of the many reflectors that we made at work. I made the tooling, then had to prove out the reflector. This ine hasn't been chem polished or anodized yet

This is another reflector prototype that I made. When it went into production it was made of of a cast aluminum. That was one good thing about working in the Toolroom and Model Shop......we got to work on the parts first.

This was some stainless steel latches I made for some light on a Boeing aircraft.

This is a quick adjusting riser block. You pull the "C" clip out, slide the inner part up or down, slip the "C" clip back in, then the screw adjustment is on top


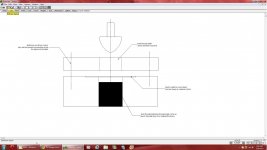
This is an aluminum handle, or the start of an aluminum handle. It goes on a searchlight for a helicopter. The handle eventually gets knurled and welded on. If anyone has ever bent aluminum tubing in a bender, you will know that the pipe will deform some in the bend and become egg shaped. This pipe had to maintain it roundness within .005 throughout the length of the tube. This tube has already been cut to length on the short end. When I made the tooling, then formed the tube, the tube was within .002 throughout the entire length. How I did it was by using two blocks of O-1 Tool steel. In each half of the blocks, I made a groove through the blocks at .500 deep x .500 radius. The tube diameter is 1.000". The two halves were doweled together and clamped. Using some grease for lubrication purposes, I then use a hydraulic press and pushed the tube down through the blocks. The size of the grooves through the block kept the diameter of the tube in check, and the result was a wrinkle free, non egg-shaped tube, bent at the correct angle each and every time.

The last picture, you guys can take a guess on it. Every single surface is machined on a compound angle. The tolerances on the part were +/-.002 everywhere, and is dead nuts on.


I've made so many precision tools for work as I showed above in my previous post, such as the angle plates, Sine plates, vises, and so on. I've made thousands of rivet punches for Universal head rivets. My wife has some of those still. Then a lot of smaller personal tools like boring bars, fly cutters, saw arbors, vise stops, and the list goes on and on. Eventually, I hope to get some equipment for home so that I can make a few things when I feel up to it. I got a lead on a 2 axis CNC mill, so I'm keeping my fingers crossed on that.
Kevin - great stuff!! How did you fixture the reflector to do the walls that thin? And, do you have a pic of the tube bending die? I'm having trouble visualizing how that works?

Thanks for posting that stuff, Kevin. You tool & die guys have my respect.
Yep! They can do math a lot.
 So I bought my first Machinist Handbook and at night, I would sit and go through the Trig section until I understood it. Even to this day, although I have a 2D CAD program, I still like to sit down with a scale and a pencil and figure the problem out in my head just to stay sharp.
Model cockpit for a stealth fighter?
I think you've posted that before? But I forget what you said it was.
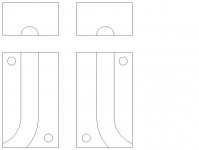
Steve......I don't have a pic of the tube bender but I'll put up a quick sketch to show you how I did it.
As far as the reflectors, they are formed in an aluminum punch and die down into rubber. I'll also put up a sketch but it won't have all of the proper dimensions.
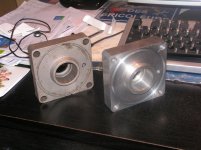
Here is a quick pic of the tooling to make a reflector. To make the punch with facets, it is put into an indexing head. The amount of facets and the shape of the reflector was determined by the engineers. They have programs that figure the light outputs and the patterns the light produces. In the aircraft industry, something as simple as a reading light has to be made with all people in mind, so that if one person turns on a reading light, it will not bother the person beside them. Lights on the outside of the aircraft also have to fall into a certain light pattern spectrum. But to make the punch, it is put into a Haas indexer, and the facets are cut with the side of an end mill. Normally there are 40 segments at 9 degrees each rotational move to give you a total of 360 degrees. The amount of facets in the "X" / "Y" moves varies. And some reflectors may not have facets at all, but may be some sort of odd radius and those would be cut in a lathe.
You drop your blank into the nest in the bottom block, bolt the top bloch to it, lube things up and press it down into the rubber plug. That is hit and miss until you get the right length of rubber, or you may have to cut a slight pocket into the rubber plug as it wants to come up around the material when it starts forming. Too much and it will rip the material. Too little and it won't form the material to the punch.
If it doesn't make sense, let me know and I can explain it a little differently.

Refueling light housing for a F117.
No one going to take a guess as to what this is?

I thought F117, but then thought "No can't be". It is pretty amazing that you made that piece for such a legendary aircraft. Kudos to you! What was the material?
I also have an appreciation for your machine tools. Nice work!
What impresses me the most with your machining is that it's all done on conventional machines! You are a true tool and die guy.
I cheat and use Mastercam and a calculator. I am a mathematical dyslectic or something. Algebra, logarithmics, square roots....**** that. Was,is my worst subject. The numbers just dance and bounce around in my heat.
Now you know my secret. I can't even play cards, because I can't count properly.
But I manage and compensate with calculators and computers.


That looks like fun!
Whats on the inside?


Did this today with/for a friend. Jig for pressing in rivets for building AKs:


 . Cheers, Jim