To avoid these ads, REGISTER NOW!

Show us your sewing projects!

To avoid these ads, REGISTER NOW!

Modern Garage

Well-known member
Joined
Mar 26, 2015
Messages
585
Location
Southern Minnesota
I've just finished a re-upholstery job for a friend who didn't like the color of the chair she inherited. Simple job except the original assembly guys were apparently paid by the staple. They were shoulder to shoulder. I did learn how to fold and sew 'hider gimp' though, so I've got that under my belt. (I could show pics but you'll get a better view if you look for Sailrite's video.)
Now I'm onto a porch glider I curb picked last Fall. I finished the first cushion today and I'm wondering if there's another technique I don't know for closing the box cushions. I've installed zippers and Velcro and also hand stitched the closing seam with a blind stitch, which I did today. Is there any other closing method I haven't learned yet? I like the looks of the blind stitch but it sure is slow.
Joe
 

Attachments

  • 0216251522a.jpg
    0216251522a.jpg
    707.8 KB · Views: 86
  • 0218251012.jpg
    0218251012.jpg
    531.3 KB · Views: 73

kerrynzl

Well-known member
Joined
Nov 8, 2013
Messages
5,054
Location
Tauranga, New Zealand
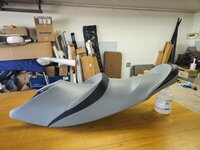
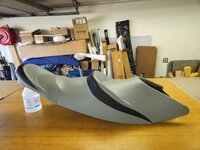
That's a nicely done shift boot Kerry. You are racing in the lap of luxury! I've never had a shift boot in a race car. Just a naked shifter.

Yeah, she's bit of an "armchair" , even my friends accuse me of having a granddad nap while on the track 😁😁

Wow, impressive

Very nice work and write up!
Top notch work and explanation. Thanks for sharing.

jhn9840
John

Thanks for that!
I made that write up a bit long winded to show that the sewing content is actually very minor.
There is more work in the design, cutting and fitting techniques than actual sewing.

So even if your skills are as "rough as guts" you can still produce very acceptable results.
Anybody can give it a go.
 

kerrynzl

Well-known member
Joined
Nov 8, 2013
Messages
5,054
Location
Tauranga, New Zealand
I've just finished a re-upholstery job for a friend who didn't like the color of the chair she inherited. Simple job except the original assembly guys were apparently paid by the staple. They were shoulder to shoulder. I did learn how to fold and sew 'hider gimp' though, so I've got that under my belt. (I could show pics but you'll get a better view if you look for Sailrite's video.)
Now I'm onto a porch glider I curb picked last Fall. I finished the first cushion today and I'm wondering if there's another technique I don't know for closing the box cushions. I've installed zippers and Velcro and also hand stitched the closing seam with a blind stitch, which I did today. Is there any other closing method I haven't learned yet? I like the looks of the blind stitch but it sure is slow.
Joe

Have you tried binding ?
This is best done on cushions [squabs] with a top and bottom with a wide border

You can also do this with a Faux Felled seam [this is best with rounded corners]
You sew the cushion inside out [but leave one side/ edge]

You turn it in the correct way and sew a top stitch through the top and border. [ but leave one side open]

1740301311946.png

After the cushion is stuffed , you close in [topstitch] the last side [sewing close to the edge]

This looks good on pleated cushions
 

Bob Heine

ALLIANCE MEMBER
Joined
Oct 24, 2009
Messages
10,708
Location
Boca Raton, Florida
The finished product with the knob installed [getting eager to go racing again]
no vertical seams are showing

1740215880503.jpeg
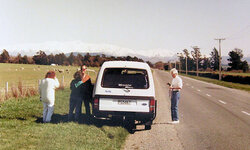
Kerry, I love the boot and knob but it appears the seat and steering wheel are on the wrong side. I had a friend shift the van when we were visiting New Zealand. He wasn't comfortable driving on the proper side but was happy to synchronize the lever with my clutch pedal and it quickly became a fun ride. When I reserved the van I asked for an automatic and the line kinda went dead. Apparently the idea of an automatic in a van was totally foreign. On the way to Mount Hutt, we pulled over to let our friends see the South Island's herd of sheep (I failed to mention that you have more).
NZ Sheep 1.jpg
The one on the right with the white hair was my 'shifter.'
 

kerrynzl

Well-known member
Joined
Nov 8, 2013
Messages
5,054
Location
Tauranga, New Zealand
Kerry, I love the boot and knob but it appears the seat and steering wheel are on the wrong side. I had a friend shift the van when we were visiting New Zealand. He wasn't comfortable driving on the proper side but was happy to synchronize the lever with my clutch pedal and it quickly became a fun ride. When I reserved the van I asked for an automatic and the line kinda went dead. Apparently the idea of an automatic in a van was totally foreign. On the way to Mount Hutt, we pulled over to let our friends see the South Island's herd of sheep (I failed to mention that you have more).
NZ Sheep 1.jpg
The one on the right with the white hair was my 'shifter.'

Bob, on the race track there is no keep left or right road rules, so it doesn't matter which side you sit on.
But I hear you about switching driving sides [I do that often flying between NZ and USA on the same day]
I find the turn signal on the other side of the steering column is more of an issue. And also reversing out of a driveway onto the wrong side of the road.

That photo looks like when you approach Lake Tekapo in the McKenzie Basin ???

The Otago "lakes district" is really nice, do you get down to Milford Sound while you're there
 
Last edited:

Modern Garage

Well-known member
Joined
Mar 26, 2015
Messages
585
Location
Southern Minnesota
Thanks Kerry, I may try that. I've been careful to leave the closing seam on what will be the bottom edge of each cushion so I could probably get away with a small top stitched seam and not be too unhappy.
This glider has an innerspring seat bench so there's no way I can wrestle it around to machine sew the closing there, but I still have a couple of side/armrest pillows so make.
Joe
 

kerrynzl

Well-known member
Joined
Nov 8, 2013
Messages
5,054
Location
Tauranga, New Zealand
Thanks Kerry, I may try that. I've been careful to leave the closing seam on what will be the bottom edge of each cushion so I could probably get away with a small top stitched seam and not be too unhappy.
This glider has an innerspring seat bench so there's no way I can wrestle it around to machine sew the closing there, but I still have a couple of side/armrest pillows so make.
Joe

Joe ,whenever you make a cushion with a border there is always a join in it. So you try and make this join near the back on the side that isn't seen.
Another trick is to close it in on this side [on the bottom]
A cheat method is to Faux top stitch both sides of the join so there is a neat visible seam.

Then join both seams together using the clear polyester thread over the top of the existing seams [most people will never see it]
Similar to the one I underlined in red above [with 2 x faux seams and 1 x join seam]
 

draco_1967

Well-known member
Joined
Jan 3, 2021
Messages
209
Location
Utah
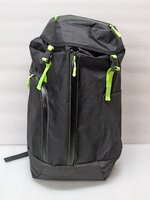
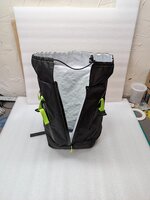
I've been working on a laptop bag for work, that can also double as a weekend travel bag (just big enough for a couple days' worth of clothes and travel essentials). It took me a lot of time to sketch it out, pick out the features I wanted, and then template it out to get true measurements. I had been putting off assembling the bag, because the materials are on the expensive side (fancy, ultralight laminates), but I finally decided to dive in.
It was by far the most complicated project I've worked on. I really had to think through order of operations for each seam, and how I would get the bag inverted when working with the lining. I learned a few things along the way, made a couple of major mistakes that had to be fixed, but overall I'm happy with how it turned out. I made a lot of notes in my sketchbook on what to alter on the design if I make another one.

gxMGWngtmEkXIaFz3-sAfO1qHwlbPWkVrGTrWG62pA09B=w400.jpg0cgPCfRaKw9QIrsW1LVOlf7BRHMaZBXJRJSGdPrttGyYh=w400.jpg
AJpDXKWu98vBlZVHFSEb0ohQtXVeb8o0tQMKwitYOZnP9=w600.jpg
mSv8ERtoxw0kCaojBY-BzUffuusQ-o2FAH9kk_R4pm0P9=w600.jpg

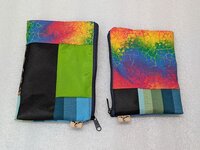
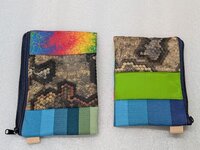
I also took some scraps that I'd saved from other projects, sewed them together like quilt, and made these little zipper pouches. Much simpler than the backpack!
EuqvzVNmipIQZs9pbmOuh4e7P_3aryMicYJ2CGlVh5lVo=w600.jpg
3yaCIsmlk7P6hMPBmdwHEthppaPRNeDklnOjMZqa3k9KN=w600.jpg

My basket of scraps is still way too full. I'm going to need to purge it, because I don't know what I would use them for other than silly little bags like these...
 

Modern Garage

Well-known member
Joined
Mar 26, 2015
Messages
585
Location
Southern Minnesota
Kerry, thanks again. I think, if I'm reading correctly, that you're describing what I did. I closed these cushions with a blind stitch/ladder stitch on the normal seam line between back and side. (There's no real front/back as I'm making these reversible.)
Clear thread! I never even thought of that!
Joe
 

Bob Heine

ALLIANCE MEMBER
Joined
Oct 24, 2009
Messages
10,708
Location
Boca Raton, Florida
Bob, on the race track there is no keep left or right road rules, so it doesn't matter which side you sit on.
But I hear you about switching driving sides [I do that often flying between NZ and USA on the same day]
I find the turn signal on the other side of the steering column is more of an issue. And also reversing out of a driveway onto the wrong side of the road.

That photo looks like when you approach Lake Tekapo in the McKenzie Basin ???

The Otago "lakes district" is really nice, do you get down to Milford Sound while you're there

Kerry, it's funny how great the directional signal on the right was for me. It was right there under my right hand in my Toyota Camry. On the other hand, doing a K-turn was not so great with the shifter on my left. It did help that the RTA required me to have an $85 heavy duty spinner on the wheel. In the US I have to reach across to the left side of the steering wheel to signal. Not horrible when I'm going straight and signaling for a turn but gets iffy when the turn is followed by another turn in the opposite direction. If signaling wasn't so ingrained in me I would do like 90% of Florida drivers and act like that stalk carries a fatal electrical charge.

Our lodging was in Christchurch and our day trip to Mount Hut and back didn't take us closer to Lake Tekapo. However, we did stop at the bridge over the Rakaia river and take a jet boat ride. The owner of our lodging warned us not to take the White Boat but the Red Boat had the engine cover open with two people ripping things apart. That White boat didn't smell all that pleasant when we climbed out and we completely understood the warning. Being American, the six of us climbed back in for a second shorter ride when a Japanese photographer requested a few action shots with Yanks in the boat. Apparently back in 1990 Japanese tourists really liked imitating Americans. This photo was taken before the driver helped us see our lives flash before us.
NZ Jet Boat 3.jpg
Sadly, our time on the South Island was limited so we didn't see all the majestic scenery your country had to offer. Happily, the lodging owner had a connection to a Maori guide in Kaikōura, to go whale watching. Turned out to be more like whale touching. As an indigenous guide he was allowed to get much closer to the Sperm whales than the big commercial tours. We weren't expecting an inflatable, or the 13 mile ride offshore but we were relieved when the guide told us the adults were way up north in Baja and all we'd see was teenage Sperm whales.
NZ Whale Watching Boat.jpg
At that moment in my life I did not know a teen Sperm whale was way bigger than our inflatable boat (one came to the surface within inches ten feet of the boat) . I also did not know Sperm whales take a dump at the start of every dive (that water by his [her?] tail isn't blue). We passed what I thought was a big chunk of bleached driftwood on the way back. The guide took us closer to see the huge suckers on the 'log.' It was a piece of a giant squid's tentacle. Giant squid are both killers of and dinners for Sperm whales.
NZ Whale Watching Whale 1.jpg NZ Whale Watching Whale 2.jpg
If I had the time and wherewithal, I could easily have spent a year touring New Zealand. We barely scratched the surface in our two years in Australia. Work is a nasty four-letter word that interferes with a lot of fun stuff but fun stuff requires W@&K to pay for it.
 

IndyGarage

Well-known member
Joined
Apr 29, 2010
Messages
9,738
Location
Indy
I've been working on a laptop bag for work, that can also double as a weekend travel bag (just big enough for a couple days' worth of clothes and travel essentials). It took me a lot of time to sketch it out, pick out the features I wanted, and then template it out to get true measurements. I had been putting off assembling the bag, because the materials are on the expensive side (fancy, ultralight laminates), but I finally decided to dive in.
It was by far the most complicated project I've worked on. I really had to think through order of operations for each seam, and how I would get the bag inverted when working with the lining. I learned a few things along the way, made a couple of major mistakes that had to be fixed, but overall I'm happy with how it turned out. I made a lot of notes in my sketchbook on what to alter on the design if I make another one.

gxMGWngtmEkXIaFz3-sAfO1qHwlbPWkVrGTrWG62pA09B=w400.jpg0cgPCfRaKw9QIrsW1LVOlf7BRHMaZBXJRJSGdPrttGyYh=w400.jpg
AJpDXKWu98vBlZVHFSEb0ohQtXVeb8o0tQMKwitYOZnP9=w600.jpg
mSv8ERtoxw0kCaojBY-BzUffuusQ-o2FAH9kk_R4pm0P9=w600.jpg

I also took some scraps that I'd saved from other projects, sewed them together like quilt, and made these little zipper pouches. Much simpler than the backpack!
EuqvzVNmipIQZs9pbmOuh4e7P_3aryMicYJ2CGlVh5lVo=w600.jpg
3yaCIsmlk7P6hMPBmdwHEthppaPRNeDklnOjMZqa3k9KN=w600.jpg

My basket of scraps is still way too full. I'm going to need to purge it, because I don't know what I would use them for other than silly little bags like these...
I'm impressed.

Making something like this backpack makes you appreciate the construction of everyday items you buy. It takes a lot of planning and sequencing to get everything to come out like you want - then of course skill in sewing to make it look good. You are a couple steps beyond my skill level.

I made a few small heavy duty bags for co workers this holiday season and they turned out pretty good, but even they took a lot of time and many steps.

I was looking at an old Tumi leather computer bag I have and the skill in making it is incredible.
 

KFBR392

Well-known member
Joined
Feb 4, 2025
Messages
142
@Outlawmws, that's our other Singer. They made lots of them and they are available on eBay for anything from a couple of hundred to more than a thousand. Absolutely wonderful machines. Not quite up to boat covers or reinforced denim pockets but great for day to day stuff.

Ours is one of a group of 25,000 commissioned August 15, 1940. It's one of the rare ones that have a Wrinkle (crinkle) finish.
Singer 8.jpg
There's a website devoted to the Singer Featherweight (https://singer-featherweight.com/collections/sold?p=10) and they mention these special machines:
"August 1940 - a very small handful of Featherweights were finished with a Wrinkle finish (aka Crinkle), however, the Wrinkle Featherweights in this batch were most likely put into storage and not distributed until 1947, when they received the chromed, striated faceplate."

I suspect this Featherweight was a gift to my mother-in-law when she and her husband moved into their first house around 1947-8. She had eight [frugal] sisters who probably pooled their money to buy it.

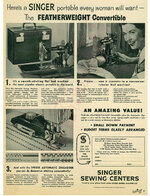
Singer also sold a Featherweight 222 Convertible that made it easy to sew cuffs on sleeves:
"July 1953, the Singer 222K Free-Arm Featherweight was introduced in the UK, Europe, Australia and some in Canada. This machine was not marketed in the USA. Production of the 222k continued until 1961."
Singer Featehrweight 222 Convertible.jpg

Singer Featehrweight 222 Convertible Ad.jpg
This is one of those tiny rabbit holes people like me and @Squankum tumble into.
One of these days, I’ll find someone selling a crinkle featherweight for a gloss featherweight price and cash in.
 
To avoid these ads, REGISTER NOW!

Outlawmws

Well-known member
Joined
Aug 9, 2011
Messages
39,312
Location
The Badlands
Bill, are the before and after pics on the headliner reversed? I'm curious about those buttons in the middle - I could use that on my samurai hard top.
 

WILD-BILL

Well-known member
Joined
Dec 10, 2011
Messages
875
Location
Brook Park Oh
No, the pics are not reversed. The 4 buttons down the center are factory plastic push on retainers. IIRC they push into holes in the structure of the roof bracing. Should be easy to find at any junk yard but colors may be limited.

This one, as well as most newer cars is foam backed fabric that is glued to a fiber board core.

The assembly needs to be removed from the vehicle. (some cars may need to remove either a windshield or back glass for this)

Removal of the old is the worst part. Best method I've found (so far) is to pull the fabric off, then using a shop vac, scrap away at the remaining foam and glue. The more you can get off this way the better. (I've done 2 of these and one was easier to clean then the other with this method)

After you get as much as you can sucked up with the vac, mineral spirits on a rag will help break down the remaining glue and clean the surface for the new install. Just like paint, surface prep is key. You want it clean as new.

Lay the new material over the board so that there is plenty of over hang. You only get on shot at this so you don't want to come up short on an end or side.

Once the material is layed out and your sure you will have full coverage, fold the materiel back over it's self halfway. ((i went front to back because of the length but you could go side to side on a shorter one).

Now for the glue. DO NOT use anything you can likely find in a spray can at the big box store. (even the 3M super 77). They break down with heat and will fail and separate after a short time. Weldwood Landau Top & Trim Contact Adhesive is the industry standard. They do offer it in aerosol cans but I have not used it so not sure if it will last. I buy it in bulk and spray it through a HF siphon style spray gun. Spray the entire exposed half of the board and the underside of the foam. You want complete coverage but don't get to much in spot as it can soak though. IT WONT STICK WHERE THERE'S NO GLUE !!!!

After spraying, wait a few minutes until the glue tacks up. It should feel sticky but not transfer to your finger.

You only have one shot at this.

Working from the fold over, start slowly smoothing the material onto the board with your flat hand. Hard presses or finger impressions are likely to stay for ever. Start from the center working out towards the side and end smoothing the material into place. Do not press hard, With a light touch it's possible to get it to stick but not so much that you can't pull it back and redo if needed. The idea of course is to get it layed out in one shot smooth with no wrinkles so you don't need to risk pulling it up as that can very likely rip the foam, ruin the project and make you have to start over.

Did I mention, You only have one shot at this.

With the first half down, repeat for the second half. Once it's all in place, then you can go over it smoothing it out with a flat hand pressing down a little firmer.

Once it is all glued down, walk away. Let it sit for roughly 8 hrs (i left it over night) before you flip it over to glue the edges and fold over areas. I think I let it sit after gluing those for about 4 hrs before cutting out the holes and installing it back in the van.

There are plenty of good you tube vids that show in detail everything I tried to describe.

Did I mention, You only have one shot at this.
 

mike93lx

ALLIANCE MEMBER
Joined
Dec 9, 2013
Messages
37,848
Location
Richmond, VA
No, the pics are not reversed. The 4 buttons down the center are factory plastic push on retainers. IIRC they push into holes in the structure of the roof bracing. Should be easy to find at any junk yard but colors may be limited.

This one, as well as most newer cars is foam backed fabric that is glued to a fiber board core.

The assembly needs to be removed from the vehicle. (some cars may need to remove either a windshield or back glass for this)

Removal of the old is the worst part. Best method I've found (so far) is to pull the fabric off, then using a shop vac, scrap away at the remaining foam and glue. The more you can get off this way the better. (I've done 2 of these and one was easier to clean then the other with this method)

After you get as much as you can sucked up with the vac, mineral spirits on a rag will help break down the remaining glue and clean the surface for the new install. Just like paint, surface prep is key. You want it clean as new.

Lay the new material over the board so that there is plenty of over hang. You only get on shot at this so you don't want to come up short on an end or side.

Once the material is layed out and your sure you will have full coverage, fold the materiel back over it's self halfway. ((i went front to back because of the length but you could go side to side on a shorter one).

Now for the glue. DO NOT use anything you can likely find in a spray can at the big box store. (even the 3M super 77). They break down with heat and will fail and separate after a short time. Weldwood Landau Top & Trim Contact Adhesive is the industry standard. They do offer it in aerosol cans but I have not used it so not sure if it will last. I buy it in bulk and spray it through a HF siphon style spray gun. Spray the entire exposed half of the board and the underside of the foam. You want complete coverage but don't get to much in spot as it can soak though. IT WONT STICK WHERE THERE'S NO GLUE !!!!

After spraying, wait a few minutes until the glue tacks up. It should feel sticky but not transfer to your finger.

You only have one shot at this.

Working from the fold over, start slowly smoothing the material onto the board with your flat hand. Hard presses or finger impressions are likely to stay for ever. Start from the center working out towards the side and end smoothing the material into place. Do not press hard, With a light touch it's possible to get it to stick but not so much that you can't pull it back and redo if needed. The idea of course is to get it layed out in one shot smooth with no wrinkles so you don't need to risk pulling it up as that can very likely rip the foam, ruin the project and make you have to start over.

Did I mention, You only have one shot at this.

With the first half down, repeat for the second half. Once it's all in place, then you can go over it smoothing it out with a flat hand pressing down a little firmer.

Once it is all glued down, walk away. Let it sit for roughly 8 hrs (i left it over night) before you flip it over to glue the edges and fold over areas. I think I let it sit after gluing those for about 4 hrs before cutting out the holes and installing it back in the van.

There are plenty of good you tube vids that show in detail everything I tried to describe.

Did I mention, You only have one shot at this.
So what you are saying is it's pretty straight forward and simple?

Sounds like it's time for a color change in the wife's daily!

Feels like I'd rather do a self-appendectomy than replace a headliner
 

IndyGarage

Well-known member
Joined
Apr 29, 2010
Messages
9,738
Location
Indy
No, the pics are not reversed. The 4 buttons down the center are factory plastic push on retainers. IIRC they push into holes in the structure of the roof bracing. Should be easy to find at any junk yard but colors may be limited.

This one, as well as most newer cars is foam backed fabric that is glued to a fiber board core.

The assembly needs to be removed from the vehicle. (some cars may need to remove either a windshield or back glass for this)

Removal of the old is the worst part. Best method I've found (so far) is to pull the fabric off, then using a shop vac, scrap away at the remaining foam and glue. The more you can get off this way the better. (I've done 2 of these and one was easier to clean then the other with this method)

After you get as much as you can sucked up with the vac, mineral spirits on a rag will help break down the remaining glue and clean the surface for the new install. Just like paint, surface prep is key. You want it clean as new.

Lay the new material over the board so that there is plenty of over hang. You only get on shot at this so you don't want to come up short on an end or side.

Once the material is layed out and your sure you will have full coverage, fold the materiel back over it's self halfway. ((i went front to back because of the length but you could go side to side on a shorter one).

Now for the glue. DO NOT use anything you can likely find in a spray can at the big box store. (even the 3M super 77). They break down with heat and will fail and separate after a short time. Weldwood Landau Top & Trim Contact Adhesive is the industry standard. They do offer it in aerosol cans but I have not used it so not sure if it will last. I buy it in bulk and spray it through a HF siphon style spray gun. Spray the entire exposed half of the board and the underside of the foam. You want complete coverage but don't get to much in spot as it can soak though. IT WONT STICK WHERE THERE'S NO GLUE !!!!

After spraying, wait a few minutes until the glue tacks up. It should feel sticky but not transfer to your finger.

You only have one shot at this.

Working from the fold over, start slowly smoothing the material onto the board with your flat hand. Hard presses or finger impressions are likely to stay for ever. Start from the center working out towards the side and end smoothing the material into place. Do not press hard, With a light touch it's possible to get it to stick but not so much that you can't pull it back and redo if needed. The idea of course is to get it layed out in one shot smooth with no wrinkles so you don't need to risk pulling it up as that can very likely rip the foam, ruin the project and make you have to start over.

Did I mention, You only have one shot at this.

With the first half down, repeat for the second half. Once it's all in place, then you can go over it smoothing it out with a flat hand pressing down a little firmer.

Once it is all glued down, walk away. Let it sit for roughly 8 hrs (i left it over night) before you flip it over to glue the edges and fold over areas. I think I let it sit after gluing those for about 4 hrs before cutting out the holes and installing it back in the van.

There are plenty of good you tube vids that show in detail everything I tried to describe.

Did I mention, You only have one shot at this.
Thanks very much for the detailed instructions I have an F350 with a very badly hanging headliner- what's the source for the material?

So what you are saying is it's pretty straight forward and simple?

Sounds like it's time for a color change in the wife's daily!

Feels like I'd rather do a self-appendectomy than replace a headliner
I think you only have one shot on a self-appendectomy too! That reminds me wasn't there news awhile back of some surgeon in Antarctica who had to do an appendectomy on himself because they were stuck in a weather travel window?
 

dscheidt

Well-known member
Joined
Apr 26, 2017
Messages
2,909
Thanks very much for the detailed instructions I have an F350 with a very badly hanging headliner- what's the source for the material?


I think you only have one shot on a self-appendectomy too! That reminds me wasn't there news awhile back of some surgeon in Antarctica who had to do an appendectomy on himself because they were stuck in a weather travel window?

Leonid Rogozov did it in 1961. Jerri Lin Nielsen treated her own breast cancer, which included doing a couple biopsies, in the late 90s.
 

WILD-BILL

Well-known member
Joined
Dec 10, 2011
Messages
875
Location
Brook Park Oh
rushinupholsterysupply

yourautotrim

albrightssupply

Between those 3 you should be able to find what you need. I like Albrights because anything over $200 ships free and it's not hard to spend over $200 doing this work LOL.

Order samples. And if your not recovering the sun visors, take one of them out of the car and hold it up to the sample in direct sunlight to get the best match. Artificial lights no matter how good can play tricks on your eyes and the colors.
 

mikegt4

Well-known member
Joined
Sep 12, 2005
Messages
3,277
Location
sw ohio
I will second "do not use 3M super 77", it will fail in short order. 3M super 99 at a bare minimum, dedicated quality auto upholstery adhesive is well worth the price. I was installing a headliner in my full size old school van using #99 when I ran out 3/4's of the way through the glue up on a Sunday afternoon. Ran to Lowes for more #99 but all they had in stock was #77. I finished the project with #77 and about a month later all the places that were glued with #77 failed and the headliner sagged down. It's pretty hot near the roof of a vehicle.
 

Private Lugnutz

Well-known member
Joined
Mar 30, 2012
Messages
30,668
Location
The Authentic Jersey Shore
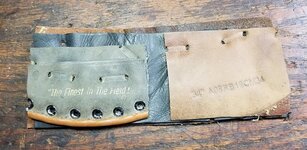
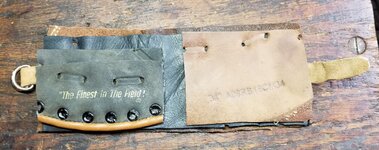
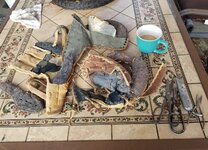
Last week on a Free Parking thread @SouthernIllinois posted a photo of a wallet he had custom made out of his old baseball glove. It wowed me right over. Doing a little scouting around revealed several enterprises making them on various websites, including eBay. As some of you may know, I am a College (Division III) and high school (NJSIAA) umpire and all three of my sons (38, 31, and 22) played from LL through high school. I decided to try to make three wallets out of their old gloves and wrap them up as Christmas presents.

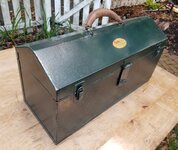
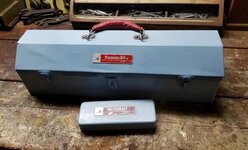
One big caveat before I post Phase I, I am not an expert in leathercraft. The most I have done is reclad leather handles on vintage toolboxes that I restored and some of those I will likely go back and re-do, since, like everything else in life, I got better as I went along. (See examples below.)

EDIT: If this is inappropriate for the thread, let me know before I go on. I did skim through it and I see that most of the projects are automotive related (upholstery, etc) and those that aren't seem to be larger, utility-oriented, and much more sophisticated.
 

Attachments

  • After 2.1.jpg
    After 2.1.jpg
    725.6 KB · Views: 23
  • After 6.jpg
    After 6.jpg
    575.3 KB · Views: 19
Last edited:

Private Lugnutz

Well-known member
Joined
Mar 30, 2012
Messages
30,668
Location
The Authentic Jersey Shore
^ Good point. Plus, Nines hasn't been here in five years, but if he were, I tend to think my old Garage Sale thread buddy and hostus emeritus (2015 season!) wouldn't mind.

Phase I: Cannibalization, Salvage, Design, Testing

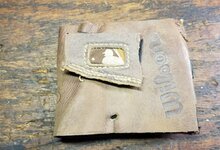
Step 1: I disassembled, excised, cut out, or otherwise removed significant swaths of leather and/or specific features (logos, brandings, etc) from four gloves - a Rawlings, a Louisville, a Wilson, and a Mizuno. None of my boys used Mizuno, but I have picked a few extras up along the way when I was coaching or giving lessons and it was a catcher's mitt, and catcher's mitts provide the longest stretch of leather uninterrupted by a bend or a finger slot, etc, so I was glad for it. (Time: 2 hours)

1 Cannibalizing.jpg2 Materials.jpg

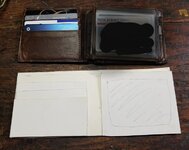
Step 2: Using my own wallet as a general model, I used cardboard to create patterns the same size and shape as the major components. I will call them the outside, the inside (forms the other half of the billfold), credit card pockets, and the driver's license/other pocket. I am reducing the number of credit card pockets. I don't know if either of them will replace their wallets with these, or just use them on occasion, moving their DL and a card etc, but if they want to use them daily, three slots plus whatever they can slide under their DL should be enough at their ages. (Time: 30 minutes)

Step 3: I assembled the patterns into the shape of the wallet to see if it was correct and satisfactory. (Time: 20 minutes)

3 Model and Patterns.jpg

Step 4: I laid out all the salvage pieces and started placing the patterns (outside, inside, credit card pockets, and DL/other pocket) over various pieces, just getting ideas. This was half fitment and half creative/aesthetic in terms of color, shape, printed embossings, patches etc. Eventually, I settled on a Wilson-themed wallet for my youngest and put everything else aside. (Time: 30 minutes)

Step 5: Using the patterns I marked and cut out the pieces. (Time: 45 minutes)

Step 6: I loosely assembled the pieces into the wallet...

4 Design 1.jpg4 Design 2.jpg

4 Design 3.jpg

...and checked it with cards, DL, folding it over, etc, again for fitment, but also if it was as pleasing to the eye as I imagined.

5 Testing.jpg


I am pretty happy with this and already know I will likely use it as a prototype for the others. (Time: 20 minutes)
 
Last edited:

Private Lugnutz

Well-known member
Joined
Mar 30, 2012
Messages
30,668
Location
The Authentic Jersey Shore
Excuse all the edits. GJ drives me nuts when it reverses or randomly rearranges the loading order of the attached photo files at the bottom, ruining any narrative flow. So I inserted them.

Taking opinions on a cinch. I keep waffling back and forth. On one hand I really like it as an extra flourish, on the other hand I worry about it being overkill/an affectation too far, or, worse, them thinking it looks feminine, despite the context of the baseball glove, or an inconvenience, and disliking it.
 

Attachments

  • 20250825_162201.jpg
    20250825_162201.jpg
    639.1 KB · Views: 17
  • 20250825_162118.jpg
    20250825_162118.jpg
    680.3 KB · Views: 15
  • 20250825_162138.jpg
    20250825_162138.jpg
    755.8 KB · Views: 20
To avoid these ads, REGISTER NOW!
Top Bottom