Here's my contribution to this thread - a pretty basic VFD installation on a new-to-me wood planer. It is a vintage made-in-Japan 16” planer (Heian AP-400), likely from the late 1960s or 1970s. It was sold off as obsolete/surplus from a commercial cabinet making shop, and has a Toshiba 3 hp, 3-phase, 550v motor. Here in Canada, this kind of used industrial equipment can often be bought inexpensively, basically because it is not good enough for industrial use anymore but is too heavy and too inconvenient for home workshop use because of the need for 3-phase power. The typical Canadian industrial workplace electrical power level is 575v (but used to be 550v years ago). I think in the US the equivalent is 460v? Anyway, my workshop only has single-phase 240v power available, so I have made use of a step-up VFD in a quick “proof of concept” installation to see if I could get my planer powered up and working. (Ignore the lifting straps in the picture - I still have it sitting on the frame of the engine hoist I used to unload, and I'll be lifting it again shortly to place the planer onto some sort of mobile base.)

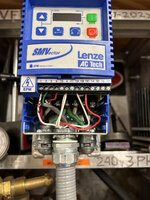
The VFD that I purchased is exactly this one shown in the picture below. Its is one of these cheap Chinese VFDs of dubious quality. I bought it probably about 2 years ago, but it only cost $109 at that time - it was some sort of end of model run special pricing, because as can be seen they are now quite a bit more expensive, at least for these larger 7.5 kW (10 hp) models. But the important selling point for me is that these VFDs, while advertised as “Single Phase 220V Input to 3 Phase 380V Output" are actually voltage doublers. So that means that at my rural home, where grid voltage runs a little bit hot at about 245v, the VFD doubles that and delivers 490 volt 3-phase to the motor. This is a bit short of nameplate 550v, so probably causes a bit of power loss in the motor, but is good enough for my home shop use requirement. I have tested my planer with this and it seems to work fine. I was just curious if others have been buying these step-up VFDs? Especially in the USA, where you only need 460v, it would seem like an ideal way to power higher voltage machinery without needing to bother with a transformer.

Also wondering if there is an elegant solution to providing strain relief or proper tethering of the power in and power out wires from the terminal connection at the bottom of the VFD? Nothing is provided on the body of the VFD to clamp to, so I installed a small box below for connecting the power cord, and then routed a short bit of flexible conduit bent to end up in a relatively close position to the terminals. Not pretty, so hoping there are better ways.
Thanks, Tom


.jpeg")
.jpeg")
.jpeg")

.jpg")

.jpg")
")