To avoid these ads, REGISTER NOW!

Show us your welding projects

To avoid these ads, REGISTER NOW!

MrSurly

Well-known member
Joined
Jan 15, 2014
Messages
1,671
Location
East Texas
Mig welded. Lincoln power mig 200 I've had for 15 years now. Tig takes to long and would've had to charge an extra 1500 in just labor to weld them up


Impressive. I’d love to develop the technique that produces those results with MIG


Sent from my iPhone using Tapatalk
 

Bansheeboy11

Well-known member
Joined
Jul 15, 2014
Messages
103
Location
NY
i made an exhaust like a rally car along the lines of the old WRC gravel spec exhausts but for like $200 instead of $900 :lol: Original here

I made some dimpled gussets for hangers and they came out good, it looks super cooland sounds like a rally car.

J7rCWaQ.jpg

RpfbMAE.jpg

39GlIE7.jpg
 

SickSpeedMonte

Well-known member
Joined
Feb 28, 2017
Messages
81
Location
MD
That would take all week with a TIG, very nice work! I would love to get that good with my MIG. Mind sharing any setup/technique tips? This is a cursive 'e' technique, pulling maybe 25-30 degree torch angle and slightly downhill. 1/4" mild steel, 0.030" ER70S-6 wire, 190A Hobart Handler on full power, 7/10 wire speed, 75/25 gas.
 

Attachments

  • Bracket.jpg
    Bracket.jpg
    147.3 KB · Views: 247

sqznby

Well-known member
Joined
Oct 26, 2013
Messages
981
Location
Coastal NC
Finished a base for a coffee table I'm making. Top will be a 38" diameter live edge oak with resin coating.


base-1.jpg

base-2.jpg

base-3.jpg

base-4.jpg
 

LG63

Well-known member
Joined
Sep 7, 2012
Messages
1,003
Finished a base for a coffee table I'm making. Top will be a 38" diameter live edge oak with resin coating.

Wow, how in the world do you keep something like that square and plumb as welding progresses? Were your miters milled or saw cut?

Outstanding
 

sqznby

Well-known member
Joined
Oct 26, 2013
Messages
981
Location
Coastal NC
Finished a base for a coffee table I'm making. Top will be a 38" diameter live edge oak with resin coating.


base-1.jpg

base-2.jpg

base-3.jpg

base-4.jpg

That's fantastic!

Thank you :beer:

Finished a base for a coffee table I'm making. Top will be a 38" diameter live edge oak with resin coating.

Slick design and execution, makes me think of MC Escher.

Royce

Thanks Royce, I appreciate it. MCE stairs are very cool.
I believe this is referred to as an infinity cube

That’s going to be beautiful. Is that an Escher design?


Sent from my iPhone using Tapatalk

Thanks MrSurly:thumbup:
This is not or at least I don't think it is. It is referred to as an infinity cube.

Even the dog is saying :wtf: WTF

Thats cool

Haha thanks, she's always by my side where ever I am, snuggling right next to me on the couch right now.
Thanks again

Wow, how in the world do you keep something like that square and plumb as welding progresses? Were your miters milled or saw cut?

Outstanding

Lots and lots of clamps and I keep it clamped until cool to the touch.
All cuts were made on my Grizzly G9742 - 5 x 6 band saw. Great little saw until I get my garage built.

Very nice. Look forward to seeing the finished coffee table.

jhn9840
John

Thanks John I appreciate it.
Me too haha. I need to build a router table for the large oak cookie and also one for the resin mix. I'm lacking in the space department right now so I have to do one thing at a time, break it down then build.
 

sqznby

Well-known member
Joined
Oct 26, 2013
Messages
981
Location
Coastal NC
Really nice! Are you leaving it bare with clear coat or painting?

Thanks man:thumbup:
Good question.
I was planning on clear coating it but, I wasn't paying attention when cutting because I was figuring out all the angles and lost track of the seam. Its not too noticeable but I can see it.
I'm honestly not sure what I'm going to do yet.
Thoughts or recommendations?
 
To avoid these ads, REGISTER NOW!

thejimmy

Well-known member
Joined
Dec 5, 2016
Messages
165
Location
Clearwater FL.
Thanks man:thumbup:
Good question.
I was planning on clear coating it but, I wasn't paying attention when cutting because I was figuring out all the angles and lost track of the seam. Its not too noticeable but I can see it.
I'm honestly not sure what I'm going to do yet.
Thoughts or recommendations?

Very nice, what size tube and wall?

There are a lot of different rattle can options, one I like is the Hammered style paint.
 

sqznby

Well-known member
Joined
Oct 26, 2013
Messages
981
Location
Coastal NC
Very nice, what size tube and wall?

There are a lot of different rattle can options, one I like is the Hammered style paint.

Thanks Jimmy:thumbup:
It's 2 x 2 x .125

True, I'm going to be heading to the hardware store to check out my options.

Thanks again:beer:
 

sqznby

Well-known member
Joined
Oct 26, 2013
Messages
981
Location
Coastal NC
Steel-It for a nice, flat stainless steel look.

I actually have some on order for some suspension parts and pondered using it for this but, my next base will be made of stainless.
This was a trial run (that worked out hah) and material I had lying around.
 

sqznby

Well-known member
Joined
Oct 26, 2013
Messages
981
Location
Coastal NC
That table is just awesome. Real nice work. Congrats.

Thanks Glen, I appreciate that:beer:

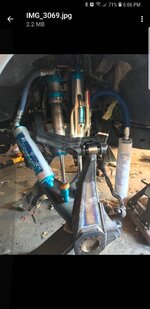
Front long travel kit I build for 95 - 04 tacoma. Gonna be making a 4x4 kit here soon hopefully.4d055ee3fab2dbbd949dfe9ac2ef47bc.jpg

Good gawd, you do some nice work TT.
Something about a long travel suspension that makes my jeans tight.
I'd love something like that for my Tahoe. Just don't know where to go with my rear set up. I need to move my tank and then I'd have all the room in the world.
What would you suggest for a rear set up on an SUV? JD Fab did a wild leaf set on a NBS Tahoe that was pretty creative. He used leaf springs instead of links/arms.
 

Bigblue&Goldie

Well-known member
Joined
Mar 12, 2009
Messages
10,670
Location
AZ
Something about a long travel suspension that makes my jeans tight.
I'd love something like that for my Tahoe. Just don't know where to go with my rear set up. I need to move my tank and then I'd have all the room in the world.
What would you suggest for a rear set up on an SUV? JD Fab did a wild leaf set on a NBS Tahoe that was pretty creative. He used leaf springs instead of links/arms.

Don't waste your time or money building a Tahoe. To make it work half way decent you're looking at BIG money. You would be money ahead buying a SxS or starting with a Ranger/Tacoma. If going for looks, anything works.
 

sanddan

Well-known member
Joined
Jul 7, 2005
Messages
708
Location
Oregon
What gage plate are you using on the suspension arms? Is it 4140 or mild steel? Parts look great.
 

jhama78

Active member
Joined
Jan 12, 2015
Messages
28
Location
Eastern Shore, Va
Been putting this together over the winter, built with old polaris spindles and .120 wall 2x2 and 1.25x1.25 square and 1 5/8" round tube. Havent welded much in the last 7 years, been great to burn some wire and put something together.

TSCCoupler12-2.jpg

1231180006b.jpg

bed mounted 2.jpg
 

TTMotorsports

Well-known member
Joined
Jan 8, 2019
Messages
1,107
Location
Lucerne Valley, CA
Made some Rose's for valentines day. Got more made to sell for mothers day0a9b936bf388b8c9478ea77449ab8217.jpg84de7b189e85c90df7c023817d961dc2.jpg315b273c4d06f90908cfd2309f495788.jpg
 

Attachments

  • 0a9b936bf388b8c9478ea77449ab8217.jpg
    0a9b936bf388b8c9478ea77449ab8217.jpg
    45.6 KB · Views: 3
  • 84de7b189e85c90df7c023817d961dc2.jpg
    84de7b189e85c90df7c023817d961dc2.jpg
    33.4 KB · Views: 3
  • 315b273c4d06f90908cfd2309f495788.jpg
    315b273c4d06f90908cfd2309f495788.jpg
    35.6 KB · Views: 4

LXCam

ALLIANCE MEMBER
Joined
Apr 23, 2013
Messages
19,091
Location
AZ
TT, dude you rock at this metal stuff. Nice job! I'm ok at the straight forward designs. But ask me to make something like that flower and I'm on my face.


But as much as I have to admire your work and bow to your skills. :thumbup:

Sqenzby wins my vote for project of the week. That table is so badass I'm going to be storing that one in the memory banks for a project. That's just too cool. :beer: :bowdown:

And jahama, the trailer is very cool. Are you going to do any type of hydraulics for the dump or just watch how you load it :)
 
Last edited:

Sevenhills1952

Well-known member
Joined
Aug 30, 2018
Messages
1,750
Location
Virginia
Made some Rose's for valentines day. Got more made to sell for mothers day0a9b936bf388b8c9478ea77449ab8217.jpg84de7b189e85c90df7c023817d961dc2.jpg315b273c4d06f90908cfd2309f495788.jpg
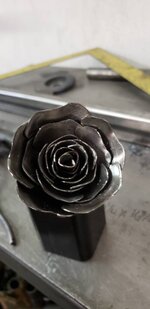
Wow! That is amazing. We have my Grandfather's rose he made in class 90 years ago. It's nice, but not that nice.
Wife, girlfriend or Mom would appreciate that more because you made it and it lasts forever.

Sent from my SM-S320VL using Tapatalk
 

Attachments

  • 0a9b936bf388b8c9478ea77449ab8217.jpg
    0a9b936bf388b8c9478ea77449ab8217.jpg
    44.7 KB · Views: 2
  • 84de7b189e85c90df7c023817d961dc2.jpg
    84de7b189e85c90df7c023817d961dc2.jpg
    33.1 KB · Views: 2
  • 315b273c4d06f90908cfd2309f495788.jpg
    315b273c4d06f90908cfd2309f495788.jpg
    34.8 KB · Views: 2

mr_magicfingers

Well-known member
Joined
Apr 22, 2013
Messages
70
Location
Devon, UK
3 years ago I bought a welder with the intention of learning to weld. It sat in the barn unused until recently because, well, life got in the way. I did a short beginner's welding evening class in the autumn and, after the little steel dice I posted recently, this is the first proper project.

I have an old trailer that had broken, you can see in the first couple of photos that it was a bit sparsely made and the draw bar had rusted through where it had been badly patched previously. I stripped out all the damaged bits, replaced them and beefed it up a bit. Some of the welds look good to me at least, some look like they were laid down by an epileptic pigeon on a bad day but they’ll probably last longer than the rest of the trailer now. All I have to do now is paint it and fit new plastic plywood sheets.

The sparsely build trailer
Twf6j7j.jpg


broken section
bHfuOqD.jpg


First couple of welds were pretty poor but seem solid
hv8hNiR.jpg


Started to get a bit better after that.
tSUvglk.jpg


6dMsozs.jpg


beefed up with thicker 5mm main spine and several additional cross pieces
SlrA2lh.jpg


TpLhQWA.jpg


Lessons learned:
When you think you've cleaned up old steel enough, clean it a bit more.
When the weld is going really badly, stop fiddling with the settings that have worked up to now and go check your earth clamp which is probably only hanging on because you've bumped the trailer a few times.
Welding upside down is difficult :)
 
Last edited:
To avoid these ads, REGISTER NOW!
Top Bottom