
You are using an out of date browser. It may not display this or other websites correctly.
You should upgrade or use an alternative browser.
You should upgrade or use an alternative browser.
Show us your welding projects
- Thread starter neonnblack
- Start date

aka Larry
Well-known member
The first use of the new welding table was to fab up some bee hive stands. I sourced the steel from an old bed frame.
The only material in the world that seems to harder than a woodpecker's lips!
R. Deschain
Well-known member
Yep, have had really good luck in using it for projects in the past. It welds like a champ and is best of all free. I have two more king/queen frames that I picked up on the side of the road broken down and stored in my angle iron storage rack.
Almost done with plasma table. First real work with sheetmetal and first welding project in over a decade. In future when I get a magnetic brake I may remake the pan in one piece. It’s 18ga and slope is 15 degrees.. I need to cap the open end and add the handle then I’m done. Only half of the drop in slats are installed.
Attachments


Bigblue&Goldie
Well-known member
Nice, that looks well built and thought out. I like how you did your slat dividers.
Nice, that looks well built and thought out. I like how you did your slat dividers.
Thank you. If I had a cold cut saw or equivalent I would’ve cut the slats directly into the 1.75” frame for the 1/8” wide slats, but given equipment I have and materials on hand decided to go this way. The bottom support and the spacers are .75” square tubing and the centerline distance between slats is 1”. An in progress closer photo of the slat set up is below. Gave me good spot welding practice. The cutting area is 2’x3’.
Attachments


Bigblue&Goldie
Well-known member
One of my hobbies in life is gunsmithing, which requires a lot of press work for some of the guns I commonly build. Accordingly, I often have to press small diameter pins and rivets. My HF 12ton had so much play in the carriage that it made these tasks incredibly difficult (and sometimes dangerous). To top it off, the press pin was welded on crooked enough for me to see by eye. For $89, I can't complain too much. fordkid88 inspired me to make the press less ******......

Carriage is made of 1" cold rolled round bar stock (same size as OEM to match tooling), 1"x2.5" cold rolled bar stock for the sliders, .188 cold rolled plate, and a piece of 2"x3"x.120" rectangular welded tubing. The sliders were machined down to a low tolerance fit to the press uprights to eliminate any forward/back movement. The holes for the press pin were done on my Bridgeport using a Blair Holecutter (awesome tools) not the holesaw in the background.

My super precise weld setup consisting of a .250" drill bit and center punch to space the cross bar off the table, which was all aligned off the edge of table using .500" TeCo clamps as alignment spacers. Super precision is required when making parts for an $89 pot metal press.


The pin actually goes through both walls of the rectangular tubing and is welded on both surfaces (flush on the top side under the jack plate).


Replaced the questionable chinese hardware with grade 8.

Carriage is made of 1" cold rolled round bar stock (same size as OEM to match tooling), 1"x2.5" cold rolled bar stock for the sliders, .188 cold rolled plate, and a piece of 2"x3"x.120" rectangular welded tubing. The sliders were machined down to a low tolerance fit to the press uprights to eliminate any forward/back movement. The holes for the press pin were done on my Bridgeport using a Blair Holecutter (awesome tools) not the holesaw in the background.
My super precise weld setup consisting of a .250" drill bit and center punch to space the cross bar off the table, which was all aligned off the edge of table using .500" TeCo clamps as alignment spacers. Super precision is required when making parts for an $89 pot metal press.
The pin actually goes through both walls of the rectangular tubing and is welded on both surfaces (flush on the top side under the jack plate).
Replaced the questionable chinese hardware with grade 8.
Last edited:
Duker
Well-known member
One of my hobbies in life is gunsmithing, which requires a lot of press work for some of the guns I commonly build. Accordingly, I often have to press small diameter pins and rivets. My HF 12ton had so much play in the carriage that it made these tasks incredibly difficult (and sometimes dangerous). To top it off, the press pin was welded on crooked enough for me to see by eye. For $89, I can't complain too much. fordkid88 inspired me to make the press less ******......
Carriage is made of 1" cold rolled round bar stock (same size as OEM to match tooling), 1"x2.5" cold rolled bar stock for the sliders, .188 cold rolled plate, and a piece of 2"x3"x.120" rectangular welded tubing. The sliders were machined down to a low tolerance fit to the press uprights to eliminate any forward/back movement. The holes for the press pin were done on my Bridgeport using a Blair Holecutter (awesome tools) not the holesaw in the background.
My super precise weld setup consisting of a .250" drill bit and center punch to space the cross bar off the table, which was all aligned off the edge of table using .500" TeCo clamps as alignment spacers. Super precision is required when making parts for an $89 pot metal press.
The pin actually goes through both walls of the rectangular tubing and is welded on both surfaces (flush on the top side under the jack plate).
Replaced the questionable chinese hardware with grade 8.
Nice mods...[emoji1531]. I was thinking of just adding some UHMW plastic to aid in movement but I might just rebuild after seeing yours.
Sent from my iPhone using Tapatalk Pro
zmotorsports
ALLIANCE MEMBER
One of my hobbies in life is gunsmithing, which requires a lot of press work for some of the guns I commonly build. Accordingly, I often have to press small diameter pins and rivets. My HF 12ton had so much play in the carriage that it made these tasks incredibly difficult (and sometimes dangerous). To top it off, the press pin was welded on crooked enough for me to see by eye. For $89, I can't complain too much. fordkid88 inspired me to make the press less ******......
Carriage is made of 1" cold rolled round bar stock (same size as OEM to match tooling), 1"x2.5" cold rolled bar stock for the sliders, .188 cold rolled plate, and a piece of 2"x3"x.120" rectangular welded tubing. The sliders were machined down to a low tolerance fit to the press uprights to eliminate any forward/back movement. The holes for the press pin were done on my Bridgeport using a Blair Holecutter (awesome tools) not the holesaw in the background.
My super precise weld setup consisting of a .250" drill bit and center punch to space the cross bar off the table, which was all aligned off the edge of table using .500" TeCo clamps as alignment spacers. Super precision is required when making parts for an $89 pot metal press.
The pin actually goes through both walls of the rectangular tubing and is welded on both surfaces (flush on the top side under the jack plate).
Replaced the questionable chinese hardware with grade 8.
Very nice modification to the press. Great execution and very detailed. I love it.

wrenchguy
Well-known member
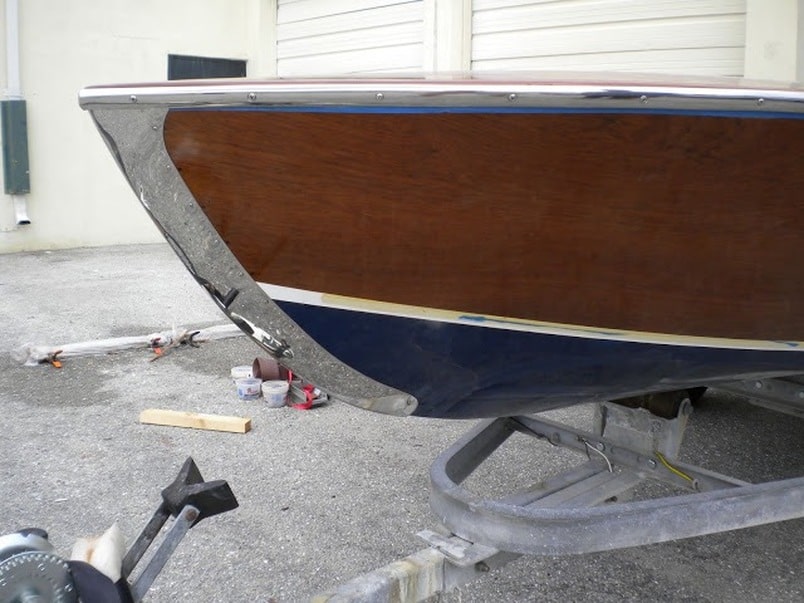
Anyone here want to build cutwaters? cutwaters.com
https://www.garagejournal.com/forum/showpost.php?p=7765643&postcount=6305
https://www.garagejournal.com/forum/showpost.php?p=7766052&postcount=6310
https://www.garagejournal.com/forum/showpost.php?p=7765643&postcount=6305
https://www.garagejournal.com/forum/showpost.php?p=7766052&postcount=6310
sqznby
Well-known member
Anyone here want to build cutwaters? cutwaters.com
https://www.garagejournal.com/forum/showpost.php?p=7765643&postcount=6305
https://www.garagejournal.com/forum/showpost.php?p=7766052&postcount=6310
That really looks like fun work. I'd love to do that especially where I live in Eastern NC. There are more boat builders in the area than I could have imagined. Just not sure if that style boat is popular around here, its mostly sport fishing and flat bottom.
I've done a lot of misc. metal work for a local boat builder but nothing like cutwaters.
sqznby
Well-known member
One of my hobbies in life is gunsmithing, which requires a lot of press work for some of the guns I commonly build. Accordingly, I often have to press small diameter pins and rivets. My HF 12ton had so much play in the carriage that it made these tasks incredibly difficult (and sometimes dangerous). To top it off, the press pin was welded on crooked enough for me to see by eye. For $89, I can't complain too much. fordkid88 inspired me to make the press less ******......
Carriage is made of 1" cold rolled round bar stock (same size as OEM to match tooling), 1"x2.5" cold rolled bar stock for the sliders, .188 cold rolled plate, and a piece of 2"x3"x.120" rectangular welded tubing. The sliders were machined down to a low tolerance fit to the press uprights to eliminate any forward/back movement. The holes for the press pin were done on my Bridgeport using a Blair Holecutter (awesome tools) not the holesaw in the background.
My super precise weld setup consisting of a .250" drill bit and center punch to space the cross bar off the table, which was all aligned off the edge of table using .500" TeCo clamps as alignment spacers. Super precision is required when making parts for an $89 pot metal press.
The pin actually goes through both walls of the rectangular tubing and is welded on both surfaces (flush on the top side under the jack plate).
Replaced the questionable chinese hardware with grade 8.
I have the same press and did something similar but not as detailed as you, nicely done

wrenchguy
Well-known member
That really looks like fun work. I'd love to do that especially where I live in Eastern NC. There are more boat builders in the area than I could have imagined. Just not sure if that style boat is popular around here, its mostly sport fishing and flat bottom.
I've done a lot of misc. metal work for a local boat builder but nothing like cutwaters.
My webpage directs customers from all over the country and some from Europe to me.
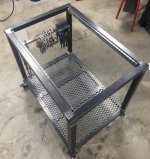
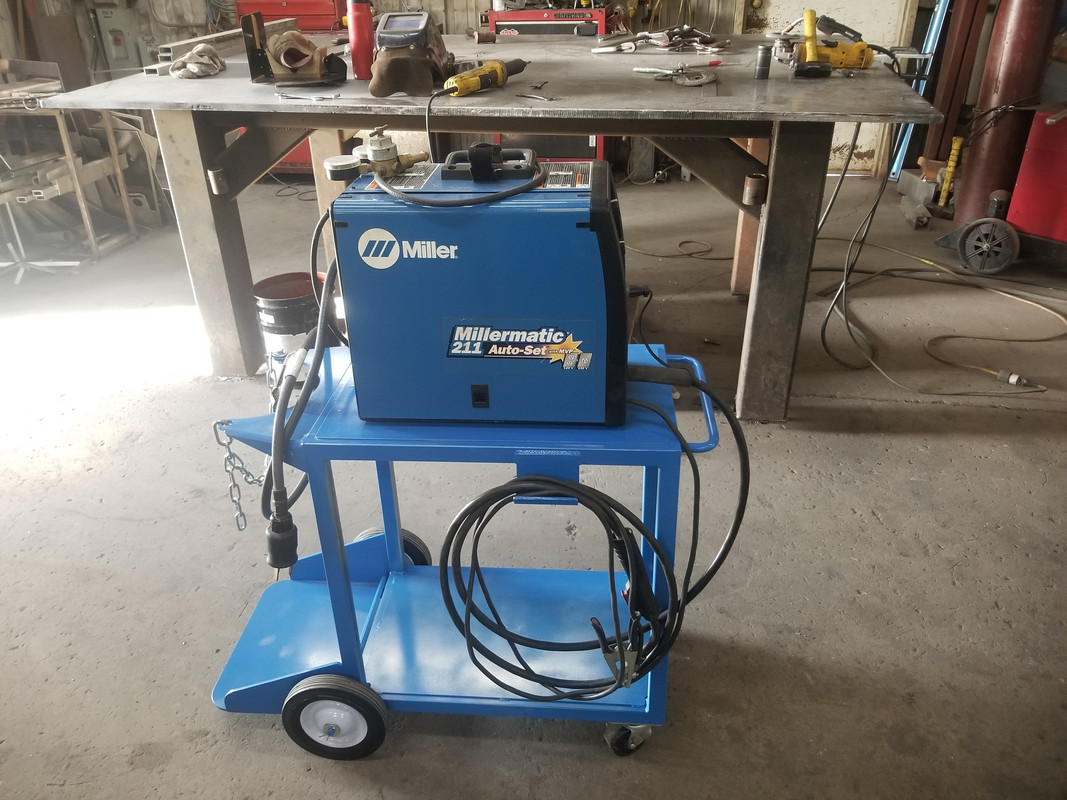
I recently scored a very lightly used Miller 211 on craigslist for $550. I decided that it needed a place to live here is what I came up with for a cart.
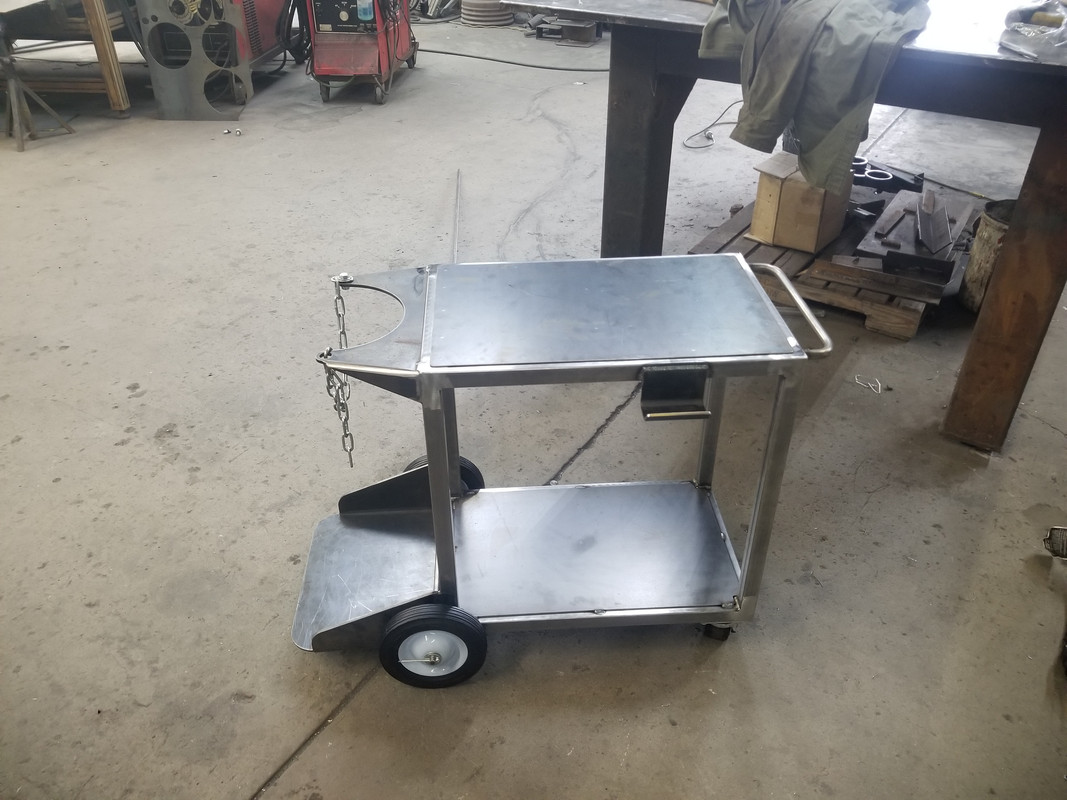
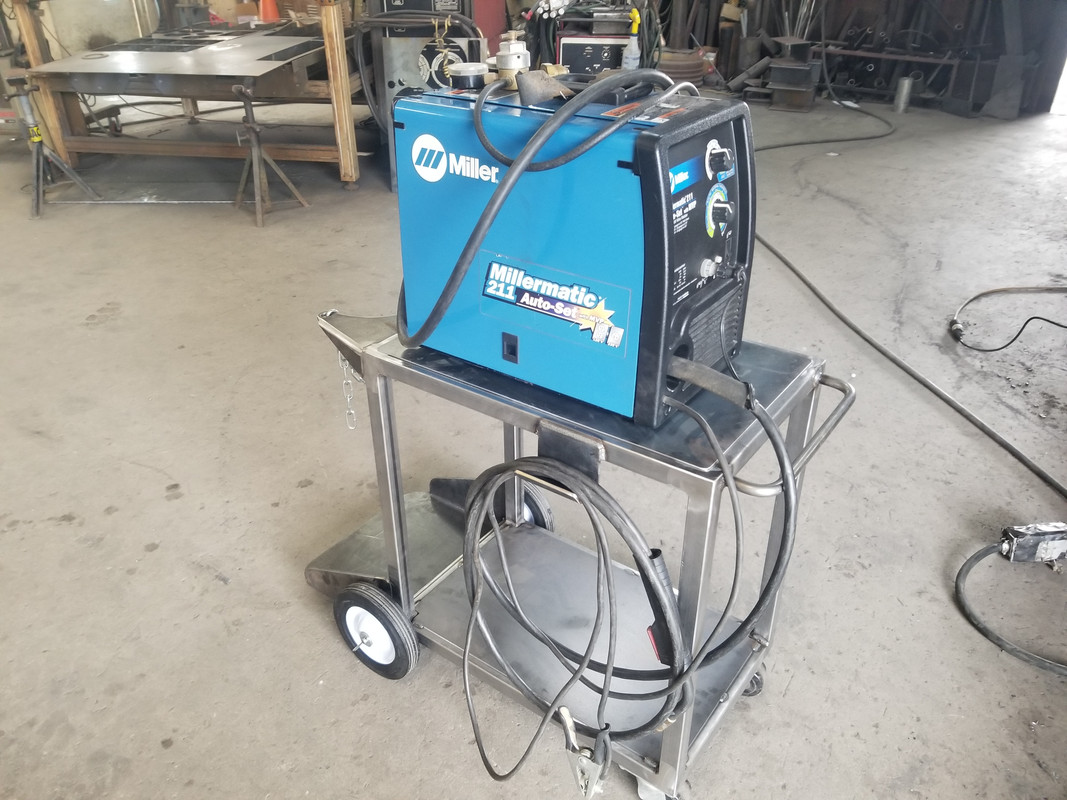
-Scott
Edit:
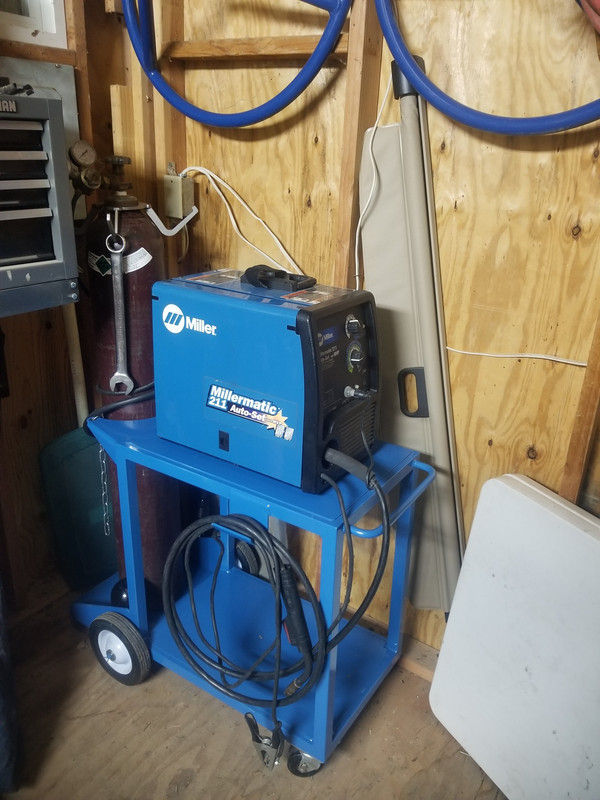
And here it is ready for work.
-Scott
Second edit: and here it is in its final resting place
-Scott
-Scott
Edit:
And here it is ready for work.
-Scott
Second edit: and here it is in its final resting place
-Scott
Last edited:
txvwnut
Well-known member
Damn! 
thejimmy
Well-known member
jimgood
Well-known member
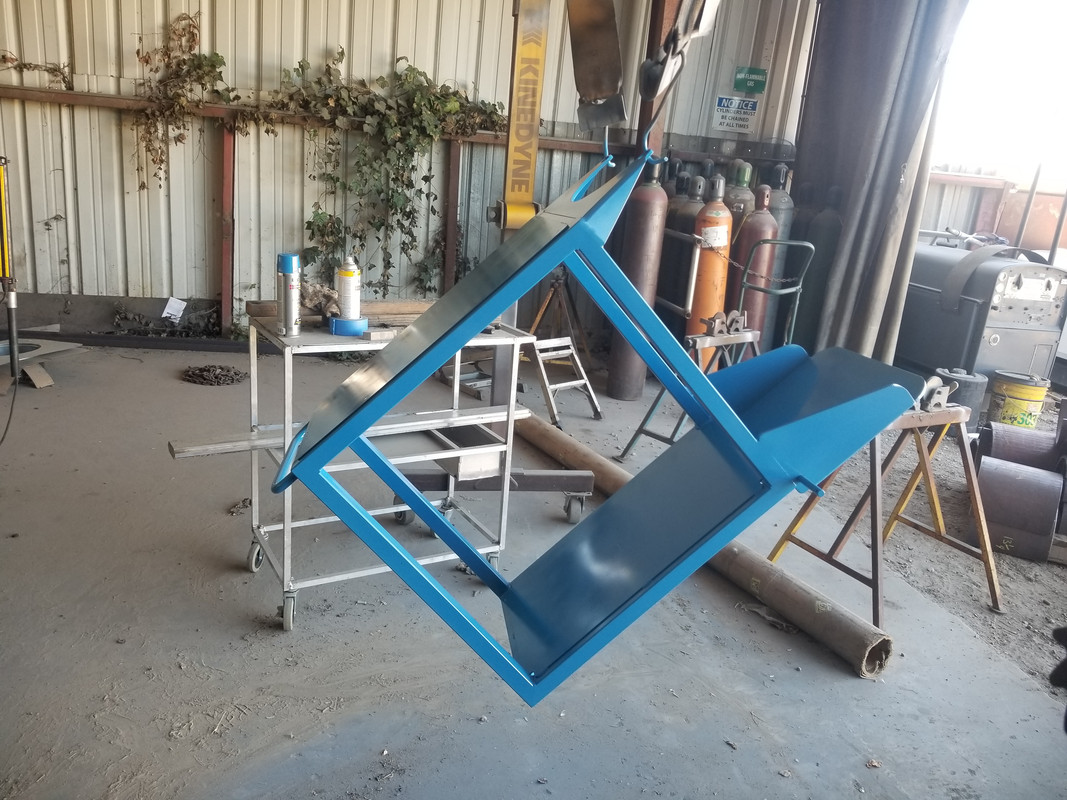
I built a hitch to use on the front of my tractor for moving trailers around on my property (more maneuverable and easier to hook up than the truck). I had all the materials on hand except for the receiver tube and ball mount. Oh, and a can of paint.
My plan was for this to be usable on both the loader and the 3-point hitch. It was taking too much time and I needed to just get it operational. So it will only work on the loader for now, which is fine. I can add on what I need to make it work in the 3-point later.
View media item 94257
Some build pics too...
View media item 93862View media item 93863View media item 93893View media item 93940View media item 94167View media item 94204View media item 94170
aka Larry
Well-known member
Cross post from my shop build thread.
When I change the oil on our cars, I always rotate the tires. No big deal because with my 2-post lift it's easy...easy with my Fusion's 16" wheels that is. I thought the 18" tires and wheels on my Mustang were heavy until we got my wife's Charger. It's new wheels are 20x9 wrapped with 275's. I haven't weighed them yet, but they are damn heavy, or at least they are for me. I'm not a strong guy and I injured my elbow a few years back which also doesn't help.
I've been telling myself that I don't have to do it very often, so why bother with a mechanical solution? However during the most recent swap, I thought was going to give myself a hernia lifting them into place. That was the final straw, so I started planning a solution, and here's what I came up with.
First I bought a small motorcycle lift from Amazon. I wanted to be able to rotate the wheel to line it up with the studs, so I bought a pair of conveyor rollers from McMaster-Carr. Of course it needed to roll, so I bought a set of casters from HF.
Since the base is kind of narrow, and the weight would be up high, I knew simply adding the casters under the base would make it tippy. I cut a set of plates and welded them to the base of the lift. I designed the mounts to offset the casters outward to allow full rotation and upward to lower the center of gravity. The actual base is now only 1/4" off the floor. To mount the conveyor rollers I welded four tabs to the upper plate of the lift.
With everything painted and assembled, here's the final product. It will allow me to raise and lower these heavy wheels easily via my cordless impact and save my back!
joe49
Well-known member
A 1 7/8'' ball or just a 3/4'' pin is all you need to move things around. No latching required if no hills involved.
shortykorte
Well-known member
Great idea on the tire lift. I just rotated a set of 20’s on my truck. I raised the truck about a 1/4” higher than lug hole. Wasn’t to bad but still heavy. I have a motorcycle jack so will need to remember to use it. Thanks!
Shorty Korte
Always remember quality in QST
Sent from my iPhone using Garage Journal
Shorty Korte
Always remember quality in QST
Sent from my iPhone using Garage Journal
jimgood
Well-known member
I like that, Larry. I wonder if I could adapt my transmission jack with a plate and rollers on top. Hmmm...Cross post from my shop build thread.
When I change the oil on our cars, I always rotate the tires. No big deal because with my 2-post lift it's easy...easy with my Fusion's 16" wheels that is. I thought the 18" tires and wheels on my Mustang were heavy until we got my wife's Charger. It's new wheels are 20x9 wrapped with 275's. I haven't weighed them yet, but they are damn heavy, or at least they are for me. I'm not a strong guy and I injured my elbow a few years back which also doesn't help.
I've been telling myself that I don't have to do it very often, so why bother with a mechanical solution? However during the most recent swap, I thought was going to give myself a hernia lifting them into place. That was the final straw, so I started planning a solution, and here's what I came up with.
First I bought a small motorcycle lift from Amazon. I wanted to be able to rotate the wheel to line it up with the studs, so I bought a pair of conveyor rollers from McMaster-Carr. Of course it needed to roll, so I bought a set of casters from HF.
Since the base is kind of narrow, and the weight would be up high, I knew simply adding the casters under the base would make it tippy. I cut a set of plates and welded them to the base of the lift. I designed the mounts to offset the casters outward to allow full rotation and upward to lower the center of gravity. The actual base is now only 1/4" off the floor. To mount the conveyor rollers I welded four tabs to the upper plate of the lift.
With everything painted and assembled, here's the final product. It will allow me to raise and lower these heavy wheels easily via my cordless impact and save my back!
Muggzy
Well-known member
Very clever [emoji106]Cross post from my shop build thread.
When I change the oil on our cars, I always rotate the tires. No big deal because with my 2-post lift it's easy...easy with my Fusion's 16" wheels that is. I thought the 18" tires and wheels on my Mustang were heavy until we got my wife's Charger. It's new wheels are 20x9 wrapped with 275's. I haven't weighed them yet, but they are damn heavy, or at least they are for me. I'm not a strong guy and I injured my elbow a few years back which also doesn't help.
I've been telling myself that I don't have to do it very often, so why bother with a mechanical solution? However during the most recent swap, I thought was going to give myself a hernia lifting them into place. That was the final straw, so I started planning a solution, and here's what I came up with.
First I bought a small motorcycle lift from Amazon. I wanted to be able to rotate the wheel to line it up with the studs, so I bought a pair of conveyor rollers from McMaster-Carr. Of course it needed to roll, so I bought a set of casters from HF.
Since the base is kind of narrow, and the weight would be up high, I knew simply adding the casters under the base would make it tippy. I cut a set of plates and welded them to the base of the lift. I designed the mounts to offset the casters outward to allow full rotation and upward to lower the center of gravity. The actual base is now only 1/4" off the floor. To mount the conveyor rollers I welded four tabs to the upper plate of the lift.
With everything painted and assembled, here's the final product. It will allow me to raise and lower these heavy wheels easily via my cordless impact and save my back!
Sent from my Pixel XL using Tapatalk
mv213
Well-known member
Very clever [emoji106]
Sent from my Pixel XL using Tapatalk
I second that...very clever indeed!
jimgood
Well-known member
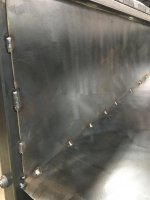
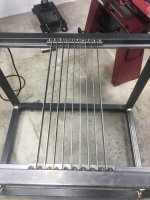
Here's a project that involved a little welding. At the track, they don't allow "jack stands on the pavement". The intent is to prevent jack stands from sinking into hot pavement and generally tearing it up when the stands are being slid around.
Now the stands are sitting on top of steel plates covered with a layer of urethane.
It wasn't strictly necessary to use a plate under the entire stand. I could have just done the corners where all the weight is borne. But this will help if I ever have to use them on soft(ish) ground.
Added bonus is they're real quiet now.
View media item 96282
View media item 96284
View media item 96285
View media item 96283
- Welded thin sheet metal to the bottom of the stands (around 14 gauge I think).
- Prepped the metal and primed it with etching primer
- Used masking tape around the edge to form a dam
- Marked the tape about 1/8" up from the edge all the way around the perimeter as a depth mark
- Hung the stands on a bar and leveled them as best I could
- Poured Alumalite Flex 80 up to the mark
- Let cure over night (really only needed about 8 hours)
Now the stands are sitting on top of steel plates covered with a layer of urethane.
It wasn't strictly necessary to use a plate under the entire stand. I could have just done the corners where all the weight is borne. But this will help if I ever have to use them on soft(ish) ground.
Added bonus is they're real quiet now.
View media item 96282
View media item 96284
View media item 96285
View media item 96283
larry4406
Well-known member
Jim that is pretty clever!
Bigblue&Goldie
Well-known member
So will they allow them with the modifications?
jimgood
Well-known member
Thanks!Jim that is pretty clever!
Who knows? I've never actually seen any enforcement of the policy. In fact, the last couple of times I was at the track I used my stands directly on the pavement as I had nothing to put under them.So will they allow them with the modifications?

As I said, I think the reason for the "rule" is to minimize damage to the pavement. Tracks have enormous maintenance costs and I kind of feel like I'd rather not make them worse as those costs get passed on to us (the competitors).
aka Larry
Well-known member
Who knows? I've never actually seen any enforcement of the policy. In fact, the last couple of times I was at the track I used my stands directly on the pavement as I had nothing to put under them.
As I said, I think the reason for the "rule" is to minimize damage to the pavement. Tracks have enormous maintenance costs and I kind of feel like I'd rather not make them worse as those costs get passed on to us (the competitors).
I'm sure you are talking about VIR right Jim? They started the rule back when the paved the north paddock several years ago since the asphalt was really soft when new. At first they were really policing it, but not now, or at least that I've seen as of two weeks ago.
jimgood
Well-known member
Yes, and Summit Point. I might be imagining it but I thought I recall hearing the announcement at driver's meetings at both tracks.I'm sure you are talking about VIR right Jim? They started the rule back when the paved the north paddock several years ago since the asphalt was really soft when new. At first they were really policing it, but not now, or at least that I've seen as of two weeks ago.
Hagatronics
Well-known member
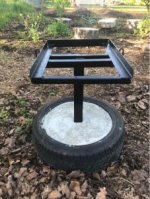
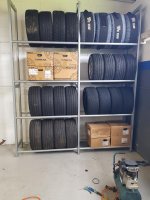
Built a tyre rack for my man cave.
- Drilled holes in each upright
- tacked and welded each upright on my fixture table
- slide the pipe through the holes to assemble and weld. Was at the very limit of what fixture table could support.
- Drilled holes in each upright
- tacked and welded each upright on my fixture table
- slide the pipe through the holes to assemble and weld. Was at the very limit of what fixture table could support.
Attachments


ClappedOutBport
Well-known member
- Joined
- Mar 30, 2016
- Messages
- 998
Pretty sweet. What did you drill the holes with? Just a large holesaw?
Hagatronics
Well-known member
Pretty sweet. What did you drill the holes with? Just a large holesaw?
Yep. 1-11/16" Cobalt holesaw on a pedestal drill. Didn't take too long.
Built a tyre rack for my man cave.
- Drilled holes in each upright
- tacked and welded each upright on my fixture table
- slide the pipe through the holes to assemble and weld. Was at the very limit of what fixture table could support.
Nice E30.
Hagatronics
Well-known member
Nice E30.
I'm putting an s54 into it in a few weeks!
lilscorpion
Well-known member
Built a tyre rack for my man cave.
- Drilled holes in each upright
- tacked and welded each upright on my fixture table
- slide the pipe through the holes to assemble and weld. Was at the very limit of what fixture table could support.
Looks sweet. Wish I had the space for one, that makes keeping the sets organized easy.