
You are using an out of date browser. It may not display this or other websites correctly.
You should upgrade or use an alternative browser.
You should upgrade or use an alternative browser.
Show us your welding projects
- Thread starter neonnblack
- Start date
Beelzeboss
Well-known member
I just finished this sheet metal bender I've been putting together over the past few weeks

Notch1988
Well-known member
Since I had the 2 post, I decided to make it more usefull and built a bike lift for it.


Old Man Roger
Well-known member
I have no real reason to think this, but with only using the two legs, it looks sketchy. The same for the pic with just the two straps on the rear.
sqznby
Well-known member
Maybe he's just showing how balanced it is. If everything lines up perfectly (which it looks like it does), he could swing a leg out of the way to get access and swing it back to secure it while working on it.I have no real reason to think this, but with only using the two legs, it looks sketchy. The same for the pic with just the two straps on the rear.
On a side note, now welding today just tapping and cleaning some 3/8 316 SS, fun fun fun haha.
Attachments
Old Man Roger
Well-known member
Ya it might be perfect solid, it just looks sketchy.lolMaybe he's just showing how balanced it is. If everything lines up perfectly (which it looks like it does), he could swing a leg out of the way to get access and swing it back to secure it while working on it.
On a side note, now welding today just tapping and cleaning some 3/8 316 SS, fun fun fun haha.
Beerhippie
Well-known member
Maybe he's just showing how balanced it is. If everything lines up perfectly (which it looks like it does), he could swing a leg out of the way to get access and swing it back to secure it while working on it.
On a side note, now welding today just tapping and cleaning some 3/8 316 SS, fun fun fun haha.
Tapping 316... I still have scars from cutting myself on the broken end of the tap when it sheared off. I've learned to just weld on a fitting that's already tapped--especially pipe taper threads.
My booger-weld of the day:

Motor mount for my treadmill-motor variable-speed drill press project.
Beerhippie
Well-known member
Tapping 316... I still have scars from cutting myself on the broken end of the tap when it sheared off. I've learned to just weld on a fitting that's already tapped--especially pipe taper threads.
My booger-weld of the day:
Motor mount for my treadmill-motor variable-speed drill press project.
What it's for:

customh
Well-known member
I have no real reason to think this, but with only using the two legs, it looks sketchy. The same for the pic with just the two straps on the rear.
Maybe he's just showing how balanced it is. If everything lines up perfectly (which it looks like it does), he could swing a leg out of the way to get access and swing it back to secure it while working on it.
Look close boys, he's got the lift pads bolted to the arms where he's only using 2.
Old Man Roger
Well-known member
Ahh! I missed that.Look close boys, he's got the lift pads bolted to the arms where he's only using 2.

sqznby
Well-known member
Tapping 316... I still have scars from cutting myself on the broken end of the tap when it sheared off. I've learned to just weld on a fitting that's already tapped--especially pipe taper threads.
My booger-weld of the day:
Motor mount for my treadmill-motor variable-speed drill press project.
Unfortunately, these are mounts that will be polished to a mirror finish.
Please please pleeeeease don't be offended or mad at me for saying this but, GOOD DAWG dude those welds look awful.
I do want to see the end result of your drill press, looks like it's going to nice.
sqznby
Well-known member
Good eyeLook close boys, he's got the lift pads bolted to the arms where he's only using 2.
") I missed that as well.
I missed that as well.Notch1988
Well-known member
Look close boys, he's got the lift pads bolted to the arms where he's only using 2.
As stated, with it bolted it's very stable. It will pick fine without the bolts, in fact, I tend to pick it up to working height so I don't have to bend over to tighten the bolts. The machinist at work made me donuts out of solid bar stock that are welded to the underside, machined for the bolt diameter and the OD is the same as my lift adapters. These would essentially have to roll out of the lift arms for this to tip over and that's not happening. I have used pipe stands under the non-supported corner which keeps the access I want and relieves any strain on the hoist arm if I'm doing work that may cause it.
Version 2.1Never seem to have a C clamp that fits the project, so here’s my first go. Expect to make several more, deeper throats, small w/ pointed contact, right angle, etc.

Quick adjust. Tang on back side can be tapped to gain close sliding tolerance.


 Time for a set of plank clamps. Table tops, furniture glue ups.
TS discarded several clothing racks w/ button lock adjustable arms.
Perfect for clamping wide glue ups. Very little welding ended up w/ nice looking 21” to 48” clamps. Salvaged extension ladder feet for the clamp face.
WillyBoy
Well-known member
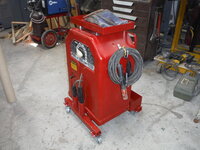
Way back on page 55, of this thread, Pco6 posted some pictures of his Lincoln 225 stick welder and the mobile base he fabricated.
I really liked how it looked and decided that something similar would be a good winter project.
Here's how it turned out.
I used 1-1/2 inch square tube. Storage box on the back and a tray on top on coupling nut standoffs.
I like the idea of receptacles on the leads and added a couple of pieces of PVC pipe to stick them into.
The hooks for the leads are a hardware store item.
The lower edges of the cabinet had a fair amount of surface rust, so this was also an opportunity to disassemble the cabinet to clean up and repaint.
Attachments


harley jim
Well-known member

Jswain
Well-known member
That looks sharp, nice job!Way back on page 55, of this thread, Pco6 posted some pictures of his Lincoln 225 stick welder and the mobile base he fabricated.
I really liked how it looked and decided that something similar would be a good winter project.
Here's how it turned out.
I used 1-1/2 inch square tube. Storage box on the back and a tray on top on coupling nut standoffs.
I like the idea of receptacles on the leads and added a couple of pieces of PVC pipe to stick them into.
The hooks for the leads are a hardware store item.
The lower edges of the cabinet had a fair amount of surface rust, so this was also an opportunity to disassemble the cabinet to clean up and repaint.
y'sguy
Well-known member
Way back on page 55, of this thread, Pco6 posted some pictures of his Lincoln 225 stick welder and the mobile base he fabricated.
I really liked how it looked and decided that something similar would be a good winter project.
Here's how it turned out.
I used 1-1/2 inch square tube. Storage box on the back and a tray on top on coupling nut standoffs.
I like the idea of receptacles on the leads and added a couple of pieces of PVC pipe to stick them into.
The hooks for the leads are a hardware store item.
The lower edges of the cabinet had a fair amount of surface rust, so this was also an opportunity to disassemble the cabinet to clean up and repaint.
Great work! I use the same welder. I may have to steal your/and their ideas for mine. Shoot, I hardly weld anything anymore but still, it's nice to have a machine set up to go like this when the time comes.
Good solution to the way the leads detach too. I'll be googiing those soon.
WillyBoy
Well-known member
Thanks everyone for the compliments. I've had this machine for a while. I bought it on sale at a Central Tractor place near where we used to live back around 1977. In the intervening 47 years it appears to doubled in weight.
I use a lot of this forum as a source for good ideas.
I use a lot of this forum as a source for good ideas.
Still working on the welding table.

These are the slides for the torch table.
These are the slides for the torch table.
Pics don't count until it's in place and loaded. We will critique the size and uniformity of your splits.I have had a need for a firewood rack for a while and today was the day. Was able to knock it out in about 6 hours which pretty good for me. Getting accurate miters with an abrasive chop saw is a pain.

Curious about the design. Are the corners of the triangles going to be a waste of space ?I have had a need for a firewood rack for a while and today was the day. Was able to knock it out in about 6 hours which pretty good for me. Getting accurate miters with an abrasive chop saw is a pain.
But then I have to paint it, and I don't love paint prep.Pics don't count until it's in place and loaded. We will critique the size and uniformity of your splits.
Likely unless you throw some twigs on top. Normally form follows function, but in this instance the aesthetic is more important than 100% space utilization. At least to me.Curious about the design. Are the corners of the triangles going to be a waste of space ?
PhantomEB
Well-known member
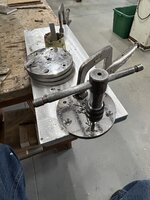
Not a welded piece but a drive roller support for my old Miller 175.

PhantomEB
Well-known member
So glad my little welder is back up to snuff.


WillyBoy
Well-known member
Looks like a nicely done project Phantom. Can you tell us what had happened to the original drive roller bracket?
PhantomEB
Well-known member
There was no support whatsoever thus tension on it caused it to sag over the years.
PhantomEB
Well-known member
Like a friend says I thought you were past the cutting phase….I replied of what project?
picmed up a little cut35i just cause.
time to try it out this weekend.
picmed up a little cut35i just cause.
time to try it out this weekend.
PhantomEB
Well-known member
Anyone ever made under table storage for all their machines?
I rather cut the cords to length and have two dedicated extension cords for 110/220.
I rather cut the cords to length and have two dedicated extension cords for 110/220.
If by "table" you mean WELDING table, no way - I'd sooner hang all my machines on the 3 foot diameter oak tree in my back yard when not in use
Explanation - I have 2 Miller migs, MM252 and MM211 - a 52 yr old 250 amp copper wound stick machine (bought new), an Everlast stick/tig and a Hypertherm PM45 plasma - both Millers cooling air ENTERS the FRONT, pretty sure it's also true of the Everlast - I never could figure out what they were thinking (if at all) by doing that, since it's pretty common to end up with that INTAKE pointing at your weld project (as in, sucking in everything you DON'T want inside your welder)
So my machines live in a corner of the garage under various sized 600 denier barbeque covers when not in use, and when they ARE in use I have a 3' x 4' piece of 1/2" plywood that gets LEANED against the front of the machine (at enough angle NOT to restrict air flow, but BLOCK direct particle flow)
My MM252 was a fantastic CL find, including dual running gear, 3 bottles and a never-used 30A spool gun for $2200 total - replacement cost today would be close to $6k so I tend to be careful (NOT hanging it from the ol' oak tree )
)
Holy ****, my 252 is even more to replace now
 store.cyberweld.com
And my second MM211 is nearly TWICE what I paid - yuck...
For the stick machines I have just over 100 feet of leads with adapters to fit either machine, so they can stay in the garage out of the way. The plasma came with 25' leads so no prob.
Power - I have 6/50 extension cords in 12, 25 and 85 foot lengths most of which get stored on heavy duty garden hose hangers so they're never kinked... Steve
Oh, an older shot of the storage area BEFORE I discovered barbeque covers
Explanation - I have 2 Miller migs, MM252 and MM211 - a 52 yr old 250 amp copper wound stick machine (bought new), an Everlast stick/tig and a Hypertherm PM45 plasma - both Millers cooling air ENTERS the FRONT, pretty sure it's also true of the Everlast - I never could figure out what they were thinking (if at all) by doing that, since it's pretty common to end up with that INTAKE pointing at your weld project (as in, sucking in everything you DON'T want inside your welder)
So my machines live in a corner of the garage under various sized 600 denier barbeque covers when not in use, and when they ARE in use I have a 3' x 4' piece of 1/2" plywood that gets LEANED against the front of the machine (at enough angle NOT to restrict air flow, but BLOCK direct particle flow)
My MM252 was a fantastic CL find, including dual running gear, 3 bottles and a never-used 30A spool gun for $2200 total - replacement cost today would be close to $6k so I tend to be careful (NOT hanging it from the ol' oak tree
)Holy ****, my 252 is even more to replace now
Millermatic 252 MIG Pkg with Spoolmatic 30A 208/230 Volt 951960
Millermatic® 252 MIG Welder package with Spoolmatic 30A 208/230 Volt 951960The Miller® Millermatic® 252 MIG Welder 951960 with Spoolmatic 30A Spoolgun is an outstanding 250 amp package for aluminum MIG welding. Includes Millermatic® 252 MIG welding power source (200/230 Volt) and all...
store.cyberweld.com
And my second MM211 is nearly TWICE what I paid - yuck...
For the stick machines I have just over 100 feet of leads with adapters to fit either machine, so they can stay in the garage out of the way. The plasma came with 25' leads so no prob.
Power - I have 6/50 extension cords in 12, 25 and 85 foot lengths most of which get stored on heavy duty garden hose hangers so they're never kinked... Steve
Oh, an older shot of the storage area BEFORE I discovered barbeque covers
Attachments

Last edited:
kaymccampbell
Well-known member
No way in Hades. They spray too much ****, along with grinders n paint n sanders n whatnot. Nope. Mine sit on a cart, away from things, unless they're in use.Anyone ever made under table storage for all their machines?
I rather cut the cords to length and have two dedicated extension cords for 110/220.
PhantomEB
Well-known member
Fair enough!
Last edited:
PhantomEB
Well-known member

Easy enough, just moved the middle shelf down an inch or two.
Jswain
Well-known member
Did the shaft get loose on the wire feed from over tightening? Solid fix! Isn't the wire/roll energized tho while welding?Not a welded piece but a drive roller support for my old Miller 175.
I had a 180 autoset like that. One end of the shaft was egged from wear(inside the wire feed motor gearbox) so I heated up and removed the gear off the shaft from inside, machined a new shaft then silver soldered it back on. It was kind of a PIA lol. And I believe their newer models used a much larger bronze bushing/shaft to probably eliminate the problem.
Last edited:
sqznby
Well-known member
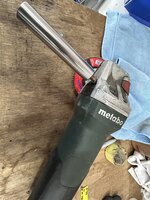
Forgot my handle so whipped this up. The bolt was a bit too long and I didn't feel the need to cut/grind it down so I used a nut and rubber washer to keep it tight so it wouldn't rotate while using it. Nothing crazy just to do a little touch up with the grinder
Attachments

Bob Heine
ALLIANCE MEMBER
@sqznby, I don't use the handles on most of my grinders but I can't bring myself to throw them away. Threaded holes in a piece of steel strap and screwed the handles in so they don't roll around in the drawer. Of course the day I finished making the strap, found another handle.Forgot my handle so whipped this up. The bolt was a bit too long and I didn't feel the need to cut/grind it down so I used a nut and rubber washer to keep it tight so it wouldn't rotate while using it. Nothing crazy just to do a little touch up with the grinder

sqznby
Well-known member
Honestly, I never use handles for my grinders either it just happens to be a certain time where it made it just a tad bit easier at the angle I needed to grind. And for the life of me I can't remember what the heck I was grinding, huh.@sqznby, I don't use the handles on most of my grinders but I can't bring myself to throw them away. Threaded holes in a piece of steel strap and screwed the handles in so they don't roll around in the drawer. Of course the day I finished making the strap, found another handle.
I wish my grinding drawer was that organized
Bob Heine
ALLIANCE MEMBER
Sadly it has taken me half a lifetime to get a couple of drawers organized. I'm 6 months from my 80th birthday so I've got to pick up the pace on organizing/trashing/donating the rest of the stuff on the flat surfaces.I wish my grinding drawer was that organized