To avoid these ads, REGISTER NOW!

Show us your welding projects

Botje

Active member
Joined
May 3, 2012
Messages
40
Location
Europe
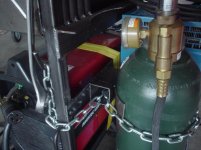
Are both those widebands wired together or have 2 separate connectors? ( I only see one in the pic ). Nice work too!

thanks, the first sensor is a narrowband for the original Bosch engine management, the second one is a Wideband. The narrowband sensor is a universal replacement so i had to splice the connector to it.
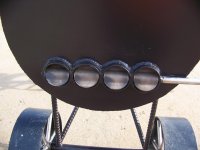
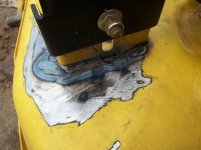
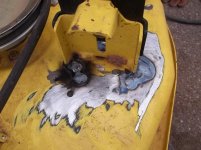
 
To avoid these ads, REGISTER NOW!

maxspeed96ct

Well-known member
Joined
Apr 6, 2012
Messages
379
Way too many to show all but here are a few of my more recent projects.

Mike.


Rear sub-frame that I built for my sons sand quad.
2whq9mt.jpg


After chrome and installation on quad.
2ylmusj.jpg


Sand quad chassis made from 4130 chromoly. Engine is out of a GS1100 sport bike.
9uazc0.jpg


Completed quad.
27wwy1w.jpg


AMAZING !! :scared:
 

NASTYZEN

Well-known member
Joined
Jun 11, 2010
Messages
2,823
Location
St-Colomban,Que. Canada
A small production job I did last week.
Nothing really special other than I had a .005'' tolerance to keep. Basically turn down a 1/4 square rod and weld a washer on top.
Because of the tolerances, I built a little jig to help locate and hold the assembly for welding.

Inserting the shaft .

dscn0510d.jpg


Inserting the washer.

dscn0511b.jpg


dscn0512f.jpg


Clamped in place and ready for a plug weld with yet another little fixture.

dscn0513y.jpg


Extraction

dscn0515a.jpg


Ready for the platers.

dscn0516k.jpg


:beer:
 

gbsmithy08

Well-known member
Joined
Mar 2, 2012
Messages
62
A small production job I did last week.
Nothing really special other than I had a .005'' tolerance to keep. Basically turn down a 1/4 square rod and weld a washer on top.
Because of the tolerances, I built a little jig to help locate and hold the assembly for welding.

Inserting the shaft .

dscn0510d.jpg


Inserting the washer.

dscn0511b.jpg


dscn0512f.jpg


Clamped in place and ready for a plug weld with yet another little fixture.

dscn0513y.jpg


Extraction

dscn0515a.jpg


Ready for the platers.

dscn0516k.jpg


:beer:

Great setup there. Fun stuff to make your own jigs and what not.
 

Moose-LandTran

Well-known member
Joined
Mar 8, 2008
Messages
15,945
Location
The Brink of Insanity (England)
Repairing a cracked flexi section on a badly-made stainless steel Aston Martin DB6 exhaust system.

Clamped in the vice:

DSC01824.jpg


Tin foil to seal the pipe for back-purging:

DSC01825.jpg


The other end sealed with a small exit vent hole:

DSC01827.jpg


My welds:

DSC01832.jpg


I may've neglected the tell the owner i've only had about 12 hours of TIG practice.. Came out better than i expected!
 
Last edited:

metalhead212121

Well-known member
Joined
Mar 21, 2010
Messages
2,897
damn Moose... you get all the nice cars to work on! The weld looks pretty damn good IMHO for just starting out with the new welder.
 

Moose-LandTran

Well-known member
Joined
Mar 8, 2008
Messages
15,945
Location
The Brink of Insanity (England)
damn Moose... you get all the nice cars to work on! The weld looks pretty damn good IMHO for just starting out with the new welder.

My job is hugely overrated...

Thanks for the kind works, need more practice but i'm getting there. That flexi section is made of coiled hollow tube, the walls of the tube are 7.8 thou.. Welding at 14A...
 

truckn_r

Member
Joined
Mar 13, 2010
Messages
18
Heres an old pic of the smoker and the 36" grill. doesnt look this clean anymore.
 

Attachments

  • 100_2982.jpg
    100_2982.jpg
    147.5 KB · Views: 342
  • 100_2575.jpg
    100_2575.jpg
    146 KB · Views: 338
  • 100_2576.jpg
    100_2576.jpg
    141.8 KB · Views: 314
  • 100_2577.jpg
    100_2577.jpg
    142.2 KB · Views: 358

srmofo

Well-known member
Joined
Oct 15, 2009
Messages
6,161
Location
SW ohio
Sounds like moose and I are about in the same boat when it comes to tig. I recently got my diversion up and running and practiced for an hour before starting my welding cart.

originally I was going to install some drawers from an old busted craftsman box on the bottom, but I came across a good deal on the hobart. I sized the cart large enough because of that reason...but I miscalculated the actually diameter of the bottles and didnt leave enough clearance. I managed to spread the 2 rear rails far enough to get both bottles in there but its a snug fit. Im probably going to trim the inside of the rails in half just so I have a little clearance in there. Tig pedal fits under the welder and out of the way.

Then by chance, I noticed an old folding shelf hanging on the side of another old craftsman box and it fit the cart perfect just by bending the top rail out. I need to flatten and smooth it out a little more but I through it up there with a clamp just to get an idea.

I still need to mock up a handle so I quit grabbing the diversion to roll it, along with all the extras like a helmet hanger, cord/hose hangers, filler rod storage, and I would like a small drawer of some sort to keep consumables and extra parts. Im also cooking up an extendable articulating tig torch holder so I always have a place to set it. Im also going to hang an extinguisher off the back somewhere:dunno:

EDIT - here is the original link to the design thread of the cart. As you can see I changed it a little as I went
 
Last edited:

sberry

Banned
Joined
Jun 18, 2005
Messages
35,747
Location
Brethren, Michigan
Built this when I was a sprout.
 

Attachments

  • Sa200 1.JPG
    Sa200 1.JPG
    32 KB · Views: 203
  • Sa200 2.JPG
    Sa200 2.JPG
    40.5 KB · Views: 202
  • sand blaster.JPG
    sand blaster.JPG
    29.9 KB · Views: 191
  • tanker front.JPG
    tanker front.JPG
    57 KB · Views: 197
To avoid these ads, REGISTER NOW!

mscribellito

Well-known member
Joined
Apr 22, 2012
Messages
157
Location
SC
Finally finished this cart today for my welder... I'ma be picking up the Northern Tool Mig welder in a few weeks here

JACCV.jpg

Z1pxI.jpg

Tywuu.jpg
 

Fexal

Member
Joined
Jul 1, 2012
Messages
24
I whacked this together today to burn through my last 200 lbs of Argon......

A random pointless thing....


DSC00145.jpg


DSC00147.jpg


DSC00151.jpg
 

930dreamer

Super Moderator
Staff member
Joined
Oct 7, 2009
Messages
22,927
Location
Amarillo,TX and Stinnett,TX
A friend stopped by the shop with his broken mower deck, this is how my projects get side tracked.:) Cleaned the surface, did a little grinding and started tacking it in spots. I won't show the completed work because other than a tack weld I can't get the HF welder to work to save my life ( lay a bead).:(

The only saving grace is it's another friends welder.:D
 

Attachments

  • 006.jpg
    006.jpg
    117.6 KB · Views: 373
  • 005.jpg
    005.jpg
    138.1 KB · Views: 346
  • 004.jpg
    004.jpg
    144.4 KB · Views: 341

WakonTonka

Well-known member
Joined
Feb 20, 2012
Messages
118
Location
The BORG ship
A friend stopped by the shop with his broken mower deck.....

Did you add any reinforcements?

I try to add small steel plate pieces when the workpiece allows (clearance issues, mostly) so that the crack does not reappear again. (that was where it broke the first time, plus now it has gotten more brittle in the HAZ)

But, "ya got 'er done"!
 

NASTYZEN

Well-known member
Joined
Jun 11, 2010
Messages
2,823
Location
St-Colomban,Que. Canada
A bit of tig welding on Alu. last week.
My machine is a 300amp P&H welder from the sixties. It's actually Lindy guts inside.
I sure miss my Miller sincrowawe 350. Now that was a machine!
I could make my welds a little prettier with it. But still not ZT quality.:D

2x2 x 1/8 6061 tubing, 1/8 5356 filler rod.

dscn0548rc.jpg


dscn0547is.jpg


Tube to 1/4'' plate.

dscn0546a.jpg


dscn0545k.jpg


:beer:
 

bad_idea

Well-known member
Joined
Jun 11, 2011
Messages
4,329
Location
Pasquotank, NC
A note on your repair job on his mower deck. When steel cracks it is good practice to drill a hole at the ends of the crack to prevent the crack from spreading after it is repaired. Also a good idea to add a piece of plate lapped over the area for reinforcement if possible.
 

zmotorsports

ALLIANCE MEMBER
Joined
Oct 20, 2009
Messages
21,308
Location
Northern Utah
A note on your repair job on his mower deck. When steel cracks it is good practice to drill a hole at the ends of the crack to prevent the crack from spreading after it is repaired. Also a good idea to add a piece of plate lapped over the area for reinforcement if possible.

Good info. To expand on this one more step, when placing a piece over the crack radius the corners. A sharp 90 degree corner is more likely to create a stress riser than a long radiused one.

Mike.
 

t100

Well-known member
Joined
Sep 3, 2009
Messages
6,101
this is the welder cart I made earlier this year. I converted my air cooled tig welder to water cooled, to save floor space, I made this one more like a dolly.

currently it has an 80cf Argon tank, it will hold a 300cf tank with the tank bracket removed. when it's rested, it sits on the tray with tank and water cooler, there's no weight on the wheels, so it's plenty steady.
 

Attachments

  • DSC00261.jpg
    DSC00261.jpg
    45.1 KB · Views: 426
  • DSC00262.jpg
    DSC00262.jpg
    41.5 KB · Views: 386
  • DSC00263.jpg
    DSC00263.jpg
    45.1 KB · Views: 377
  • DSC00265.jpg
    DSC00265.jpg
    51.4 KB · Views: 315

BD1

Well-known member
Joined
Mar 18, 2007
Messages
4,602
Location
north side
Wife is going in for foot surgery. Made a adjustable laptop table for her chair and to use when she is in bed. It's telescopic both on the rise and at the table. The table tilts too.
 

Attachments

  • P1000751.jpg
    P1000751.jpg
    146.4 KB · Views: 236
  • P1000752.jpg
    P1000752.jpg
    148.6 KB · Views: 266
To avoid these ads, REGISTER NOW!
Top Bottom