To avoid these ads, REGISTER NOW!

Show us your welding projects

Hot Chop shop

Well-known member
Joined
Apr 12, 2013
Messages
628
Location
Las Vegas
Also you burn thru , easy to add the metal back.

Hey quick question how do you add metal back? I have had plenty of gaps to fill and I have burned through before, I just laid down a bead over another bead over another bead to build up the area and grind down to fill it then repeat if necessary... Is there a better why ? Or a correct way ? Thanks!
 
To avoid these ads, REGISTER NOW!

IONH

Well-known member
Joined
Feb 12, 2010
Messages
2,043
Location
Central Massachusetts
+1 on that. IF your welder has or can be fitted with the solenoid valve, DO convert it to a MIG. Polarity changes when you switch from flux core to solid. I changed my Lincoln over years ago, never looked back and almost immediately my welds improved, or to be more precise, began improving. The next thing is a good auto dimming helmet. Lastly, try to keep focused on the puddle. If when you put the hood up you see something you were not expecting, you may not have actually been looking at the puddle.. I like the Airgas argon/ CO2 mix.

Same here. Night and day when I finally switched from flux cored to gas shielded.
 

steel 35

Well-known member
Joined
Feb 20, 2011
Messages
2,105
Location
Between the PNW and the Emerald Triangle
Play with the welders settings adjust a single setting at a time,

Another thing to consider is different positions may require different settings so do them the same for a while then change.
Get use to that and the adjustments that are needed as well. Listen closely as you go and get familiar to the sound when it is working well; the sound changes when your closer or farther away! So does the weld.


HCS

Several passes should look better then sticking a bolt in it :thumbup:
 

MotoDave

Well-known member
Joined
Jul 1, 2009
Messages
505
Location
Ventura, CA
Guess I'll share a recent project from my '62 Scout 80 build:

I've been working on my 3 link front suspension, and quickly realized the motor mounts I originally built (TBI 350 Chevy V8) would limit up travel due to interference with the upper link.

I played with CAD (cardboard aided design) and came up with these side plates, showing the additional clearance that will be gained to the upper link
2013-11-11%252021.12.50.jpg


Some more CAD work, and I plated in the top and bottom of the mount. The aluminum spacer is .030" wider than the finished joint when using typical spring eye bushings, and is a handy spacer to have around for making mounts like these fit without Paul Jr'ing it into place.
2013-11-16%252009.54.48.jpg


Added speed holes and burned in the top and bottom
2013-11-16%252011.43.25.jpg


2013-11-16%252011.43.45.jpg


Had to re-make the motor mount off the engine as well
2013-11-17%252017.15.09.jpg


And here it is, tacked into place on the frame.
2013-11-17%252019.46.43.jpg


2013-11-17%252019.47.01.jpg
 
Last edited:

kazlx

Well-known member
Joined
Oct 30, 2012
Messages
2,851
Location
Tustin, CA
Wow, you guys have some amazing skills; I don't know if I should be discouraged or inspired. I guess I'll just go with both, it's humbling and kind of awesome that a thread can span such a wide skill gap. My first-ever welding project is a welding cart to get my little Hobart 140 off the ground. .030" flux core from HF seems to be capable of better quality than I am right now, but that's ok with me at this point.

I came into this without much of a plan, just a welder to build a bit of a cart under. The goal was to get it up off the ground and to learn a bit, and I succeeded on both counts.

11198668363_1792678f46_c.jpg


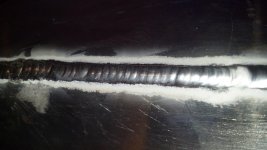
Some of the welds went well (by my standards):
11198534935_c66d33ede2_c.jpg

11198539764_d550c65a8b_c.jpg


Others didn't go so well (by any standard):
11198541914_c2c983d131_c.jpg


I was considering grinding down the really bad ones and trying again, but changed my mind. I'm just going to keep adding features like casters and a mig gun holder, use it for a bit, and once I have more practice under my belt, I'll make another, bigger, better cart.

I'm open to any feedback on how crappy it looks (the legs aren't even square, but it stands up so we'll just gloss over that), just bear in mind that this is my very first attempt at holding two pieces of metal together without using fasteners. To be clear: I'm not worried about getting ripped apart, I'm worried about getting advice that's WAY over my head.

You are running way too cold. Slow the feed down a bit and up the heat. Also, on the part where you blew a hole, you aren't on the joint. Make sure you can see the puddle. Your face should be six inches away from where you are welding, not 3 feet. Even on mig, you should be right up in there, using a hood that allows you to see the puddle. If you need it, get magnifiers. Also clean the metal with a flap wheel and bevel the joint a little, it will help the weld lay down in there. That looks like roughly 14 gauge. I see you are using .030. I would suggest .023. Although, it is doable with 30, the 23 is easier on the thinner stuff. Flux core will also run hotter than gas shielding mig with 75/25.
 
Last edited:

er3456df

Well-known member
Joined
Dec 1, 2009
Messages
230
You are running way too cold. Slow the feed down a bit and up the heat.

Also, if you don't know this already, take some time to ponder why doing either one of these on their own would have the same effect. Leave the heat alone and just slow down on your next weld, see if you can notice what's happening. Then turn the heat up and see that you need to move faster to keep up.

My best results came from figuring out what speed I was comfortable moving at, and adjusting the heat to work at that speed.
 

drummingpariah

Well-known member
Joined
Jul 20, 2009
Messages
306
Location
Manchester, NH
Wow, thanks for the feedback guys! I'm not quite ready to invest in a tank and gas, I'm funds-limited as well as VERY space-limited, so I'm going to have to make the most of flux core for the time being.

You are running way too cold. Slow the feed down a bit and up the heat. Also, on the part where you blew a hole, you aren't on the joint. Make sure you can see the puddle. Your face should be six inches away from where you are welding, not 3 feet. Even on mig, you should be right up in there, using a hood that allows you to see the puddle. If you need it, get magnifiers. Also clean the metal with a flap wheel and bevel the joint a little, it will help the weld lay down in there. That looks like roughly 14 gauge. I see you are using .030. I would suggest .023. Although, it is doable with 30, the 23 is easier on the thinner stuff. Flux core will also run hotter than gas shielding mig with 75/25.

I had a lot of trouble seeing with a few of those joins, I have to work out my lighting situation. My garage is really small (12x18, I believe) and the primary lighting are a couple of halogen lights to the side of the workbench. That means the auto-darkening hood I have is dark any time I'm looking at the work ... which ... makes it difficult to see. I flat-out missed on quite a few of these. The few that looked decent started out in a comfortable position: my arms were in a comfy place, I was right on top of the weld, and I could see.

As far as running too cold, I'll play around with it a bit. For all these welds, I was just running the 14ga .030 flux core settings on the door of the welder. It seemed pre-emptive to try to nail down the right welder settings when my skills are still so inconsistent. Comparing it to racing: I'd rather drive a slow car fast than to drive a fast car slow. Once I'm consistent, I can get a little more definitive about what settings work and what settings don't - that's where your experience is so helpful. I'll go a little hotter, and hopefully I'll be consistent enough to see a notable change in penetration.

What I'm hearing is that flux core is going to be quite a bit more difficult, so once I get decent with flux core and hit a learning plateau, I can switch to 75/25 gas and .023 solid wire and force my way to the next step in the learning curve.

EDIT - After all that, my friend Laurie sent me an example of what I should really be going for, from a project she was working on this morning. Again, inspiring or discouraging? I have so much to learn.
 

Attachments

  • laurie_welds.jpg
    laurie_welds.jpg
    46.5 KB · Views: 524
Last edited:

kazlx

Well-known member
Joined
Oct 30, 2012
Messages
2,851
Location
Tustin, CA
The problem is that if you don't have the right welder settings, your skills won't improve. It's like someone handing you a hammer and telling you to screw something together. That Hobart is actually a great little machine...it was my first one. Get a drop light or spot light or something and point it directly at your joint so you can see.

Also, if your hood is darkening when you aren't welding, either a) you don't have it adjusted correctly or b) it *****. If you don't have a nice auto darkening hood, I would strongly suggest just using a nicer fixed shade or putting a quality lens in the hood you have now. Being able to see is the biggest challenge for most people. My buddy has a average auto dark helmet and was asking about the differences. I let him look through my Speedglas 9100XX and let's just say it's an easy sell. Try a quality #10 or 11 gold lens. They aren't that much.

Also:


aka Larry

Well-known member
Joined
May 2, 2012
Messages
8,016
Location
Eastern, NC
Wow, thanks for the feedback guys! I'm not quite ready to invest in a tank and gas, I'm funds-limited as well as VERY space-limited, so I'm going to have to make the most of flux core for the time being. I had a lot of trouble seeing with a few of those joins, I have to work out my lighting situation.

BTDT as I also started with flux-core. Another vision issue is caused by the smoke that is given off using the FC. You won't believe the difference once you start using the gas.

"Generally" speaking you rather go too hot and back the heat down vs. the other way around IMO. As others have said, the sound will also clue you in letting you know when you get it right.
 

pepi

Well-known member
Joined
Mar 27, 2013
Messages
2,883
Location
Woodstock, GA
Hey quick question how do you add metal back? I have had plenty of gaps to fill and I have burned through before, I just laid down a bead over another bead over another bead to build up the area and grind down to fill it then repeat if necessary... Is there a better why ? Or a correct way ? Thanks!

That's the way aim the stinger so that you're trying to fill from the bottom up or out.
 

truckfan

New member
Joined
Dec 19, 2011
Messages
2
Made use of the ol' scrap pile. Beefed up the welding cart, added drawer storage and a tool rack up top.

30rmipv.jpg

11r3wjk.jpg

2w33l9v.jpg
 

Richard D

Well-known member
Joined
Jan 19, 2007
Messages
1,922
Location
Texas City, between Houston and Galveston
+1 on that. IF your welder has or can be fitted with the solenoid valve, DO convert it to a MIG. Polarity changes when you switch from flux core to solid. I changed my Lincoln over years ago, never looked back and almost immediately my welds improved, or to be more precise, began improving. The next thing is a good auto dimming helmet. Lastly, try to keep focused on the puddle. If when you put the hood up you see something you were not expecting, you may not have actually been looking at the puddle.. I like the Airgas argon/ CO2 mix.

Yep. Flux core=***** more.
 

Richard D

Well-known member
Joined
Jan 19, 2007
Messages
1,922
Location
Texas City, between Houston and Galveston
For those who have'haven't seen it yet, the fab table I've been working on:


Need to get some heavy duty drawer slides:

A closeup of the sliding clamp "pucks" as I call them. They are drilled 3/8"-16 on one side, and 1/2"-13 on the other. I got a piece of 2"x1/2" flatbar, drilled and threaded it for a stud, and tacked a toggle clamp on there to see how well it works. Sure would be nice if I could find cheap toggle clamps with a stud mount!
 

toomanytoyzz

Well-known member
Joined
May 11, 2012
Messages
1,571
Location
Malvern, PA
^^Me likes ALOT!!!^^:beer:

I'd love to get ahold of an Acorn table one day. One was for sale about a year ago in my area, but it went pretty quick. They are very useful especially if you are making frames for cars/trucks.

The only downfall I see with those style of tables is that my clumsy *** would constantly be dropping tools/materials through the cracks:sad:. I think I could get over that problem though:evil:.
 

1upmoto

Active member
Joined
Nov 29, 2013
Messages
29
NICE, What kind of bushing are you using? or is it solid?
Guess I'll share a recent project from my '62 Scout 80 build:

I've been working on my 3 link front suspension, and quickly realized the motor mounts I originally built (TBI 350 Chevy V8) would limit up travel due to interference with the upper link.

I played with CAD (cardboard aided design) and came up with these side plates, showing the additional clearance that will be gained to the upper link
2013-11-11%252021.12.50.jpg


Some more CAD work, and I plated in the top and bottom of the mount. The aluminum spacer is .030" wider than the finished joint when using typical spring eye bushings, and is a handy spacer to have around for making mounts like these fit without Paul Jr'ing it into place.
2013-11-16%252009.54.48.jpg


Added speed holes and burned in the top and bottom
2013-11-16%252011.43.25.jpg


2013-11-16%252011.43.45.jpg


Had to re-make the motor mount off the engine as well
2013-11-17%252017.15.09.jpg


And here it is, tacked into place on the frame.
2013-11-17%252019.46.43.jpg


2013-11-17%252019.47.01.jpg
 

Richard D

Well-known member
Joined
Jan 19, 2007
Messages
1,922
Location
Texas City, between Houston and Galveston
^^Me likes ALOT!!!^^:beer:

I'd love to get ahold of an Acorn table one day. One was for sale about a year ago in my area, but it went pretty quick. They are very useful especially if you are making frames for cars/trucks.

The only downfall I see with those style of tables is that my clumsy *** would constantly be dropping tools/materials through the cracks:sad:. I think I could get over that problem though:evil:.

I welded a length of angle iron down each side to slide a tray under there for the same reason, and to keep slag off tools/etc. underneath. And I will be using the table to build car frames. Future plans include removable extensions for both ends.
 

MotoDave

Well-known member
Joined
Jul 1, 2009
Messages
505
Location
Ventura, CA
NICE, What kind of bushing are you using? or is it solid?

I am using urethane spring eye bushings, I think I got them from Ruffstuff
http://www.ruffstuffspecialties.com/catalog/merchant.mvc?Screen=PROD&Product_Code=BUSHDOM

The aluminum spacers are just some parts I turned to make building parts like these easier, they let you bolt the part together without worry of overheating the urethane, and I make them .030" wider than the bushing sleeve to allow room to get the bushing in and out more easily.
 
To avoid these ads, REGISTER NOW!

1upmoto

Active member
Joined
Nov 29, 2013
Messages
29

zmotorsports

ALLIANCE MEMBER
Joined
Oct 20, 2009
Messages
21,332
Location
Northern Utah
Guess I'll share a recent project from my '62 Scout 80 build:

I've been working on my 3 link front suspension, and quickly realized the motor mounts I originally built (TBI 350 Chevy V8) would limit up travel due to interference with the upper link.

I played with CAD (cardboard aided design) and came up with these side plates, showing the additional clearance that will be gained to the upper link
2013-11-11%252021.12.50.jpg


Some more CAD work, and I plated in the top and bottom of the mount. The aluminum spacer is .030" wider than the finished joint when using typical spring eye bushings, and is a handy spacer to have around for making mounts like these fit without Paul Jr'ing it into place.
2013-11-16%252009.54.48.jpg


Added speed holes and burned in the top and bottom
2013-11-16%252011.43.25.jpg


2013-11-16%252011.43.45.jpg


Had to re-make the motor mount off the engine as well
2013-11-17%252017.15.09.jpg


And here it is, tacked into place on the frame.
2013-11-17%252019.46.43.jpg


2013-11-17%252019.47.01.jpg

Nice job on the motor mounts.

Mike.
 

ndr1968

Well-known member
Joined
Apr 18, 2012
Messages
207
Location
Oklahoma
Well he has no gloves on so I see why he is so far from the work! ... You learn to change those habits real quick though and start only welding with gloves... Oh and to the guy in the picture jeans do NOT stop slag and think of how you are sitting and WHAT is closest to the work.... PAIN!

Exactly! My solution to the welding in the summer-time problem was to make my own belted leather apron. It's just a piece of leather with an old cut-in-half battery strap stich awled to it so it goes around the waist and clicks together at the back. The get up looks kinda goofy but it keeps the hot stuff off me!
 

Attachments

  • IMG_0638.jpg
    IMG_0638.jpg
    145.8 KB · Views: 512
  • IMG_0641.jpg
    IMG_0641.jpg
    147.8 KB · Views: 498

superspec

Well-known member
Joined
Nov 28, 2011
Messages
2,172
Location
WM louisiana
Wow, thanks for the feedback guys! I'm not quite ready to invest in a tank and gas, I'm funds-limited as well as VERY space-limited, so I'm going to have to make the most of flux core for the time being.


I had a lot of trouble seeing with a few of those joins, I have to work out my lighting situation. My garage is really small (12x18, I believe) and the primary lighting are a couple of halogen lights to the side of the workbench. That means the auto-darkening hood I have is dark any time I'm looking at the work ... which ... makes it difficult to see. I flat-out missed on quite a few of these. The few that looked decent started out in a comfortable position: my arms were in a comfy place, I was right on top of the weld, and I could see.

As far as running too cold, I'll play around with it a bit. For all these welds, I was just running the 14ga .030 flux core settings on the door of the welder. It seemed pre-emptive to try to nail down the right welder settings when my skills are still so inconsistent. Comparing it to racing: I'd rather drive a slow car fast than to drive a fast car slow. Once I'm consistent, I can get a little more definitive about what settings work and what settings don't - that's where your experience is so helpful. I'll go a little hotter, and hopefully I'll be consistent enough to see a notable change in penetration.

What I'm hearing is that flux core is going to be quite a bit more difficult, so once I get decent with flux core and hit a learning plateau, I can switch to 75/25 gas and .023 solid wire and force my way to the next step in the learning curve.

EDIT - After all that, my friend Laurie sent me an example of what I should really be going for, from a project she was working on this morning. Again, inspiring or discouraging? I have so much to learn.


This is just how it worked for me so take it for what it is worth.

several years ago my dad was doing some welding at his house. he had a what must have been an auto darkening hood from HF. I couldnt see a thing. He was also using an old Hobart mig. things basically looked ****** no matter what. He later bought a nice millermatic 210 and the results still didnt improve. if you cant see what the F you are doing its just going to be bad.

In the past year I decided to buy a bunch of equipment and all good stuff. I got a diversion 180 and miller digital elite hood. I watched a bunch of youtube videos and got a 15min crash course from a buddy who worked at hennessey performance. Im still not a master with Tig but I have gained knowledge through practice and reading.

Recently I went to help my dad rebuild his 48' trailer because all of his cold joints started to fail. we added another 20ft of 6x6 tubing across the trailer. he was going to weld half the sides and i would weld the other half. He quickly realized i was much better and asked why. for one of the first times I was able to not only help him learn something but also make him see that sometimes it is well worth spending the money to buy nice equipment.
 

Richard D

Well-known member
Joined
Jan 19, 2007
Messages
1,922
Location
Texas City, between Houston and Galveston
Exactly! My solution to the welding in the summer-time problem was to make my own belted leather apron. It's just a piece of leather with an old cut-in-half battery strap stich awled to it so it goes around the waist and clicks together at the back. The get up looks kinda goofy but it keeps the hot stuff off me!

I agree! hate sweating my *** off down here in Texas. I have welded in shorts, tank top, and flip flops when it as over 100 degrees, and have the scars to prove it! Now I sometimes use the slip-on sleeves(or often just deal with a bit of spatter/burn), but I hardly ever go out in the shop in flops anymore. I need to rig up some Velcro welding leathers and slip-on steel toe sandals. Fatasses like me hate the heat!
 

ndr1968

Well-known member
Joined
Apr 18, 2012
Messages
207
Location
Oklahoma
Nice projects everyone. I cringe at the cost of steel when I want to build something. I've honestly only purchased flat or angle iron steel from HD, Lowes or a local parts store, so I probably did not get the best prices.

Are the prices better typically better or worse in your experience at welding supply houses than the big box stores?

Thing about HD, ACE & them is that they're open nights and weekends, no?

I used Metal Supermarket for a while until I discovered that they were WAY HIGH on most of the stuff I bought there. They have or can get just about anything you want but on steel they are high.

My last two purchases were from Albright Steel. They are a lot cheaper than MS, they are in the neighborhood and they only charge 50 cents a cut to get the 20 foot "sticks" down to a size I can get into my trucks 7 foot bed. Minimum order is one "stick". They may make exception to this on the larger rod and other solids.
 

vartz04

Well-known member
Joined
Feb 17, 2009
Messages
1,882
Location
LaSalle County IL
I'm Almost embarrassed to show my stuff. I just started welding 2 weeks ago. I made a rear bracket to hold extra weight on My tractor.
20131127_143101_zpsbf02e670.jpg
20131127_143047_zps7dfbdba8.jpg


Welds were made with the $90 hf flux core welder.
 

toomanytoyzz

Well-known member
Joined
May 11, 2012
Messages
1,571
Location
Malvern, PA
I'm Almost embarrassed to show my stuff. I just started welding 2 weeks ago. I made a rear bracket to hold extra weight on My tractor.

Welds were made with the $90 hf flux core welder.

It will work for what you need now. We all started somewhere. Welds look pretty good for a beginner:thumbup:!!

Just think in two years and about $3k later you'll have a small fab shop worth of metalworking tools at your disposal. It's addictive.
 

75Dually

Well-known member
Joined
Dec 5, 2013
Messages
444
Location
Lubbock, TX
Here is a shop project I did a year ago. I wanted a tray for holding tools close to my projects. I also use it quite often for doing small assembly because the tray holds all the small parts from falling on the floor. I went to a restaurant supply house here in town and got one of the large aluminum cooking trays and then I hade some 1" tubing laying around.

The tray is very stable and will hold a lot more weight than I ever thought it would. It is very light weight, but strong.

I use it a bunch when working on my dirt bikes or working on my Dually project. Check it my 75 dually project: http://www.duallyscene.com/forums/p...688.html?sid=b85cb995e86c96ba66418021944912fa
 

Attachments

  • Tray 1.jpg
    Tray 1.jpg
    54.7 KB · Views: 180
  • Tray 2.jpg
    Tray 2.jpg
    139.9 KB · Views: 200

R.Anderson

Well-known member
Joined
May 26, 2012
Messages
906
Location
Wisconsin
I'm Almost embarrassed to show my stuff. I just started welding 2 weeks ago. I made a rear bracket to hold extra weight on My tractor.

Welds were made with the $90 hf flux core welder.

Are you sure you only started two weeks ago and not two years ago, looks good:thumbup:
 
OP
N

neonnblack

Well-known member
Joined
Jun 7, 2010
Messages
4,913
Location
Reno, NV
Thing about HD, ACE & them is that they're open nights and weekends, no?

I used Metal Supermarket for a while until I discovered that they were WAY HIGH on most of the stuff I bought there. They have or can get just about anything you want but on steel they are high.

My last two purchases were from Albright Steel. They are a lot cheaper than MS, they are in the neighborhood and they only charge 50 cents a cut to get the 20 foot "sticks" down to a size I can get into my trucks 7 foot bed. Minimum order is one "stick". They may make exception to this on the larger rod and other solids.

Here in town, I get mine from PDM Steel. I was expecting to spend a fortune on some metal from them. Nope. I can buy a 20' stick of angle iron from them, for the same price that HD carries a 4' piece. Think it was 15 bucks.

Cutting is fairly expensive though. I got some stuff to build a desk, and if i had a couple 45's cut and about 6 other straight cuts doubled the price of my order.
 

ndr1968

Well-known member
Joined
Apr 18, 2012
Messages
207
Location
Oklahoma
Read the precautions on the cans. Both of these solvents are common, but REALLY nasty. To use them in an industrial setting, all kinds of special precautions are needed. Especially the MEK. Avoid it if possible. Low flash point, high toxicity... I saw a trash can catch on fire that had some MEK soaked scraps in it. It was like a 2 foot across welding torch! It ROARED! One of our guys had the b@lls and presence of mind to quickly drag it out the roll up door, and turn it upside down to try to stifle it. The heat and fire burned a hole in the asphalt pavement. We would have lost the whole shop if not for the easy exit. (As an aside, it was a terrible place to work, dangerous and miserable. OSHA violations, poor management, etc, and within a year they were out of business.)

I use denatured alcohol as a degreaser prior to paint. Less odor, less toxic, not as flammable. Does a great job. Sometimes on large frameworks, I apply it with a paint cup gun as a wash down. As a bonus it takes off all your sharpie marks.

Protect yourself. Those solvents add up, and eventually you can become sensitized to them to the point where you almost can't ever use them again because the smallest exposure triggers adverse effects. I always try the least nasty stuff first, and work up the the big boys if needed. I haven't cracked open a can of MEK in over 10 years.

Nice projects all!

zuk

+1 on the sensitization to solvents. I've been a printer for over thirty years and if I even look too hard at certian solvents my fingers crack open and hurt!

Zuk, man! please be careful with spraying the alky! Especially if it's the 99% stuff! You know all the spray rules (ventilation, explosion proof ect). But, thing is, I KNOW you're probably pooling the stuff on the floor remember it IS fuel and will go up as it sits! I would definately only do something like that outdoors well away from anything combustible! Even then, be carefull and not get too much on your shoes or clothing.
 

that-guy

Well-known member
Joined
Sep 6, 2012
Messages
603
Location
NoVA
custom submerged surge tank for inline Bosch 044 fuel pump. CNC face plate with -6 an fittings, 1/8" 6061 sheet metal. 3/32 green tungsten with 3/32 rod, 19cfh, #6 gas lens, 90 amps with Eastwood TIG200...sorry for the ****** pics, taken with my cell with the horrible lighting in my garage last night
 

Attachments

  • surge tank1.jpg
    surge tank1.jpg
    146.5 KB · Views: 352
  • surge tank2.jpg
    surge tank2.jpg
    144.7 KB · Views: 269
Last edited:

ndr1968

Well-known member
Joined
Apr 18, 2012
Messages
207
Location
Oklahoma
I dont want to sound like an ***, but can you please cut most of the photos out when you quote someone.

Its brutal on my phone (as Im sure it is on others) when I check on this thread and the same photos are posted several times on the same page.

Thanks

+1 on the photos included in quotes. Also, what's going on with all the different photo hosts (many of which show "photo removed by poster" or some such) What's wrong with just using the site included file attachment tool?
 

ndr1968

Well-known member
Joined
Apr 18, 2012
Messages
207
Location
Oklahoma
My latest is another example of the fact that I'm not much of a welder -- but I never let that stop me from 'going big.' :)


And here it is covered with shade fabric.

dayan.jpg


Hey Jack. Man! I sure hope you have good weather proofing on those patio doors when it rains hard! Or...is the fabric like "transparent" to rainfall?
 
To avoid these ads, REGISTER NOW!
Top Bottom