To avoid these ads, REGISTER NOW!

Show us your welding projects

MN4x4

Well-known member
Joined
Sep 5, 2010
Messages
1,443
Location
Minnesnowta
Update on the Stock Picker Battery Transfer Cart:

I removed the rollers from the conveyor frame. Here I have one cleaned up, but the rest are as I got them:

photo 1-4.jpg

I used a wire wheel, some Roloc disks, and I even used a media blaster to clean up the ends. Here they are partway through the paint process:

photo 4-5.jpg

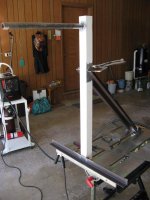
I don't have a blast cabinet, but I've been meaning to build one. I have a start on it that you might recognize (hint, it's upside down from it's normal position) so I cobbled this together so I could use it today:

photo 3-5.jpg

While I'm at it, I might just as well rebuild the casters and paint the frames with Silver POR15:

Caster.jpg

OK - enough teasing. Here's a final view of the cart from the side:

photo 1-7.jpg

And from the front:

photo 2-5.jpg

The colors are designed to match my Crown Picker. The rollers are silver, the main body is 'Dark Grey' and the roller frame (upper portion) is what Crown calls 'Bright Beige'. I like it!

Total cost was under $100, not counting my time.
 
Last edited:
To avoid these ads, REGISTER NOW!

MagnumForce

Well-known member
Joined
Jun 3, 2014
Messages
1,392
Location
Ohio
Pretty much exactly our wire barrel carts, just replace black with blue and grey with yellow. Looks good.
 

MN4x4

Well-known member
Joined
Sep 5, 2010
Messages
1,443
Location
Minnesnowta
Pretty much exactly our wire barrel carts, just replace black with blue and grey with yellow. Looks good.

I've seen that some of the Battery Transfer Carts have a small winch mounted on them to pull the battery onto the cart. Do yours have a winch on them? Would you recommend one for my application?
 

MN4x4

Well-known member
Joined
Sep 5, 2010
Messages
1,443
Location
Minnesnowta
If you have rollers I don't see a reason for it.

It can be quite a challenge to roll the battery out, even with the rollers. Getting a thousand pounds started can be quite a challenge. It's not as much trouble getting it stopped as you might think, since the rollers don't really allow it to freewheel. All of that weight tends to want to make the load stop rather than continue to roll.

That's assuming you're doing this on level ground, of course?!

:lol_hitti
 
Last edited:
OP
N

neonnblack

Well-known member
Joined
Jun 7, 2010
Messages
4,913
Location
Reno, NV
They have winches for just that. If its not perfectly(or very near) It can be quite difficult to RnR lift batteries.
 

Grinder Bill

Well-known member
Joined
Jan 11, 2011
Messages
217
This is my winter project, due to be on the road next spring. 1935 GMC sheet metal grafted to a '99 Blazer 4x4 chassis & firewall. The hood is now complete, the doors have been chopped 3", the box is fitted, the dash is 90% and the wiring is 95% done. Once the snow flies I need to finish the power windows, install the doors and fit & finish the back of the cab.

https://scontent-a-sea.**.fbcdn.net/hphotos-xpa1/v/l/t1.0-9/1981930_10152340077054722_6881768113671251440_n.jpg?oh=00182709593b720d3c0e9919ff476740&oe=545FD688

https://scontent-a-sea.**.fbcdn.net/hphotos-xfp1/v/t1.0-9/10258083_10152340077144722_7143149912390289346_n.jpg?oh=6cba4405e3e6bc2d7bf5adb08a7c11d4&oe=5470FBE8
 

MN4x4

Well-known member
Joined
Sep 5, 2010
Messages
1,443
Location
Minnesnowta
Is that a fireplace insert for a blast cab?

Sure is!

It needs some legs and a door/window but it served its purpose of collecting (some of) the blast media and controlling what it bounced off of.

For this quick use I just sat it on a 5-gallon pail. Worked fine.
 

ColoradoToy91

Well-known member
Joined
Aug 13, 2014
Messages
98
Location
Roxborough, CO
Beginning:
429090_10150846520694478_385075084_n.jpg

Closer:
483464_10151865327069478_1994357660_n.jpg

"Done"
1544470_10152786773840744_4038542381941937267_n.jpg
 

MarkG

Well-known member
Joined
May 23, 2012
Messages
1,219
Location
Elgin, IL
Table-mounted bike work stand. Jaws grip the seatpost. Jaws are 2x4 with bored hole for pipe clamps and seatpost. The rest is salvaged metal tube and angle. Rear brace through-bolts to table. Front edge can just be clamped. Solid as a rock! I'm pretty happy with it. I've never needed to spin my bike around like a windmill on my stand, so I don't miss that 'feature' on this version a bit!
 

Attachments

  • 012.jpg
    012.jpg
    136.9 KB · Views: 174
  • 010.jpg
    010.jpg
    148.1 KB · Views: 157
  • 005.jpg
    005.jpg
    136.8 KB · Views: 160
  • 008.jpg
    008.jpg
    142.1 KB · Views: 85
Last edited:

zmotorsports

ALLIANCE MEMBER
Joined
Oct 20, 2009
Messages
21,312
Location
Northern Utah
Fabricated a base for my new knee mill.

Started with 2"x4"x.125" rectangular tubing and added TECO leveling feet.
29v198h.jpg


I machined some threaded bungs so I could bolt the milling machine directly to the base and then level the base with the adjustable feet.
1431ekl.jpg


One of my welds.
5frwic.jpg


Completed and painted. Sitting in front of the mill waiting to be put to use.
29ymgyb.jpg
 

kazlx

Well-known member
Joined
Oct 30, 2012
Messages
2,851
Location
Tustin, CA
It looks like you are running individual tack welds. A no-no on anything but thin sheet metal. Especially since those plates look burly.
 

bullnerd

Well-known member
Joined
Sep 17, 2012
Messages
5,690
Location
Jersey
I like the bike work mount,cool use of a bar clamp.

Z...isn't the base going to make the mill too high? Or is that your intention?

I have pics somewhere of a nice mobile mill base that keeps it pretty low.
 

zmotorsports

ALLIANCE MEMBER
Joined
Oct 20, 2009
Messages
21,312
Location
Northern Utah
Z...isn't the base going to make the mill too high? Or is that your intention?

I have pics somewhere of a nice mobile mill base that keeps it pretty low.

No, it is actually a 2/3 or 3/4 size Bridgeport and I don't want to be kneeling down when machining. The 8" that I raised it is PERFECT for both my son and I. It was a bit tall to reach the drawbar but I had already decided a power drawbar would be on my list of modifications even before the mill showed up. It just got bumped right to the top of the list within a few very short hours of operating the mill.

I have seen quite a few mobile bases on milling machines but for some reason I am not a fan of having that large a piece of equipment being mobile. I like them firmly "planted" to the floor of the shop. I do like the fact that I can sweep 360 degrees around it. At first I wasn't even considering having it in the middle of the floor like that but I am out of wall space and my wife suggested this location. I had such a mental block because I was searching for wall space that I never even considered putting in the middle of the floor and having space available to walk completely around it which is nice for cleanup duties.

Mike.
 

Hot Chop shop

Well-known member
Joined
Apr 12, 2013
Messages
628
Location
Las Vegas
Working on the welding table... tig welds pretty much.

vubypequ.jpg


7e7eha7y.jpg


u7ytared.jpg

Looking forward to updates on this project... Thinking about making a new welding table this winter... I have zero need for it but so many great ideas here always want to throw a few more in there.


Sent from my iPad using Tapatalk HD
 
To avoid these ads, REGISTER NOW!

MagnumForce

Well-known member
Joined
Jun 3, 2014
Messages
1,392
Location
Ohio
After seeing some of the welds on this thread I feel I need a little more practice, so here is a couple of mine.

View media item 43127
View media item 34474
Regards
Is that MIG? If so you have more issues than I first thought, I didn't realize it was MIG. You need to weld as one continuous weld, not a bunch of tacks. You have basically no penatratraion there and I wouldn't trust it at all.
 

1/2 Cup

Member Emeritus
Joined
Apr 28, 2012
Messages
19,283
Location
Shepparton. Victoria. Australia
Is that MIG? If so you have more issues than I first thought, I didn't realize it was MIG. You need to weld as one continuous weld, not a bunch of tacks. You have basically no penatratraion there and I wouldn't trust it at all.

Thanks for the comment, appreciated.
Yes it is a MIG, a very old one at that and I am having trouble getting the amps right for a continuous weld in thin metal.

The piece that I welded there is thin wall square section, tacked at first to keep it square, then welded as you see in the pic.
The welds were then ground flush with the parent metal.

Regards
 

mr_magicfingers

Well-known member
Joined
Apr 22, 2013
Messages
70
Location
Devon, UK
Well a couple of slow days at work and I've just been through this whole thread, there's some amazing skills and ideas within it. I recently bought my first welder but can't really fire it up until we finish the workshop we've just torn down and are rebuilding.

once that's done I'll be back here to ask a lot of, no doubt, obvious questions and to post the results of my first attempts.
 

coma13

Well-known member
Joined
Nov 5, 2012
Messages
247
Thanks for the comment, appreciated.
Yes it is a MIG, a very old one at that and I am having trouble getting the amps right for a continuous weld in thin metal.

The piece that I welded there is thin wall square section, tacked at first to keep it square, then welded as you see in the pic.
The welds were then ground flush with the parent metal.

Regards

Yikes. There is probably almost nothing holding the pieces together at this point.
 

bullnerd

Well-known member
Joined
Sep 17, 2012
Messages
5,690
Location
Jersey
OK, that's what I figured. Nice job.
Yeah I have a BP clone that will be getting a power draw bar in the future.Once you use one ,you cant go back!

I'm a fan of having the machines out away from the walls too. Easier to clean and maintain for sure.

No, it is actually a 2/3 or 3/4 size Bridgeport and I don't want to be kneeling down when machining. The 8" that I raised it is PERFECT for both my son and I. It was a bit tall to reach the drawbar but I had already decided a power drawbar would be on my list of modifications even before the mill showed up. It just got bumped right to the top of the list within a few very short hours of operating the mill.

I have seen quite a few mobile bases on milling machines but for some reason I am not a fan of having that large a piece of equipment being mobile. I like them firmly "planted" to the floor of the shop. I do like the fact that I can sweep 360 degrees around it. At first I wasn't even considering having it in the middle of the floor like that but I am out of wall space and my wife suggested this location. I had such a mental block because I was searching for wall space that I never even considered putting in the middle of the floor and having space available to walk completely around it which is nice for cleanup duties.

Mike.
 

bullnerd

Well-known member
Joined
Sep 17, 2012
Messages
5,690
Location
Jersey
1/2Cup...go to weldingtipsandtricks.com, he has great videos on setting up a mig welder. You'll be welding better in no time.
 

Toolhorder

Well-known member
Joined
Nov 9, 2009
Messages
5,711
Location
Montana
Here's my grinder stand I've been working on and off since May. Never enough time in the shop to finish it. It's at least functional at this point but I wanted to add paint and hooks for cord and helmet.
I thought this project would be fairly simple but it wasn't as easy as I thought. The 4x4 square tubing wasn't perfectly cut straight and even after cutting it in my chopsaw it was still "off" when I tried to level it. I ended up tacking the piece to the base then grinding the top and checking with a level over and over until it was level then I welded the top plate on.


Robert Hall

Well-known member
Joined
Jan 17, 2011
Messages
414
Location
Utah
While the big welding table is coming along...

0837e8eca381d1ca1117f420355ee2f3.jpg


The tool chests fit perfectly. The idea is that the table can be broken in to smaller pieces if it ever had to be moved.

I solved the most difficult question... what color paint!! (Safety yellow)

I added a clamp hanger to one side...

cec70b5ad16c7b0084fef434be2f80f2.jpg


Also added a hanger for grinders.

The main welding project today was the "humble" welding cart for the free Idealarc I was given last week. 35 years young. Pristine inside. I'll redo the paint this winter.

2b253ab9d3b808b71fa5aeb36874df38.jpg


779e5f21547078ad963d4d53b2b0f278.jpg


2b6de69054b2d2d56fcc5da840bf5210.jpg


6010 all the way around.
 

ClintNZ

Well-known member
Joined
Sep 6, 2012
Messages
107
Location
Rotorua, New Zealand
Nice welds!

Cheers! Some of the credit should go to my girlfriend Rosie, we did the circular welds between the upright tube & the bearing housings by assembling it on the spindle, laid down in the vice, then she turned it while I drove the TIG without having to shift position. Kinda cheating but it works good :D

Rosie also ran the pedal while I welded in the bottom of the bush in the bumper. There is nothing nicer for out of position welding than a TIG with voice controlled amperage ;)

Cheers
Clint
 

zmotorsports

ALLIANCE MEMBER
Joined
Oct 20, 2009
Messages
21,312
Location
Northern Utah
Machined a new end for a suspension link.
rwqx3r.jpg


Old end cut off of link.
4tu2hd.jpg


Newly machined end welded on to link.
2vmypl1.jpg


Bead blasted, primed and painted prior to installation.
zxmj2v.jpg


Mike.
 

tractordude

Well-known member
Joined
Nov 16, 2009
Messages
2,226
Location
WI
Any one care to venture a guess on this contraption?
It's incomplete, I was just asked to build this much.
 

Attachments

  • 000_0807.jpg
    000_0807.jpg
    138 KB · Views: 663
To avoid these ads, REGISTER NOW!
Top Bottom