richeyc2000
Well-known member
Seriously impressive. Great job.
A few guards and you could market that. [emoji106]
Sent from my iPhone using Tapatalk
A few guards and you could market that. [emoji106]
Sent from my iPhone using Tapatalk

Here are some pictures of a roll bender I built recently. I needed some tubing rolled for a bike project and the only guy locally that I could find to do it wanted a 500-1000 piece order. I have dies that go from 3/4 - 2". The picture with the full circle is 1-1/4 .120 wall DOM. The half circle is 2" .120 wall DOM and the last tube shown rolled is 2" .188 wall.
Wow, now that's a roller. Clearly well thought out with amazing attention to detail. But you can't drop a bomb like this without more details on the bike project......
Here are some pictures of a roll bender I built recently. I needed some tubing rolled for a bike project and the only guy locally that I could find to do it wanted a 500-1000 piece order. I have dies that go from 3/4 - 2". The picture with the full circle is 1-1/4 .120 wall DOM. The half circle is 2" .120 wall DOM and the last tube shown rolled is 2" .188 wall.

Here are some pictures of a roll bender I built recently. I needed some tubing rolled for a bike project and the only guy locally that I could find to do it wanted a 500-1000 piece order. I have dies that go from 3/4 - 2". The picture with the full circle is 1-1/4 .120 wall DOM. The half circle is 2" .120 wall DOM and the last tube shown rolled is 2" .188 wall.


Well this is the second time trying to reply to your questions. I am not very good with a computer. I see some of you have expressed interest in plans for the bender. I don't really have any "plans". I thought this all up in my head and built it as I went. It should not be too hard for me to come up with some plans though. I will supply the "plans" for free to whoever wants them but you must supply me with your email or mailing address somehow. This is the first post on here I believe and I have no idea how to get them to me. If there is a private message system maybe that will work. As far as the bike project goes I used to turn a lot of Harley's into choppers. Some of the guys wanted their backbone rolled and I could not do it so I built this roller. It is an on again off again kind of hobby. You never know when or what people are going to want. Now that I can roll tubing I probably won't have anybody ask, isn't that how it goes? Ha Ha. If anybody sends their address please give me some time to make the plans. For free this will not be a detailed set of blueprints but I will supply material sizes and dimensions etc so it can be duplicated.
Thanks
Bill
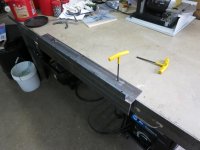
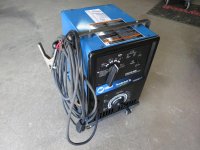
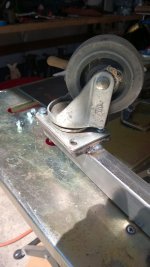
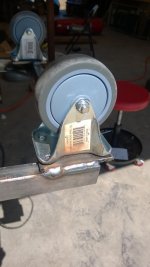
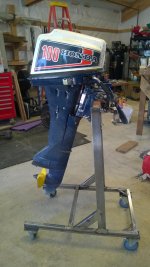
Made this cart? dolly? for my new Thunderbolt.


Any tips on welding fittings onto rad tanks? I have a new rad that is from a race car that used a filler neck on the block and doesn't have one one the tank. I want to retrofit it to use in my 65 F250. I can buy the necks, but I have never tigged on a rad before. Just like other thin aluminum?Finished dual passing my radiator.
Any tips on welding fittings onto rad tanks? I have a new rad that is from a race car that used a filler neck on the block and doesn't have one one the tank. I want to retrofit it to use in my 65 F250. I can buy the necks, but I have never tigged on a rad before. Just like other thin aluminum?
Cheers
Thanks for the advice. It's a new radiator, still in the box, so I figured it might be the same as regular thin aluminum but wanted to check.I fabricated the end tank above form scratch replacing the existing one, so that part was easy. The internals on the radiator is prob pretty dirty so you may need to turn up your balance (if you can). Otherwise it is pretty much like any other thin wall dirty aluminum welding.
Thanks for the advice. It's a new radiator, still in the box, so I figured it might be the same as regular thin aluminum but wanted to check.
Thanks again.

Good call. I always spend 10 min or so getting my rythem back on scrap before any important project. Don't get as much torch time as I would like and get rusty quickly.Then you should be good to go [emoji106]
FYI my radiator end tank was maybe .0625" wall thickness. Might dial your settings in on some scrap.
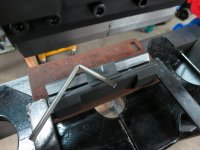
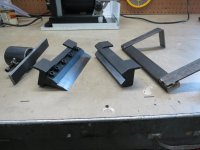
It was done in a brake (even homemade, maybe with angle iron). You can tell because of the lines on either side of the bend from the shoe. They work well with a hydraulic press and aren't that expensive to build or buy.
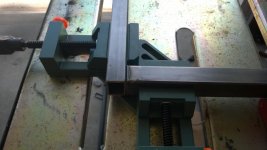
Yep. I have a couple of bigger brakes but I find myself using the $50 Grizzly brake that is designed to use in a vise more than the two big guys combined.
I made up an adapter to use it in the shop press. Works great on the lighter stuff I do a lot of.
Yep. I have a couple of bigger brakes but I find myself using the $50 Grizzly brake that is designed to use in a vise more than the two big guys combined.
I made up an adapter to use it in the shop press. Works great on the lighter stuff I do a lot of.
Thanks for the photos and explanation. It really cleared things up. I did not realize the two cast parts were magnetized and the bottom jig is to alight the base with the top. I got it now.OK. I'll get out there later his morning and do the photos. I didn't change the original tool in any way. I just made some adaptors for the magnets to stick too. The lower die had to be indexed to the upper of course and that's what the "fingers" hanging over the edge are all about.
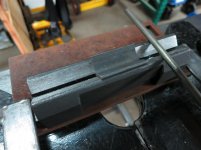
This is the 6" finger brake model. You can arrange the separate pieces of the ram for making boxes or other complicated shapes. The "teeth" are 1", 2" & 3".
It works pretty good with just a vise but positioning the work can get you into some really awkward body postures. I made some shallow pans out of .063" aluminum sheet with it that way. They were 12" and 13.5" on a side. You kind of have to get creative and make partial bends along the length before trying to get to the full ninety because you can only take a 6" bite.
I have bent 1/4" round with it but quickly discovered that a "mother in law" piece of angle iron needs to be put in to protect the bottom die from denting. Otherwise, I have bent 1" x 1/8" bar with it with no problems. Not sure it would take too much more than that width. It appears to be made of cast steel.
One caveat I did read about was that your vise needs to be pretty heavy duty. I think some guys have actually broken their vises with this thing by trying to work either too thick or wide material.


A workbench/motorcycle lift, more pics @ my garage build-topic, just need to update it first..
Wish you'd started this in its own thread. KudosA workbench/motorcycle lift, more pics @ my garage build-topic, just need to update it first..