ClappedOutBport
Well-known member
- Joined
- Mar 30, 2016
- Messages
- 998
I'm putting an s54 into it in a few weeks!
Whooo, that will be a blast. I love the noise my m52 makes when revving out, I can't imagine an 8k s54.

I'm putting an s54 into it in a few weeks!
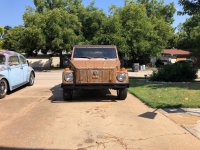
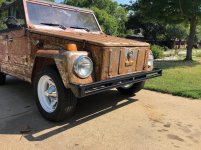
Nice bumper. Is the Thing staying that color? Sweet bug too.
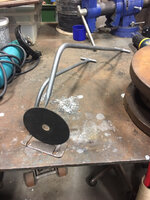
Here’s my quick but gaudy weld project.
Shorty Korte
Always remember quality in QST
Sent from my iPhone using Garage Journal
Built a bumper for the wife’s Thing. One of these days it will get paint on it but right now she’s enjoying driving it and I don’t want to take that away from her.
Built a bumper for the wife’s Thing. One of these days it will get paint on it but right now she’s enjoying driving it and I don’t want to take that away from her.


nice work mike. need to do a kubota deck that I've been putting off...

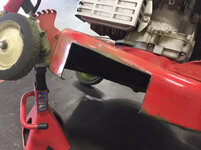
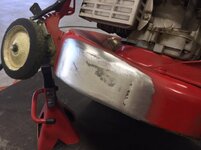
Mower deck repair.
More picture of this repair can be found in my Shop Projects 2.0 thread.
Is the deck made of reasonably thick material? I tried that once and kept blowing holes. The deck was kinda thin. Did you run beads or just a bunch of tacks? You probably used TIG?
Shorty Korte
Always remember quality in QST
Sent from my iPhone using Garage Journal
I dont have a picture but i passed my mgaw structural bend test first time first try. My instructor said that he didnt expect anybody to pass so i had to be cocky about it.
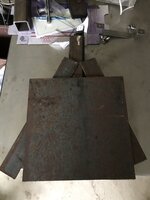
My real first attempt at a functional welding project
Not gonna hurt my feelings, let me know what you think.
My real first attempt at a functional welding project
Not gonna hurt my feelings, let me know what you think.
Thanks for the advice
I know that the vertical pieces don’t have that much pressure
But they are 1/4 plate and the base is 3/8 plate.
My biggest concern is where the 2x2 that slides into the receiver is welded to the base of the cradle.
Just don’t have enough experience to trust the welds
My real first attempt at a functional welding project
Not gonna hurt my feelings, let me know what you think.
If you are concerned , I would add 2" square tube to it. Run the new tube from the base bottom to the receiver end with the hole. Run the new tube on a angle like the tongue on a trailer. It would be like a "A".
Sent from my iPhone using Tapatalk
Probably good that you did weld the whole length, it doesn't look like you got very good penetration. Will it hold? Can't really say from the pictures. Next time you're working with something that thick, maybe try to slow down the feed and crank up the amperage.My real first attempt at a functional welding project
Not gonna hurt my feelings, let me know what you think.
Welds are a lot like ***, they don't have to be pretty, but penetration is key
Not really understanding


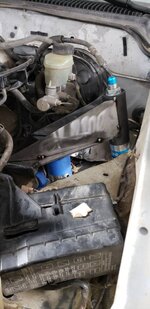
Got my shock towers on the tacoma and suspension cycled to mount the air bumps. Then removed them to add another gusset and more welding. Will have a removable cross brace between them to make sure nothing moves
Awesome


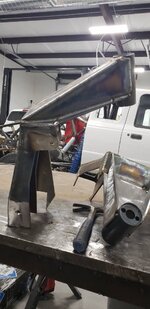
Fabricated stainless steel exhaust risers for a lobster boat I’m rigging
Sent from my iPhone using The Garage Journal mobile app