jhn9840
Well-known member
WAITS, nice work and welds.
jhn9840
John
jhn9840
John

 Waits nice job. I imagine this isn't your first crack at something like this.
Small repair for a buddy tonight (half finished)

And be aware of those swinging keys, lolPontiac,
I took vocational Welding in school back in 1981, we were required to do a pad weld, the same thing your doing, its a great way to practice. Find the straightest weld on your pad and follow that, remember to watch your puddle and keep it consistent.
One thing to look at is can you actually see that good threw your current helmet, maybe your using to dark of a lens, its worth every penny to invest in a really good helmet, if your planning to keep on welding. You would be amazed at how well you can see with the new technology of today's helmets.
I use a Viking model 3350 from Lincoln. Great helmet!
KEEP ON PRACTICING!!!


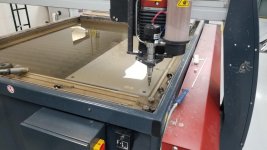
My new 2'x4' 5/8" table top that I had water jetted. 5/8" holes on 4" centers. Originally had it drawn up for 2" centers but was going to take over 3.5 hours to cut so I knocked it down so my machinist didn't have to baby sit it so long.
Gonna be a bit before I can get the frame built but couldn't wait to show it off!
That looks awesome! I am in the process of wanting to build/designing my first welding bench (kneeling on the floor is getting old). I have been thinking of either 2'x4', 3'x4', or something in between like 30". How do you like the 2'x4' size? Is wider much of an advantage? I figured you would use the 4' length often.
You have what i really want, fixture holes as well as 5/8. I keep thinking i will end up with regular 1/2" hot rolled with no layout grid though. If you dont mind my asking, what does a top like that run? if its not too much maybe i need to just **** it up and pay more. I havent been able to find any good plate on craigslist in the last few months.
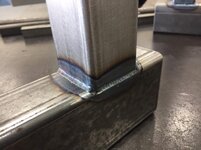
That gap is nothing, its why they invented wire feeds and it lets it penetrate which allows things to be ground flush. As a side note,,, fwiw,, since I / you are the designer. I see a LOT of fascination with miter cuts on the forum but I so rarely ever do one that I havnt changed the saw in years and if I absolutely have to nip it some other method. If its humanly possible I design with square cuts and limited welding on sides of tubes. . ( I understand that's the way you want it)
I do like the bottle plate on the underside, good idea. I like the little crane too.
[/QUOTE]
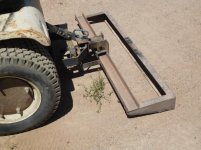
Pieced together the sleeve hitch from used parts for my JD 112 so now I needed something to hang on it.
Try attaching some used brake rotors to the rear wheels as added weight to the existing plates.
[/QUOTE]What do you mean by "cook the carbon out" ?but I didn't cook the carbon out or blow through.
What do you mean by "cook the carbon out" ?
BTW, doesn't look too shabby...
Adding filler will make for a cooler weld pool (but increases the overall complexity of GTAW welding), but if it isn't cosmeticor load bearing I guess this 'll do just fine.

My new 2'x4' 5/8" table top that I had water jetted. 5/8" holes on 4" centers. Originally had it drawn up for 2" centers but was going to take over 3.5 hours to cut so I knocked it down so my machinist didn't have to baby sit it so long.
Gonna be a bit before I can get the frame built but couldn't wait to show it off!
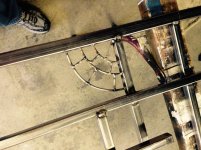
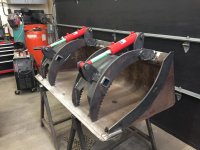
My cousin had a extra 60" skid steer bucket sitting around and he asked me if I could convert it to a grapple bucket. I cut the original sides back and made them curved to give clearance for branches/log. I cut the grapples claw from 5/8" plate with 1/4" plate in between to protect the cylinder. The cylinder is 2.5" bore with 8" of stroke.
f150skidoo said:My cousin had a extra 60" skid steer bucket sitting around and he asked me if I could convert it to a grapple bucket. I cut the original sides back and made them curved to give clearance for branches/log. I cut the grapples claw from 5/8" plate with 1/4" plate in between to protect the cylinder. The cylinder is 2.5" bore with 8" of stroke.

This my friend is awesomely bad *** fabrication.
My cousin had a extra 60" skid steer bucket sitting around and he asked me if I could convert it to a grapple bucket. I cut the original sides back and made them curved to give clearance for branches/log. I cut the grapples claw from 5/8" plate with 1/4" plate in between to protect the cylinder. The cylinder is 2.5" bore with 8" of stroke.
My cousin had a extra 60" skid steer bucket sitting around......


My cousin had a extra 60" skid steer bucket sitting around and he asked me if I could convert it to a grapple bucket. I cut the original sides back and made them curved to give clearance for branches/log. I cut the grapples claw from 5/8" plate with 1/4" plate in between to protect the cylinder. The cylinder is 2.5" bore with 8" of stroke.