While I'm sitting here for a few minutes waiting on water to dry, I have a couple more little bits of info about rivets. One is a rivet shaver. We had to use them at work to shave down rivets so they would meet specs. If things are made correctly, there shouldn't be a need to shave a rivet, but certain jobs required that we did. If you notice there is also a dial that is marked in .001 increments plus two feet for stabilization.
You had to look up the spec for the part and rivet to see what allowance was permitted. If you were shaving the head of a countersunk rivet, IIRC you were allowed no more than .002 above the material, but you were not permitted to touch the material, or shave the rivet below the surface of the material.
These are what the cutters look like for the shaver.
The most common rivets we used were either the countersunk flat head rivet, a drilled rivet, and a universal head rivet. In our aircraft line of work was lighting. Thousands of rivets used daily, but nothing overly large.
The four sizes of the Universal Head Rivets that we used are 1/16", 3/32", 1/8", and a 3/16". The diameters listed are the body diameter of the rivet. The corresponding head sizes are 1/8", 3/16", 1/4", and 3/8".
A Universal Head Rivet IS NOT a round head rivet. A proper tool for nesting the head of the rivet is required. Some tools are sold to nest the head, but a lot of them are sold and are not correct. So what happens is that if the rivet is not nested properly, you can get a ring deformation around the head of the rivet in your material, or you can get a ring deformation in the head of the rivet itself. Neither meets specs in the aircraft industry. Below is the proper configuration for a Universal Rivet. If you notice, there is a slight flat area on the head. The corresponding depths for the cutters are .027, .040, .054, and .080 deep. You can go a little shallower, but not deeper. If you go deeper, then you will get a ring deformation around the head of the rivet.
Then there is a tubular rivet, sometimes called a drilled rivet. It actually has a round head to it. Most of the times a nest is made using a ball-nose end mill since it is a true spherical radius and does not have a flat like a universal head. The punch to roll over the drilled or tubular side takes a special punch. There are a couple formulas floating around for making the punch to roll them over, but the formula is not cut in stone because there are many variables that can flaw the formula. It can be the material the rivet is made from, and material may vary slightly from lot to lot, but is still within specs. It may be the plating causing a problem, if it is plated. I may be the case of sitting in the vats a little to long when conversion coating (iridite) the rivets.
Over the years, I have made literally thousands of rivet punches for all sorts of rivets. For tubular rivets, on certain days, I could make a punch to roll over the end in maybe 30 minutes from grabbing the stock to heat treating and polishing it. Then there were days that i would have to cut and try the punch 15 times before I could get one to roll properly, and it may have been the same as one I made in minutes a month ago. They could be simple at times, and other times you'd be pulling your hair out.
This is the Drilled or Semi-tubular rivet, and not the full radius on the head.
An eyelet is the same concept for a punch to roll the eyelet over, but you need a nest that fits the other factory portion of the eyelet. If you look at the pic below, the nest would look just like the head of the eyelet. It's usually easier for some reason to make a punch for an eyelet than it is for a drilled rivet

And once the other end is rolled over, it should look exactly like the factory head.

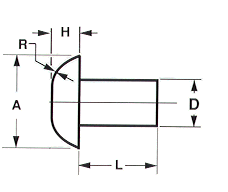
Then you have your flat head rivet.It is what it says. It has a flat head and has a countersink. You buck it just like a Universal Head. The only difference is that you will either have a countersunk hole for the head to fit in, or in the case of some sheet metal that is thin, you have to make a dimple tool. Even though it sounds simple to make a dimple tool, there is actually a little bit of work to it, and if you don't know anything about trig, then you don't know jack about a dimple tool. My apologies to anyone that has made dimple tools for large holes in sheet metal like Nasty made a gazillion sets of......but in the aerospace industry, things have to fit mating parts very precise. You want the dimple in the sheet metal to have a crisp line to it, so that you don't have a gap around the diameter of the head of the rivet and your sheet metal that it is going into. In order to know how to make the dimple tool, you need to know your rivet body diameter, your rivet head diameter, your angle of your rivet head, which is usually 100 degrees, then you have to basically draw the rivet out on paper, or on a Cad program, then you start adding in your material, then figure up the size for your punch, and figure up the size for your die. What works for say a .010 thick piece of material, will not work for a .020 thick piece of material. Granted, some will try to use the same, and some may get it past the inspectors, but wrong is wrong, whether it passes or not. It boils down to what is right, and what is a ****** piece of work. I always did it the proper way. I've watched people struggle, and I've watched people half *** things, just to get the job over with. I guess that is why I always made more money than my coworkers
And when you are cutting metal, there is no reason to half-*** a job, just to get it completed, so you can grab another job and cut metal some more.

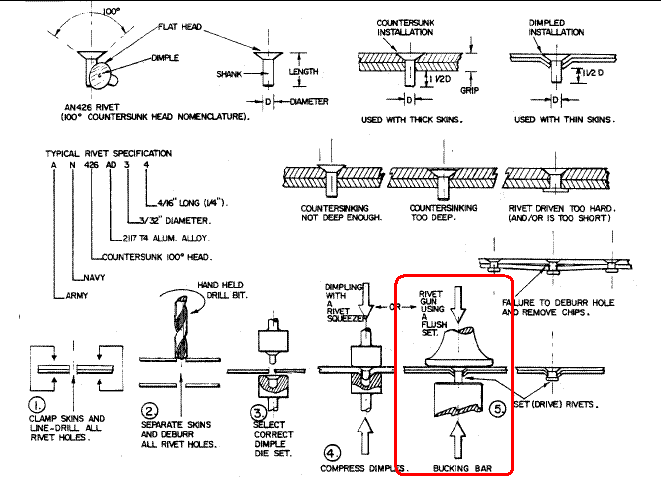
Here is a few diagrams of Flat Head or Countersunk Rivets. Also notice the number designation on the left hand side. The "AN" followed by the number and AN is "Army/Navy" On a lot of other components like Clinch Nuts, Anchor Nuts, you may have a "MS" preceding the number. MS is "Military Standard".
Also notice on the right hand side of the drawing where it says "Failure to deburr hole" and how the material is being held apart. That stands true for all rivets and not just a flat head rivet. And it stands true for ALL HOLES.....make sure they are deburred.
Another good drawing I found is "Rivet Length". If you notice, both a Universal Head Rivet, and a Countersunk Rivet...the rivet length is measured differently. You want to make sure when ordering your rivets, that you get the appropriate length for what you are doing. You are talking quite a few thousandths difference in length between the two.
I'll post a link to this for the time being, as I need to find a good diagram of the types of rivet punches. This is for a Taumel Riveter. Taumel is the name of the company, and they make ORBITAL Riveting machines. An orbital riveter is a rotating riveter. It's automated, it will spin while putting downward pressure on your rivet. We had a few in our shop, and only two people that in later years knew how to properly make a orbital riveting punch. That was me, and the person I trained. Some thought they knew, but couldn't quite grasp the concept of holding an invisible dimension to .001
With a Taumel Orbital Riveter, the punch sets in the head at a 3, 4, or 5 degree angle. The length of the punch is a very, very, critical dimension to properly roll over a rivet. If your punch is too long, you are past your centerline intersection point. If your punch is too short, you are not reaching the centerline intersection point. And when that happens, there is no way to properly roll over the rivet. We always used a Taumel for extremely hard large rivets. Normally made out of Stainless Steel and were used to hold the wiper blades onto the wiper arms, and riveting the arm to the wiper main body. With the size of the rivets, there was no way to buck the rivet, be consistent, and mainly just get it done. But the orbital riveter would form the rivet right down in a few seconds. A good way to describe how critical the length of the orbital punch is, would be to take a pencil, and with the point of the pencil down on a piece of paper standing straight up and down......now lean the pencil over a few degree, holding the eraser end with your finger. Now rotate the eraser end around in a 1" circle or so. Now pull back on the pencil still leaning at the same angle and notice how far off of center the point is if you were looking straight down from the top. And it would be the same thing if you pushed the point through the paper at an angle. So dead on the money is the way an orbital punch has to work.
Here is a link to a Taumel Orbital Riveter
http://www.taumel.com/Pages/selecting_machines.html I found a good pic as to what I was talking about. I guess I didn't search deep enough.


 First off, I want to apologize. For some reason I was thinking that when i replied that this was your thread. I'll be alright....maybe:tard: