To avoid these ads, REGISTER NOW!

Some Lathe Stuff

OP
D

deere2210

Well-known member
Joined
Apr 3, 2008
Messages
232
My wife played Santa and bought me the 4th axis which arrived early.. Anyway, couldn't leave it in the box so broke it out and set it up.. Never CAM'd 4th axis stuff and was off from the day job on Friday so decided to crank through it and figure it out.. Drew up a little test knob with ball mill grooves. Shot some powder on it this morning and gave it a try.. got all kinds of ideas to do with this thing..

481518_2700265881659_1214312897_n_zps109fd441.jpg


29570_2698217590453_1765617685_n_zps450c60bb.jpg


262724_2698217150442_2039045471_n_zpsbe3193ae.jpg


521278_2700265681654_1406824979_n_zps7426a0c2.jpg


75500_2700266001662_486422594_n_zps3acfb9d7.jpg


541757_2700265841658_1773362728_n_zpsb8dc8b6e.jpg
 
To avoid these ads, REGISTER NOW!

1953mercury

Well-known member
Joined
Nov 25, 2012
Messages
701
Location
Steamboat Springs CO
Kevin, I just got them and first time using them. They are Mitee Bite t-slot clamps. I will have to say they are fantastic.. They hold really well, quick lock down.. And, they are low profile so I can face the whole plate. They are going to be a core tool in my kit now. I looked around and there is a $30-$40 price difference for the same ones. I found them at Penn tool for $40 less than other places.. I highly recommend them!

Deere, which size clamp are you using, and would you consider another size necessary or desirable. I'm using a 9x42 Bridgeport. Also were you using a flood cooling setup on your Bridgeport? I purchased a Chillybits air cooing setup and it helps and cuts down on the mess, but I doubt it works anywhere as well as fluid cooling. Your stuff is looking great. Thanks, Mike
 
Last edited:
OP
D

deere2210

Well-known member
Joined
Apr 3, 2008
Messages
232
Deere, which size clamp are you using, and would you consider another size necessary or desirable. I'm using a 9x42 Bridgeport. Also were you using a flood cooling setup on your Bridgeport? I purchased a Chillybits air cooing setup and it helps and cuts down on the mess, but I doubt it works anywhere as well as fluid cooling. Your stuff is looking great. Thanks, Mike

I'm using the 5/8 T-slot ones.. They came in a kit with four of the cams and the two allen wrenches. They work great, really happy with them. Don't see the need for any additional size in this style, but mitee bite has a bunch of other stuff that would be great, but their stuff can be pricey.. My next fixture item will probably be a dovetail setup for the 4th axis.. I used an oil can and little brush on my Bridgeport. Worked well, but really dig the flood collant stuff.
 

1953mercury

Well-known member
Joined
Nov 25, 2012
Messages
701
Location
Steamboat Springs CO
Thanks for the response. Guess if I had looked closer at their site I wouldn't have had to ask. Guess I can blame it on the the after caroling cocktails. Thanks, Mike
 
OP
D

deere2210

Well-known member
Joined
Apr 3, 2008
Messages
232
Not a lathe project, but a mill one.. Had a request to make some Harley speaker grill covers for a guy. Thinnest stuff I had machined.. Built a good jig to hold down when machining and then reused it when I laser engraved them.. Thickness is .025..

IMAG1475_zps26d0a7f8.jpg


IMAG1478_zps08a3eb63.jpg
 

zmaxmotorsports

Well-known member
Joined
Jan 11, 2013
Messages
11,948
Location
South of omaha
Made the cap that goes on the outside today.. I didn't have an insert or toolholder for the lathe with the right geometry to do the countersync so faced and drilled it on the lathe, took it over to the mill indicated it and then did the countersync, and then back to the lathe to turn the radius and part it off.. Little bit of work, however every time I simulated it in CAM the tool I was using crashed because of clearance.. So a little extra time/steps but it worked out..

0.jpg


1.jpg


2.jpg


3.jpg


4.jpg


5.jpg

I like those caps you made,nice work!:bowdown:
 

zmaxmotorsports

Well-known member
Joined
Jan 11, 2013
Messages
11,948
Location
South of omaha
I come from the blacksmith /springmaker/boiler maker side of the metal industry,I must say the tool and die guys Ive come across inthe last few years since Ive been getting back into the vintage motorcycle/old street rod world are a lot higher caliper than the close enough construction guys my dad used to call them years ago.
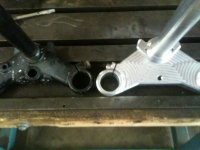
Heres a couple of shots of a lower triple tree I designed to try and keep the older look while being a lot lighter/stronger than the origional steel tree and stem.
I build mostly 73-80 kawasaki 900/1000 stuff,and have no use for the plastic throw away cookie cutter sport bike stuff as I call it.
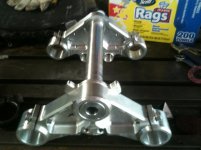
So anyway heres some pieces my buddy Les Holt built for one of my retro projects that Ill have powder coated black to keep the vintage look but still have enough little details built into it to keep people walking around scratching their heads!:drool:
I had him build it with double button head allen head pinch bolts in the rear on each side instead of singles like stock,and beveled all the edges so it didnt look so much like a block of billet to help hide things when you look at it.
Stem is a seperate chunk of aluminum pressed in from bottem and pinned in:beer:
Thats a stock tree on left for comparison
Yeah I know its got regular allen heads in it right now,but that will be changed shortly.
 

Attachments

  • tn.jpg
    tn.jpg
    54 KB · Views: 133
  • 2.jpg
    2.jpg
    42.2 KB · Views: 134
Last edited:

Kevin54

MEMBER EMERITUS
Joined
Jan 12, 2005
Messages
29,341
Location
Urbana, Ohio
Steve....the countersinks for the flat head socket head screws are 82 degrees. What you should get is a set of them. I'll look in my toolbox to see the different sizes you would need and how many is in the set. I think there are 8 in a set, from, #4 through 1/2". If you use the 82 degree countersink, you go in far enough that you will have a small vertical side on the countersunk hole. That will match the slight small side on the OD of the head of the screw. Each countersink in the set...the diameter goes along with the head diameter of the flat head socket head screw.


attachment.php
 

Attachments

  • countersink.jpg
    countersink.jpg
    48.1 KB · Views: 1,101
OP
D

deere2210

Well-known member
Joined
Apr 3, 2008
Messages
232
Beautiful work, Deere. Can you show us the jig you used?

This was one that I actually "over thought".. Really simple jig.. One on left I set up as G55 coordinates to drill the holes and one on the right was G54 and ran simple 2D contour op.. Cut blanks out with bandsaw and pretty much plug and play after that..

IMAG1490_zps03b6f15e.jpg
 
OP
D

deere2210

Well-known member
Joined
Apr 3, 2008
Messages
232
Steve....the countersinks for the flat head socket head screws are 82 degrees. What you should get is a set of them. I'll look in my toolbox to see the different sizes you would need and how many is in the set. I think there are 8 in a set, from, #4 through 1/2". If you use the 82 degree countersink, you go in far enough that you will have a small vertical side on the countersunk hole. That will match the slight small side on the OD of the head of the screw. Each countersink in the set...the diameter goes along with the head diameter of the flat head socket head screw.


attachment.php

Kevin, thanks.. I had bought one but for some reason and didn't use it.. I think I measured it and it seemed like it was a little tight for the flat head bolt to fit. I'll give it another try.. What's the best practice/standard to set it in from flush? (.02?) Also, peck drill it?
 

Nelson58

Well-known member
Joined
May 29, 2010
Messages
278
Location
New York, New York
This was one that I actually "over thought".. Really simple jig.. One on left I set up as G55 coordinates to drill the holes and one on the right was G54 and ran simple 2D contour op.. Cut blanks out with bandsaw and pretty much plug and play after that..

IMAG1490_zps03b6f15e.jpg


Forgive my stupidity, but what is G54 and G55? Is this CNC code?
 
OP
D

deere2210

Well-known member
Joined
Apr 3, 2008
Messages
232
Forgive my stupidity, but what is G54 and G55? Is this CNC code?

It's the reference to the coordinate system. It allows multiple coordinate locations to be setup. I reference the top left corner on the plate on the left as G55 and the little center dot on the jig on the right as G54. That way I have both jigs setup at the same time and can easily move back and forth.
 
OP
D

deere2210

Well-known member
Joined
Apr 3, 2008
Messages
232
Decided to try and build some new fender braces for the rod as a winter project.. Simple slots.. Machined out the mounting bracket and then lasered the braces out of .25 Aspen wood as a prototype to check the dimensions.. Final billet piece will be thicker to give beefier look.. The brace is longer than the X travel on the mill so I'm gonna need to figure that one out..

IMAG1494_zps9e57bb43.jpg


IMAG1506_zps36128050.jpg


IMAG1508_zps91465126.jpg


IMAG1507_zps889249b3.jpg

Gonna build a battery box later to dress the battery up..

IMAG1512_zpsb7d69989.jpg

Wood templates..
 
Last edited:

Kevin54

MEMBER EMERITUS
Joined
Jan 12, 2005
Messages
29,341
Location
Urbana, Ohio
Decided to try and build some new fender braces for the rod as a winter project.. Simple slots.. Machined out the mounting bracket and then lasered the braces out of .25 Aspen wood as a prototype to check the dimensions.. Final billet piece will be thicker to give beefier look.. The brace is longer than the X travel on the mill so I'm gonna need to figure that one out..

It looks like the braces are symmetrical so do half then just flip it for the other half.

If you plan on making ling narrow parts, you might wan to consider making a long set of vise jaws. I used to have a set for a Kurt that was about 1 1/2' long and made out of 1" x 2" tool steel. They worked great.
 
To avoid these ads, REGISTER NOW!

isaac338

Well-known member
Joined
Aug 4, 2007
Messages
727
Location
Halifax, NS, Canada
What kind of chamfering cutter did you use for the chamfers? They look great. Does Sprutcam automatically calculate the depth and diameter compensation for the chamfer?
 
OP
D

deere2210

Well-known member
Joined
Apr 3, 2008
Messages
232
I use a .375 spot drill for the chamfers. I set the tool tip height to .03 instead of "auto or 0"). Then in Sprut pick the top face and set to "Top Level" and then select the Chamfer line and set to "Bottom". The chamfers are .05 but when sprut runs it actually shows the depth as .08 in Z since I raised the tool tip definition up by .03. I use "2D Contour" as the operation type in Sprut.
 
OP
D

deere2210

Well-known member
Joined
Apr 3, 2008
Messages
232
I see them at the bottom of page 15.. I think it just created a new page and they are one back..
 

Kevin54

MEMBER EMERITUS
Joined
Jan 12, 2005
Messages
29,341
Location
Urbana, Ohio
I see them at the bottom of page 15.. I think it just created a new page and they are one back..

The problem is on my end. I use Opera as my browser and they updated with the latest revision the other day, so since they did, I can't see pics with Opera. On I.E. I can see them just fine.
 
OP
D

deere2210

Well-known member
Joined
Apr 3, 2008
Messages
232
That light is awesome!! I didn't realize how dark it was until I turned that on the first time..

Those turned out nice.:thumbup:
I see you got yourself the spindle light. Gotta get around to ordering one or two of those.
 
OP
D

deere2210

Well-known member
Joined
Apr 3, 2008
Messages
232
I'm running the Fogbuster 1/2 gallon. It works pretty good, but I'm still trying to figure it out. I've noticed it will be putting out a fine mist out and then stop so I seem to always be turning the valve flow on the head to adjust to get the mist restarted. I haven't run any heavy cuts with it, so I still have the flood coolant on standby for roughing.

What mister are you running?
 

bullnerd

Well-known member
Joined
Sep 17, 2012
Messages
5,690
Location
Jersey
Theres a link to a thread to build a copy of the fogbuster on here somewhere, might have to search for it. Can be made very cheaply.

Nice work Deere.....wait that didnt sound right.
 

Spencyg

Active member
Joined
Mar 25, 2009
Messages
40
Theres a link to a thread to build a copy of the fogbuster on here somewhere, might have to search for it. Can be made very cheaply.

Nice work Deere.....wait that didnt sound right.

Very easy to build. I've got two in my shop (both experience the same issues that Deere comments on above with the occasional plugging / valve adjustments) but I've got $50 in parts into each one of mine and they can each take over a gallon of coolant.
 
OP
D

deere2210

Well-known member
Joined
Apr 3, 2008
Messages
232
Here's a link to a video I took with my phone of the first run on a gang toolholder I picked up to help with the center drill, drill, tap process for the axles on the iPad stands I make. I'm still figuring some things out with it and running wide clearances as you'll see in the video.

 
OP
D

deere2210

Well-known member
Joined
Apr 3, 2008
Messages
232
Finished up some billet wine stoppers.. These are going to my mom who has a party in the retirement community planned and is going to give them out as gifts to her buds.. Thanks to Kevin54 for some insight on the ball end mill work on the 4th axis.. Was getting a lot of deflection so entered on the shallow end which greatly helped..

IMG_0518_zps5f6a96d4.jpg
 
OP
D

deere2210

Well-known member
Joined
Apr 3, 2008
Messages
232
Decided the garage/shop needed a "billet bling" beverage opener.. Sketched it out and off to the mill to make some chips...

photo_zps42f1b151.jpg
 
To avoid these ads, REGISTER NOW!
Top Bottom