To avoid these ads, REGISTER NOW!

Square Cuts on Round Tube Elbows

Fix Until Broke

Well-known member
Joined
Feb 21, 2016
Messages
794
Location
SE Wisconsin
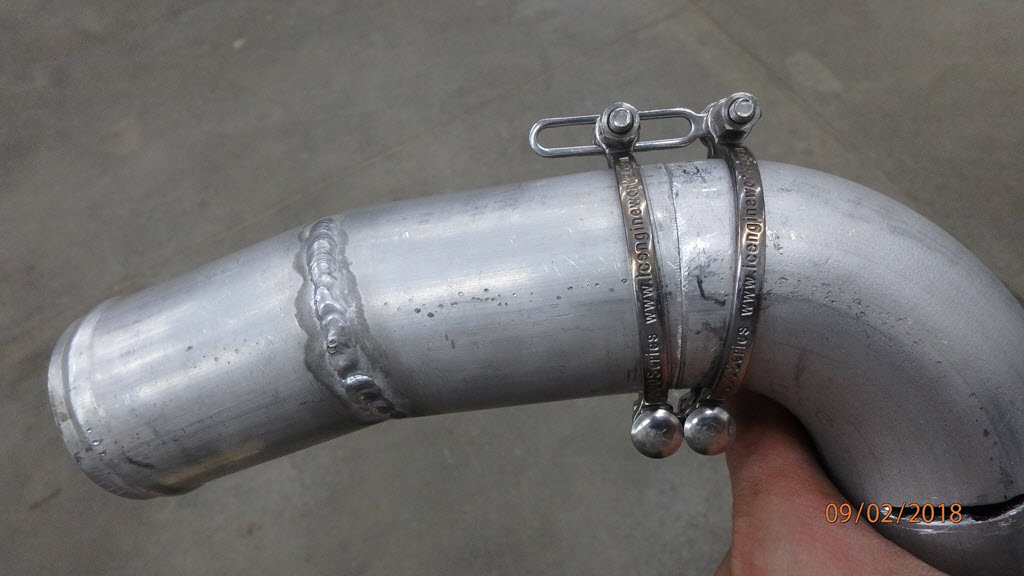
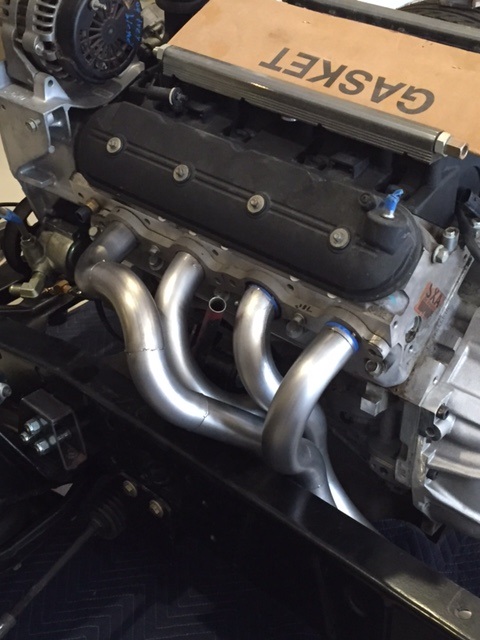
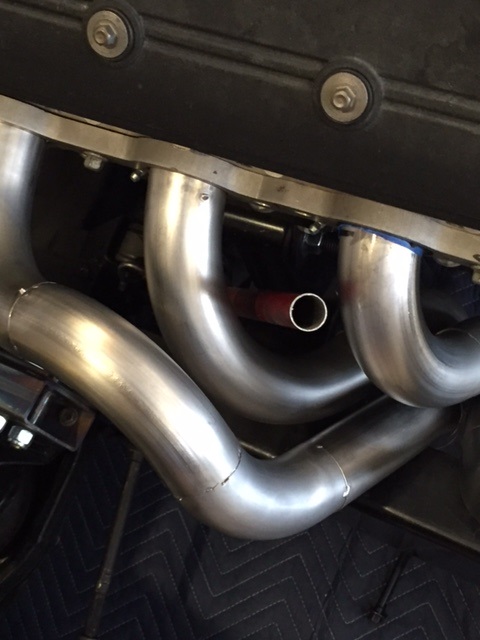
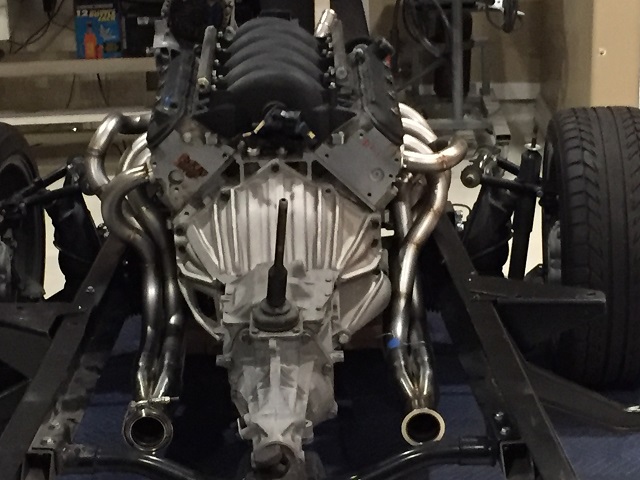
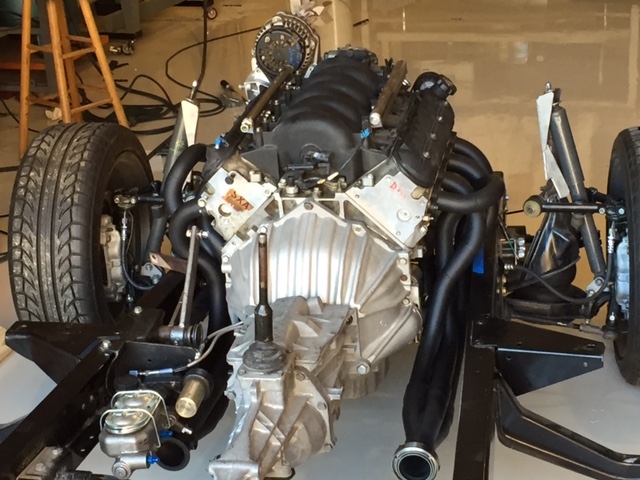
I'm looking for a "better" way to make square cuts, mid bend, on round tube elbows for things like engine exhaust, intercoolers, headers, etc. Similar to the below which started off as a mandrel bent 90 that I reduced down to ~65 degrees then added the straight extension on.

downpipe-adapter-1st-bend.jpg
.

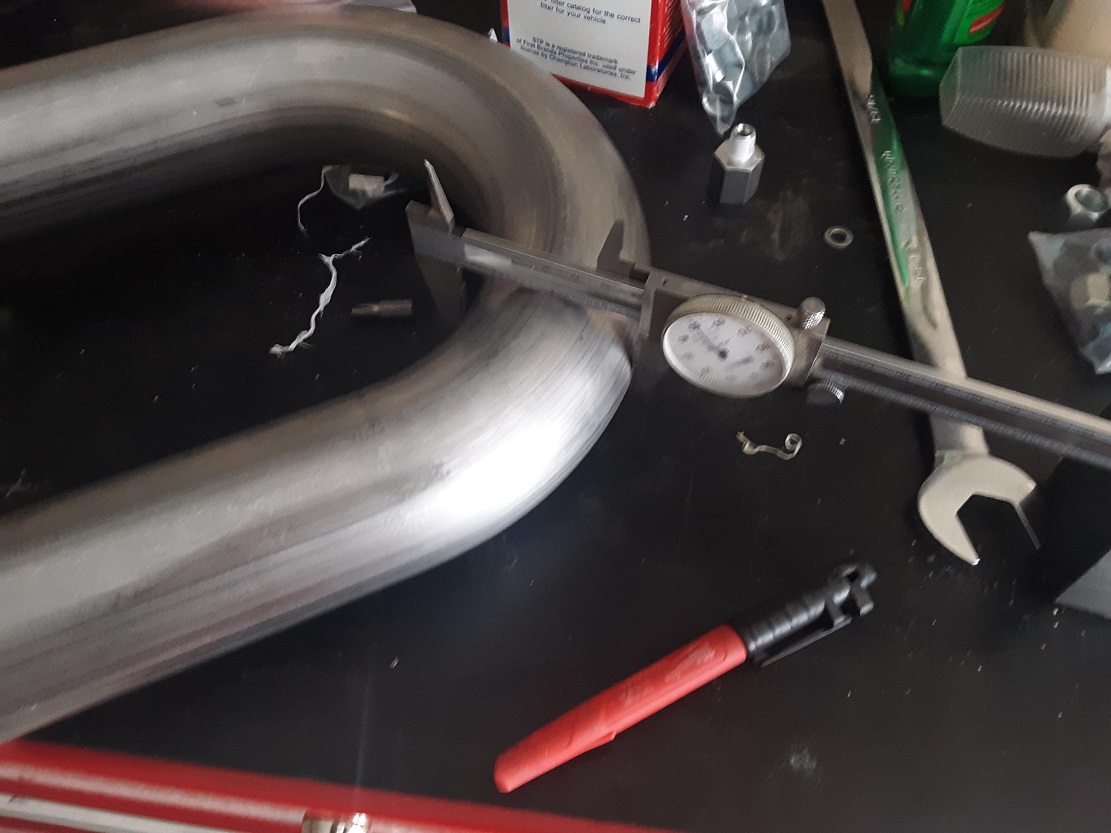
What I did on the above was to used a digital protractor to set to the angle I need and use the natural score marks on the top of straight part of the tube aligned with one leg of the protractor. The protractor is then slid axially along the tube until the other leg is perpendicular to the same score marks. You can kind of see the marks in the picture of the tube below (I'll get better pictures this coming weekend).

wixey.jpg

digital-protractor.jpg
woolf-4in-x-4in-clr-90.jpg


Wixey Link
Digital Protractor Link
Mandrel Bends Link

The tube is then marked at this one spot, clamped in a vice and then cut with a sawzall.

This works OK, but sometimes there's not a nice seam/score mark on the tube, and sometimes my sawzall skills are not as straight and true as I'd like them to be.

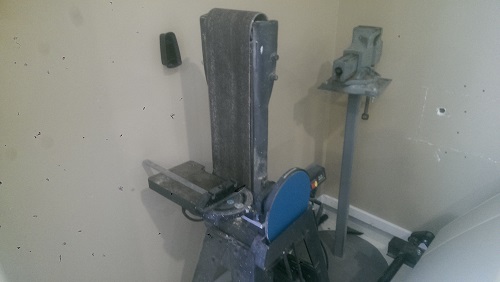
For the straight sections, I use a Lee Rap Around and then scribe a mark to follow with the sawzall (just outside the line) and can clean it up with a 6" 36 grit sanding disc down to the line. This works relatively well but if I need a short piece of tube (say 1.5" long piece of 4" tube), it's a little clumsy.

lee-rap-around.jpg


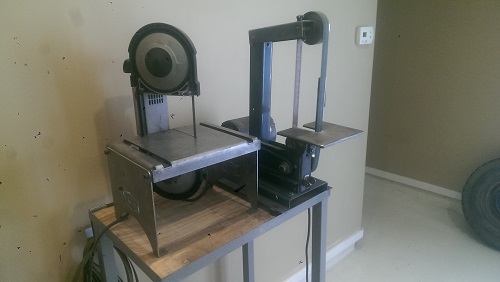
I believe the ideal solution is a nice big vertical band saw and one of these from ICEngineworks in 4" or a wire EDM machine, but that's not in either the $$ budget or floorspace budget at this time.

So - is there anything that I can do better than what I'm already doing?

I've tried tubing cutters and have a lot of trouble getting them not to spiral/thread on the harder/larger material (all these tubes are stainless). So much so that I've given up on using them.

rigid-medium-tubing-cutter.jpg
rigid-large-pipe-cutter.jpg


Any thoughts on making a perimeter mark around a tube in the middle of a bend? If there's a straight line, I can follow it pretty good.

I have not tried a chain cutter, will that work in the middle of a bend? Even if it does not cut all the way through, if I can get a straight/true line, I can work with that.

What about one of the SWAG tables and a Milwaukee PortaBand? My current project is 4" so I'm concerned that the 13" wide table will be a bit small for a full size elbow (~24" overall with both legs). This is at the upper limit of my budget right now at ~$500 all in.
swag-portaband-table.jpg


These are all TIG welded **** joints so fitment needs to be pretty good. The wall thickness is 0.065" on the straights which isn't too bad to work with, but on the outside of a 1D CLR bend, the thickness will be down at 0.030" or less, so filling any gaps by imperfect fitment gets challenging and a bit ugly.
Imagine filling a 1/2" gap on a **** joint with 1/4" thick material - that's what happens if you're off by one blade thickness!

So, tube fabrication experts...what is a better/different way to do this?
 
Last edited:
To avoid these ads, REGISTER NOW!

bullnerd

Well-known member
Joined
Sep 17, 2012
Messages
5,690
Location
Jersey
I'm not an expert, but I've made a couple ss headers.

If your going to be doing repeat tubing fab jobs, Make room for a vertical bandsaw.

I made one of these out of plywood. Not exactly, but close. Rides in the t-slot on an old 14" Delta Rockwell bandsaw so cut is always perpendicular to radius.(Whaaaa?)

https://www.google.com/url?sa=i&sou...aw24W4CiIg44BhRiPyF_jwW2&ust=1558477794392854

Works great.

Saw, then hit on a 6x48 belt sander and fit is perfect.

The nice thing about plywood jigs is you can tack with an air brad gun or I use 1/4" crown staples. Then pull it apart and reuse for other specialty set ups.

Don't need a fancy machined jig.
 
Last edited:
OP
F

Fix Until Broke

Well-known member
Joined
Feb 21, 2016
Messages
794
Location
SE Wisconsin
joe49 - I like that contour marker...That also helps accurately get the angle as well as mark it all the way around the bend. At ~$130, cheaper than a band saw :) - I couldn't find the combination adapter quickly, but it looks just like a simple standoff.

curve-o-mark-contour-marker-combination-adapter.jpg


bullnerd - I know a vertical band saw is a good solution, but just not the room/budget for it now. The ICEngineworks products are nice, but require the bandsaw so also out of the question right now. The belt sander works well, but I seem to end up with an angle. The belt sander always pulls to one side due to the direction of the belt. Using a right angle air sander tool with a 6" 36 grit disc seems to work well and keeps things straight/true/perpendicular since it spins on the same axis as the tube so no bending to sand one side more than the other.

right-angle-air-sander-6-inch.jpg


Any more ideas? Keep them coming!
 

bullnerd

Well-known member
Joined
Sep 17, 2012
Messages
5,690
Location
Jersey
I don't understand your issue with the belt sander. Im talking about a mounted belt sander, not a hand held.

Just my opinion, but I think you'll see if some other fabricators here chime in, Neither of those tools mentioned above are the way to go.
 
OP
F

Fix Until Broke

Well-known member
Joined
Feb 21, 2016
Messages
794
Location
SE Wisconsin
I don't understand your issue with the belt sander. Im talking about a mounted belt sander, not a hand held.

Just my opinion, but I think you'll see if some other fabricators here chime in, Neither of those tools mentioned above are the way to go.

Yes, a 6" wide x 24" long bed, 3 HP belt sander, not hand held. The trouble I seem to run into is that you have to hold the thing you want to sand in your hands and the belt is pulling away from you or from left to right. Since there's a constant pull (drag) in one direction, it makes the leading edge push harder on the belt than the trailing edge so you have to compensate for that. I apparently can't compensate well enough to get a square surface. It will be flat, but not square. It's probably something I could get good at with more practice, but I've had much better luck with the spinning disc than the traversing belt.

What is the other tool that's not the way to go? The contour marker?

Have I got a deal for you. I'm looking to re home a 16'' Walker-turner variable speed that I don't use and is just sitting.

Talk to me Goose :). You can e-mail me at fixuntilbroke at gmail if you'd like or PM me here.
 

bullnerd

Well-known member
Joined
Sep 17, 2012
Messages
5,690
Location
Jersey
Probably part of the problem is the crappy cut from the sawall. That leaves you with a lot more to clean up. With a fine tooth bandsaw blade, you should be able to just touch it up on the belt sander. Obviously results will vary depending on the size/material of tube.

Belt should go from top to bottom, with a cast iron table to set your parts on.

Yeah, the scribe is probably ok for large tube or even pipe, but I've never seen anyone use it for headers.
 
OP
F

Fix Until Broke

Well-known member
Joined
Feb 21, 2016
Messages
794
Location
SE Wisconsin
A table on the belt sander would be much easier. This one is a horizontal one with no table. What you're saying makes much more sense now, and hopefully my struggles make more sense to you as well.

The sawzall cuts are pretty smooth/straight but a band saw will do a better job for sure as there's only one axis to control instead of 2 with a sawzall. I use a fine tooth blade and take it slow. A cut through 4" stainless will take 3-4 minutes and about 30 seconds with a file and I can weld them. I'm just trying to do a better job in less time.
 

Kenstone1

Well-known member
Joined
Oct 2, 2015
Messages
734
Sounds like scribing the line and following the line are 2 problems here not one.
Have you considered a thin piece of Masonite type material with a tube size hole cut thru it.
Trim the width of the Masonite to the be the same as the pipe size, so you end up with a pipe diameter C shaped cut on the end, tangent to both side.
Mount that on something 90 degrees to hold it square to the layout table.

Push that up against the tube at the proper angle and scribe the line along the Masonite
on the tube inside bend, move it around to the outside of the bend and scribe a line that meets the ends of the 1st scribed line for a line completely around the tube that's both perpendicular and at the proper angle.

For cutting I use a hacksaw with a fine toothed blade "backwards", so it cuts on the pull stroke to keep the blade in tension for less bowing/catching.

With the tube clamped in a vise or camped onto the bench, cut thru the tube wall with the hacksaw handle somewhat angled down.
Once thru the tube wall, tip the saw handle up, a little closer to horizontal, this prevents the saw from catching on the tube wall closest to you.
Continue to cut thru at the front of the saw and tipping the saw handle up as you go, following the line around the pipe.
You will eventually have to rotate the tube in the vise so you can cut further around the tube following that scribed line, and you will get around it eventually.

Sometimes I put blue painter's tape along the scribed line making it easier to see/follow when cutting.
whew
that works for me, your results may vary,
:bounce:
 
Last edited:

Jlarson

Well-known member
Joined
Mar 27, 2015
Messages
738
Location
AZ
I do it on steel and stainless tube with my master marker (what flange wizard calls their contour marker), bandsaw/portaband or cutoff tool and the vertical belt sander with the table on. Obviously in process tube fab we try to avoid butchering elbows, but it does come up in oddball situations and this method has always worked.
 

Milton Shaw

Well-known member
Joined
Feb 11, 2011
Messages
4,837
Have you looked at chain type tail pipe cutters. They work like a pipe/tubing cutter except they have many cutters so that you can cut pipe with just a 20 degree or so swing even on the car. I also have a type that has 4 cutting wheels and a thread adjustment with spring on it to put pressure on it as you move back and forth with it. Both of these types work very well.
 

Chook

New member
Joined
Apr 12, 2016
Messages
3
Perhaps something like this is what you’re after? It’s made by PRL Motorsports to suit 1.5onxh sch40 elbows, we use it to hand a lot of handrails/balustrades. Put elbow in die, set to angle and either draw around and cut with grinder or clamp the whole lot into a bandsaw vice and chop away. Saves so much time and is super accurate for what we do.

Perhaps see if they make something similiar, alternatively get a machine shop to make one up for you, especially if you’ll be using the same bends over and over. Hope this helps :beer:
 

Attachments

  • 40C8114C-5A81-4386-94C7-8447238ECA16.jpg
    40C8114C-5A81-4386-94C7-8447238ECA16.jpg
    84.3 KB · Views: 207
  • B36EC1C3-5BBA-4EAC-AB0B-F24DC0F48ADD.jpg
    B36EC1C3-5BBA-4EAC-AB0B-F24DC0F48ADD.jpg
    133.3 KB · Views: 177
OP
F

Fix Until Broke

Well-known member
Joined
Feb 21, 2016
Messages
794
Location
SE Wisconsin
Sounds like scribing the line and following the line are 2 problems here not one.
Have you considered a thin piece of Masonite type material with a tube size hole cut thru it.
Trim the width of the Masonite to the be the same as the pipe size, so you end up with a pipe diameter C shaped cut on the end, tangent to both side.
Mount that on something 90 degrees to hold it square to the layout table.

Push that up against the tube at the proper angle and scribe the line along the Masonite
on the tube inside bend, move it around to the outside of the bend and scribe a line that meets the ends of the 1st scribed line for a line completely around the tube that's both perpendicular and at the proper angle.

For cutting I use a hacksaw with a fine toothed blade "backwards", so it cuts on the pull stroke to keep the blade in tension for less bowing/catching.

With the tube clamped in a vise or camped onto the bench, cut thru the tube wall with the hacksaw handle somewhat angled down.
Once thru the tube wall, tip the saw handle up, a little closer to horizontal, this prevents the saw from catching on the tube wall closest to you.
Continue to cut thru at the front of the saw and tipping the saw handle up as you go, following the line around the pipe.
You will eventually have to rotate the tube in the vise so you can cut further around the tube following that scribed line, and you will get around it eventually.

Sometimes I put blue painter's tape along the scribed line making it easier to see/follow when cutting.
whew
that works for me, your results may vary,
:bounce:

Kenstone1 - well put, there's one issue of making an accurate mark and another issue of following that mark. These are not mutually exclusive. For example, with the ICEngineworks system, making a mark is not necessary. Set the angle, load the bend, slide the fixture across the table and it's done.

icengine-3000fecs30_a-1200x800.jpg


I like your suggestion for making a good mark on a tube with a "C" shaped cut out perpendicular to the tube, then flip it over.

I do it on steel and stainless tube with my master marker (what flange wizard calls their contour marker), bandsaw/portaband or cutoff tool and the vertical belt sander with the table on. Obviously in process tube fab we try to avoid butchering elbows, but it does come up in oddball situations and this method has always worked.

Thanks for the lead on the Master Marker - I like the fact that it has a level built into it so you can re-locate it and still keep your line as well as the option to mount the arm anywhere around the block. In the automotive intake/exhaust world, you're always doing this kind of "elbow butchering" thing. A lot of respect for the quality of work that you process guys do!

Do you find that the arm is pretty "stable"? Maybe asked another way - is there a lot of slop at the end of the arm due to the bearings and such?

miter-marker.jpg


Have you looked at chain type tail pipe cutters. They work like a pipe/tubing cutter except they have many cutters so that you can cut pipe with just a 20 degree or so swing even on the car. I also have a type that has 4 cutting wheels and a thread adjustment with spring on it to put pressure on it as you move back and forth with it. Both of these types work very well.

Milton - Something like this? If it works like I think it will, it should do a good job of making a mark around the perimeter of the bend after the initial position of the mark is established.

chain-wheel-cutter.jpg
 
OP
F

Fix Until Broke

Well-known member
Joined
Feb 21, 2016
Messages
794
Location
SE Wisconsin
Perhaps something like this is what you’re after? It’s made by PRL Motorsports to suit 1.5onxh sch40 elbows, we use it to hand a lot of handrails/balustrades. Put elbow in die, set to angle and either draw around and cut with grinder or clamp the whole lot into a bandsaw vice and chop away. Saves so much time and is super accurate for what we do.

Perhaps see if they make something similiar, alternatively get a machine shop to make one up for you, especially if you’ll be using the same bends over and over. Hope this helps :beer:

More good ideas - This would be great for a lot of repetitive work like railings or repeating exhaust manifolds, etc. I bet it would get expensive for a 4" tube. I do like the way that it clamps though - no (minimal) distortion of the tube.

I seem to do all different sizes and materials - from 3/4 stainless tube, to 2" aluminum intercoolers, to 1-1/4" stainless schedule 10 pipe turbo manifolds to 4" stainless tube exhaust (and everything in between).

P9022880-0007.jpg


P9022872-0015.jpg


img_2265.jpg
 

danski0224

Well-known member
Joined
Jan 29, 2005
Messages
13,411
Location
Near Naperville, IL
I've used the cutoffs from aircraft cable style material hangers to wrap around a piece of pipe and trace along it to mark the cut line.

Small diameter cable, maybe ~1/16".
 

sqznby

Well-known member
Joined
Oct 26, 2013
Messages
982
Location
Coastal NC
The last hot side I built I had to go to his garage and used his chop saw on some sch10 ss and 065 ss tubing. It worked.
I'm lacking in the space department myself, I have a small Grizzly horizontal band saw with pivoting head, makes cutting easier and you don't have to adjust/move the material. Cuts like a charm and has a relatively small footprint with the stand or you can mount it on a table top.
Before that I used 4.5" grinder with cut off wheel and then my porta band.
 

Milton Shaw

Well-known member
Joined
Feb 11, 2011
Messages
4,837
Fix until broke that pipe cutter is the chain type that I was recommending. They go a good job marking the pipe but may leave a burr inside the pipe that needs to be removed to slide over another pipe.
 
To avoid these ads, REGISTER NOW!
OP
F

Fix Until Broke

Well-known member
Joined
Feb 21, 2016
Messages
794
Location
SE Wisconsin
sberry - that's a good example of what I'm trying NOT to do :). It's perfectly functional and there's a lot of times where that's exactly what is needed - just not this time for me.

Thanks everyone for the suggestions - I've learned a lot and have a lot more things to look into going forward. Specifically I want to touch/feel one of the Contour Markers or Miter Markers as they look pretty slick. If you have more ideas/suggestions, please keep them coming - there's always more to learn and different ways to do things.

For now, I'm going to try a simple approach and see how it works. I found an online protractor "generator" that you can specify the ID or OD of a protractor, then print it out to size on a printer. Pretty cool!

https://www.blocklayer.com/protractor-printeng.aspx

So, I printed out a 4" OD protractor and a 12" ID protractor which should fit the ID and OD of my 4" diameter, 4" CLR mandrel bends. I'm going to laminate these, then cut them out and line up the 0 degree mark with the tangency (start) of the bend which I can get pretty accurately with the Lee Rap Around.

I also printed an 8" OD protractor that I can set on the "top" of the tube to get a mark at the centerline.

I'll transfer a mark at the angle I need on the ID, OD and centerline of the tube, then use either the chain cutter idea from Milton Shaw or the cable wrap around idea from danski0224 to mark the whole perimeter. Hopefully 3-4 points around the perimeter will be sufficient to make a good, straight line. Once I have a straight line, I can follow it pretty good with a sawzall and true up anything with the disc sander.

That's the plan anyway - I'll be sure to get some pictures of it in action this weekend and let everyone know how it works - good or bad.

4inch-protractors.jpg
 

Jlarson

Well-known member
Joined
Mar 27, 2015
Messages
738
Location
AZ
Thanks for the lead on the Master Marker - I like the fact that it has a level built into it so you can re-locate it and still keep your line as well as the option to mount the arm anywhere around the block. In the automotive intake/exhaust world, you're always doing this kind of "elbow butchering" thing. A lot of respect for the quality of work that you process guys do!

They are pretty sturdy, the longer arm has a little more play but you probably just need the smaller model anyway, the MMS505 is probably what you want not the MMS510.

I started using the flange wizard ones just because of the levels and the fact the mag block is interchangeable with some of their other stuff.
 

e015475

Well-known member
Joined
Jul 24, 2012
Messages
643
Location
Show Low and Mesa Arizona
I've built my own version of the ICE cutting tool out of wood, but to be honest, after a while it was just too fussy to use.

I have the ICE tubing 'legos' to build headers in plastic, then transfer the dimensions to the mandrel bends.

To get a square cut, I take a pair of dial calipers and place it over the tube and wiggle it until I get the minimum dimension and mark it with a Sharpie. The minimum dimension on the dial will define the cut that is a 90 degrees to the center line of the tube. If the mandrel bend is good, it will be a perfect circle and you can weld a straight pipe onto it with no problems. I don't usually connect the marks from the outer radius of the tube to the inner. but I sometimes will take a worm clamp and slide it over the tube to connect the marks.

I make all my cuts with a Portaband mounted to a SWAG table and controlled with a HF foot switch.

To square up the cuts I have a larger stationary belt stander with a cast iron table. I square it at the start of every fab session. Once the tube end is flat, I check it for fit with its mating tube. I'll adjust it a little out of square if I have to for a best fit. Steel tube is pretty easy, but the spring back on stainless is a pain in the ***. I don't want to see any light in the fitup and no more than about .010" step in joint. I can sometimes cheat a little by squeezing the tube in a vise to get the shapes to match a little better.

My belt sander setup.....
full


The Portaband on a SWAG table. The belt sander next to it is great for quick touchups
full


I made these to tack weld tube together
full


Some headers I made for a truck project - just tacked and not welded yet
full


Little better view of the fitups- the tube sticking up is a mockup of the steering shaft that had to go through the headers

full


Right or wrong, that is what works for me
 

e015475

Well-known member
Joined
Jul 24, 2012
Messages
643
Location
Show Low and Mesa Arizona
Read through the suggestions and the OPs questions again, and came to the conclusion that he's overthinking this problem a little.

Like all 'keyboard kommandos', I tend to think my solution the best one, so I'm going to double-down on my arrogance and expand my post.....

I'm about to start the exhaust system for a truck that I'm going to fab from 2.5" steel so materials are accumulating on my bench. Here's a photo of the technique to get a square cut on a mandrel bent tube........

full.jpg

- Put the caliper rack over the mark on the tube where you want to cut.

- Put your thumb and index finger on the anvils of the caliper, and with your other hand, wiggle the caliper until you have the minimum distance

- Mark the tube with a Sharpie on both sides of the caliper anvil - you want the saw kerf to go through the middle of the two marks.

- Put the tube in the bandsaw and put the saw kerf on the outside tube between the marks. Eyeball it and line the blade up with the other two marks and make your cut.

- Make it flat and tweek it on the belt sander. The whole process shouldn't take you more than a couple of minutes.

Here's a few more suggestions if you decide to use the caliper/bandsaw/belt sander approach-

- $10 HF digital calipers work better than the Mitutoyo in the picture. They tend to have more 'stiction' in them and it's a little easier to use when you saddle the tube.

- A cheap HF portable band saw works about as good as the Milwaukee I have. There's lots of plans to build a stand for one on GJ as an alternative to the SWAG (which I had to frinkle with for an hour to get it to fit my saw)

- Buy the 18-20 TPI bi-metal blades from Milwaukee or Morse. You can 'connect the dots' with a straighter cut on a fresh blade. Worn blades tend to wander or veer off easily. The minute the I can hear a 'bump' when I'm cutting (lost a tooth or kinked the blade a little), I put on a new blade.

- I use an 80 grit belt in the sander. Ceramic grain in resin seem to cut best and last the longest on steel. Zirconia belts are ok, but don't last as long. The belt sander is an old Craftsman that I put a 1.5 hp motor on and re-pullied to slow it down a little. It takes a fair amount of 'umph' to push the stiff resin belt along.

- Cutting a straight piece of tube so it square using a band saw is harder than you'd think (cut one, turn it 180 and put it in a v-block and you'll see what I mean) To have the best shot at it, I take a piece of paper and wrap it around the tube so it overlaps squarely and mark it with a Sharpie. To cut it I 'roll' the tube in the bandsaw so the blade isn't cutting in two places and follow the Sharpie line.
 

e015475

Well-known member
Joined
Jul 24, 2012
Messages
643
Location
Show Low and Mesa Arizona
The truck chassis that the new exhaust system is going into is this..............
full

After ceramic coating.........
full


One thing that I didn't mention is mandrel bend quality. If the tooling is worn on the mandrel bender from pulling too many parts off of it before refreshing, the cross section across the bend will be oval or pear shaped. I bought some tubing from Summit last month that was so bad that the diameter was off about 1-2 wall thicknesses. To use it, I had to put it in a vise to tack it to keep the step anywhere close to weldable. The best value bends come from mandrelbends.com. They seem to keep their tooling in good shape and prices are pretty good, but their customer service *****.
 

mohead1

Member
Joined
Apr 10, 2013
Messages
8
Burns is the only place to get quality tubing in just about any material....world class operation for custom headers and exhaust

Sent from my SM-G900V using Tapatalk
 

kbs2244

Well-known member
Joined
Nov 11, 2006
Messages
14,065
I would re-try the tube cutter.
Just use a lighter touch on the first few rotations.
 
OP
F

Fix Until Broke

Well-known member
Joined
Feb 21, 2016
Messages
794
Location
SE Wisconsin
The pieces in that pic rolled apart, they fit perfect.
I could see that they fit well, however the off axis "pie" cuts and such are not what I'm going for - visually - on this project. No argument that there's minimal functional difference and your method is MUCH faster.

A Sawzall with the right blade and a good operator can cut just fine :)
There's a lot of practice/skill in making straight clean cuts with a sawzall. I've had good luck with a blade called "muffler buster" - it's a cobalt alloy and seems to have the best value. They're about $4 each and if you're nice to them you'll get 3-4 cuts through 4" stainless before they're missing teeth, dull, etc. I've tried the carbide tipped Diablo's, Milwaukee's, Lenox, etc and while they work well, their cost is a lot more and they're just as easy to destroy making them a lot more expensive option.

e015475 said:
I've built my own version of the ICE cutting tool out of wood, but to be honest, after a while it was just too fussy to use.

I have the ICE tubing 'legos' to build headers in plastic, then transfer the dimensions to the mandrel bends.

First off, that's some beautiful tube fabrication work there! Nice!!

Could you elaborate on what was too fussy about the ICE system (or is it just the cutting tool?). They've been working on a 4" system for a while but have not released it yet.

Read through the suggestions and the OPs questions again, and came to the conclusion that he's overthinking this problem a little.
I've been known to do this :)

e015475 said:
Like all 'keyboard kommandos', I tend to think my solution the best one, so I'm going to double-down on my arrogance and expand my post.....

I'm about to start the exhaust system for a truck that I'm going to fab from 2.5" steel so materials are accumulating on my bench. Here's a photo of the technique to get a square cut on a mandrel bent tube........

full


- Put the caliper rack over the mark on the tube where you want to cut.

- Put your thumb and index finger on the anvils of the caliper, and with your other hand, wiggle the caliper until you have the minimum distance

This is a good idea on smaller tubes or long jaw calipers. My calipers only have ~1.5" jaw so maybe a 3" tube max, more likely 2.5". Would need something big for the 4" I'm working with here!

e015475 said:
- Mark the tube with a Sharpie on both sides of the caliper anvil - you want the saw kerf to go through the middle of the two marks.

- Put the tube in the bandsaw and put the saw kerf on the outside tube between the marks. Eyeball it and line the blade up with the other two marks and make your cut.

- Make it flat and tweek it on the belt sander. The whole process shouldn't take you more than a couple of minutes.

Here's a few more suggestions if you decide to use the caliper/bandsaw/belt sander approach-

- $10 HF digital calipers work better than the Mitutoyo in the picture. They tend to have more 'stiction' in them and it's a little easier to use when you saddle the tube.

- A cheap HF portable band saw works about as good as the Milwaukee I have. There's lots of plans to build a stand for one on GJ as an alternative to the SWAG (which I had to frinkle with for an hour to get it to fit my saw)

- Buy the 18-20 TPI bi-metal blades from Milwaukee or Morse. You can 'connect the dots' with a straighter cut on a fresh blade. Worn blades tend to wander or veer off easily. The minute the I can hear a 'bump' when I'm cutting (lost a tooth or kinked the blade a little), I put on a new blade.

- I use an 80 grit belt in the sander. Ceramic grain in resin seem to cut best and last the longest on steel. Zirconia belts are ok, but don't last as long. The belt sander is an old Craftsman that I put a 1.5 hp motor on and re-pullied to slow it down a little. It takes a fair amount of 'umph' to push the stiff resin belt along.

- Cutting a straight piece of tube so it square using a band saw is harder than you'd think (cut one, turn it 180 and put it in a v-block and you'll see what I mean) To have the best shot at it, I take a piece of paper and wrap it around the tube so it overlaps squarely and mark it with a Sharpie. To cut it I 'roll' the tube in the bandsaw so the blade isn't cutting in two places and follow the Sharpie line.

Good tips on cutting, blades, belts, etc - Thanks!

This is a solution for cutting any angle on an exhaust bend that I thought was one to save. I looks line it could work with my bandsaw. One more option.
https://www.jalopyjournal.com/forum...g-and-routing-exhaust-mandrel-u-bends.993838/

Thanks for the link with the detailed explanation/pictures. I'll be sure to reference that when I get a vertical band saw!

I would re-try the tube cutter.
Just use a lighter touch on the first few rotations.

I've tried this so many times...I don't know if it's me, the tool(s), the materials, the process, etc, but 9/10 times it will thread on me. I've tried light to heavy cuts on the first few turns, fixtured in a vice, held in my hands, clamped the cutter in the vice and turned the tube, etc. They work great on 1" and smaller soft tubing (copper waterlines, brake lines, etc) but I struggle on the larger/harder materials.
 
OP
F

Fix Until Broke

Well-known member
Joined
Feb 21, 2016
Messages
794
Location
SE Wisconsin
Here's the process I used for this project - 4" stainless exhaust on a 1996 Buick Roadmaster wagon.

I started with 10) 4" diameter, 4" centerline radius, 0.065" (ish) wall, 304 stainless mandrel 90's and 1) of the same in 45 degree from Woolf Aircraft.

One Aero Exhaust 4040XL muffler and 2) 4" V-band clamps from Vibrant

For cuts in the middle of a bend, I used the Lee Rap Around to establish a "zero" point at the start of the bend. The mandrel bends have 2 legs on them - the long end is what I'm calling the "held" end in the bender. The short end is the "free" end and has a lot of shrinkage and pull in it so I try to zero from the long end wherever possible. There is a nice visual mark from the die that gives a good reference as shown just to the left of the Rap Around below

lee-rap-around-1.jpg

The Rap Around is lined up with itself and used to establish a straight, perpendicular line around the tube. I always wrap it at least 1.5 full turns to insure it's straight and then trace it with a scribe or marker. I like the fine line of a scribe, but used a red sharpie here for the pictures.

lee-rap-around-2.jpg

lee-rap-around-3.jpg

Once the zero is established, I used 3 protractors that I printed, laminated and cutout (link to online protractor creater). One for the OD, one for the ID and one for the centerline. For this example, I needed to make a 45 degree cut. I lined up the zero of the protractor with the zero line and then put a dot at the desired angle.

4inch-dia-4inch-clr-od-protractor-in-use.jpg

4inch-dia-4inch-clr-id-protractor-in-use.jpg

4inch-dia-4inch-clr-clr-protractor-in-use.jpg

This gives 4 marks around the perimeter of the bend (one on the ID, one on the OD and two on the centerline - front and back). I used a long zip tie to connect the dots and then traced around the edge of the zip tie like the Rap Around. When I got to the end of the zip tie where it pulls away from the tube, I just rotated the zip tie around the tube and made sure the rest of it lined up with the existing line, then finished the missing part.

zip-tie-for-perimiter-marking-at-angle-2.jpg

As mentioned above, I use a sawzall with 8" "muffler buster" blade. Keep the recip speed slow on the sawzall - about 1/3 to 1/2 speed max else it will burn both the tube and blade turning them blue and making the tube difficult to cut and the blade soft and dull quickly. Sorry, no pictures of the cutting. Take it slow, alternate between front and back side of the cut, try not to cut "perpendicular" to the wall as the tooth pitch of the blade is larger than the material thickness causing each tooth to make a large cut and it will grab/pull. There is quite a bit of residual stress in the mandrel bends so it's not uncommon for the saw cut to "close" up on you as you cut - just keep going and follow the line as best as you can.

Here's some shots of the raw cut with the sawzall - first pair is the "held" side, second pair is the "free" side of the mandrel bend.

raw-sawzall-cut-1.jpgraw-sawzall-cut-4.jpg

raw-sawzall-cut-2.jpgraw-sawzall-cut-3.jpg

So - How good did it work?

I used an angle finder, zeroed on the leg of the tube, then held on a square across the raw face of the cut. First picture is the "held" side, second is the "free" side

45-degree-angle-raw-cut-1st-half.jpg45-degree-angle-raw-cut-2nd-half.jpg

I'm pretty happy with that :)

I then used a 6" sander to clean/true up the faces
6inch-sanding-disc.jpg

I checked the angles again to see if I changed things much - not really any change
45-degree-angle-sanded-1st-half.jpg45-degree-angle-sanded-2nd-half.jpg

The wall thickness varies quite a bit from ID to OD. The "held" end which should be what the raw tube is since it's not stretched at all started out at 0.058" and the ID and OD at 45 degrees (mid bend) were 0.078" and 0.029" respectively
4in-dia-4in-clr-065wall-id-thickness-at-unbent-end.jpg4in-dia-4in-clr-065wall-id-thickness-at-45-deg.jpg4in-dia-4in-clr-065wall-od-thickness-at-45-deg.jpg

The end result (after 45+ hours including 8 straight hours of welding - almost 25 linear feet!) - fits like a glove.
dmaster-exhaust-front-pipe-on-floor-e1559073090334.jpg
roadmaster-exhaust-over-axle-1.jpg
roadmaster-exhaust-muffler-tailpipe-2.jpg

Installation pictures...
roadmaster-exhaust-forward-routing-from-axle.jpg
roadmaster-exhaust-muffler-tailpipe-installed-2.jpg

And, just a little something extra - I had to make some sort of clamp that allowed me to hold the joints tight and still be able to tack the pieces together...so I used a stainless steel band clamp that I cut windows in. Worked great and only cost about $10
4-inch-tack-clamp-2.jpg
4-inch-tack-clamp-on-pipe.jpg
4-inch-tack-clamp-on-pipe-welded-close-up.jpg

For the mandrel bends, there's not enough (any) straight material to clamp to so I either just held it in place and marked it with a sharpie, pulled both pieces out, tacked it together, re-asembled with the next piece (repeating as necessary to correct, etc. The other method was to use a worm gear hose clamp. This was thin enough to be able to grab on both pieces if you got it centered just right and could still be re-positioned as necessary - then marked and tacked. Tedious process for sure.

If I had to do it again (and I will :)) I'll be sure to use some of the suggestions above as that will make things easier. Maybe by then I'll have saved up enough for a vertical bandsaw and a table for the belt sander :).

Any comments/questions/suggestions on this topic - Please bring them up and post here. I'd like to share how others do this so we can all benefit. Thanks again for everyone's thoughts, opinions and ideas - they were helpful!
 
Last edited:

sberry

Banned
Joined
Jun 18, 2005
Messages
35,747
Location
Brethren, Michigan
The band clamp idea is really good. I did a fussy ****** like that a while back, not as complicated but had some weird angles and actually built it out and tacked it all up in place, pulled it off again for weld up.
 

bullnerd

Well-known member
Joined
Sep 17, 2012
Messages
5,690
Location
Jersey
Nice job!

Sawzall cuts look pretty good.

Your tube work looks waay nicer than the rusty chassis its going in!
 

sqznby

Well-known member
Joined
Oct 26, 2013
Messages
982
Location
Coastal NC
Nice job Fix, looks great. Have a few of those band clamps myself, they work great.

Can always rely on a zip tie too ;)
 
To avoid these ads, REGISTER NOW!
Top Bottom