To avoid these ads, REGISTER NOW!

Square Cuts on Round Tube Elbows

OP
F

Fix Until Broke

Well-known member
Joined
Feb 21, 2016
Messages
794
Location
SE Wisconsin
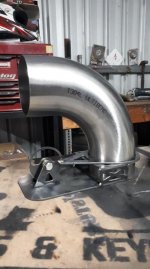
The band clamp idea is really good. I did a fussy ****** like that a while back, not as complicated but had some weird angles and actually built it out and tacked it all up in place, pulled it off again for weld up.

That's how I did this - all built and tacked together under the car to make sure I could get it disassembled without needing a hoist, started the engine to make sure there were no rattles and such, then pulled it out to weld on a benchtop.

Nice job!

Sawzall cuts look pretty good.

Your tube work looks waay nicer than the rusty chassis its going in!

Thanks - The back half will get the same cleanup and paint as the front half once the rear suspension goes in. It's all surface rust and looks worse than it is. The front half looked the same before it got cleaned up and painted.

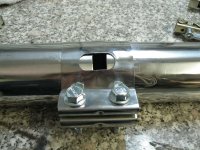
Nice job Fix, looks great. Have a few of those band clamps myself, they work great.

Can always rely on a zip tie too ;)

The flat band clamps work ok, but I always have to put a self tapping screw through the clamp and tube else the clamp will slip and the tube will rotate. Not a big deal, but takes the convenience factor out a bit. Still much cheaper than V-band clamps!

I still really want a vertical band saw, but have to make the best of what is available (sawzall blades, zip ties and printed protractors :))

I remembered to get some of the sawzall blade info. Couldn't find much online about them.

muffler-buster-blade.jpg
 
To avoid these ads, REGISTER NOW!

danski0224

Well-known member
Joined
Jan 29, 2005
Messages
13,412
Location
Near Naperville, IL
As mentioned above, I use a sawzall with 8" "muffler buster" blade. Keep the recip speed slow on the sawzall - about 1/3 to 1/2 speed max else it will burn both the tube and blade turning them blue and making the tube difficult to cut and the blade soft and dull quickly. Sorry, no pictures of the cutting. Take it slow, alternate between front and back side of the cut, try not to cut "perpendicular" to the wall as the tooth pitch of the blade is larger than the material thickness causing each tooth to make a large cut and it will grab/pull. There is quite a bit of residual stress in the mandrel bends so it's not uncommon for the saw cut to "close" up on you as you cut - just keep going and follow the line as best as you can.

Saw stroke speed and blade selection are critical.

Just thought I'd quote this part so it gets seen again.

I see lots of guys run a Sawzall at full speed, then wonder why the blade is no good after about 15 seconds. Especially on stainless.

The Milwaukee Sawzall with the speed dial is excellent for limiting the speed of the tool. On the other hand, I have yet to use a yellow tool with a speed control that is more than useless. The recip saws with the longer stroke are also better.

I prefer a much finer blade- the 24 TPI versions provide a very nice cut on tubing and sheet metal. The fine tooth blades can also cut almost perpendicular to the material being cut without grabbing. These can be hard to find in box stores. In my area, Menards has a very good selection in store compared to the other two players.

Second preference would be Milwaukee Torch blades or Bosch blades.

I would disagree with your choice for those "muffler buster" blades for anything other than demolition work or rough cuts on tubing based on the tooth count.

I also prefer to run the blade "upside down" in the Sawzall.
 
OP
F

Fix Until Broke

Well-known member
Joined
Feb 21, 2016
Messages
794
Location
SE Wisconsin
I e-mailed Cone Engineering and they will make the fixtures in whatever sizes you'd want (within reason).

I asked for 2", 2.5", 3" and 4" all with 1d CLR's and they said there would a be a $200 engineering fee to design all of them up and they would sell for about $30 due to the extra material in the larger sizes and longer leg lengths. Would take a couple weeks to complete.

Not something that I'm going to have done (no specific project and no $$ to do it), but good to know none the less.
 

Graham08

Well-known member
Joined
Dec 10, 2007
Messages
713
Location
Iron Station, NC
Nice work on the exhaust! Seems like you got marking/cutting figured out.

I made this tool for marking bends when I did the headers on my last sprint car. It's for 1-7/8" x 3" CLR tube. It's similar to what Cone Enginering sells. BTW, their other products are some pretty nice stuff. I've used their collectors and I was really happy with them.

The Furick tool looks awesome, but you would have to be doing a lot of headers to justify the expense. Last I knew, list price on it was roughly $2K.
 

Attachments

  • IMG_20151129_091600008.jpg
    IMG_20151129_091600008.jpg
    83.2 KB · Views: 77

gmwelder86

Well-known member
Joined
Dec 8, 2010
Messages
463
Location
Oakdale , ca
When cutting down fittings at work I use a wrap around. Mark inside and outside radius. On smaller fittings I’ll just use the tape from my 3foot tape and mark that as it bends the radius better. String works to.
 

Kevin54

MEMBER EMERITUS
Joined
Jan 12, 2005
Messages
29,341
Location
Urbana, Ohio
The OP mentioned that he would like a straight line around the tube that he can cut and grind to. Two of the easiest ways to make a straight line around the tube no matter where the angle is at on the radius, is to use either a rubber band or a zip-tie. Both will give you that straight line that you can mark to.
 
To avoid these ads, REGISTER NOW!

ARC designs

New member
Joined
Dec 2, 2020
Messages
1
Location
Western Australia
Hey guys i drew and cut this lastnight what do you think? I've put a detent every 15deg from 0 - 90 on the wheel which helps with marking common angles. There is a finger with a "bump" on it that applies tension on the wheel and locates the detents.

I think it will help with marking lines all the way around for people who don't have the luxury of a vertical bandsaw.

This was designed to be used on the Ultibends.

Any suggestions welcomed to improve this concept

This is just tacked for now to prove the concept and should i need to make any changes for testing purposes until i cut the Revized versions
 

Attachments

  • Ulti marker.jpg
    Ulti marker.jpg
    66.3 KB · Views: 116

joe49

Well-known member
Joined
Sep 25, 2009
Messages
1,883
Location
Tonica, Il
Changes I would make are moving the radius arm along one side and then make multiple diameter rings that attach to that arm. That would allow adjusting to various radiuses and diameter tubes. Great idea though.
 
OP
F

Fix Until Broke

Well-known member
Joined
Feb 21, 2016
Messages
794
Location
SE Wisconsin
ARC designs - nice work there! The detents are clever. You could put a magnetic base angle finder on it for angle confirmation easily.

Ultibends look like they make some nice product - wish they had 1D CLR options though.
 

Bob Heine

ALLIANCE MEMBER
Joined
Oct 24, 2009
Messages
10,706
Location
Boca Raton, Florida
And, just a little something extra - I had to make some sort of clamp that allowed me to hold the joints tight and still be able to tack the pieces together...so I used a stainless steel band clamp that I cut windows in. Worked great and only cost about $10
4-inch-tack-clamp-2.jpg

4-inch-tack-clamp-on-pipe.jpg

4-inch-tack-clamp-on-pipe-welded-close-up.jpg


Any comments/questions/suggestions on this topic - Please bring them up and post here. I'd like to share how others do this so we can all benefit. Thanks again for everyone's thoughts, opinions and ideas - they were helpful!
Fix Until Broke, this is a great thread but a little late for me. A few years ago I bought a Magnaflow system for my '72 Big Block Corvette.
attachment.php


Installed it in the car but the head pipes didn't come close to matching my ****** headers. Made aluminized steel head pipes and hated them. Made 2.5" stainless head pipes and liked them better. Then I made 3" pipes from the headers to the crossmember and reduced them to 2.5" to match the Magnaflow system behind the crossmember "While I was at it" I cut up the two mufflers, modified a single dual-inlet, dual outlet muffler with quad tips and added a couple of electric cutouts (I'm really old and can afford the tickets). My first time welding stainless, using MIG for most of it.
attachment.php


I really like those clamps with windows you made but I cheated and bought the [more expensive] ready-made Exhaust Welding Clamps from Summit (lots of different sizes).
attachment.php


https://www.summitracing.com/search...aust Welding Clamps&kr=Exhaust Welding Clamps
 

Attachments

  • 72 corvette magnaflow exhaust 16841.jpg
    72 corvette magnaflow exhaust 16841.jpg
    56.3 KB · Views: 150
  • Exhaust System Final.jpg
    Exhaust System Final.jpg
    75.6 KB · Views: 150
  • Clamp With Windows.jpg
    Clamp With Windows.jpg
    119.1 KB · Views: 150
OP
F

Fix Until Broke

Well-known member
Joined
Feb 21, 2016
Messages
794
Location
SE Wisconsin
Link to lilscorpion's thread which has a lot of good info in it as well...

 
To avoid these ads, REGISTER NOW!
Top Bottom