To avoid these ads, REGISTER NOW!

steelspan shop new post

To avoid these ads, REGISTER NOW!

GarageFreak

Well-known member
Joined
Jan 20, 2008
Messages
48
Location
Chocolate City (a.k.a. New Orleans)
Now that is what I would call a Garage Freak!! Building basically an airplane hangar, part of it gets knocked down, pull out the damaged sections and keep going...very nice job ACN!! Keep your head up....you'll be done before you know it!! :thumbup:
 
OP
A

autoclassicnut

Well-known member
Joined
Nov 24, 2007
Messages
1,382
Location
Montana
Close as in close to 1/2 way done... Got 17 panels and 19 is halfway... 30 x 80 when done....Go big or go home!
 
OP
A

autoclassicnut

Well-known member
Joined
Nov 24, 2007
Messages
1,382
Location
Montana
Thanks for the encouragement Garage Freak... Kinda been running into a few snags but that's part of the fun right???
 

Tony Raine

Member
Joined
Jun 20, 2007
Messages
8
Thanks for the email! I just read through this whole thread, good stuff.

You set the base pieces in the foundation before putting up the arches? I thought you were supposed to bolt them to the arches during assembly, set them in the trough, then fill when you are done. I like your way better!
 
OP
A

autoclassicnut

Well-known member
Joined
Nov 24, 2007
Messages
1,382
Location
Montana
These baseplates are instead of using the troughs. This keeps the panels aligned better at the bottom, no chance of them creeping as you assemble them. Sure makes it tougher to put them together up top as they tend to lean, thus they recommend using 1 1/2" x 1 1/2" x1/8" and drilling holes on the 24 1/2" centers. Then I use the diamond plate steel plates I made to match the panel center bolt pattern and come-alongs and straps to "load the spring " if you will... Works pretty good ,now that I'm figuring out the "tricks".
The baseplates are good for water run-off too!
 
OP
A

autoclassicnut

Well-known member
Joined
Nov 24, 2007
Messages
1,382
Location
Montana
Yes, my boy skateboards like crazy when he's not snowboarding... I built that half-pipe a few yaers ago and he's dying to get it set up in the garage . I told him he can have a small section, if he helps me , so far he only gets to look at where It'll go. Between working after school and going to the local slopes, he's staying out of trouble (so far, knock on wood).
 
OP
A

autoclassicnut

Well-known member
Joined
Nov 24, 2007
Messages
1,382
Location
Montana
I'm updating the progress of my shop... Finally got the computer to accept the picture sizes... All I had to do was reset the camera for the image size. Never to old to learn.
I'm down to 9 arches left to go... weather has been great (knock on wood) and really kickin' **** now...
 

Attachments

  • east.jpg
    east.jpg
    25.9 KB · Views: 156
  • view from back of house.jpg
    view from back of house.jpg
    25.4 KB · Views: 123
  • different angle of whats left.jpg
    different angle of whats left.jpg
    19 KB · Views: 130
  • 9 panels to go....jpg
    9 panels to go....jpg
    22.5 KB · Views: 140
  • nw.jpg
    nw.jpg
    18.3 KB · Views: 116
  • north.jpg
    north.jpg
    24.3 KB · Views: 113
  • northeast.jpg
    northeast.jpg
    24.7 KB · Views: 119
Last edited:
OP
A

autoclassicnut

Well-known member
Joined
Nov 24, 2007
Messages
1,382
Location
Montana
Re: steelspan shop

This is an update.... 34 panels done 4 to go! 3 guys came out to help me today and we got 5 panels up and the bracing by 4:00. Boy this is gonna be great!
 

Attachments

  • view from back of house.jpg
    view from back of house.jpg
    25.4 KB · Views: 76
  • long view.jpg
    long view.jpg
    7.4 KB · Views: 79
  • inside of all the straps.jpg
    inside of all the straps.jpg
    12.1 KB · Views: 85
  • 30 x 80 almost done.jpg
    30 x 80 almost done.jpg
    7.6 KB · Views: 72
  • 3-21-$4.jpg
    3-21-$4.jpg
    7.8 KB · Views: 79
  • 3-21#3.jpg
    3-21#3.jpg
    8.1 KB · Views: 81
  • 3-21-08.jpg
    3-21-08.jpg
    7.6 KB · Views: 76
Last edited:

Bob/Colfax

Member
Joined
Dec 27, 2007
Messages
7
When you mentioned Livingston I totally understood. I grew up in the Billings area (24 yrs), went to MSU and spent 10 years in Bozeman. Now I'm stuck in southeastern WA at least it has mild winters. I'll be headed to Laurel this Friday to visit for a week. Sure wish I could move back to MT, maybe when I retire.

Bobg
 
OP
A

autoclassicnut

Well-known member
Joined
Nov 24, 2007
Messages
1,382
Location
Montana
Hi Bib overalls:
I'll put on the endwall install the doors and continue on the inside... Until the endwalls are on , I was told with the winds we have (and right now we have 45 mph.out of the south with gusts to 60 mph...) i was to run the strapping every 8 or so panels in a diagonal pattern to keep the arches from heaving in and out, Seems to work O.K. Wish I'd taken time to do that in the early stages of my build. Also with the winds I have been tightening all the bolts in the arches as I've progressed, The directions say to leave them finger tight until all the arches have been assembled and put up, Well they would've been blown to Billings by now.
Took today off for Easter , felt good to relax and not cimb a scaffolding or ladder.
 
OP
A

autoclassicnut

Well-known member
Joined
Nov 24, 2007
Messages
1,382
Location
Montana
Hi Bob Colfax:
You know about the constant struggle on the interstate that bypasses Livingston then.
I have a buddy that works for the RR in Laurel. Every town has it's issues, Laurel smells like a refinery...LOL
 
OP
A

autoclassicnut

Well-known member
Joined
Nov 24, 2007
Messages
1,382
Location
Montana
Here's the last of the 38 panels... only the endwall and doors are left for the outside! Yahoo!
 

Attachments

  • northeast.jpg
    northeast.jpg
    25.2 KB · Views: 67
  • further ne.jpg
    further ne.jpg
    25.7 KB · Views: 78
  • northern view.jpg
    northern view.jpg
    25.5 KB · Views: 63
  • from farther ne.jpg
    from farther ne.jpg
    30.3 KB · Views: 65
  • from ne.jpg
    from ne.jpg
    30.4 KB · Views: 65
  • from eastern.jpg
    from eastern.jpg
    24 KB · Views: 82
OP
A

autoclassicnut

Well-known member
Joined
Nov 24, 2007
Messages
1,382
Location
Montana
Some more of the southern end of shop...Also inside shots, bundle of endwall sheets and also the bracing that I just finished painting, ready to be put up tomorrow.
 

Attachments

  • last of outside bracing to go up.jpg
    last of outside bracing to go up.jpg
    31.7 KB · Views: 84
  • inside view.jpg
    inside view.jpg
    33.3 KB · Views: 83
  • inside from sw.jpg
    inside from sw.jpg
    35.3 KB · Views: 98
  • from sw corner.jpg
    from sw corner.jpg
    31.3 KB · Views: 84
  • from behind house.jpg
    from behind house.jpg
    24 KB · Views: 59
  • endwall sheets in bundle.jpg
    endwall sheets in bundle.jpg
    40.1 KB · Views: 64
  • further sw.jpg
    further sw.jpg
    26 KB · Views: 62
OP
A

autoclassicnut

Well-known member
Joined
Nov 24, 2007
Messages
1,382
Location
Montana
Here's some more updates on progress.
I have 3/4 of south endwall up and decided I'd better brace the inside A.S.A.P. as they have high wind warnings again for next week. I have the small entrance door ready as soon as I can get to it. I put the inside 2 x 6 bracing up in 4 sections so I can handle the weight by myself. i just put it up on the scaffolding and climbed up and nailed it down, wasn't as bad as i thought, My helpers didn't show up as they promised. Can't let that slow me down. I hope that will hold up against 100+ winds. I spaced them on 24" centers for the insulation, (future expense).
 

Attachments

  • extra bracing for windy wall.jpg
    extra bracing for windy wall.jpg
    17.2 KB · Views: 122
  • bracing.jpg
    bracing.jpg
    16.6 KB · Views: 99
  • as of 3-29-08.jpg
    as of 3-29-08.jpg
    13.8 KB · Views: 80
  • south wall  progress.jpg
    south wall progress.jpg
    11.7 KB · Views: 81
  • inside of south wall.jpg
    inside of south wall.jpg
    14.2 KB · Views: 129

Charles (in GA)

Well-known member
Joined
Jan 11, 2006
Messages
12,489
Location
50 mi south of Atlanta
I've always suspected these buildings were not as easy to put up and they claim.

Questions. Where are the base plates anchored, inside the triangles? And did you drill and use anchor bolts? or what?

I know that buildings are not strong if left open. My building manufacturer was quite concerned when I put up my conventional steel 60x60x16 building that was going to have one end open for about four months. Its east facing and in Georgia, the wind was really not a concern, esp from the east, but they wanted to know how long it would be open and that I did plan on closing it, as they would have to make it stronger if I didn't.

I've given thought to a building with the arches like yours, much smaller, something in the 20x30 range for storage of tractor and mower and gas power tools and gasoline, etc, to get it out of the main building.

Charles
 
OP
A

autoclassicnut

Well-known member
Joined
Nov 24, 2007
Messages
1,382
Location
Montana
You notice the ones on the commercials never show the full size...As the latest "me and my buddy put mine up in one weekend"... B.S. Maybe for a 15 x 20 shop...My 30 x 80 x15 has 9600 bolts and nuts to assemble, They send 6 one gallon buckets of 3/4' bolts and square nuts with the building, In a perfect world , 3/4 " bolts would work, I ended up buying "several" 1 1/4" bolts to make the assembly of the corners of the arches easier... money well spent. Would I put up another one of these buildings??? Probably, now that I know how, I might put one up in half the time that it took me.You have the normal learning curve, and throw in a few brain storms here and there, Hey that's what I call a challenge that pays for itself, I probably saved $5000 -7000 in what it could've cost to erect such a building for sure.
 
To avoid these ads, REGISTER NOW!
OP
A

autoclassicnut

Well-known member
Joined
Nov 24, 2007
Messages
1,382
Location
Montana
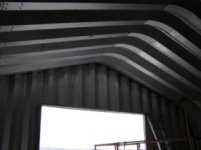
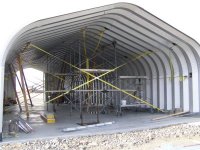
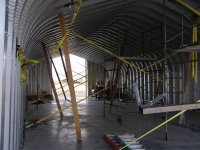
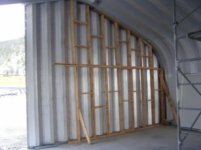
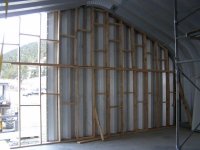
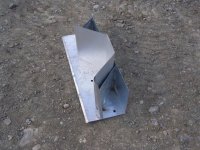
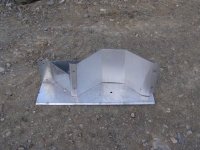
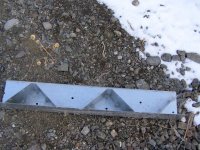
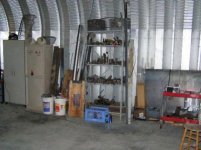
Yes, the base plates are anchored, inside the triangles and along the outside of the triangles every 1' I did drill and use anchor bolts,with washers, Hilti brand I believe (3 1/2 ").
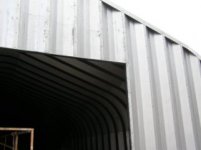
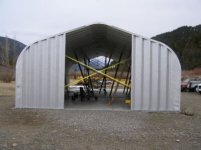
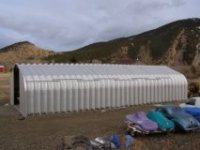
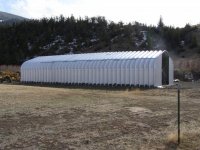
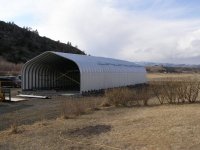
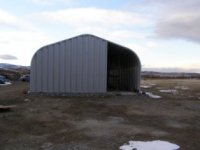
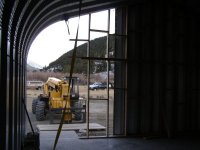
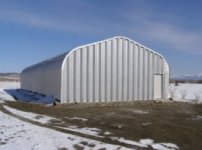
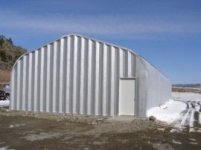
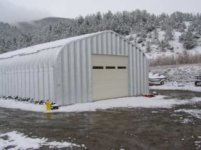
The buildings are not as strong if left open, But I know of one about 5 miles from mine, who hasn't enclosed his for at least 2 years, i would be worried about the elements picking it up like a parachute. It's still standing proud.

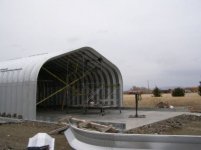
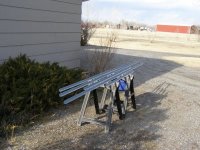
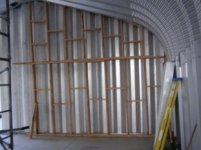
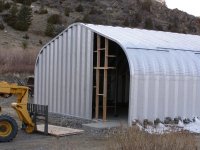
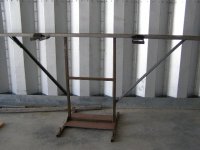
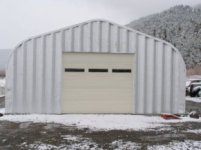
A building with the arches like mine, much smaller, something in the 20x30 range for storage of tractor and mower and gas power tools and gasoline, Would probably take me 25 - 30 days with one person (outside only), using the brackets, straps and plates I show in my postings.
 
Last edited:
OP
A

autoclassicnut

Well-known member
Joined
Nov 24, 2007
Messages
1,382
Location
Montana
Here's an update of todays progress on inside framing of the south wall (towards wind). It's not perfect but it'll be covered up anyway.
 

Attachments

  • south #6.jpg
    south #6.jpg
    20 KB · Views: 65
  • south#5.jpg
    south#5.jpg
    24.6 KB · Views: 70
  • south #4.jpg
    south #4.jpg
    21.9 KB · Views: 68
  • south #3.jpg
    south #3.jpg
    23.3 KB · Views: 71
  • south #2.jpg
    south #2.jpg
    27.1 KB · Views: 75
  • south #1.jpg
    south #1.jpg
    24.7 KB · Views: 75
  • as of 3-30-08.jpg
    as of 3-30-08.jpg
    29.6 KB · Views: 67
OP
A

autoclassicnut

Well-known member
Joined
Nov 24, 2007
Messages
1,382
Location
Montana
I am also including some photos of the baseplates to show how they bolt to the slab better. You can see there are 2 rows of bolt holes looking from above. They are spaced every 2' , so in essence there are holes every 1' on the stagger.
 

Attachments

  • baseplate sample #2.jpg
    baseplate sample #2.jpg
    32.8 KB · Views: 77
  • assebled baseplate sample.jpg
    assebled baseplate sample.jpg
    28.4 KB · Views: 75
  • 2 short baseplates.jpg
    2 short baseplates.jpg
    28.6 KB · Views: 80
  • longer baseplate.jpg
    longer baseplate.jpg
    44.8 KB · Views: 83
  • baseplate piece.jpg
    baseplate piece.jpg
    41 KB · Views: 92
Last edited:
OP
A

autoclassicnut

Well-known member
Joined
Nov 24, 2007
Messages
1,382
Location
Montana
Got the southwall done inside and out. Walk-in door is on, I have the big (12h x 10w) door on order for the North end-wall and pro installer will be here next week!
 

Attachments

  • isw3.jpg
    isw3.jpg
    13.5 KB · Views: 78
  • isw5.jpg
    isw5.jpg
    16.7 KB · Views: 75
  • isw1.jpg
    isw1.jpg
    11.6 KB · Views: 78
  • sw6.jpg
    sw6.jpg
    15 KB · Views: 58
  • sw3.jpg
    sw3.jpg
    10.6 KB · Views: 62
  • sw2.jpg
    sw2.jpg
    10.7 KB · Views: 59
  • southwall done1.jpg
    southwall done1.jpg
    11.5 KB · Views: 72

truck

Well-known member
Joined
Feb 8, 2008
Messages
203
Location
Manassas, Va
I need a favor, can you tell me how high your side wall is at the point it starts to curve, and then how tall it is every foot from the side wall (up to 4 feet out). I'm trying to figure if I'm going to need to extend the hight of mine to fit a lift without putting it in the dead center of the building. My peak hieght is supposed to be 16'.

Thanks,

Truck
 
OP
A

autoclassicnut

Well-known member
Joined
Nov 24, 2007
Messages
1,382
Location
Montana
Hi Truck: side walls are at 7' then first curve starts. Peak height is 15' 3" outside steel dimension. Hope this helps. I can measure every foot if you still need me to .
 
OP
A

autoclassicnut

Well-known member
Joined
Nov 24, 2007
Messages
1,382
Location
Montana
I'm putting in some photos of the forklift "attachment that I built and designed" to help put up the arches. Kind of crude but it worked well. You can see the fork pockets I made and you can also lift from underneath too. Whichever felt more stable, I did use straps to tie the forks to the attachment, when lifting from the bottom because it felt as if it wanted to be a little tippy feeling without it. Notice the shape of the outside ends which matched up to the upper straight panels just above the curves. Duct tape was used as to not scratch the panels surface.
 

Attachments

  • garage journal photos 013.jpg
    garage journal photos 013.jpg
    68.4 KB · Views: 81
  • garage journal photos 012.jpg
    garage journal photos 012.jpg
    67.5 KB · Views: 82
  • garage journal photos 011.jpg
    garage journal photos 011.jpg
    69.4 KB · Views: 82
  • garage journal photos 010.jpg
    garage journal photos 010.jpg
    54.9 KB · Views: 94
  • garage journal photos 009.jpg
    garage journal photos 009.jpg
    72.1 KB · Views: 85
OP
A

autoclassicnut

Well-known member
Joined
Nov 24, 2007
Messages
1,382
Location
Montana
Overhead door guy came in today and framed out for the door to be installed later this week. I left this one up to the pros so they can only cuss themselves if the install is difficult. Besides the warranty requests it.
 

Attachments

  • north endwall framing done, ready for door 9.jpg
    north endwall framing done, ready for door 9.jpg
    17.1 KB · Views: 97
  • north endwall framing done, ready for door 8.jpg
    north endwall framing done, ready for door 8.jpg
    10.2 KB · Views: 79
  • north endwall framing done, ready for door 7.jpg
    north endwall framing done, ready for door 7.jpg
    11.8 KB · Views: 82
  • north endwall framing done, ready for door 5.jpg
    north endwall framing done, ready for door 5.jpg
    10.7 KB · Views: 101
  • north endwall framing done, ready for door 4.jpg
    north endwall framing done, ready for door 4.jpg
    12 KB · Views: 90
  • north endwall framing done, ready for door 1.jpg
    north endwall framing done, ready for door 1.jpg
    16.8 KB · Views: 90
  • north endwall framing done, ready for door 10.jpg
    north endwall framing done, ready for door 10.jpg
    15.5 KB · Views: 75

walt111

Well-known member
Joined
Nov 25, 2006
Messages
305
Location
TN
Would it be to much to ask for a copy of your foundation plan? That should show the correct dimensions for the industrial connector you used to mount your walls to. I have a 25 by 50 building like yours and I am getting ready to pour the footing next week. My plans came for a trought in the footings to set the walls into then grout.I decided I want to have a flat slab and mount the walls in a c channel the grout. You can get another foundation plan to change mounting to a c channel from the manufacturer for over a thousand dollars, does not matter that you bought the building from them or not. My building is identicle to yours except shorter and narrower.
My e mail is wrenchatinfostations.com. I put the word at instead of @ because yahooligans don't like email addresses besides there own.
Thank you in advance walt
 
OP
A

autoclassicnut

Well-known member
Joined
Nov 24, 2007
Messages
1,382
Location
Montana
Thanks for the compliment.
Believe it or not there has been a couple companies try wind generators east of town but they have trouble with the brakes on them. they burn up the brakes because you don't need fast speed to make electricity, you need Slower Steady wind.
I'll post pictures of the overhead door installed tomorrow.
We just had a couple cold ones to celebrate the outside of the shop is done... here's a picture of my son ( about 8 years ago) being a muscle man! It's funny, I hope you get a laugh out of it .( he's a teenager now and he eats like a horse) We're gonna use it on the HS graduation big screen slide show for sure.
 

Attachments

  • muscleman.jpg
    muscleman.jpg
    22.3 KB · Views: 108
OP
A

autoclassicnut

Well-known member
Joined
Nov 24, 2007
Messages
1,382
Location
Montana
Here's some pix of the overhead garage door and opener... The door is from Martin and opener is a DC3700e. ( I am in no way affiliated with Martin I just give them my money...LOL).
I can't believe how quiet this opener is. Belt driven, and ultra quiet.
I had them put the window section of the overhead door on the 4th from the ground as I don't care to see out and I don't want "unwanteds" to see in.
It helps on light coming in too as I don't have power in here yet.
 

Attachments

  • ohd opener 2.jpg
    ohd opener 2.jpg
    13.8 KB · Views: 86
  • ohd opener 1.jpg
    ohd opener 1.jpg
    17.5 KB · Views: 97
  • ohd2.jpg
    ohd2.jpg
    9.6 KB · Views: 66
  • ohd3.jpg
    ohd3.jpg
    9.3 KB · Views: 63
  • ohd5.jpg
    ohd5.jpg
    9.1 KB · Views: 62
  • ohd4.jpg
    ohd4.jpg
    13.9 KB · Views: 61
  • overhead door 1.jpg
    overhead door 1.jpg
    13.9 KB · Views: 72

e-tek

Well-known member
Joined
Dec 19, 2007
Messages
10,690
Location
Saskatoon, SK
WOW - now that's a good size shop!! Hated to hear about your knock-down, but now it's an intersting memory - right?! I'm guessing your son will get a good space in this place! and if it keeps him busy....
I could fit 3 of my 24x40 shops in there!!
Can't wait to see the inside take shape.
 
OP
A

autoclassicnut

Well-known member
Joined
Nov 24, 2007
Messages
1,382
Location
Montana
I don't have power yet to the shop, finances are down as a personal family setback, (nothing serious ) I'm running a cord from the deck for now and keeping the door open when I'm out there. I've been hauling my stuff from the attached garage, I can't believe how much I had in there. I'll probably be a month or so away from lights and power. Also, I go in for a job interview this week locally so I don't have to travel out of town for construction any more....I hope. When I get more done i'll post some of the lighting, I think i'll suspend them (8 ' florescent tubes) from those black plates I fabbed to pull the panels when I was erecting the shop, as they bolt up and are very strong.
As far as the memory of the knock down....That was a contributer to the setback mentioned earlier, but all is O.K.
I'm going to insulate this fall, Hopefully I won't cook in mid-July.
And yes my son will probably get his half-pipe for skateboarding in there as soon as he buys new decking for it as it sat outside for all last summer. I used the suncracked decking for a shelf the other day because I new he'd need it replaced. ( i asked his permission first) LOL ...
 
OP
A

autoclassicnut

Well-known member
Joined
Nov 24, 2007
Messages
1,382
Location
Montana
Took some time to update some of the progress of the interior, nothing fancy, will insulate later and wire A.S.A.P.
 

Attachments

  • int 3.jpg
    int 3.jpg
    31.6 KB · Views: 161
  • int 2.jpg
    int 2.jpg
    33.5 KB · Views: 154
  • int5.jpg
    int5.jpg
    38.4 KB · Views: 200
  • 36 cevy project 1.jpg
    36 cevy project 1.jpg
    20.2 KB · Views: 203
To avoid these ads, REGISTER NOW!
Top Bottom