To avoid these ads, REGISTER NOW!

Above 1200 Sq/FT T.h.e...e…x….p…..a……n…….s……..i………o……….n

Wokspaces above 1200 squarefeet.

C_F

ALLIANCE MEMBER
Joined
Jan 21, 2005
Messages
9,675
Location
Utah...SNOW BLOWS!
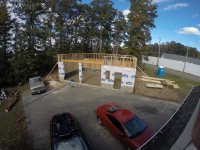
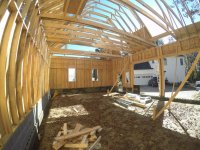
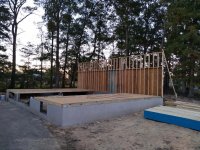
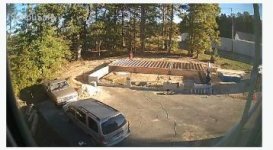
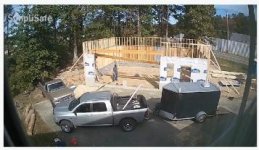
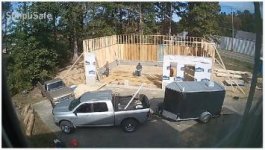
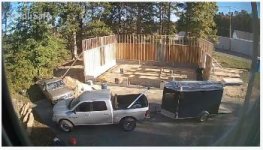
Waiting patiently for its new home........

Your Vette will love it's new home! What year is it, I'm guessing somewhere between '73 and '75?

Those block walls look straight as an arrow, very nice! I'm curious though, the two bottom rows are wider blocks than the upper ones. I haven't noticed this done before, I'm wondering what the reason may be?

attachment.php
 
To avoid these ads, REGISTER NOW!
OP
M

MAYOR28

ALLIANCE MEMBER
Joined
Mar 22, 2010
Messages
786
Location
Southern MD
Your Vette will love it's new home! What year is it, I'm guessing somewhere between '73 and '75?

Those block walls look straight as an arrow, very nice! I'm curious though, the two bottom rows are wider blocks than the upper ones. I haven't noticed this done before, I'm wondering what the reason may be?

attachment.php
'76 actually.

I believe this was done to reduce the interior impact. The walls will be 2x6. I assume this was also cheaper, but it also provides a ledge for the concrete to sit on at the transition from 8" to 6".

It made sense to me, anyone else seen this?

Sent from my moto g(6) play using The Garage Journal mobile app
 

wasfast

Well-known member
Joined
Apr 10, 2014
Messages
874
Location
San Diego CA
Block work goes quickly when you have an experienced mason. As a DIY, it's not quick all. Nice build going here!
 
OP
M

MAYOR28

ALLIANCE MEMBER
Joined
Mar 22, 2010
Messages
786
Location
Southern MD
I asked for a copy of the truss drawings. They look good to me, but I am no Truss Engineer. :thumbup:

attachment.php


.
 

Attachments

  • 455.jpg
    455.jpg
    19.9 KB · Views: 2,087

el monte slim

Well-known member
Joined
Apr 4, 2018
Messages
243
Location
Midwest USA
I believe this was done to reduce the interior impact. The walls will be 2x6. I assume this was also cheaper, but it also provides a ledge for the concrete to sit on at the transition from 8" to 6".

It made sense to me, anyone else seen this?[/URL]

This is the first time I've seen this done. It sort of makes sense to me as well, but I have some concerns. At the interior side of the wall, the length and thickness dimension of the bottom row of 6" blocks is not fully supported by the 8" blocks below. When you add up the amount of this unsupported surface area across the entire perimeter of the interior portion of the wall, it's substantial. Also, the bottom row of 6" blocks don't appear to have much horizontal surface support area at their opposing ends, especially when factoring in the width of the mud that joins them. That said, I'm open to being convinced otherwise by a qualified expert on the matter. Still, for my own piece of mind I'd consider back filling concrete right to the top of those openings in the 8" blocks before pouring the floor.
 
Last edited:

matt_i

Well-known member
Joined
Mar 14, 2008
Messages
10,726
Location
SE Michigan
I missed how you resolved the footing inspection "fail" and were able to continue laying block (?)

Usually the footing inspection is to verify that the foundation is laid out where it was noted on the drawings, before any (expensive) concrete is poured.
 
OP
M

MAYOR28

ALLIANCE MEMBER
Joined
Mar 22, 2010
Messages
786
Location
Southern MD
I missed how you resolved the footing inspection "fail" and were able to continue laying block (?)

Usually the footing inspection is to verify that the foundation is laid out where it was noted on the drawings, before any (expensive) concrete is poured.
Oh yes I think I did forget to mention that. The excavation company call a professional surveyor professional engineer when they heard that the inspector couldn't make it out. They provided a stamped letter stating that the footing was dug as required. And a soil test was completed. I just have to show that paperwork to the inspector or directly to the county before or during my final inspection.

Sent from my moto g(6) play using The Garage Journal mobile app
 
OP
M

MAYOR28

ALLIANCE MEMBER
Joined
Mar 22, 2010
Messages
786
Location
Southern MD
Jumping head a little bit, this is what I'm planning for the wall design. I want to put corrugated metal on the bottom 42 to 48 in of the wall. I am looking at getting the same sort of stuff in the Chipotle restaurants. the idea is if I need to run new utilities to one part of the shop I'll be able to take off the corrugated panels easily to make the change.

Then build a sort of chair rail to how is the electrical outlets Compressed Air Lines and other utilities. The lines may not run behind that red chair rail, but I want to mount the outlets to the chair rail.

Above the chair rail I'm still debating what material to use. I was considering using some smooth t-111 siding mounted horizontally or plywood sanded and coated with thick paint to make it smoother. But I haven't made that decision yet. The ceiling will be white metal, but I do not think that I want to put that on the walls as well. I will insulate between the studs prior to finishing the walls I am currently getting quotes for the insulation.

What do you think? Good? Bad?

attachment.php


attachment.php


wall_section_copmplete-a.jpegwall_section_copmplete-b.jpeg

Sent from my moto g(6) play using The Garage Journal mobile app
 
Last edited:
OP
M

MAYOR28

ALLIANCE MEMBER
Joined
Mar 22, 2010
Messages
786
Location
Southern MD
I am also on the hunt for a metal vendor to get the ceiling and wainscoting. I have checked with the various lumber yards in the area, but they all have very limited supplies or even suppliers.
.
.
.
.
.
Anyone have a good source for corrugated metals?
 

Homebody

Well-known member
Joined
Dec 14, 2007
Messages
1,347
Location
Northern Illinois
I used the metal as a wainscoting also. Pretty easy to find but rather expensive these days for the weathered stuff.
I've seen people buy the new stuff and weather it themselves with muriatic acid and works very well.
1-25 by Laine Olson, on Flickr
 
OP
M

MAYOR28

ALLIANCE MEMBER
Joined
Mar 22, 2010
Messages
786
Location
Southern MD
I used the metal as a wainscoting also. Pretty easy to find but rather expensive these days for the weathered stuff.
I've seen people buy the new stuff and weather it themselves with muriatic acid and works very well.

Where did you get the metal from?
I am not looking for a weathered look, just the bare metal or galvanized.
 

sawduststeve

Well-known member
Joined
Oct 7, 2016
Messages
2,139
Location
Havering-Atte-Bower,London/Essex boarders, England
Morning mate,

That's gonna be a lovely looking garage, nice house also.:thumbup:
We use a lot of block here , but mostly solid not hollow, and things sure do go up quick. You can trust your guys I'm sure.
Nice 'vette I had a '76, Cali import, they do look good.

Good luck with the build
Steve:beer:
 
OP
M

MAYOR28

ALLIANCE MEMBER
Joined
Mar 22, 2010
Messages
786
Location
Southern MD
Finally, after waiting, and waiting, the framing began. As I expected, they started with the easiest wall(s), that being the uninterrupted back wall.

attachment.php


The wall was built in 3 pieces, and stood, left to right.

attachment.php


I think they left off the top sheathing just so they could brace the wall from the back side.

attachment.php


Left side wall waiting to be stood:

attachment.php


Right side, with the windows:

attachment.php


.
 

Attachments

  • IMG_20181024_182313606.jpg
    IMG_20181024_182313606.jpg
    158.2 KB · Views: 1,659
  • IMG_20181024_182042309.jpg
    IMG_20181024_182042309.jpg
    156.9 KB · Views: 1,664
  • IMG_20181024_182151859.jpg
    IMG_20181024_182151859.jpg
    159.5 KB · Views: 1,659
  • FRAMING A.jpg
    FRAMING A.jpg
    20.5 KB · Views: 1,667
  • IMG_20181024_182303472.jpg
    IMG_20181024_182303472.jpg
    149 KB · Views: 1,657
OP
M

MAYOR28

ALLIANCE MEMBER
Joined
Mar 22, 2010
Messages
786
Location
Southern MD
Interesting to me, but apparently not that odd, the sheathing was fastened with 1/2" crown staples to the studs. :headscrat :headscrat.....

A quick google shows that this is actually recommended by some engineering firms, and I found many anecdotes saying that removing sheathing that used staples was a massive PITA. Learned something. :thumbup:


attachment.php


.
 

Attachments

  • IMG_20181024_182540303.jpg
    IMG_20181024_182540303.jpg
    102.9 KB · Views: 1,653
OP
M

MAYOR28

ALLIANCE MEMBER
Joined
Mar 22, 2010
Messages
786
Location
Southern MD
Day 2

Sorry for the somewhat crappy images. I took a bunch of these with my security camera. I will come back and fill in with better images when I figure out how to pull them from the timelapse video I have been shooting.

attachment.php


attachment.php


attachment.php


attachment.php


attachment.php
 

Attachments

  • FRAMING 2h.jpg
    FRAMING 2h.jpg
    20.4 KB · Views: 1,591
  • FRAMING 2f.jpg
    FRAMING 2f.jpg
    21.6 KB · Views: 1,575
  • FRAMING 2e.jpg
    FRAMING 2e.jpg
    21.3 KB · Views: 1,573
  • FRAMING 2b.jpg
    FRAMING 2b.jpg
    21 KB · Views: 1,575
  • FRAMING 2a.jpg
    FRAMING 2a.jpg
    20.8 KB · Views: 1,584
To avoid these ads, REGISTER NOW!

C_F

ALLIANCE MEMBER
Joined
Jan 21, 2005
Messages
9,675
Location
Utah...SNOW BLOWS!
Interesting to me, but apparently not that odd, the sheathing was fastened with 1/2" crown staples to the studs. :headscrat :headscrat.....

A quick google shows that this is actually recommended by some engineering firms, and I found many anecdotes saying that removing sheathing that used staples was a massive PITA. Learned something. :thumbup:

Huh, I didn't know that either, how about that. :)
 

that-guy

Well-known member
Joined
Sep 6, 2012
Messages
603
Location
NoVA
the MAYOR is finally getting his new shop...gonna have to swing by sometime and check it out when its done
 
OP
M

MAYOR28

ALLIANCE MEMBER
Joined
Mar 22, 2010
Messages
786
Location
Southern MD
Anyone have a good online source for electrical parts? Outlets, covers, etc?

Not lighting, I think the lighting section has that covered.....
 

that-guy

Well-known member
Joined
Sep 6, 2012
Messages
603
Location
NoVA
i got most of the switches, boxes, panels, covers, all that kind of stuff from Lowes for decently cheap, plus the added military/government discount. i was expecting them to be way more expensive than i was finding online but i went with them because of ease of availability
 
OP
M

MAYOR28

ALLIANCE MEMBER
Joined
Mar 22, 2010
Messages
786
Location
Southern MD
End of the lower level framing (mostly), and ready for trusses:::

attachment.php


attachment.php


.
 

Attachments

  • GOPR6002.jpg
    GOPR6002.jpg
    146.3 KB · Views: 1,540
  • GOPR6006.jpg
    GOPR6006.jpg
    146.2 KB · Views: 1,522
Last edited:
OP
M

MAYOR28

ALLIANCE MEMBER
Joined
Mar 22, 2010
Messages
786
Location
Southern MD
After the walls were frames, we had to wait once again. With the wettest year in recent memory, we had a little bit of water in the foundation. I rented a pump to get it out....

attachment.php


.
 

Attachments

  • IMG_20181028_143750877.jpg
    IMG_20181028_143750877.jpg
    149.5 KB · Views: 1,532

casmurbax

Well-known member
Joined
Sep 25, 2012
Messages
2,758
Location
Wilton, NY
Thank you for sharing, looks like it will be very nice.

I can't seem to locate it, but there was member on here who posted their build and they built in a chase along their walls for future electrical and/or air lines I believe, maybe someone else recalls that.
 
OP
M

MAYOR28

ALLIANCE MEMBER
Joined
Mar 22, 2010
Messages
786
Location
Southern MD
TRUSS DAY!!!!!!!!!


Turns out having the right tool for the job really makes all the difference......

Big trusses means big crane......:bowdown::bowdown::bowdown:


attachment.php


.

.
 

Attachments

  • CRANE LIFT A.jpg
    CRANE LIFT A.jpg
    155.3 KB · Views: 1,512
Last edited:
OP
M

MAYOR28

ALLIANCE MEMBER
Joined
Mar 22, 2010
Messages
786
Location
Southern MD
At the end of Crane Day, here is what we had:

2 wide openings for dormers, and one on the far right for the stairs.

attachment.php


Truss Shot:
attachment.php


A view from the inside. This is the first time that I realized how tall in the interior ceiling is going to be. Tall. Real Tall. Should be :thumbup:

attachment.php


.
 

Attachments

  • GOPR6038.jpg
    GOPR6038.jpg
    142.7 KB · Views: 1,503
  • GOPR6048.jpg
    GOPR6048.jpg
    152.8 KB · Views: 1,503
  • GOPR6032.jpg
    GOPR6032.jpg
    154 KB · Views: 1,506
OP
M

MAYOR28

ALLIANCE MEMBER
Joined
Mar 22, 2010
Messages
786
Location
Southern MD
Thank you for sharing, looks like it will be very nice.

I can't seem to locate it, but there was member on here who posted their build and they built in a chase along their walls for future electrical and/or air lines I believe, maybe someone else recalls that.
Maybe I will need to tap my google-fu to find some ideas.....

Sent using The Garage Journal mobile app
 
To avoid these ads, REGISTER NOW!
Top Bottom