To avoid these ads, REGISTER NOW!

"Thayer's Patent" Civil War era combo tool

Private Lugnutz

Well-known member
Joined
Mar 30, 2012
Messages
30,599
Location
The Authentic Jersey Shore
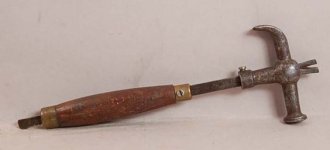
I don’t mind coming home from the flea market with only one tool when the tool is something like this one.

View media item 77715
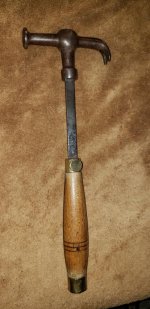
Here it is cleaned up and in some better light on my workbench.

View media item 77717
View media item 77716
View media item 77722
View media item 77723
View media item 77721
View media item 77719
View media item 77718
It was patented (#35,715) by John Adams Thayer during the Civil War (June 24, 1862) as a “combination tool.” Here is the diagram from his patent application.

View media item 77726
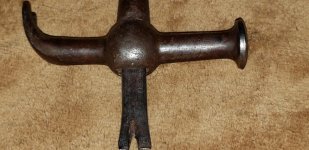
He described it as a “shank or bar graduated to form a scale” with a “screwdriver and a claw on the ends of said shank or bar,” with an adjustable “handle or sleeve” and an adjustable “hammer-head.”

See the thumbnail below for a more complete example of this tool from the Donnelly Antique Tools Auction site. The idea is to slide the handle/sleeve and the hammer head away from their respective ends to use this as a screwdriver and claw, and back down into their end positions to use it as a tack hammer and tack puller. As shown in the two diagrams on the patent. My example is missing the sleeve/handle and also the set screw for adjusting the position of the hammer-head.

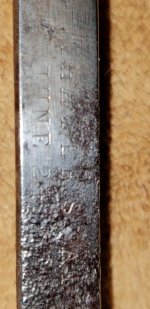
Speaking of the hammer-head, mine is frozen in place at the moment, but in a position where just enough of the marking on the shank is revealed. The whole marking reads “THAYER’S PAT” over “JUNE 24, 1862.”

View media item 77724
Chalked:

View media item 77725
I’ve got some penetrating oil soaking inside the head. This is not characteristic of me, but I am actually thinking of trying to restore this tool. My idea is to cannibalize a handle from one of the antique Babbitt scrapers I have, core it out for the shank, re-shape it a little and fit it with a second ferrule on the back, and drill and thread a small hole in the existing ferrule for the set screw.

Note that the Donnely auction example blow (which sold for $350, incidentally!) has brass slotted set-screw heads, the patent diagram I posted above shows fancy wingnuts, while an example shown on DATAMP, which can be seen by going to this link, and clicking on photograph 3, has knurled thumbscrews. So it’s pretty wide open in terms of what kind of set screw I can use to restore mine.
 

Attachments

  • 5044d85e1b52be68b3917fb9ff3271d0--vintage-tools-antique-tools.jpg
    5044d85e1b52be68b3917fb9ff3271d0--vintage-tools-antique-tools.jpg
    12.5 KB · Views: 115
Last edited:
To avoid these ads, REGISTER NOW!

four.cycle

Well-known member
Joined
Oct 19, 2015
Messages
28,953
Location
Tacoma, Washington
Way cool. :thumbup:
Looks like Mr. Thayer was subsequently issued another patent (264,492) for what appears to be an "upgrade" to that unit.

Somewhere I've seen a You-Tube video of a guy turning a new wood handle for an old monkey wrench. I wonder if you might be able to make one (or get one made by somebody who does wood turning.)
 
Last edited:

Gmonkee

Well-known member
Joined
May 9, 2010
Messages
2,824
That is quite the find.

My oldest is an 1850's Sheffield steel wood gouge. No handle of course.
 

twertsy

Well-known member
Joined
Jan 5, 2014
Messages
6,726
Location
Reedville, VA
In case you wanted to know who manufactured it..............
 

Attachments

  • thayer-backus.jpg
    thayer-backus.jpg
    146.4 KB · Views: 77
  • thayer-carp.jpg
    thayer-carp.jpg
    135.7 KB · Views: 102
Last edited:

gkoester

Member
Joined
Dec 6, 2018
Messages
11
Location
attached
I found one with the handle intact. Ebay time.
 

Attachments

  • 20190223_222501.jpg
    20190223_222501.jpg
    90.7 KB · Views: 93
  • 20190223_222522.jpg
    20190223_222522.jpg
    76.5 KB · Views: 76
  • 20190223_222553.jpg
    20190223_222553.jpg
    150.3 KB · Views: 75

Mintgrun

Well-known member
Joined
Oct 7, 2015
Messages
2,133
Location
Kingston, Wa.
I need to find someone to turn a nice reproduction wood handle for me.

I'd like to apply for this job. :) I recently turned a couple of maple handles for a small spatula and cheese slicer. The A&J handle on top is on a spoon and I copied the basic shape, but made these smaller.

IMG_0027 (7).JPG

I wish I had a bucket full of those stainless steel ferrules because I'd like to make some more handles in this style.

IMG_0004 (7).JPG

The hole I drilled for the tang is the same size as these bamboo skewers and they make it easy to spin the handles with a drill, to apply the finish.

IMG_0029 (7).JPG

I made a batch of blanks while I was at it. They're 1-1/8" square x 6" long. Based on the photos above, they might be a tad small for the hammer, but I have other maple wood on hand.

IMG_0018 (7).JPG

The straight sided brass ferrules would be easy to make (compared to the thin rounded/flared stainless style). One way to put a rectangular slot through the middle would be to bore it out for a dowel and then remove the center of that dowel and glue the two "halves" into the handle blank.

The photos above are enough to get the overall shape right, but a few dimensions would be helpful, such as overall length, top and bottom OD and a measurement of the fattest part of the handle.

(no pressure Lugz. this was a good excuse to share some recent fun)

Tom

Tom
 

four.cycle

Well-known member
Joined
Oct 19, 2015
Messages
28,953
Location
Tacoma, Washington
So we've gone from "Manufacturer Unknown" to the piece having been made by no fewer than three different companies? Correct?
I'll see what I can dig up on these three names later:

Thayer / John Adams Thayer, East Boston, MA / combination tool / patent 35715 Jun 24 1862 & 264492 Sep 19 1882 John Adams Thayer / manufactured by Q.S. Backus, Winchendon, MA; Carpenter & Watkins, Winchendon, MA; and J.R. Clifford Co., Boston, MA / https://www.garagejournal.com/forum/threads/thayers-patent-civil-war-era-combo-tool.376998/ /
 
OP
P

Private Lugnutz

Well-known member
Joined
Mar 30, 2012
Messages
30,599
Location
The Authentic Jersey Shore
This old scrounger is tickled maple mahogany to announce that his formerly one-half of a c. 1862 Thayer's Patent "Hammer with Nail-Claw, Tack-Lifter, Screw-Driver and Rule" is now whole! :pimpflash

Complete 1.jpg

Kudos and a round of applause to @Mintgrun. 👏

I'm not going to spoil his fun even trying to explain his process. His approach was meticulous, collaborative, and sensitive to my aesthetics, and I have plenty of PM in-progress reports with photos and descriptions. But he deserves the well-earned spotlight and I invite him to post his work here as he sees fit.

If you scroll up to my first post you'll see a patent diagram that shows winged set screws, but none of the surviving examples I have seen on-line exhibit those features, and we concluded that they may not have been made that way by any of its three (at least) manufacturers once the design hit production. I tried to source them at an 80-year-old hardware store here, and online, but finding two matching 8-32's, one brass, one steel, same style, period correct, proved difficult. So he made those for me as well as the brass end caps, "torch-ering" them (to borrow his coined term) to age them, copying the hardware on surviving examples found in museums and various upscale antique auction houses on-line.

I will simply say that I couldn't be happier with how it turned out. The shape is perfect and it looks splendid and convincingly old yet well preserved, matching the condition and finish of the shank and hammer head, which was exactly what I asked for.

Complete 2.jpgComplete 3.jpgComplete 4.jpgComplete 5.jpgComplete 6.jpg
 
Last edited:
To avoid these ads, REGISTER NOW!
OP
P

Private Lugnutz

Well-known member
Joined
Mar 30, 2012
Messages
30,599
Location
The Authentic Jersey Shore
I found a marking I had not seen before, because I had never slid the entire hammer head off, with the shank being bent. A "C" inside a diamond. I am betting it's for Clifford & Company of Boston, one of the three known manufacturers. See the trade journal snippet in post #15.

Complete 8.jpg

And here are more photos showing the branding and patent notice, the rule, the dimples in the shank for the set screws...

Complete 7.jpgComplete 10.jpg

Complete 12.jpgComplete 13.jpg

...and the tool completely dis-assembled.

Complete 11.jpg

The most popular configuration for photos of this tool is one in which the handle is slid slightly up and the hammer head slid slightly down, as I led off with in post #20, because it shows all the tack-lifter and the screwdriver. But that is not the positions of the dimples.

This is with the sets screws in the dimples.

Complete 14.jpg

But it would have to be used something like this for the tack puller and the screwdriver.

Complete 15.jpg
 

Attachments

  • Complete 7.jpg
    Complete 7.jpg
    230.7 KB · Views: 19
Last edited:

ooba tooba

Well-known member
Joined
Jan 13, 2014
Messages
744
What a stunning example of a fine antique tool. I love antique tools and always seem to be adding to my collection (especially levels)
 

alinc100

Well-known member
Joined
May 26, 2013
Messages
3,028
Location
Dearborn,MI
This old scrounger is tickled maple mahogany to announce that his formerly one-half of a c. 1862 Thayer's Patent "Hammer with Nail-Claw, Tack-Lifter, Screw-Driver and Rule" is now whole! :pimpflash

Complete 1.jpg

Kudos and a round of applause to @Mintgrun. 👏

I'm not going to spoil his fun even trying to explain his process. His approach was meticulous, collaborative, and sensitive to my aesthetics, and I have plenty of PM in-progress reports with photos and descriptions. But he deserves the well-earned spotlight and I invite him to post his work here as he sees fit. If you scroll up to my first post you'll see a patent diagram that shows winged set screws, but none of the surviving examples I have seen on-line exhibit those features, and we concluded that they may not have been made that way by any of its three (at least) manufacturers once the design hit production. So he made those, one steel and one brass, as well as the brass end caps, "torch-ering" them (to borrow his coined term) to age them, copying the hardware on surviving examples found in museums and various upscale antique auction houses on-line.

I will simply say that I couldn't be happier with how it turned out. The shape is perfect and it looks splendid and convincingly old yet well preserved, matching the condition and finish of the shank and hammer head, which was exactly what I asked for.

fabulous work. :thumbup:
great work, great collaboration. Mintgrun how about a few steps of the process? How did you end up making the rectangular slot?
 

RTM

Well-known member
Joined
May 13, 2019
Messages
13,190
Location
SF Bay Area
WOW, NICELY DONE! If I didn’t know, I’d easily believe that was a well cared for example from way back when. @Mintgrun 👏👏👏. I hope you are as proud of your work as Lugz is if the finished product. Nice to see that brought back to life.
 

Mintgrun

Well-known member
Joined
Oct 7, 2015
Messages
2,133
Location
Kingston, Wa.
Wow, thank you for that write up, Greg. I'm flattered. You sure did a nice job aging the wood!

What a stunning example of a fine antique tool.

I agree. It was a treat to get to work on it.

fabulous work. :thumbup:

Thank you.

WOW, NICELY DONE! If I didn’t know, I’d easily believe that was a well cared for example from way back when. @Mintgrun I hope you are as proud of your work as Lugz is if the finished product. Nice to see that brought back to life.

Thanks. I put it in the mail the same day I finished it, because I was starting to get attached to it. I guess that means I was proud of it.

great work, great collaboration. Mintgrun how about a few steps of the process? How did you end up making the rectangular slot?

Thank you. I'm going to cheat and do some copy/paste from the messages we exchanged to show the process.


I turned one of the blanks down to round and bored out the center to 3/8", which is the width of the hammer shank. I also turned one of those 1/2" square blanks into a 3/8" dowel, which could have 3/16" cut out of the center, with two pieces left over glued in to fill in the hole in the handle, leaving a slot.
To do it the other (original) way, I'll need to rip the slot in a square handle blank to fit the thickness of the shank and then fill that slot in with a piece of maple that also matches that width. That piece can come out of one of the 1/2" x 1/2" pieces and will match pretty well if I align the grain properly, since they all came from the same piece of maple.

Here are some photos.

1669258838204.jpeg

1669258887240.jpeg

1669259073623.jpeg

1669259109958.jpeg

1669259147884.jpeg

1669259183304.jpeg

1669259283614.jpeg

I am going to need to use a few replies to show the process, due to the ten attachment limit. Sorry if it is obnoxiously long. There were a lot of little steps involved.

Tom
 
Last edited:

Mintgrun

Well-known member
Joined
Oct 7, 2015
Messages
2,133
Location
Kingston, Wa.
After that, I figured it'd be better to copy the way it was originally done, even though the ripped dowel felt like a clever solution.

I decided to cut a slot in a handle blank and fill it back in with another strip of wood, leaving the rectangular hole for the shank.

1669259491394.jpeg

I matched the grain pattern as best I could. The wood came from the same piece, so the color match is spot on. The maple is a lot lighter than the wood in some of the original tool photos, but I chose maple based on the "flecky" grain structure in some of those photos. "Flecky" as seen in the side facing up in the photo above.

This was with the piece glued in place.

1669259525075.jpeg

Then I cut little 1/4" long plugs for the ends, so I could grip it in the lathe. Those will get cut off when it is cut down to length. You can see that the slot is not perfectly centered, but I think it will be close enough. I made the slot by passing the piece through the table saw and then flipping it around and passing it again, so the slot is in the center. The slot was too narrow, so I moved the fence and ran it again, but I moved it a tiny bit too far, so flipping the part to center it would have made the slot too wide. It is a fussy adjustment to make on the saw, since the fence movement is doubled when the piece is flipped and run through again. As usual, if I had 100 pieces to make, it would be an efficient way, but setting up the tools for just one piece is quite tedious. (In hindsight, I could have just trimmed the ends and relocated the cross cuts to be centered on the slot, (instead of the piece) since there was extra material. Live and learn).

1669259574319.jpeg

I found this drive piece at Habitat a while back and simply grip it in the metal lathe's chuck to spin wood.

1669259609093.jpeg

My buddy bought a lathe that came with a tool rest for chisels that mounts where the tool post is. I wish I had one of those. I should try to make one, because it is fun to free hand with chisels, as opposed to turning the cranks. The cranks/tool post are nice for getting the size just right (for the capped ends) though.

1669259644641.jpeg

1669259680510.jpeg
 
Last edited:

Mintgrun

Well-known member
Joined
Oct 7, 2015
Messages
2,133
Location
Kingston, Wa.
To determine the size/shape of the handle, I used the patent drawing and zoomed in on it until the image on the screen was the same size as the hammer and then measured the handle.

Then traced the hammer onto a piece of paper to draw the handle full scale. I think it resembles the patent drawing and photographs.

1669259860344.jpeg

1669259917360.jpeg


I turned the ends of the handle to match the OD of the brass, so I could blend the body of the handle at the ends.

1669259973124.jpeg

(The tape on the right side is because I turned that side down a little too far for the OD).

1669260018565.jpeg

Then I turned it down to match the brass ID on the ends.

1669260116494.jpeg

I get a kick out of using the boring bar attachment. This one is made by the Armstrong Bros. I like how it leaves a flat bottom hole, which is needed for the ferrule's end. I left the brass nice and thick to have enough meat for the 8-32 threads.

1669260162521.jpeg

They're machined for a snug press-fit, but it is possible to grip them in a vise with padded jaws and remove them, by twisting and pulling, if need be.

1669260354163.jpeg

I decided to age the brass a bit, but I'll leave it up to you to abuse the wood. Torch-ering them gave the brass a nice dull appearance and I put a few little dents and dings in them too, just for fun.

1669260380139.jpeg

I used this 6" drill bit to start the slot in the ferrule from within and joined the holes with files. That part was satisfying.

1669260427632.jpeg

1669260641345.jpeg
 
Last edited:

Mintgrun

Well-known member
Joined
Oct 7, 2015
Messages
2,133
Location
Kingston, Wa.
Brass sure machines nicely.

1669260807090.jpeg

I forgot to cut the threads on it before removing it from the lathe, so I had to get a little creative about holding it tight enough to thread it without damaging it. I considered grabbing the knob with pliers to add to the aged look, but plier-knurling always bums me out. So, I made a quick and dirty wooden holder.

1669260843796.jpeg

I remembered to thread the steel one while it was on the lathe. (As you can see, I bent it a bit when running the die up against the head, but that part got cut off). Both screws got rounded tips to fit the divots in the shank and have just enough threads to reach the bottom of those divots.

1669260913746.jpeg

1669260970435.jpeg

I scratched them up a little bit and hit them with the torch.

1669261012664.jpeg

1669261350898.jpeg

That last photo shows what an amazing job Lugz did on the wood's finish. I'm curious what was in his secret concoction. :)

Tom
 
Last edited:
OP
P

Private Lugnutz

Well-known member
Joined
Mar 30, 2012
Messages
30,599
Location
The Authentic Jersey Shore
That last photo shows what an amazing job Lugz did on the wood's finish.
Thanks. I'm very happy with it.
I'm curious what was in his secret concoction.
No secret. I roughed it up with coarse sand paper, followed by fine sand paper, dropped it in a jar filled with Minwax Golden Maple. I let it sit half a day, wiped it down, then I roughed it up again with coarse sand paper, followed by fine sand paper, and dropped it in a jar with Minwax Red Chestnut. I let it sit for an hour and wiped it down. Voila.

Here's the other side.

20220515_200400.jpg
 
Last edited:

Old Radar

Well-known member
Joined
Apr 17, 2019
Messages
2,755
Location
San Antonio, TX
Beautiful work @Mintgrun!! I know it would be a PITA, but it would sure be nice if you could re-load the photos that no longer appear in your process explanation.

One thing surprises me: If only one of the companies that was producing these was churning out 5,000 to 7,000 dozen weekly, I'm surprised that they are not more common.
 

Mintgrun

Well-known member
Joined
Oct 7, 2015
Messages
2,133
Location
Kingston, Wa.
Beautiful work @Mintgrun!! I know it would be a PITA, but it would sure be nice if you could re-load the photos that no longer appear in your process explanation.

Thank you, Old Radar. It was fun to see these photos again. Half the reason I take photos is so I can remember what the heck I did. That was a really fun project.

I'm seeing all the photos show up. Could you be more specific about the ones you cannot see?
 

Old Radar

Well-known member
Joined
Apr 17, 2019
Messages
2,755
Location
San Antonio, TX
Missing the same as RTM, plus missing all pix in post 26. So basically all your pictures except the last one on post 28 (round file in the handle held in a vise) and the same photo that shows up on post 26 as an attachment.
 

Mintgrun

Well-known member
Joined
Oct 7, 2015
Messages
2,133
Location
Kingston, Wa.
In post 27 & 29, no pix for me.

In 28 only the last one shows up

Oh. So, only 23 images to dig up and reload.

Missing the same as RTM, plus missing all pix in post 26.

Ugh, make that 29.

It's really strange that they all show up for me. At least that makes it easier to redo them. I'm not sure it will work the second time around either though.

I feel like I'm being punished for overloading my posts with photos.

Thank you for letting me know.
 
OP
P

Private Lugnutz

Well-known member
Joined
Mar 30, 2012
Messages
30,599
Location
The Authentic Jersey Shore
I see ALL your photos without any problems, @Mintgrun, so before you repost everything for naught, this might be some kind of incompatibility thing. EDIT: I see them ALL on my phone (Android, Chrome) and on my laptop (Dell/MS, Edge).
 
Last edited:
OP
P

Private Lugnutz

Well-known member
Joined
Mar 30, 2012
Messages
30,599
Location
The Authentic Jersey Shore
If only one of the companies that was producing these was churning out 5,000 to 7,000 dozen weekly, I'm surprised that they are not more common.
Those numbers are as totally baffling to me now as they were when I first read them. Forget dozens. Frankly, I would consider 5,000 to 7,000 units of these per week to be unrealistic. Conservatively, that's ~1,000 per day, ~125 per hour. But it's not just the production that seems off. I don't know if those kinds of numbers make sense in terms of demand, commercially, for the late 19th century.
 

2oolhound

Well-known member
Joined
Dec 18, 2010
Messages
5,918
Location
BC Canada
I'm missing the same photos. All of lug's photos show up from posts 20 and 21 though. Maybe the 2 of you have the images already on your devises and they are recognized that way to you. dunno?

But a heck of a story and collaboration! Bravo both of you!
 

Marsim

Well-known member
Joined
Feb 9, 2022
Messages
496
That tool is really neat looking. That's definitely one of your cooler finds, regardless of what it's worth.
 
To avoid these ads, REGISTER NOW!
Top Bottom