To avoid these ads, REGISTER NOW!

Between 265 & 485 SQ/FT The 12-Gauge Garage

Workspaces sized between 265 and 485 squarefeet.

bczygan

Well-known member
Joined
Nov 4, 2009
Messages
22,002
Location
DETROIT! Arsenal of Scrappers
Re: Making my own race-car wing

I need to follow this thread. We need to cut a foam exercise roll, like the one below, lengthwise. We use it for our physical therapy exercises.

24903_second_foamexercisesportsroll.jpg
 
To avoid these ads, REGISTER NOW!

EdT

Well-known member
Joined
Sep 21, 2010
Messages
1,104
Location
North Georgia
Re: Making my own race-car wing

There are still a lot of folks cutting foam wing cores for model airplanes. Google "custom foam wing cores" and you'll find a lot of sites and a few you tube vids on doing it. It's not too tricky, but there are some subtleties. Nichrome wire and some kind of variable power supply is what's commonly used IIR.
 

Strouty

Well-known member
Joined
Mar 21, 2010
Messages
38,220
Location
Southern Maine
Re: Making my own race-car wing

Jack, I wonder if you could use a soldering gun with custom shaped blades? You could make them about any size and contour, then instead of trying to move the foam, you could move the cutter.
 

404

Well-known member
Joined
Aug 23, 2014
Messages
3,463
Location
Mass
Re: Making my own race-car wing

Jack, the pushing force is a weight on an arm that is swinging down. The fishing string is actually 2 pieces, one going to each end of the cutting bow.
The strings join together at the same place on the arm for a wing that has the same chord length at both ends.
To make a tapered wing, the fishing lines are attached a distance apart on the arm so the bow finishes going thru the foam completely at the same time end to end.

Stopping will leave a mark.

There is an article on making a cutter on page 103 of this pdf.

http://www.rcsoaringdigest.com/pdfs/RCSD-2008/RCSD-2008-11.pdf

Have fun.
 

gte718p

Well-known member
Joined
Mar 12, 2009
Messages
3,977
Re: Making my own race-car wing

I've watched your threads for several years. Building the CNC hot wire cutter is fairly easy and cheap. I'm relatively sure you have the skills to do it. Arduino+Grbl shield+some 80/20 extrusion with some small stepper motors and you have can turn your hot wire cutter into a CNC hot wire cutter.
Watching the video of you losing the wing, it looks like the wing had a lot of flex in it. Some balsa wood stringers and spare would help give it some more rigidity and strength without adding a lot of weight.
 

Guster

Well-known member
Joined
Mar 11, 2012
Messages
1,543
Location
Auckland, New Zealand
Re: Making my own race-car wing

Now all you need is a small vacuum pump, carbon, resin and a few ancillaries to vacuum-bag a nice carbon wing. Don't throw away the material you cut the wing from as they can be used to support the wing to prevent any warping while the resin cures.

Use a carbon spar in the wing and make some wing end plates from a few layers of carbon vacuum bagged to a flat polished aluminium surface. Cut them out with a bandsaw and glue them onto the wingtips with thickened epoxy. Few coats of clear coat and you have a high tech race component made on the workshop bench for a 1/10th of the retail cost,
 

404

Well-known member
Joined
Aug 23, 2014
Messages
3,463
Location
Mass
Re: Making my own race-car wing

Small vacuum pumps come from anything that has a refrigerant in in.
 

Craptain

Well-known member
Joined
Apr 18, 2013
Messages
4,029
Location
Tampa Bay FL
Re: Making my own race-car wing

For the kind of vacuum needed a shop vac is usually good enough and has the volume to overcome the occasional leaks. That is basically what we use in a (high end) boat yard.
 

Guster

Well-known member
Joined
Mar 11, 2012
Messages
1,543
Location
Auckland, New Zealand
Re: Making my own race-car wing

Just have to be careful not to collapse the polystyrene foam. My vacuum pump has a small valve that lets you regulate the pressure for softer foam cores. On wood and PVC and corecell you can crank it right up to get good consolidation and mold finishes.
 

Charles (in GA)

Well-known member
Joined
Jan 11, 2006
Messages
12,489
Location
50 mi south of Atlanta
Re: Making my own race-car wing

Just be careful and investigate the type of foam you chose. Some foams cannot be hotwire cut as they produce poison gas when heated or burned. This is true of some of the foams used in parts of the Rutan designs.

Charles
 

mtnwalton

Well-known member
Joined
Apr 25, 2010
Messages
210
Re: Making my own race-car wing

We built a couple hot wire saws in our scene shop and also had handheld units with custom inserts for molding profiles. Your foam supplier should have several densities available. I'd use a higher density for projects like this.
 

joeflys

New member
Joined
Oct 6, 2013
Messages
1
Re: Making my own race-car wing

fbd07e8438394f8ddb151c6d34a4ca5d.jpg

I built this airplane using the methods in that Rutan book. The Hotwire method works fine. But if you have a 60" span you will get lag in the middle of the wire. It may be best to do two pieces and join them. Two people is a must and you put "taking lines" at corresponding % chord locations on each template so one person doesn't get ahead of the other.


Sent from my iPhone using Tapatalk
 

EdT

Well-known member
Joined
Sep 21, 2010
Messages
1,104
Location
North Georgia
Re: Making my own race-car wing

I don't know what the lead time is from your hot wire cutter, but it may seem short before you're done. Anyhow, here's another, long winded approach.Some friends and I made some surf boards this way a million years ago (1964 IIR). Lets say the wing is 5' long and 10" wide. Thats's not a lot of surface area to worry about. So lets get a nice 5' x 1.5" fiberglass tube from McMaster Carr for <$30 shipped. Cut seven ribs from plywood or aluminum or other material of your choice. They need to have a hole for the fiberglass tube at the thickest part and they need to be the same. I'd make some rough blanks, put the holes(s) in and then sand them to final shape as a stack. I would then make a multi layer sandwich gluing (probably epoxy) the ribs onto the fiberglass tube with foam blocks about 10" wide between each rib. It might be worthwhile to add a second, small tube through the rear part of the rib to keep everything aligned. The tubes should stick out the ends of the outside ribs about and inch. The outsticking tubes will be placed on LEVEL support blocks at each end while it all cures. Might need something in the middle as well. You could also leave removable support tabs on the bottoms of the ribs to help avoid building twist into the wing. This would obviate the need for the support blocks, but you'll probably want some of the tube sticking out one end or both ends to have something to mount with and to attach the articulation mechanism if you're still using that.
OK. Now we have lump with a wing inside. Use a bread knife, electric carving knife or other implement of destruction to remove most of the excess foam. Try real hard not to cut down lower than the ribs. Now make a sanding board from a nice straight piece of something. Perhaps a Tee bar made from some plywood would be good. Cove one side with the coarsest sandpaper you can find. The ribs are spaced at 10" so you can use an 11" wide piece of sand paper. Sand off the remainder of the excess foam. It will move pretty fast. Don't use bead foam or you'll never get a smooth surface. I'd then glass the whole thing, but other coverings will work too. Epoxy resin will work with any kind of foam, but the polyester resins will eat styrofoam. If you want to use polyester, use urethane foam. Sand the stuff outside. It makes a lot of dust. Have a fan to blow the dust away from you. Unlike wood dust, foam dust does not soften up when it gets in your eye, it just continues to scratch. Just another one of the countless ways to make a wing. I'm sure you'll figure out a good way.
 

MarkG

Well-known member
Joined
May 23, 2012
Messages
1,219
Location
Elgin, IL
Re: Making my own race-car wing

Cool stuff, Jack! I briefly tried the same thing when I was building a wing for a scratch-built R/C glider and found similar hot-wire cutting plans guys were using to cut wing cores.

Next, you'll be sucked into building your own vacuum-bagging set-up for glassing it! :) These can be made pretty simply too-----as usual, YouTube and Google are your friends.
 

Larry Wiechman

New member
Joined
Oct 30, 2011
Messages
3
Location
Roscoe, IL
Re: Making my own race-car wing

Vacuum bagging is more trouble than it's worth, for this application. The Rutan methods and the use of peel-ply will produce strong, safe parts at low cost.
 
OP
J

Jack Olsen

Super Moderator
Staff member
Joined
Mar 22, 2009
Messages
6,678
Location
Los Angeles
Re: Making my own race-car wing

Here's update #2. So far, so good. But I think it might accurately be said that it's easy to do a lousy job cutting foam, but much, much more difficult to actually get the finished product right.


My apologies for the loud tone sound (from the cutter) and my basement-level production values. :)
 
To avoid these ads, REGISTER NOW!

MarkG

Well-known member
Joined
May 23, 2012
Messages
1,219
Location
Elgin, IL
Re: Making my own race-car wing

Hey Jack, I can't find the exact link now, but the R/C plane and glider guys use the same process and I've seen a jig that uses a weight set-up to pull the cutting arm through the foam (weight of the arm holds it in contact with profile guides) which gives a very nice and even cut surface. If I remember right, the 'slices' were left in place until both the top and bottom profiles were cut to eliminate the warping problem.
 
Last edited:
OP
J

Jack Olsen

Super Moderator
Staff member
Joined
Mar 22, 2009
Messages
6,678
Location
Los Angeles
Re: Making my own race-car wing

I've seen it. It describes itself as gravity-fed, and it uses a weight to pull on both sides evenly. It's a pretty elaborate apparatus, but I think it is an effective way to minimize the bowing of the wire.
 

Strouty

Well-known member
Joined
Mar 21, 2010
Messages
38,220
Location
Southern Maine
Re: Making my own race-car wing

That looks like it came out pretty good. Is the plan to make it one piece or are you going to combine smaller parts to make the wing?
 
Last edited:

Dave Crichton

New member
Joined
May 26, 2015
Messages
1
Hi Jack..I'm new to the thread...I'm currently working on a '67 912 with a '71 911 2.2 engine that i'm modifying etc...My question is about your lift. I'm looking at getting a scissor lift...maybe a Bend Pak or Hemi Roadrunner...and i'm just wondering what you consider the best lift points to be? I know your lift does the full bottom of the car, but i'm not likely to find a lift like that again. any suggestions or thoughts on where to support my car with a scissor lift like i mention. just want to make sure i get the right lift.
 
OP
J

Jack Olsen

Super Moderator
Staff member
Joined
Mar 22, 2009
Messages
6,678
Location
Los Angeles
Re: Making my own race-car wing

I took a detour this weekend.

I'm waiting for replacement NiChrome wire, and also realizing that a single-piece wing will probably exceed the capabilities of my simple hot wire setup. So, my new plan is to make a two-piece wing that will actually remain as two pieces -- something I can carry in the car and then assemble at the track like an all-aluminum two-piece one I made a few years back.

At the same time, I got the quote back from the outfit that cut my wings and it was lower than I remembered. So I went ahead and ordered a single-piece core as a kind of insurance for this whole project. It arrived in a few days, so I decided to jump ahead so I would definitely have a wing to test for my June 17 track day.

How fast can I make a wing? Pretty fast, now. Because I just don't make 'em strong enough, apparently. :)

Here's the thing that got this started. I'd reused an aluminum spar and also put a few holes into it in the construction process, and after several years of use, it snapped.

rXv0X2.jpg


So, the next spar will be thicker aluminum, without stress-concentrating holes. But in addition to the EPS foam core, I'll need mounting points and end-pieces to attach the end plates to. I traced the airfoil shape out and then drew the feet and piece that would provide support all the way back to the gurney flap.

PpnfFZ.jpg


I cut the shapes out of thin plywood. I recently started using my jigsaw upside-down in a vise. For some jobs, it seems easier.

ob15vV.jpg


And once I have a wood version of the shape, I've got a way to make as many copies in aluminum as I want. The trick is to rough cut the aluminum piece -- make it 1/8" to 1/4" too large all around, without having to worry about getting the shape actually right. Then I adhere the correct wood shape to the too-big aluminum version and use a tabletop router to trim the aluminum piece down to the exact shape of the wood model, using a straight-cut bit like you'd use to trim laminate for a countertop.

a9JSI9.jpg


I hope that makes sense. Here's the router bit with its bearing-type guide following the wood shape and cutting the aluminum to conform.

XLt2zm.jpg


This shows the conformed shape. My bit is pretty dull. But I'm cheap and don't want to replace it yet.

KPgfGf.jpg


So, here you see two each of the aluminum parts sitting on top of the wood models.

M6we1e.jpg


Ready to go, now. I conform some thin aluminum to the airfoil shape, and then rivet (with L-stock) the leg pieces to the thin aluminum. The weight is there while I wait for the cheap-but-slow-curing foam adhesive.

oO1HxR.jpg


One setback. I damaged the thin trailing edge of the foam. You can see it in this picture where the aluminum gurney flap piece meets the wing near the far end. So I did my best to make up for it with a longer piece of aluminum for the gurney piece -- and later some spackle.

9XPzmW.jpg


I use 3M structural adhesive to bond the aluminum pieces together where the spar meets the end plates and where the endplates and base pieces meet the gurney flap.
 
Last edited:
OP
J

Jack Olsen

Super Moderator
Staff member
Joined
Mar 22, 2009
Messages
6,678
Location
Los Angeles
Re: Making my own race-car wing

While the foam adhesive for the end pieces cured, I spackled over the damaged areas on the wing and also checked the fit on the uprights and the angle of attack.

ZmgfHn.jpg


Now, I've never done fiberglass work. And I'm not going to start with a quick project like this. But I recently read in the RC aircraft community about using fiberglass fabrics with latex floor finish and even a Glidden primer that also (oddly) happens to be a very effective adhesive for EPS foam.

So here's the wing draped in a sheet of fiberglass fabric I picked up at a local surfboard shop.

TmjmQu.jpg


And here it is with the primer rolled on to adhere the fabric to the wing. It will never be as hard or (quite) as strong as if I'd used resin. But it will be lighter than a resin-made piece, and stronger than the different foam coverings I've used in the past. I did test pieces with both the floor finish and the primer, and found the best bond with the Glidden Gripper primer.

wKYgPR.jpg


Here's the thing with the fabric roughly trimmed off. Later, I was able to use a razor blade to clean all that up. But you can see the fabric pattern in the inset, which I learned after a second coat that primer is not going to fill in without MANY coats.

PCLl28.jpg


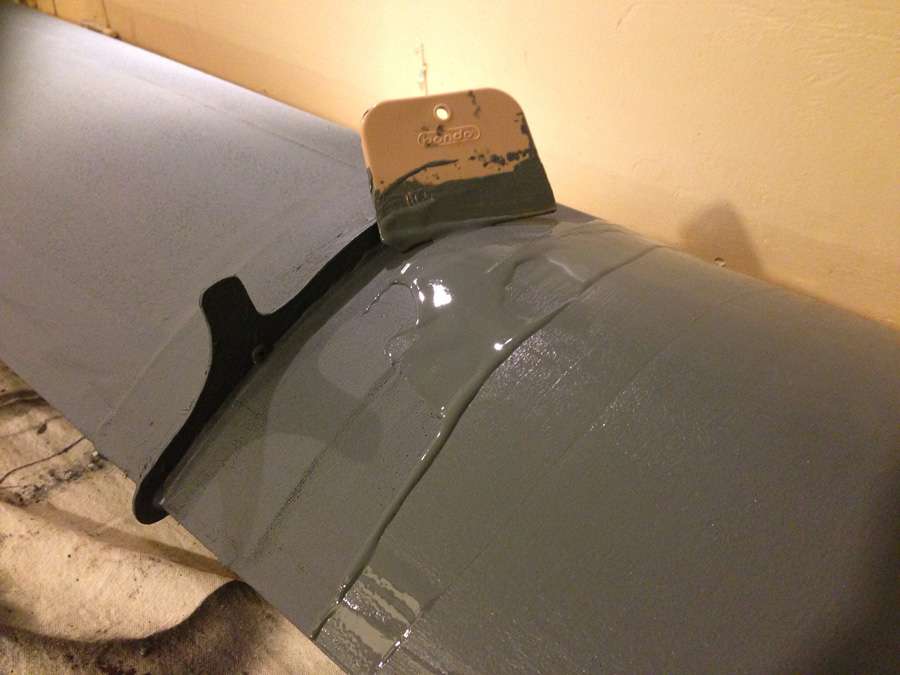
So, since I'm lazy, I looked up a way to thicken up the primer for the next coat. I added inexpensive microballoons to make the stuff thick as pancake batter, and then used a squeegee to fill the pattern.

ZbRQ49.jpg


I'll have to sand this smooth. But it will be a lot easier than doing 10 coats of the unthickened primer.

zH35Hk.jpg
 
Last edited:

TauntDevil

Well-known member
Joined
Mar 19, 2014
Messages
194
Location
Mesa, AZ
Re: Making my own race-car wing

So I dont have a lot of knowledge on the hot wire but was wondering if you used maybe a wingnut on one end that was ground and if you needed tension, to just tighten it maybe?

Also until the last image, I was curious on what your final goal was to be. When I was making my hood panel as well as other stuff like the rest of my bumper (which would get broken often from racing), I would use the green style Styrofoam that you get at Micheals because it does a good job with cuts. Once done, would just do a layer of bondo to smooth it out (Also good cover to keep the Styrofoam from melting). I like this idea of the entire thing being even all across but the wire sag does seem like an issue. Maybe having the center of the dual wing to have overlaping parts that flush Allan bolts hold together?
 
OP
J

Jack Olsen

Super Moderator
Staff member
Joined
Mar 22, 2009
Messages
6,678
Location
Los Angeles
Re: Making my own race-car wing

You can only put so much tension into the wire before it snaps. Ask me how I know that. :)

Here's the finished wing -- sanded, painted, and drying in the sun.

DW8AAi.jpg


This one is significantly more rigid than the last one I made -- and still weighs less than 5 pounds.

Here's the one it's replacing. It only gets bolted on for trips to the track.

B0xpQ6.jpg
 

Guster

Well-known member
Joined
Mar 11, 2012
Messages
1,543
Location
Auckland, New Zealand
Re: Making my own race-car wing

A note on epoxy: it shouldn't be any heavier than the primer and can be mixed with microlight or microspheres to get the thicker consistency to save on weight from being absorbed into the foam core. Position the wing with the leading edge up. You may need a fixture to do this. Cut the glass to size using a sharp pair of scissors and you can tape the area with masking tape before you cut to reduce the fraying. Drape the glass over the wing and squeegee the thickened resin on working from leading edge to trailing edge. Don't worry about removing too much at this point.

Then drape a sheet of clear polyethylene plastic over it then using a clean squeegee, firmly squeegee out all the excess resin and bubbles making sure the plastic and glass does not pull away from the core. Once cured pull off the plastic, give it a light sand and a light coat of paint. Using the plastic sheet will reduce the amount of pinholes. Acrylic spot putty is great for filling pinholes before painting, thin and dries fast.
 

iceman510

Well-known member
Joined
Mar 18, 2014
Messages
147
Location
Michigan
Double-sided tape without the liner peeled yet on the outside, to adhere the two pieces together for the router work.
 
OP
J

Jack Olsen

Super Moderator
Staff member
Joined
Mar 22, 2009
Messages
6,678
Location
Los Angeles
Exactly. (It didn't help that I'd accidentally switched the position of two of the pictures in the sequence -- I fixed that now.)

Here's the thing mounted up, with end plates. I also made a larger pair of them, for go-for-broke days. But this is the set that's less painful to look at.

SRML2N.jpg


So...

$78 for the foam core (from FlyingFoam.com)
$8 for the fiberglass
$20 for aluminum (although I had it all on hand)
$40 for primer, paint and micro balloons (although I only needed about 20% of what I bought)

That's $146 -- which is not as cheap as ones I've done before. But still, a lot less than commercially available wings -- and I got to choose my own airfoil.
 
Last edited:

Squankum

Well-known member
Joined
Mar 28, 2011
Messages
7,802
Location
Southeast
Jack, do you use a foot switch when you put your jigsaw in the vise? I've been pondering similar tricks with a belt sander, and just now, found out that foot switches are easy to get and plug things into.

MLCS 9080 Billy Pedal Foot Switch, Deadman Style
Link: http://amzn.com/B000LJNJOE


Seems like a safe way to do such things.


_
 
OP
J

Jack Olsen

Super Moderator
Staff member
Joined
Mar 22, 2009
Messages
6,678
Location
Los Angeles
I use one for my portaband saw, but didn't think of it for the jigsaw. Mine is the click on, click off kind. A momentary on type like you're describing would be better for this application. My concern with putting the housing of the jigsaw in the vise is that compressing it that way might compromise the seat for the bearings or some other structural aspect of the saw, which might not be good for it long-term. But it makes it easy to make smooth curves.
 

MarkG

Well-known member
Joined
May 23, 2012
Messages
1,219
Location
Elgin, IL
The difference between using latex for saturating the glass and using epoxy would be night and day! Latex is rubber and not adhesive, and probably doesn't even 'wet out' fiberglass very well, epoxy dries solid (hard and not stretchy) and highly adhesive and made for this type of application and can be sanded glass-smooth. It is, after all, how fiberglass panels and parts of all sorts are made. I've used it quite a bit in the process of building 2 boats (West System is probably about the best along with System 3)

You did all the hardest parts and put a lot of work into it----I would've kept going and used epoxy to really make it into something. (If I were you, that is! I wouldn't do it myself, because I became very allergic to epoxy after building 2 boats with the stuff!)
 
Last edited:

Outlawmws

Well-known member
Joined
Aug 9, 2011
Messages
39,305
Location
The Badlands
I use one for my portaband saw, but didn't think of it for the jigsaw. Mine is the click on, click off kind. A momentary on type like you're describing would be better for this application. My concern with putting the housing of the jigsaw in the vise is that compressing it that way might compromise the seat for the bearings or some other structural aspect of the saw, which might not be good for it long-term. But it makes it easy to make smooth curves.

Jack, I doubt if would be an issue unless the vise simply doesn't grip well and you have to overtighten to hold it, but try this: a set of "soft jaws" to pad and conform better: Rubber, soft wood, etc... you can cobble this type of pad up. (just don't cover the cooling vents on the saw)

you can also make an oversize wood shoe for the saw attach that to the existing shoe, and clamp the shoe in the vise... If your vise lacks enough depth, do you have a WorkMate or a wood workers vise??
 
Last edited:

rixtrix1

Well-known member
Joined
Aug 25, 2013
Messages
3,010
Location
Chandler, AZ (from west NE)
Looks good, Jack. Last time I was involved with hot-wire cutting foam, our wire was 1/8" and didn't bow at all, but money( not mine) wasn't an issue. You've got a very good start on doing this if you choose to continue to cut your own foam. Your final cost is great. Personally, I would have used f'cloth and resin, but you're around a tenth the cost of a CF wing. Are those headlight door actuators to change the AOA of the wing? Do you control it manually while on the track? It's another awesome idea. Thanks!
 

Squankum

Well-known member
Joined
Mar 28, 2011
Messages
7,802
Location
Southeast

Strouty

Well-known member
Joined
Mar 21, 2010
Messages
38,220
Location
Southern Maine
Jack, did you ask the surf shop what they would charge to fiberglass it?

I would think that the wing would be a lot stronger with resin, rather than latex. I can't imagine that a slight weight difference would be worth having to buy a new wing when it breaks.
 
OP
J

Jack Olsen

Super Moderator
Staff member
Joined
Mar 22, 2009
Messages
6,678
Location
Los Angeles
For this particular application, I was more concerned with weight than strength. I want slightly less flex in this iteration of this design, but using the stiffer spar accomplished that. The sheathing here was mostly to clean up airflow over my aluminum pieces and to make the wing easier to handle -- and for convenience. Polyester resins dissolve this particular kind of foam. I know there are some epoxy resins that will work with it, but they're not cheap. And the fumes/time/effort of that path can be pretty significant.

I'd like to learn real glassing and even CF vacuum-bagging. I've even bought a pump for it. But for this wing, this way seemed sensible and fast. This particular primer is used with EPS foam as an adhesive, and in my tests worked better than more-popular alternatives.

I'll be interested to see how this wing holds up. And over time, I hope to expand my skill set.
 
To avoid these ads, REGISTER NOW!
Top Bottom