To avoid these ads, REGISTER NOW!

The 26” Toolbox Modify Tread

jakemac

Well-known member
Joined
May 21, 2013
Messages
9,035
Location
New England
HF 26” Toolbox Modify Thread

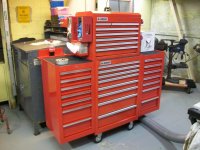
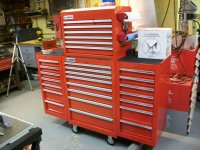
A few months ago I mentioned how my HF 26” box had an issue with me adding a 7-drawer side box to it (with another planed for the other side).

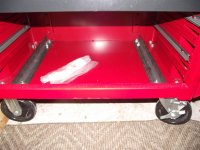
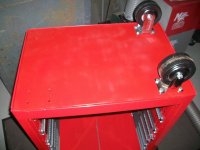
Here’s the problem(s). The 26” box isn’t built to handle the weight of additional add-ons. It’s a great box for the money, with a drawer layout that I like, but it isn’t a Clydesdale. The casters use a lighter gauge steel than the ones on the HF 44” box and a smaller base. But that isn’t the real issue, the big problem is that there is no frame under the box to handle extra weight. Instead, there are two strips of 18 gauge steel spot welded to the 18 gauge bottom of the box in an attempt to stiffen the bottom. For a single stack that isn’t overloaded, this would be adequate . Unfortunately, I live in the real world where my toolbox will get stuffed to the gills.

Here’s my attempt to beef up the toolbox, with pictures.

I started with a steel plate I picked up at the scrapyard. I wanted to use 3/16” plate, but when I got it home I realized that it was 1/4” instead (better too much than too little). It had a bow to it, so I ran over it with my truck a few times (20 + jumping up an down on the bumper :bounce:) to straighten it out. I didn’t get it all, but it’s close enough. I was going to cut it to size with a sawsall, but I was too lazy. I marked the lines and took it to a machine shop with a hydraulic shear. Since it was already marked, they chopped it for free even though I offered to pay. Next it was off to the wire cup to clean it.

Preparing to wire brush the plate for the rust neutralizer, primer, and paint.
attachment.php


While I was painting the plate I needed to empty the box and prepare the bottom.

Emptying out the cabinet. :sad:
attachment.php


Interior of case, showing insert nuts for the casters that will have to be drilled out from the other side.
attachment.php


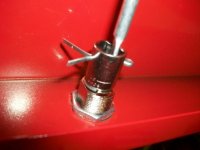
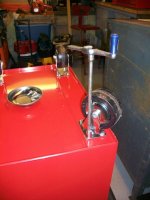
Removing the Casters. I finally found a use for my 3/8" Speeder Ratchet !
attachment.php


The insert nuts go through the case and bracing, and then are crimped like rivets. They will need to be drilled out to remove the braces.

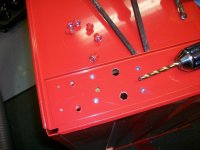
Drilling out the insert nuts and spot welds on the thin gauge bracing, to remove it.
attachment.php
 

Attachments

  • 100_0478.JPG
    100_0478.JPG
    142 KB · Views: 5,978
  • 100_0479.JPG
    100_0479.JPG
    68.2 KB · Views: 5,977
  • 100_0482.JPG
    100_0482.JPG
    78.7 KB · Views: 5,942
  • 100_0487.JPG
    100_0487.JPG
    86.1 KB · Views: 5,924
  • 100_0486.JPG
    100_0486.JPG
    55.3 KB · Views: 5,964
Last edited:
To avoid these ads, REGISTER NOW!
OP
J

jakemac

Well-known member
Joined
May 21, 2013
Messages
9,035
Location
New England
Post continued -

The plate is cleaned, primed, painted, drilled, and ready to be installed.
attachment.php


I replaced the nut inserts with fender washers, lock washers, and nuts
attachment.php


The new plate in place.
attachment.php


Once the plate was in place and the box was turned upright, it was now time to install the side box. The mounting holes for the side box were in the wrong spot for the 26” box. They would have been blocked by the drawer supports, so they had to move. On the 44” box, the bolts would have gone into threaded inserts already in place, so I had to use locknuts on the 26”.
attachment.php


Humpty Dumpty back together again.
attachment.php


The new plate is a big improvement over the old set-up. For one thing, the box no longer sways when I open or close the drawers. And I no longer have to worry about the bottom buckling under load. I’m still concerned that the casters may give out, but since I don’t roll the box around it shouldn’t be an issue. The balance is still off due to the side box, but that should solve itself when I finally get another side box for the left side. It will also help if I shim the wheels, my cement floor isn’t level. The spot that the box sits in has a dip under one of the casters.

I think that if I’m a really good boy maybe Santa will leave a few HF gift certificates in my stocking, so I can buy the second side box to balance the whole thing out. (I’m screwed)


So - now that I’ve bored you all with my latest project, what improvements have you made to your 26” boxes to make more room, or fit your needs ?
 

Attachments

  • 100_0512.JPG
    100_0512.JPG
    68.1 KB · Views: 5,929
  • 100_0509.JPG
    100_0509.JPG
    72.9 KB · Views: 5,868
  • 100_0508.JPG
    100_0508.JPG
    63.3 KB · Views: 5,868
  • 100_0507.JPG
    100_0507.JPG
    88.4 KB · Views: 5,862
  • 100_0506.JPG
    100_0506.JPG
    80.4 KB · Views: 5,880
Last edited:

NUTTSGT

Super Moderator
Staff member
Joined
Sep 14, 2009
Messages
50,856
Location
Northern Central Ohio
It looks good but you do realize that for the price of two side boxes you could have bought a 44" box. ;)

You know if you replace the casters, (if your luck is like mine) the bolt pattern will be different. :lol_hitti
 
OP
J

jakemac

Well-known member
Joined
May 21, 2013
Messages
9,035
Location
New England
I looked at the 44" box, but money is tight and I like the shallow drawers on the 26" that you don't get with the 44, or it's top box. I also like the drawers on the side cabinet. I decided to build my box 1 piece at a time as the coins on the floor of my truck added up. As it is now the box is 43 1/2". With another side box, I'll have around 60" of storage.

I thought about changing the casters when I installed the plate, but once again it was a money issue. Besides, the box won't be moving, so if the casters become an issue, I can always block the side cabinets to relieve the load on the wheels.
 
Last edited:

s14kev

Well-known member
Joined
Dec 12, 2008
Messages
245
Nice post. I like seeing stuff like this.

I had the HF 26" combo and agree that with side cabinets it is a better drawer layout than the HF 44". The only benefit of the 44" is the full length drawer. I recently upgraded to a Snap on Classic 78 but for the price, the 26" is excellent. I haven't measured but the 26" seems to have more overall square feet of drawer space over the 44"
 

MikeF2316

Well-known member
Joined
Dec 29, 2012
Messages
9,605
Location
Thornhill, ON
Re: The 26” Toolbox Modify Thread

Here's what I did to my Craftsman (Beach made) 26" from the 90s. The bottom was bending from the weight of the side cabinet, but only in the front-back direction. So I bolted in a couple of steel angles to stiffen the bottom in that direction. If I thought that stiffening was needed in the other direction, I would have added some structure there, but this seems good. Add in some longer bolts for the wheels, and this is a very quick and easy job.

attachment.php


attachment.php
 

Attachments

  • Brace1L.JPG
    Brace1L.JPG
    95.8 KB · Views: 5,598
  • Brace2L.JPG
    Brace2L.JPG
    79.8 KB · Views: 5,592
OP
J

jakemac

Well-known member
Joined
May 21, 2013
Messages
9,035
Location
New England
The flex that I was getting was in both directions, but primarily across the long axis. It never occured to me to work inside the box ! [dopeslap] It would have saved me a lot of hassle. Since the weight of the box is translated down the sides, I thought that a full plate would help carry the load.

That was a nice simple solution to the issue. Nice job. :thumbup:
 
OP
J

jakemac

Well-known member
Joined
May 21, 2013
Messages
9,035
Location
New England
Thanks to member jfish, I now have a set of 5 keyed alike locks for my boxes on order.

I had tried to place an order with HF before, but no luck. Every time I called, I got an outsourced rep who couldn't think "off script". If it isn't in the computer for a specific model, they don't have a clue.

jfish posted in another thread (here) about his purchase of a keyed alike set for his 44" box. He gave a part #. (HF item #12892) This time it worked ! :rocker:

I expect that I'll have to "fiddle" with the locks to get them to work for my boxes, we'll see how it goes when they arrive. With 5 cylinders I'll be able to have the same key for my 26" stack (2 locks), my side cabinet, and my 5-drawer cart. With one lock left over for when I get a second side cabinet.

With shipping and tax I got out of it for $39.92.
 
Last edited:

basspro

Well-known member
Joined
Mar 20, 2013
Messages
327
Location
In the sticks, WI
I like how your setup looks, and a great job you did on beefing it up. At work, we all have angle iron frames under our boxes, makes a huge difference. Ive seen boxes cave in on the bottom at our plant with just the casters attached to them.
 

rsanter

Well-known member
Joined
Dec 22, 2007
Messages
18,487
Location
visalia ca
What is the bottom of the side boxes like
I was thinking it would be cool to move the casters under the side boxes (with some bracing) for improved stability and maneuvering

Bob
 
OP
J

jakemac

Well-known member
Joined
May 21, 2013
Messages
9,035
Location
New England
The bottom of the side box is similar to the bottom of the 26" box, but without the bracing. The side boxes alone would not be able to hold the weight of all the boxes. To move the castors out under the side boxes (which would improve stability) , it would be best to build a full frame for all of the boxes to mount to (not an option for me to do alone). Another option that I could have gone with would have been to add swivel castors on a brace to the side box to carry the additional weight. But it was simpler and cheaper to just add the plate.
 
OP
J

jakemac

Well-known member
Joined
May 21, 2013
Messages
9,035
Location
New England
So, here's the latest update on the lockset.
The locks finally arrived on saturday, I rushed down to the shop to start installing them. But when I opened the package and inspected the locks, I found that HF had sent 4 keyed-alike cams, and 1 with a separate pin set-up. Not the 5 keyed-alike sets that were supposed to be in the package :mad:

I called HF customer service today (I waited until monday so I wouldn't have to deal with weekend outsourced service again). I had to explain, in detail, what the issue was several times before the rep understood the problem, but the end result was that they will send me a return label and ship out a new set of locks. The whole call took about 30min. Not too bad.

Hopefully, it won't take 3 1/2 weeks this time. [crossed fingers]

The saga continues ....................
1sm213sharepopcorn.gif
 
To avoid these ads, REGISTER NOW!
OP
J

jakemac

Well-known member
Joined
May 21, 2013
Messages
9,035
Location
New England
The next installment in my ramblings -

The return label for the bad lockset showed up on monday, mailed it out tuesday. The replacement locks showed up wednesday - YEAH ! Wednesday night I started to swap out the locks, with mixed results. It didn't help that I was rushing to finish before the World Series game.

The side cabinet was pretty much a straight swap (this lockset was made for the 44" box system anyway). The fastener is a tension spring. Simply pull it out, install the new cam (a little tricky), and push in the tension spring to finish.

The fifth lock will be saved for another side box to be bought later.

The 5-drawer cart was a little more work. It's fairly easy as such, but the cams don't come with a retaining nut or tension spring, and the nut from the old lock won't fit. So today, I had to go to a (well stocked) locksmith to get a few nuts to fit the new lock cams. I got lucky, after 20min of searching through junk drawers, he found what I needed. Since it wasn't local, I dropped off a couple of old cabinet locks that needed keys. I won't know how much he charged me until the locks are done.

Now we get to the meat of the project -

The 26" Top Box needed some extra attention to get the new lock to work. The barrel locks on the 26" stack are slightly smaller than the locks on the 44" roller (damned metric hardware ! :mad:). This is where I needed another retaining nut for the new cam. The hole in the front of the cabinet needed to be larger, top to bottom. A little elbow grease with a half-round file took care of the problem. Next, The shank on the back of the old lock was smaller than the shank on the new lock, so - more work with a small square file on the locking lever to get it to fit on the new shank (no going back to the old lock now). The big difference in how the new and old locks operate is that the old lock has a 90° stop on it. The new lock has a 180° stop. Normally, I would have swapped the stop washers, but I wasn't interested in using a file on the smaller washer. The 180° stop works on the top box, I just need to remember to keep the area clear up top.

The 26" Bottom Box is next. Here's where it all goes south.
Like the top box, the lock hole needs to be filed larger. A new retaining nut or spring needs to be found, once again the locking nut on the old lock won't fit. Now we get to the hard part. The old lock has an adapter (see pic of lock) that goes between the lock and the transfer bar that goes to the mechanism at the back of the box. In my haste to watch the game, I thought that it unscrewed from the shank on the back of the lock. This was based on looking at the lock cam on the top box. So, I grabbed a pair of pliers and unscrewed it. WRONG ! It snapped the cast metal shank. That's when I took a better look. There is a small tension pin through the adapter and the shank that I missed earlier. The proper way to release the adapter is to drive the pin out. No going back now. DOH !

It didn't matter anyway. The square hole on the adapter is too small to fit the shank on the new lock. I could file it larger, but the shank on the new lock is too short to pin the adapter to it. So ....... I'll need to fabricate a new adapter. I've been thinking about making a C shaped piece to go between the two out of bar stock, or perhaps something out of brass tube. Which means that I'll hem-n-haw about it for a few weeks before I finally say "eff it !!" and cobble something out of odd bits of plastic out of the recycle bin in under two minutes.


So .... that's where I stand right now, 3 out of 5 locks installed with my drawers on the floor, waiting to finish the job. (that doesn't sound quite right) :headscrat


.
 

Attachments

  • 100_0620.jpg
    100_0620.jpg
    78.1 KB · Views: 152
OP
J

jakemac

Well-known member
Joined
May 21, 2013
Messages
9,035
Location
New England
Well, I finished the lock on the bottom box today. I forgot to take pictures until I was done. What I ended up doing is adapting a socket to make the transition for the lock to the transfer rod.

I was going to use a cheap chinese socket, but after looking at different ones at every YS and FM for the last two weeks, I found that they were all too shallow to put the locking screw into. Craftsman makes the deepest shallow socket, so that's what I used. I found an 11mm 6pt (which just fits over the flat end of the transfer rod) with an upside down G2 code to hack up. Justice. I hate the G series of craftsman sockets. The only ones worse are the EE series IMO. I had to replace the tooth washer to make it fit inside the 11mm socket.

The first thing that I did was grind the ratchet end of the socket down about 1/8" so the screw will stick out. Then, I used a small square file to open up the 1/4" hole to about 5/16" so it will fit onto the square shank on the back of the lock's cam.

Next, I fit everything together so I could mark where the hole for the cotter pin goes, to secure the transfer rod. Drilling a 1/8" hole through the side of the socket was a PITA with the bits I was using, so I grabbed a small engraving bit from my Dremel kit to use in the DP instead. With a little cutting oil it went through like butter. I just needed to use the 1/8" bit to open the hole and clean it up.

The final step was putting it all together, making sure it worked properly, then putting in the cotter pin, and finally getting the drawers off my floor and installed.

The picture is of the new lock and adapter in place inside the box. I may need to make some shims for inside the socket to keep the rod from twisting the cotter pin. We'll see.


That should be the last update for a while. The box is done until I get another side cabinet sometime after the holidays. Everything is ready for it to be installed, so it should pop right on. (famous last words)

.
 

Attachments

  • 100_0684.jpg
    100_0684.jpg
    137.6 KB · Views: 301
Last edited:
OP
J

jakemac

Well-known member
Joined
May 21, 2013
Messages
9,035
Location
New England
Santa was very generous this year. He left me several HF gift cards under the tree, totaling $155. The side cabinet is on sale for $189 during January, $10 less than the perpetual regular sale price. So, my new side cabinet only cost me $34 + tax. :D

Pic 1 - a crate full of HF goodness
Pic 2 - drilling the new holes to mount the side box (explained above w/ the first side box)
Pic 3 - swapping out the lock so all 4 are keyed alike
Pics 4&5 - The box is finally complete ! :rocker:

Now that I have the box finished, I need to spend some time re-organizing and putting more tools in it. The box is now 60.5" of storage for all my tools (it will never be enough). Now, if I can only finish the other 20 odd projects I have scattered around the shop floor ............ :willy_nil
 

Attachments

  • 100_0773.jpg
    100_0773.jpg
    134.3 KB · Views: 359
  • 100_0774.jpg
    100_0774.jpg
    132.2 KB · Views: 351
  • 100_0775.jpg
    100_0775.jpg
    134.6 KB · Views: 398
  • 100_0776.jpg
    100_0776.jpg
    138.2 KB · Views: 561
  • 100_0777.jpg
    100_0777.jpg
    140.2 KB · Views: 639
Last edited:

NC-Shaun

Well-known member
Joined
Nov 20, 2013
Messages
662
I have that same 26 inch tool box, I always wondered how it would look with either 2 of the side lockers installed or 2 of the drawer setups like you have done. It sure does look nice.
 
Last edited:

kool_BOY8323

Well-known member
Joined
Feb 23, 2013
Messages
280
Location
arizona
well done! now that I have the 26" I completely get what you mean, and this post has the wheels turning. I see some mods coming to it very soon.
 

archirelic

Well-known member
Joined
Sep 24, 2010
Messages
2,263
Location
texas
Santa was very generous this year. He left me several HF gift cards under the tree, totaling $155. The side cabinet is on sale for $189 during January, $10 less than the perpetual regular sale price. So, my new side cabinet only cost me $34 + tax. :D

Pic 1 - a crate full of HF goodness
Pic 2 - drilling the new holes to mount the side box (explained above w/ the first side box)
Pic 3 - swapping out the lock so all 4 are keyed alike
Pics 4&5 - The box is finally complete ! :rocker:

Now that I have the box finished, I need to spend some time re-organizing and putting more tools in it. The box is now 60.5" of storage for all my tools (it will never be enough). Now, if I can only finish the other 20 odd projects I have scattered around the shop floor ............ :willy_nil

That is a slick set-up you've outfitted yourself with!
 

jfish

Well-known member
Joined
Apr 26, 2012
Messages
342
Location
Tacoma WA
Thanks to member jfish, I now have a set of 5 keyed alike locks for my boxes on order.

I had tried to place an order with HF before, but no luck. Every time I called, I got an outsourced rep who couldn't think "off script". If it isn't in the computer for a specific model, they don't have a clue.

jfish posted in another thread (here) about his purchase of a keyed alike set for his 44" box. He gave a part #. (HF item #12892) This time it worked ! :rocker:

I expect that I'll have to "fiddle" with the locks to get them to work for my boxes, we'll see how it goes when they arrive. With 5 cylinders I'll be able to have the same key for my 26" stack (2 locks), my side cabinet, and my 5-drawer cart. With one lock left over for when I get a second side cabinet.

With shipping and tax I got out of it for $39.92.

jakemac, I was doing a search for Harbor Freight threads and reading random (or all) of them and started reading this thread. To my surprise you gave me a mention from another thread. I post to internet forums seldomly and was pleased to see my info helped. All of my locks also required a bit of fiddling. I have 2 - 44" rollers with 2 - side cabs all 4 pieces are different years and year to year small pieces changed ever so slightly.
 

tlmartin84

Well-known member
Joined
Apr 23, 2012
Messages
1,085
Location
West Virginia
Nice post. I like seeing stuff like this.

I had the HF 26" combo and agree that with side cabinets it is a better drawer layout than the HF 44". The only benefit of the 44" is the full length drawer. I recently upgraded to a Snap on Classic 78 but for the price, the 26" is excellent. I haven't measured but the 26" seems to have more overall square feet of drawer space over the 44"

What does he mean full length drawer? As in the 44" long middle drawer? Or are the 26" drawers shallower (less than 18") than the 44" model?

Besides the thin bottom and caster mounting issues, are there any other structural differences in these boxes???

I too am in the same situation. I like the bigger boxes, but I think the drawer layout *****. Everything is measured in Cubic Inches. I am more interested in square inches when it comes to storage. I like my stuff flat, wrenches, sockets on rails laid flat. Pull open a drawer and you see what is there. The 26" model offers 6552 in^2. The 44 (with top and bottom chest) has 8712 in^2. You can buy 2 of the 26" for the same price as the 44 combo, and have more storage.
 

Cope

Well-known member
Joined
Mar 8, 2013
Messages
2,067
Location
Houston, TX
I looked at the 44" box, but money is tight and I like the shallow drawers on the 26" that you don't get with the 44, or it's top box. I also like the drawers on the side cabinet. I decided to build my box 1 piece at a time as the coins on the floor of my truck added up. As it is now the box is 43 1/2". With another side box, I'll have around 60" of storage.

I thought about changing the casters when I installed the plate, but once again it was a money issue. Besides, the box won't be moving, so if the casters become an issue, I can always block the side cabinets to relieve the load on the wheels.

I like the stacked sets also. Mine is 35" wide w/o the side cabinets, and I like the drawer layout better than the wide boxes.
 

cheechi

Well-known member
Joined
Feb 29, 2012
Messages
4,384
Location
Triad, NC
What does he mean full length drawer?
The top drawer on the 44" roller.

Both the 26, 44, and side boxes are good for different types of storage. For one single box you can do all this work or buy a 44". It all comes down to what's best for you.
 

tlmartin84

Well-known member
Joined
Apr 23, 2012
Messages
1,085
Location
West Virginia
I was checking these out in the store the other day.


The slides are smaller on the 26" box. Has anyone else noticed this?

The steel is all lipped and the same thickness. The only difference was the slides.......
 

Cope

Well-known member
Joined
Mar 8, 2013
Messages
2,067
Location
Houston, TX
I was checking these out in the store the other day.


The slides are smaller on the 26" box. Has anyone else noticed this?

The steel is all lipped and the same thickness. The only difference was the slides.......

Slides don't need to be as large on narrower drawers.
 

tlmartin84

Well-known member
Joined
Apr 23, 2012
Messages
1,085
Location
West Virginia
They 44" has roughly the same width drawers as the 26".

I was doing a direct comparison on the same "height" and width drawers.

Still seemed flimsier, and slides were nearly 1/4" thinner.
 
To avoid these ads, REGISTER NOW!
Top Bottom