GirlnAgarage
Well-known member
Does your garage have a floor???

M_P, nice score at the sale. Always nice to find useful equipment at garage sale prices. At one office building I worked in, I got my wall mounted TV shelf for $5.
Congrats on the 1 year of pounding rivets. Seems I haven't seen any smiley faces in a long time. Hold on to that sample as a memento of Aluminum - Day One!
And that question on the gray stuff is a hard one.I can't put my finger on it, but I'm sure you are all over it and will figure it out. Although I've heard from some people that when you get so much of that stuff, it's time to get more tools...
Does your garage have a floor???
 Actually I started doing that because I like to run in there real quick and I'm barefoot.
MP, have a look at urethane dies. From what I've seen they're extremely impressive and there's a wide range of stuff you can do with them. They also don't mar the outer side of the bend.
I will look into that...thanks!
M_POn the wall, you see the Reconfigurable Tool Rack and the first couple of Custom Tool Boards I have built...
View media item 20533
M_P


I could probably find most of your smaller tools in my garage as well. Growing up we had my Dad's '56 Cessna C-172 in the garage as we rebuilt it. We formed ribs for the flaps and ailerons just like you are doing. I also have a shrinker that helps on those curves. You will love that punch.
One source for sheet metal tools that I have found good prices is The Yard Store. Not sure what the hammer tip would cost there, but other tools are reasonable.
Keep it up M_P and have fun out there. Glad to see the Baileigh is getting used.
Keep it up.
In the future if you need to grind aluminum, get some blocks of wax from a craft shop. Touch your grinding disk to the wax and grind away. The wax will stop the disk from filling up with aluminum. Also will help when sawing thicker aluminum.
I apologize in advance for cluttering your thread with pictures. But I made a wing out of aluminum a few years back. I was totally improvising with the design, but it held up for years of use as an automotive wing, which is a pretty punishing kind of use.
I made a wooden buck so I could duplicate the airfoil shape of the ribs. I used a combination of nesting tubes and T-shaped stock for the spars. I skinned it with aluminum sheet that is sold as roofing flashing. It was all held together with 3M structural adhesive. At the time, I put about $25 worth of aluminum into it. But the adhesive costs were somewhere around $50.
--LOTSA PICS--
And as a footnote: you'll see that it was all done outside, under a canopy. This was back when my garage was just a 20x22 pile of storage and junk -- not inhabitable at all.
Pick up a 35mm lens for your DX camera! You'll like it a lot better than the 50. I bought a 50mm first as it was half the price, and then sold it for $30 less... Big waste of money! The 35mm is win on a DX.
M_P,
I saw the video on flow forming shortly after I got a tote full of aircraft tools from an estate sale; including a rivet gun or two. It looked like an ideal solution for a project my neighbor had asked me to investigate involving some long obsolete car parts. They are fairly simple heat shields involving intersecting stiffening ribs and rolled edges. The standard way of doing stiffening ribs is with a beading machine, but the intersections are tricky. Apparently it can be done using a skateboard wheel for the lower wheel. But, since this is a multi piece project I was concerned about the repeatability of the process especially the location of the beads and their ends. While flow forming requires making a form to make the part in, it does offer repeatability once that is made. Anyhow, it's been remarkably successful as a way to make the parts. I've been using .040 AK steel and .032" regular CRS. The stiffening ribs are the simplest part while the outside corners are the hardest (as you found).
On your test piece, I think if you anneal the aluminum and work from the center of the corner around to the straight sides you should have good luck. I think the idea is to redistribute the extra metal into the straight part where it can be more easily "absorbed". That's what I've been doing, and it seems to work. Avoid letting the metal get into a tight pleat as you massage it to shape. I also found it helpful to reduce the width of the bent down flange to what it will ultimately need to be. The wider it is, the more extra metal you have to deal with. Bigger radii are easier. One of the pieces I'm working on has six outside corners and four inside corners. The inside ones are a breeze because the metal is getting stretched. That said, you need to watch out for nicks and other stress risers when you are stretching or you run the risk of a tear. Even the little toothy marks your hand shears leave can be problematic.
I am definitely liking flow forming and I'm looking for other projects to apply it to. I'm sure Kent is ticked because I made my own tooling, but I have the material, the equipment and the time and no sense or money so that seemed the best way for me. TM's prices are fair when I look at what it took me to make a set up that worked and didn't have fatigue failures. Third time was the charm
Here is one of my next projects. I've been wanting a clock in the garage, but not wanting something 'normal.' I love the old 'flip clocks,' so I got one on eBay. My plans? You guessed it! Take an aluminum face panel, cut a hole to see the clock face through, then mount it as a Custom Tool Board on the Reconfigurable Tool Rack...
View media item 20871
M_P


Looks like a neat event, Mr Rivet. BTW I can't think of a rivet without thinking "MP's duct tape"
Your work is improving rapidly, looking good! The relay bracket you made looks first class.
Won't be long and you'll have better sheet metal skills than the majority of aircraft mechanics.
Great looking work A_P is right, your work is first rate.
Shaun
Hey Machine....check out this company...it's called Zero Can. They have all sorts of square, and round housings that you can utilize to make different types of enclosures http://www.zerocases.com/#
Agreed, nice looking work, M_P.
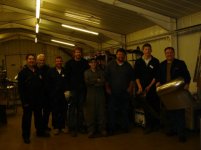
That Metal Meet sounds great...the workshop you held sounds like it went well. Might be an idea to post a thread with some of what you taught for those of us not near the west cost.
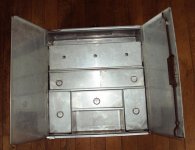
Ha! I think I've finally found a signature line which works for me. It was actually on your thread that I came up with that phrase...while others were teasing me about what my suggestion would be for keeping your drawer liners down (i.e. build a riveted frame out of aluminum to hold them down).
Oh...did you see the post above...you inspired me to try building my own tool drawers. I built my first mini drawer at the Cuesta Metal Meet this weekend. It is just a tiny 6"x12" drawer to hold the tools associated with the 3-in-1 sheet metal machine.
Thanks for stopping by my thread. I'm looking forward to seeing what you are planning for that other corner of your garage...sounds like you are going to build a cabinet for your crosscut saw.
M_P
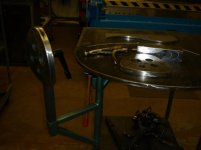
 Is that Baileigh cool or what?
 I remember your suggestion though. I might have to use them.