
You are using an out of date browser. It may not display this or other websites correctly.
You should upgrade or use an alternative browser.
You should upgrade or use an alternative browser.
Above 1200 Sq/FT The Empty Cup 40x64 Post Frame
- Thread starter eastmtn
- Start date
Wokspaces above 1200 squarefeet.
macnugget
Active member
I love seeing what we all do in our spaces just as much as I love seeing the spaces come together!This is some of the stuff I look forward to doing in the Empty Cup.
@Blackbyrd and @macnugget Maybe I should change the name to the empty reservoir. I'm starting to understand the gravity of this build and this property that we purchased.
in the next six weeks alone, I have plans to install:
Swiss Trax flooring in the back of the garage
air distribution lines for the compressor
green house
chicken coop
new generator enclosure
and gutter guards.
As long as there are people that keep coming back to watch this circus then I will keep updating. I may have to schedule sleep and meals in there somewhere
interested in the swiss trax...... would like an honest opinion on it. I stayed away from it cause I didnt like how open it was and I thought it would look dirty all the time.
Ive since seen reviews that explain due to it being open it appears cleaner longer as you dont see the loose debris setting attop the floor? It showed cleaning was simpler cause you just had to vacuum out the crevices and wipe down the rest in most instances.
in for that one.
I consider air compressor stuff from time to time. But ive backed way off my air tools and use battery stuff almost entirely. My compresser isnt even plugged up anymore. My choice though was less about efficiency and more about noise. Since im in the basement and at the time I made that choice had a light sleeping toddler, cycling a compressor or hitting max ugga dugga's was kind of a no no. Where the older camaro is now is directly beneath the master bedroom of the house for reference.
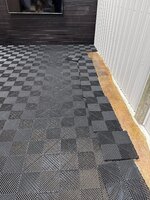
In the summer of '21 I bought Swisstrax for the garage attached to the house. Our house is built into a slope so the attached garage, is under the main level and in the back. My wife exercises and brews beer down there so my son and I surprised her for her birthday with the Ribtrax smooth Pro in black. It was so easy to put down that my son did the entire thing on his own without my help. Dirt sticks out on the black tiles but it's easy to vacuum and there are no issues with rolling things like creepers or bucket Dolly's if you get the smooth version. Haha,I just checked my order online and realized that I ordered the non smooth version. Dammit! I guess I'll find out soon how it compares to the smooth.
The tiles are easy to pick up individually with a paint can opener or screwdriver if you lose a small washer in the slats. Honestly I have yet to drop anything small enough to fit down in the holes. There are built in channels underneath for water to flow however the floor grade is set. I haven't seen the need to clean underneath any of the tiles yet. They are definitely less fatigueing to stand on vs the concrete floor.
I'll take a pic of the floor tonight so you can see what a year and a half of daily use looks like as compared to the photo below when we put it down.

My original setup with tools was built around a compressor. But since I moved to this house it's been inaccessible. I switched to more cordless tool use to get things done out of necessity. Now that the building is up and I have a utility room for the compressor I dont feel the urgency to hook it up because of the other tools. However, my vehicle detailing setup relies heavily on the compressor so I will still set it up. I just don't anticipate dragging hose to use air impact drivers.
And speaking of drivers, I dropped my favorite cordless offset driver into a 5 gal bucket of the 2 part primer I had mixed for the floor. I managed to save the battery but the liquid got down into the motor brushes and seized the moving parts in a matter of minutes. I'm gonna miss that driver.
The tiles are easy to pick up individually with a paint can opener or screwdriver if you lose a small washer in the slats. Honestly I have yet to drop anything small enough to fit down in the holes. There are built in channels underneath for water to flow however the floor grade is set. I haven't seen the need to clean underneath any of the tiles yet. They are definitely less fatigueing to stand on vs the concrete floor.
I'll take a pic of the floor tonight so you can see what a year and a half of daily use looks like as compared to the photo below when we put it down.
My original setup with tools was built around a compressor. But since I moved to this house it's been inaccessible. I switched to more cordless tool use to get things done out of necessity. Now that the building is up and I have a utility room for the compressor I dont feel the urgency to hook it up because of the other tools. However, my vehicle detailing setup relies heavily on the compressor so I will still set it up. I just don't anticipate dragging hose to use air impact drivers.
And speaking of drivers, I dropped my favorite cordless offset driver into a 5 gal bucket of the 2 part primer I had mixed for the floor. I managed to save the battery but the liquid got down into the motor brushes and seized the moving parts in a matter of minutes. I'm gonna miss that driver.
@Blackbyrd heres a closeup of the Ribtrax Smooth Pro after 1.5yrs of daily foot traffic, Taebo, PX90 and Jazzercise use. I'll let y'all know how it stands up to my junkyard dog workouts and a trailer after I get installed in the Empty Cup.


Yeah black is a pain hahaha
Another thing that kept me away was my floor is epoxy coated under neat. It's just a kahki tan color which isn't my style. I was afraid with the drain through passages you would see it under the tiles
Another thing that kept me away was my floor is epoxy coated under neat. It's just a kahki tan color which isn't my style. I was afraid with the drain through passages you would see it under the tiles
jollygreengiant
Well-known member
@Blackbyrd and @macnugget Maybe I should change the name to the empty reservoir. I'm starting to understand the gravity of this build and this property that we purchased.
in the next six weeks alone, I have plans to install:
Swiss Trax flooring in the back of the garage
air distribution lines for the compressor
green house
chicken coop
new generator enclosure
and gutter guards.
As long as there are people that keep coming back to watch this circus then I will keep updating. I may have to schedule sleep and meals in there somewhere
Are you kidding? Of course we want you to keep posting. We need someone to post progress pics for those of us who's builds are a much slower pace, for motivation of course. But also to steal all the good ideas and incorporate them into our shops.

Cdubu52
Well-known member
Im glad your steps turned out as good as they did. They look great! Keep posting East, I get the feeling like all of us that started posting around the same time are like classmates. We look to each other for inspiration and ideas and then lean on the upper classmen who have been here a lot longer. We also look out for and are genuinely excited to see the next update. I think we all feel invested in each others projects. Well, that's at least how I feel about this community.
jbrentd
Well-known member
Raptor looks great. And nice job on those floors and steps! Keep up the good work and the update posts too!
No kidding! I've got so many ideas to steal that sometimes I can't keep straight who I am stealing from.We need someone to post progress pics for those of us who's builds are a much slower pace, for motivation of course. But also to steal all the good ideas and incorporate them into our shops.
Yeah, when I started my build I started following the threads around me that began about the same time for motivation and progression milestones. I've pretty much found the other threads by reading the threads that you all were liking. The WA and BC threads appeal to me because they often have similar terrain and environmental challenges. Although let's face it, BC'ers prolly think my 6 inches of snow isn't even worth getting out of bed to plow.I get the feeling like all of us that started posting around the same time are like classmates.
Thanks! Will do.Raptor looks great. And nice job on those floors and steps! Keep up the good work and the update posts too!
Last edited:
I got home at 2AM from working 30hrs straight, saw all of these boxes in the driveway and suddenly wasn't tired anymore. So I got the hand truck out and moved everything into the garage.

First I muscled the refrigerator up to the loft. Time's like this make me glad that I went with 42 inch stair treads.

It's a retro styled apartment refrigerator.

First I muscled the refrigerator up to the loft. Time's like this make me glad that I went with 42 inch stair treads.
It's a retro styled apartment refrigerator.
Last edited:
Next I moved all the lumber into the shop and setup the miter saw. Thats for the green house and chicken coop which will be a family build project.

Swiss Trax flooring goes down very easily and it's rated at 70,000 lbs per tile. I saved the row closest to the wall for last so I could trim each piece with a miter saw for a good fit with 1/2 inch of space. One thing to be careful of is jack stand placement. You have to put a piece of plywood underneath to distribute the weight or it will gouge the tiles.

I'm going to put my gym equipment and surfski's in that area. It will also double as camping trailer storage eventually. I have to order a few more ramp pieces to finish up the tiled area. The forward bay will be the home of the lift.
Swiss Trax flooring goes down very easily and it's rated at 70,000 lbs per tile. I saved the row closest to the wall for last so I could trim each piece with a miter saw for a good fit with 1/2 inch of space. One thing to be careful of is jack stand placement. You have to put a piece of plywood underneath to distribute the weight or it will gouge the tiles.
I'm going to put my gym equipment and surfski's in that area. It will also double as camping trailer storage eventually. I have to order a few more ramp pieces to finish up the tiled area. The forward bay will be the home of the lift.
Attachments
Last edited:
Maxcustody
Well-known member
Love that fridge! Nothing like new stuff to keep you going
Maxcustody
Well-known member
The Swiss track looks great. It finishes that area off nicely.
Is the lift is going in front of the Swiss track towards the door?
Is the lift is going in front of the Swiss track towards the door?
Thanks, the fridge was a good find. I wasn't looking to buy one yet but the deal popped up with 36% off and cheap express freight of $55 so I pulled the trigger on it.The Swiss track looks great. It finishes that area off nicely.
Is the lift is going in front of the Swiss track towards the door?
Yeah the lift will go in front. Nussbaum is the company who makes them. It will be a scissor lift that will either be recessed or just on top of the surface so I can park a vehicle or trailer behind it.

Maxcustody
Well-known member
Very nice! I watch Matt from Obsessed Garage..............did you get it from them?
Yep it's an OG product. While I don't have the stomach to buy alot of Matt's products at those prices, I like the extent to which he researches and tests products before he puts them on his shelf for others to buy. I buy things from his store that our so unique and well thought out that it's worth the price. It'll probably be another year before I buy the lift.Very nice! I watch Matt from Obsessed Garage..............did you get it from them?
I have the OG pressure washer setup on the wall. I bought the compressor air distribution lines and fittings from OG also. The air lines are still on my Git R Dun list to get done.

Maxcustody
Well-known member
Yeah I agree, his stuff is nice and he definitely seeks out the best......................however his prices are what stops me as well. For instance I was looking at one of the cord reels, $800
I thought that was the OG pressure washer, I think I asked you about that previously. That is a great setup and will be awesome! The list never ends......................get one thing checked off and add two
I thought that was the OG pressure washer, I think I asked you about that previously. That is a great setup and will be awesome! The list never ends......................get one thing checked off and add two
Cdubu52
Well-known member
East, Slow down a little, you are making me feel lazy.
Love OG'S stuff and vids, it's great for ideas. But usually his stuff is a smidge outta my price range.
Really want the active 2.0 pressure washer, and a wall vacuum hose reel....
Anywho, all coming together nicely. Swiss tracks looks really good
Really want the active 2.0 pressure washer, and a wall vacuum hose reel....
Anywho, all coming together nicely. Swiss tracks looks really good
1st, love this threat and amazed at what you are creating there.
So just gotta ask, post 293 shows a picture of a air compressor with what appears to be 2 compressor units. I have never seen anything like that and I am wondering what up with that ?
So just gotta ask, post 293 shows a picture of a air compressor with what appears to be 2 compressor units. I have never seen anything like that and I am wondering what up with that ?
Thanks for following along. That unit has 2 oil free motors at 2hp each that feed the 60 gallon tank. California Air tools makes these and they are the only direct drive manufacturer that I know of that can compete with belt driven. They are quieter than belt drive units and operate in adverse weather and uneven terrain. They don't have the peak CFM output of a belt drive but will run all of the same tools including 1" impact. Belt drives and rotaries also have the advantage of much longer life. Being more of a DIYer it has served me well for 8 years so far.So just gotta ask, post 293 shows a picture of a air compressor with what appears to be 2 compressor units. I have never seen anything like that and I am wondering what up with that ?
@Cdubu52 request I decided to slow the pace down a bit.  . We started a family project of building a chicken coop and a new greenhouse after the last one was destroyed in the first major winter storm of the season.
I rented a mini skid steer and with the help of my 6yr old foreman cleared and roughly grade a sloped area for the chicken coop


We finished the last post hole with the auger attachment before the wet snow started coming down heavy.

The wife is gonna take the lead for these projects and prebuild the structures in phases inside the Empty cup. I supervised remotely for a few minutes today.

. We started a family project of building a chicken coop and a new greenhouse after the last one was destroyed in the first major winter storm of the season.I rented a mini skid steer and with the help of my 6yr old foreman cleared and roughly grade a sloped area for the chicken coop
We finished the last post hole with the auger attachment before the wet snow started coming down heavy.
The wife is gonna take the lead for these projects and prebuild the structures in phases inside the Empty cup. I supervised remotely for a few minutes today.
jbrentd
Well-known member
Nice to see the new shop getting used for new projects! What size greenhouse is she planning? Oh, and I’ll be watching the chicken coop. My wife has wanted chickens for a while.
Yeah it is nice to get some sawdust on the ground. I looked at the plans and couldn't make out the overall measurements. My guess is 9ft by 16ft with a lean-to roof. She built three walls of it today.Nice to see the new shop getting used for new projects! What size greenhouse is she planning? Oh, and I’ll be watching the chicken coop. My wife has wanted chickens for a while.

Cdubu52
Well-known member
Well, Im glad you are taking my advice. Although, it was for completely selfish reasons!
6SpeedBowtie
Well-known member
Fantastic thread and an impressive build! I could steal SO MANY great ideas from this build! Where do I start?!?!
Concrete stain; Brick with the Black accent; loft office/game room/theater; enclosed workshop; can go on and on! keep sharing as not only are we interested in stealing great ideas, but it's so much fun to live vicariously through others as well. I know in each of the garages I've had over my years I've extracted different ideas from this forum and it's great members.
I think if I did a lot of wrenching or assembly work I might prefer a solid tile as every now an then I'll drop a screw and have to go grab a magnet to get it out from under the tiles.
I bit the bullet a few years ago and bought a Vyper Chair and it glides over the tiles very easily. For anyone deliberating one, the Vyper Chair is well worth it. Build quality, appearance, comfort are all top notch.
Concrete stain; Brick with the Black accent; loft office/game room/theater; enclosed workshop; can go on and on! keep sharing as not only are we interested in stealing great ideas, but it's so much fun to live vicariously through others as well. I know in each of the garages I've had over my years I've extracted different ideas from this forum and it's great members.
@Blackbyrd I installed RaceDeck FreeFlow in the garage at my townhouse a few years ago, and I've been very pleased with it. Before the install, the floor always seemed dirty, but every since, it's always looking clean. Every now and then, I'll use the leaf blower to clear out the leaves and debris, but it almost always looks clean.interested in the swiss trax...... would like an honest opinion on it. I stayed away from it cause I didnt like how open it was and I thought it would look dirty all the time.
Ive since seen reviews that explain due to it being open it appears cleaner longer as you dont see the loose debris setting attop the floor? It showed cleaning was simpler cause you just had to vacuum out the crevices and wipe down the rest in most instances.
I think if I did a lot of wrenching or assembly work I might prefer a solid tile as every now an then I'll drop a screw and have to go grab a magnet to get it out from under the tiles.
I bit the bullet a few years ago and bought a Vyper Chair and it glides over the tiles very easily. For anyone deliberating one, the Vyper Chair is well worth it. Build quality, appearance, comfort are all top notch.
This is such and epic build I love following along. Swistrax, retro fridge, etc.. etc.. amazing build thanks for continuing to post such cool updates.
Also I recall a while back you mentioned you started to realize the gravity of your project. That is sure something I can relate to... 18months I've live at my place and I sure have done a lot, but it feels a times like I will need to go at my current pact for another 10 years to get the place where I want it. But then again if your like me and aren't *planning* to move then as long as we're having fun (and can afford it) then it's ok even if it takes a decade to get your property to where you envision it. So keep at it and have fun enjoying the journey.
Also I recall a while back you mentioned you started to realize the gravity of your project. That is sure something I can relate to... 18months I've live at my place and I sure have done a lot, but it feels a times like I will need to go at my current pact for another 10 years to get the place where I want it. But then again if your like me and aren't *planning* to move then as long as we're having fun (and can afford it) then it's ok even if it takes a decade to get your property to where you envision it. So keep at it and have fun enjoying the journey.
Hey I stole the ideas first! That's what I tell myself anyway. I look forward to seeing your version.Fantastic thread and an impressive build! I could steal SO MANY great ideas from this build! Where do I start?!?!
Like you, I plan to stay on this homestead for awhile. It will evolve through continuous improvement but yes, despite it's magnitude I have enjoyed the journey.Also I recall a while back you mentioned you started to realize the gravity of your project. That is sure something I can relate to... 18months I've live at my place and I sure have done a lot, but it feels a times like I will need to go at my current pact for another 10 years to get the place where I want it.
racer-john
Well-known member
I don't see a date or value for the concrete pad.Timeline:
11/2020 Started looking for a contractor
04/2021 Signed with the pole barn contractor
08/2021 Building permit approved by the county
08/2021 Signed with Excavating Contractor
12/2021 Site excavation finished
12/2021 Signed with interior/utilities Contractor
12/2021 Beginning of Snowpocalypse delaying building start
01/2022 Materials delivered and start of the Exterior build
02/2022 Main Structure complete. Waiting on garage doors, gutters, and concrete slab.
02/2022 Gutters installed and concrete slab poured
03/2022 Garage Doors installed. Delivery took 4 months
04/ 2022 Electrical subcontractor started work
05/2022 Electrical roughed in and electrical permit signed off for service Hook up.
06/2022 plumbing roughed in
07/2022 Electrical service energized
12/23/2022 Interior contractor work complete
01/2023 Floor stained and sealed with Single Part Polyurea
Expenses:
$2,700 Building Permit
$155,000 Pole barn exterior, slab concrete, doors, and gutters
$26,000 Excavation, ditch work, and curtain drain
$3,000 Loft permit design /engineering
$4,000 Septic, Water, and Electric trenching
$6,300 Build ramp to Garage entrance and gravel motor court
$26,400 Loft and Shop Framing, OSB walls
$ 9,600 Brick Veneer on the shop exterior walls
$ 6,700 Loft LVP Flooring
$11,000 Metal stairway, landing and loft railing
$23,000 R21 and R38 Batt Insulation for walls and ceiling
$23,000 interior liner panel for main garage area walls and ceiling
$11,000 .Wood Accent rear wall. Solid hardwood
$5,000 3 Interior doors and baseboard trim
$12,500 Plumbing, toilet bidet, water heater, utility sink, pressure washer mount
$25,000 HVAC ductless/ducted combo 5 ton
$5500 Salt etch, stain and Polyurea seal concrete DIY. Legacy Industrial Products
$78,000 Electrical and low voltage comms, 200A panel, new meter, 50A manual transfer switch, 46 lights, 39 receptacles 120 and 240V, Ceiling Fan,
The concrete pad was completed on 2/27/2022. 4 inch pad with fiber mesh for strength. The price of it was included in the exterior build by the first GC. I looked at my paperwork and it's not broken down. I had line by line expenses with the interior build by the second GC so that was much easier to breakdown. I supplied about 30-40 percent of the interior material costs and saved a ton of money there with time and patience.
@ovscrider. Thanks. I definitely put alot of thought into it but plenty of room for improvement. That's what the next 30 years is for. 
Last edited:

I think I mentioned earlier that the wife would be taking the lead on the greenhouse build. Our last one was destroyed in the first major storm of the winter season. We also lost all 5 of our bee hives. Well it was time to stop licking our wounds and get back to business. Little did we know that the punishment was not over. J prebuilt the frames in the shop from a set of plans she bought. Her first palm hand strike was realizing that the plans were originally setup for metric and the designer made a set in imperial that didn't translate very well. She had alot of cuts that had the measurements in tenths of an inch. Also the plans made some assumptions that J hadn't thought about like a level surface and having proper footings to keep the bottom plates out of the dirt. But I'm getting ahead of myself.
After 4 marriages I've learned that I'm not the easiest person to live with so I give J plenty of credit for putting me in my place when I'm wrong. I've also learned, mostly, when to keep my mouth shut and just go with the flow. I'm just gonna tell the story as it happens. If she finds out I wrote this she's gonna flip her lid. At least the dog and I have a 3300sqft dog house now.
We carried the frames out and got the 6 walls erected.


Looking at the picture you will notice that the post holes don't quite match up to the frame sections. This was again due to the bad conversion from metric to imperial measurements. So we decided to widen the holes and drill two new holes for 6 posts instead of 4. This may take me a few mornings of typing on the ipad to get y'all caught up so stay tuned in.
After 4 marriages I've learned that I'm not the easiest person to live with so I give J plenty of credit for putting me in my place when I'm wrong. I've also learned, mostly, when to keep my mouth shut and just go with the flow. I'm just gonna tell the story as it happens. If she finds out I wrote this she's gonna flip her lid. At least the dog and I have a 3300sqft dog house now.
We carried the frames out and got the 6 walls erected.
Looking at the picture you will notice that the post holes don't quite match up to the frame sections. This was again due to the bad conversion from metric to imperial measurements. So we decided to widen the holes and drill two new holes for 6 posts instead of 4. This may take me a few mornings of typing on the ipad to get y'all caught up so stay tuned in.
Maxcustody
Well-known member
Projects are looking good, that is going to be a nice greenhouse. Workout area looks great!
J wanted a break to regroup and improvise her plan for the greenhouse. So I got up on the roof of the Empty Cup and took care of the gutter situation that had been bothering me. The first set of gutter guards I put up, came down with the first heavy snow. I couldn't tuck them underneath the roof panels so they slid off when the snow thawed.

It was a mess up there. The needles were filling up the gutters every other week and doing up downs on a ladder that often is not my kind of workout.

My pole partner at work is an ex-roofer and he suggested I try gutter foam because it goes inside the channel rather than on top and leaves a few inches for the water to drain underneath.
I'm happy to report that the gutters are draining magnificently now and have stood the test of multiple wet heavy snows.

It was a mess up there. The needles were filling up the gutters every other week and doing up downs on a ladder that often is not my kind of workout.
My pole partner at work is an ex-roofer and he suggested I try gutter foam because it goes inside the channel rather than on top and leaves a few inches for the water to drain underneath.
I'm happy to report that the gutters are draining magnificently now and have stood the test of multiple wet heavy snows.
Last edited: