Thanks. You are reading the expenses correctly. I sincerely hope that others find better quotes with work of equal or better craftsmanship. I have pretty much built a barndominium home without a kitchen.Beautiful post frame build!
But am I reading your expenses correctly? $78,000 for electrical?

You are using an out of date browser. It may not display this or other websites correctly.
You should upgrade or use an alternative browser.
You should upgrade or use an alternative browser.
Above 1200 Sq/FT The Empty Cup 40x64 Post Frame
- Thread starter eastmtn
- Start date
Wokspaces above 1200 squarefeet.
Thanks for stopping by. I was a lurker for about 3 years before I registered and made my first post. I'm glad I did.Amazing build. I registered on this site just for this.
How did you go about finding the contractors for this? I'm up in the Seattle area and struggling to find anyone who does post frame builds near here.
I got the names of contractors, and ambitious small jobbers from others on this site, referrals from professionals in adjacent fields, and a few were cold calls off of a Google search where I asked to see some of their completed projects. Some never returned my call. Some didn't follow up after the initial conversation. Others were too high in price or couldn't grasp what I wanted to do and tried to steer me into their cookie cutter factory. There are others whose reputation precede them and fall way short of what they promise.
I'll send you some names for the Seattle area.
Some of the trim is now up. The GC had the idea to put it on the vertical corner of the brick work and in the loft. I think it came out pretty good. More of the railing is up. We ran out of material for the railing again and had to order more.
I'm also concerned about the amount of wear on treads with the wax and how slippery they are. I thought I would try some clear stair tread anti-skid tape. If anyone else has an idea how to protect the stair treads, I'm all ears.


Thie top of the pic shows the uncaulked seams and the bottom of the pic shows caulked seams. It makes a big difference in convincing the eye that the brick is real.


I torched and stained a sheet of plywood also. I'll either have the brick continue around the stair landing or use this. We will see which one looks better.

I'm also concerned about the amount of wear on treads with the wax and how slippery they are. I thought I would try some clear stair tread anti-skid tape. If anyone else has an idea how to protect the stair treads, I'm all ears.
Thie top of the pic shows the uncaulked seams and the bottom of the pic shows caulked seams. It makes a big difference in convincing the eye that the brick is real.
I torched and stained a sheet of plywood also. I'll either have the brick continue around the stair landing or use this. We will see which one looks better.
Last edited:
The front of the garage is the final area left to install liner panel. Once this and a few more trim pieces are put up, the GC can get their equipment off of the floor and clean up the site. I've been anxious to start on the floors because the polyurea sealer and stain is nearing the end of its shelf life. I called the manufacturer to make sure it wasn't too late to apply this batch.


Last edited:
Maxcustody
Well-known member
Looks Great!
I put together this AV rack for the theater equipment and a similar one for the server, network switches, surveillance, and backup power supplies.

A couple of black friday deals here to keep up with the industrial look.

Here I started staging where I'm going to put the AV equipment. The wood console is hand built off of an Etsy console maker in California. The blue tape represents the 130 inch motorized screen that will be rolled up when not in use to keep down on the dust and supervisor paw prints. The big boxes are the subwoofers.")

These are the theater seats that are staged with 2 more subwoofers. The Styrofoam piece marks the primary seat. At the back of the room are 2 more speakers. I'm going to have to add more wiring for those. At the last minute I decided to make it a 7 speaker surround with 4 Atmos and 4 subwoofers. I'm actually going to attempt to pressurize the building with enough subs. If it doesn't work, I'll just make them near field so the seated people can at least hear the intended rumbles. I was going to have some economical seats built by a seating manufacturer when I stumbled upon these Valencia seats of higher construction quality already built and ready to ship. I guess the company had built them for someone else and the potential owner decided to not to take possession. So, I got brand new motorized seats at over $1,000 off with shipping and liftgate service included.

A couple of black friday deals here to keep up with the industrial look.
Here I started staging where I'm going to put the AV equipment. The wood console is hand built off of an Etsy console maker in California. The blue tape represents the 130 inch motorized screen that will be rolled up when not in use to keep down on the dust and supervisor paw prints. The big boxes are the subwoofers.
These are the theater seats that are staged with 2 more subwoofers. The Styrofoam piece marks the primary seat. At the back of the room are 2 more speakers. I'm going to have to add more wiring for those. At the last minute I decided to make it a 7 speaker surround with 4 Atmos and 4 subwoofers. I'm actually going to attempt to pressurize the building with enough subs. If it doesn't work, I'll just make them near field so the seated people can at least hear the intended rumbles. I was going to have some economical seats built by a seating manufacturer when I stumbled upon these Valencia seats of higher construction quality already built and ready to ship. I guess the company had built them for someone else and the potential owner decided to not to take possession. So, I got brand new motorized seats at over $1,000 off with shipping and liftgate service included.
Last edited:
First snow of the year is usually the hardest for downed trees and power lines. I cleared this tree off of a major street. It's bigger than it looks and took up two lanes.

This is a downed tree blocking my street. All of this happened on the same night on my way home from work.

This is another pic of my street. All of those branches are weighed down by the wet snow. Normally the view is clear and those limbs are all sticking up vertically.

I unmasked the light bar on the Raptor and pulled the Stihl Chainsaw out of it's winter slumber. Time to go to work.

I've been working 18 hours on and 6 hours off since the snow started last week to repair damaged power lines and restore power to customers. I finally get to go home this morning and get some shut eye in my own bed. Looks like there's more snow forecast for next week so I anticipate more sleepovers at work.
This is a downed tree blocking my street. All of this happened on the same night on my way home from work.
This is another pic of my street. All of those branches are weighed down by the wet snow. Normally the view is clear and those limbs are all sticking up vertically.
I unmasked the light bar on the Raptor and pulled the Stihl Chainsaw out of it's winter slumber. Time to go to work.
I've been working 18 hours on and 6 hours off since the snow started last week to repair damaged power lines and restore power to customers. I finally get to go home this morning and get some shut eye in my own bed. Looks like there's more snow forecast for next week so I anticipate more sleepovers at work.
Thanks. The building failed its first test by mother nature. The new HVAC system stopped working. I called the HVAC installer and they were able to get one of the 3 indoor units to work. They have to reschedule with the manufacturers tech support to figure out why the other 2 units aren't working. The building was at 50deg for 2 days. With the one unit on it has taken 3 days to climb 8deg to 58 and won't go any higher.Looks Great!
Also, all 3 of the new garage openers are malfunctioning to where they won't stay closed unless I disengage the motors after they come down. I checked the photo eye sensors, and they are aligned. I'm getting cable tension failure error codes which makes me think that they just need to be re-adjusted.
Also, my own power went out several times over the course of the week. The generator powering the garage quit working at some point. I'll have to figure what's going on with that one when I get some time off. Thankfully the portable generator for the house has been running like a champ, pun intended.
It's made by Champion.Maxcustody
Well-known member
Wow, sorry to hear about all the issues.....................There are several threads on peoples openers doing strange things. Hope you get everything sorted out, I know you will. I understand how frustrating it must be, especially with the new equipment issues.
Wow, you have really been stress testing your new digs huh. Well the media area is looking great! My brother actually works for a flooring company let me reach out and see if he has any recomendations for what you set up.
also...... pictures like this is why I live in the south! Snow is pretty and I like to look at it, no interest in being in it though haha
also...... pictures like this is why I live in the south! Snow is pretty and I like to look at it, no interest in being in it though haha
Cdubu52
Well-known member
Also, all 3 of the new garage openers are malfunctioning to where they won't stay closed unless I disengage the motors after they come down. I checked the photo eye sensors, and they are aligned. I'm getting cable tension failure error codes which makes me think that they just need to be re-adjusted.
I just had the same issue with my opener and I think we have the same one. I had unknowingly clipped one of the photo eye sensor wires. I really think I had just nicked it since the light was still working. I still had a solid light and both were working, but the door would not shut. I rewired the wire on the wall that I had just been working on and now it works like a charm. Even though the sensor was on and the green side was not blinking it was still throwing the code that there was an obstruction or a fault. Through that process, I reprogrammed it about 4 times. Its fairly quick and painless and only takes a couple of minutes. If that is all that it needs, then it is a super easy fix. Just check your sensor wires if you can.
Also, Im pretty sure there are clear epoxy or even spray on non slip coatings that can be applied. I have some friends that resore old Cris-Craft wooden boats and they use it all of the time.
Last edited:
@Blackbyrd , let me know if your brother comes up with any ideas or suggestions. Thanks!
@Cdubu52 , good idea about checking the wires. This happened after the contractor removed the sensor wires so that they could put the liner panel up. I'm witnessing all of the symptoms that you described. The photo eyes are on and solid green, but the doors go down and come back up. I'll take a look.
I like the clear epoxy idea, maybe with a light anti-skid medium mixed in. I just did a search, and it looks like the clear Polyurea I bought to seal the concrete can also be applied to wood. It's waterproof and flexes with extreme temp changes and won't crack or peel. I'll test a piece of scrap wood for reaction. This may be the winner!
I walked into the utility closet today and saw this. I was quickly reminded of the night that I tried to put together the air distibution system for the compressor. I had made a map and legend of the system with all the parts needed several months ago. I thought I could get it up and running in 8 hours especially since I had such a detailed plan. Well, 8 hours later that pic is all the progress I had made. YouTube made it look so easy  .
.
This project is going to be moved a little further down the list. My current priority is evicting my contractor so I can prep and seal the floor. I wonder if they will move any faster if I start charging them climate controlled storage fees for the tools and equipment lying around.

.This project is going to be moved a little further down the list. My current priority is evicting my contractor so I can prep and seal the floor. I wonder if they will move any faster if I start charging them climate controlled storage fees for the tools and equipment lying around.
I have debated on whether to make this post. After all, this site is about how we build and use our defined spaces. Whether it’s farming, or wrenching, entertaining or just being, what we do in our space has meaning to us and others.
I dedicate this post to my Uncle who passed away last week. When I was little I wanted to be like him. He taught me to be myself. Along the way he also taught me to honor the work and be there for others and everything would be as it should. He was the youngest of my mother’s family and the strongest. His hands, like his heart were massive. He did what needed to be done without saying a word, with a smile on his face like he knew the punchline to the joke before it was told. He has been watching the progress of the Empty Cup from the moment I conjured it in my head. I am disappointed that he didn’t get to see the finished product, but that’s life. We have the best of intentions with the things that we do but it doesn’t always come out the way we intended. Every once in a while it does. It is what it is.

So, from Louisiana to Samoa and everywhere else in between, e mo oe lo’u uso, Faafetai. C’est pour toi mon frère, merci. This is for you my brother, thank you. Gone but not forgotten.
I dedicate this post to my Uncle who passed away last week. When I was little I wanted to be like him. He taught me to be myself. Along the way he also taught me to honor the work and be there for others and everything would be as it should. He was the youngest of my mother’s family and the strongest. His hands, like his heart were massive. He did what needed to be done without saying a word, with a smile on his face like he knew the punchline to the joke before it was told. He has been watching the progress of the Empty Cup from the moment I conjured it in my head. I am disappointed that he didn’t get to see the finished product, but that’s life. We have the best of intentions with the things that we do but it doesn’t always come out the way we intended. Every once in a while it does. It is what it is.
So, from Louisiana to Samoa and everywhere else in between, e mo oe lo’u uso, Faafetai. C’est pour toi mon frère, merci. This is for you my brother, thank you. Gone but not forgotten.
Last edited:
Maxcustody
Well-known member
Sorry for your loss. It is always hard losing a loved one. Prayers to you and your family.
Cdubu52
Well-known member
I meant to say that the epoxy has anti skid in it. They use it on the swim platforms and on the steps in areas of those wooden boat restorations. Whatever they use is an antiskid epoxy or has the medium mixed in.I like the clear epoxy idea, maybe with a light anti-skid medium mixed in. I just did a search, and it looks like the clear Polyurea I bought to seal the concrete can also be applied to wood. It's waterproof and flexes with extreme temp changes and won't crack or peel. I'll test a piece of scrap wood for reaction. This may be the winner!
Also, sorry for your loss. To grieve is to love, without love there is no grief.
Last edited:
macnugget
Active member
The people who occupy our spaces are even more important than the spaces themselves. Thanks for posting.
So it ended up being a micro switch that monitors the tension on the cable. when the contractor put up the liner panel it left the microwaves switch open enough to give the signal that there was too much tension on the cables. I ended up cutting the liner panel away from that area and the garage installer ran new wire to the micro switch. it's a black device with a small spool on the end that the cable runs up and down. It looks like this.I just had the same issue with my opener and I think we have the same one. I had unknowingly clipped one of the photo eye sensor wires. I really think I had just nicked it since the light was still working. I still had a solid light and both were working, but the door would not shut. I rewired the wire on the wall that I had just been working on and now it works like a charm.

I thought I'd come up for air and give a few updates on the build.
This showed up via freight delivery. I don't know who it's for or why it showed up at our house. At least that's what I told the wife . She didn't fall for it. It's an arcade with over 4,700 games and controls for up to 4 players. My foreman tested it out for quality control purposes.


This showed up via freight delivery. I don't know who it's for or why it showed up at our house. At least that's what I told the wife
. She didn't fall for it. It's an arcade with over 4,700 games and controls for up to 4 players. My foreman tested it out for quality control purposes.
Last edited:

I cleaned up the area, made a couple of dump runs, and moved everything out of of the main garage and into the shop. Next I taped up the area with plastic to prevent the chemicals from getting on the walls. My plan was to stain and seal the main area and bathroom first. After that's done I'll move everything out of the shop and perform the same process there. I'm going to take pictures from the same 2 vantage points so y'all can see the difference as I move through each phase of the floor transformation. The floor will be salt etched, then stained with two overlapping colors using a water based stain. Finally, I will primer and coat with a single part polyurea called Nohr-S. This is a time sensitive project because I bought the products last March and the polyurea only has a shelf life of 1 year.


I tested the salt etch on a few spots first to make sure that it foamed up and reacted with the concrete. I used a 1:3 ratio and liberally sprayed enough area that I could work it afterwards with a deck brush and give it 10 minutes to set before power washing and vacuuming up the suds. I did a water absorption test after the first etch and dry period. The water did not soak into the concrete so I made a second pass with 1:2 ratio of solution to water. This time I didn't wash afterwards. I waited 15min then wet vacuumed only. Since I was a one person operation I bought this back sprayer with a wand that clipped to the lever and rotated out of the way so I could spray and brush without taking the pack off. I waited 18hrs for the concrete to dry before going on to the staining phase. Below is what the floor looked like after it dried.


Maxcustody
Well-known member
Almost to the finish line……….shop is looking Great. Looking forward to the floor project and your thoughts on the process.
I rinsed out the sprayer and made 2 passes with Deltadye stain. This color from Legacy Industrial is Tobacco road. It dries to dull finish. The trick is to apply it very lightly so that it has a chance to absorb and not leave residue on the surface that can be wiped away. I tried a few techniques with the sprayer. Spraying in circles, changing the height of the wand from the floor. I even tried using a squeegee to purposely splatter and smear the color.


Each time I finished a coat I would back myself up to the stairs, remove my shoe covers and take a nap in the loft or do some work up there.
This is pics of the primer coat. It goes on white and dries clear. I primed the edges first with a small roller and then filled in with an 18" roller. The primer goes on like paint. After it dried I could see some of my roll marks. I overlapped and back rolled but it wasn't enough to hide everything.
I removed the plastic lining and retaped with painters tape to get the clear coat closer to the edges.
When it came time to apply the final coat I added fine antiskid media. This stuff is thick and goes down like honey. With the primer coat I had to move fast because once you mix the 2 parts together there's a pot life of up to 45min depending on ambient temperature. I took my time with the final coat and worked on covering the roll marks from the primer coat as well as ensuring I had full coverage. It's hard to see what you have and haven't done. Here's a pic of the antiskid close up.


These last 2 shots show how the floor changes when all the lights are on and half of them off


These last 2 shots show how the floor changes when all the lights are on and half of them off
Last edited:
So what would I do differently the next time? Fortunately we get to find out because it's time to do the shop room. I'm going to etch with 1:2 salt solution and wet vacuum. I Won't use the pressure washer. During the stain phase I won't have the tip of the sprayer so close to the floor. More like 3ft off the ground vs 1 ft. I'm going to mix the primer in smaller batches of 2 gallons vs the 3 gallon batches I made last time. With the concrete being so new and unsullied it's a toss up of whether to etch or grind. The etch was a pain to scrub and I still had to wet vac but I feel like grinding is always more work to clean up.
Afterwards I could walk on the floor with shoe covers within 10hrs. Honestly it takes 24 hours for foot traffic. 5 days minimum before I would put any vehicles on it.

Afterwards I could walk on the floor with shoe covers within 10hrs. Honestly it takes 24 hours for foot traffic. 5 days minimum before I would put any vehicles on it.
That was a 3 day process and I applied that material around the clock to push the pace when coinciding with curing time. 2-3 people would have been more efficient but I made it work doing it alone. In between drying times I had time to clean up the loft, install the motorized projector screen and setup the sound system. I even had time to watch a movie, for quality control purposes of course.


jbrentd
Well-known member
Looks awesome...upstairs and downstairs! I need one of those arcade machines.
Idle Serge
Well-known member
What. A. Build. 
Cdubu52
Well-known member
Its about time you rejoined the group. It looks like you have made some significant progress. Its always enjoyable to catch up. The floors look great. Its funny how you had to use the security camera to get a photo of yourself doing what you say you were doing. I find that I have the same issue, always a photo of what's being done, but not of who is doing it.
It was difficult to find a screenshot where I wasn't blurry. I'm not one to sit in one spot for very long. I'm trying to catch Sasquatch for the hide and seek champion of the Pacific Northwest.Its funny how you had to use the security camera to get a photo of yourself doing what you say you were doing. I find that I have the same issue, always a photo of what's being done, but not of who is doing it.
Thanks Black. The shop floors came out good also. That will be in the next post.the floor looks spectacular btw. ties the whole thing together very nicely.
The process for prepping, staining and sealing the shop went smoother. I went with just the brown color but made more passes to get it filled in without oversaturation. This area is 728sq/ft 26x28ft and it took me 2 days to complete. I finished it last night so it will be able to handle light foot traffic tomorrow.


The last pic is the primer layer drying. After the final clear coat went down the white glare went away.
The wife is chomping at the bit to start using the shop. She rented a box truck and came back with a bunch of lumber and a new project for me to work on. Stay tuned in! It's gonna get interesting.
Last edited:
@Cdubu52, I did some digging based on the ideas you and @Blackbyrd gave me and learned that the polyurea I used on the floor also works on wood. I cleaned the stair treads and used the leftover primer and clear coat on them with some anti-skid. They came out better than I thought.


This is what the polyurea looks like when it sets up. I pulled that out of the bucket that was used to mix the material.

This is what the polyurea looks like when it sets up. I pulled that out of the bucket that was used to mix the material.
This post will be pic heavy. While it didn't happen in my garage, vehicle mods are one of my guilty pleasures, especially when it comes to my 1st gen Raptor.
As many of you have witnessed, some products and materials are experiencing long wait times to deliver. Ford Raptor Gen 1 parts were difficult to keep in stock even before the virus started circulating.
I ordered a new set of Deavers leaf springs to replace the OEM leafs. I also ordered a larger set of front and rear Fox shocks and beefier adjustable bump stops. It took 4 months for all of it to arrive. These trucks come standard with Fox shocks and they have to be rebuilt every 50,000 miles. I typically drive down to Northern CA to get them rebuilt for the same day turn around time. Otherwise I'd have to remove the shocks, mail them in for rebuild, and wait up to a month for the rebuilt ones to come back before reinstalling them. That can easily add up to 6 weeks of down time.
I went to a spring shop on the mainland and had them install the new kit for me. I now have 2 sets of complete shocks so I can rotate them in and out of service with minimal down time or the 2 day drive to California.
Here's a pic of the tie rod and upper control arm out of the way so the front shock could be removed.

These are the new front shocks with remote reservoir.

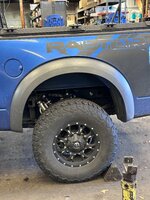
 This is the new rear shock, leaf spring, and adjustable bump system. Now I can move the height of the bump stops up and down for high speed off roading, city driving, or towing.

The truck sits 2 inches higher now but will lose an inch after the leafs are broken in.

This is some of the stuff I look forward to doing in the Empty Cup.
As many of you have witnessed, some products and materials are experiencing long wait times to deliver. Ford Raptor Gen 1 parts were difficult to keep in stock even before the virus started circulating.
I ordered a new set of Deavers leaf springs to replace the OEM leafs. I also ordered a larger set of front and rear Fox shocks and beefier adjustable bump stops. It took 4 months for all of it to arrive. These trucks come standard with Fox shocks and they have to be rebuilt every 50,000 miles. I typically drive down to Northern CA to get them rebuilt for the same day turn around time. Otherwise I'd have to remove the shocks, mail them in for rebuild, and wait up to a month for the rebuilt ones to come back before reinstalling them. That can easily add up to 6 weeks of down time.
I went to a spring shop on the mainland and had them install the new kit for me. I now have 2 sets of complete shocks so I can rotate them in and out of service with minimal down time or the 2 day drive to California.
Here's a pic of the tie rod and upper control arm out of the way so the front shock could be removed.
These are the new front shocks with remote reservoir.
This is the new rear shock, leaf spring, and adjustable bump system. Now I can move the height of the bump stops up and down for high speed off roading, city driving, or towing.The truck sits 2 inches higher now but will lose an inch after the leafs are broken in.
This is some of the stuff I look forward to doing in the Empty Cup.