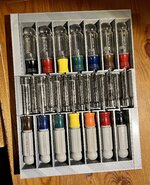
Pretty close. In the back of the printer there is a wiper/cutter. Before #2 occurs the loaded filament is cut just above the hot end and then retracted back into the AMS. I'm not sure the "magic" inside the AMS but I suspect there is a four way junction just like the hub above where each spool is fed to. Below is what the far right spool looks like. To load, put the spool on the rollers and then feed the filament into the white hole slightly pulling the nub just above the yellow part towards you. At a certain point the AMS senses the filament and will start pulling it inside. It goes in about four to five inches and then pulls it back a bit. I assume there is a sensor or something that detects it's about to hit the four into one junction so it stops and pulls back away. On the back of the AMS there is a section of PTFE tube that slips into a connector on the back of the printer and the AMS has a cord that plugs into the back of the printer. One thing that does kind of **** with the AMS, it's designed for large spools. I have found a multitude of adapters people have made and put on Thingiverse. The spool of white below is a pretty small size, I think it's 500kg and not very wide so I had to improvise an adapter for another type of spool for it.
When a filament change occurs, as I said above the filament is cut from the extruder and pulled back into the AMS. The next color is then pushed to the extruder and the prior filament is then purged from the hot end. In the back left corner of the printer there is a hole for the purged filament to fall out the back and just to the right of that hole there is a wiper that cleans the hot end. From the time the print stops and the print head goes "home" (above the purge hole), cutes the current filament, retracts the filament, loads the next filament, purges the prior filament, wipes the hot end and continues to print.

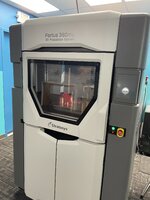
To illustrate, the below picture is of the back left of the printer. when "resting" the print head sits in th emiddle and about two to three inches from the back. When purging, the print head goes to where the green arrow is and then it drops out the back. The yellow is just showing where the hole is covered and it's ramped towards the back to make a slide if you will for the filament to go out. One of the first things I printed was a bin to put behind the printer to catch the discards. The red circle is around the wiper arm. Once the purging has occured the print head will go and rub against the white part a few times and then go on to print..

Q1: I have not figured out why sometimes it prints a tower and other times it does not. Since it has the wiper arm I don't think it needs it but sometimes it does get generated. It has to be in the slicer but I have not explored it fully yet. It has options to turn on and off supports. It recommended printing with supports for the coaster holder but I did it without with no issue.
Q2: I never timed it, less than a minute for sure. Maybe 15-20 seconds.
As to your equating it to locking into Apple's ecosystem, I didn't think of it that way but yes it is like that for the AMS stuff but I always have the option to hang a spool off the back of it and run it that way if I want. I printed a temporary ring for my wife a little bit ago and did it in TPU. There is one guy who made TPU work in the AMS but everywhere it says not to. I tried it, almost had to take the AMS apart to get it out. Ended up just hanging the spool off the back (there is an included hanger) and printing it that way. The only drag about that is you have to disconnect the tube from the AMS and then put it back on when done. There is a "Y" someone made on Thingiverse that I'll probably print at some point so I can leave the tube connected.

 to I'd be proud as #e!! to show that off! Especially as a custom gift someone made for me, your spouse will be too I am sure! Looks Great! Harry