To avoid these ads, REGISTER NOW!

The Everything 3D Printer Thread

To avoid these ads, REGISTER NOW!

kppolich

Well-known member
Joined
Apr 7, 2020
Messages
344
Location
Eastern Iowa
Made a few of these little organizer trays for an upcoming take apart and put together project. Not too bad at 1hr each at 70mm/s on my Vyper @ 20% infill


rollinlower

Well-known member
Joined
Oct 17, 2017
Messages
174
Location
Rogersville TN
Does anyone know of ANY kind of 3d print supply houses around nashville? me and the youngest part of the heading that way this weekend to get out and stretch our legs a little
 

Grimpala

Well-known member
Joined
Jul 16, 2012
Messages
1,404
Does anyone have the full version of Fusion 360 that wouldn't mind converting an F3D to DXF for me? I need one file and don't feel like the ~$70/mo would be a good bang for the buck investment at this time.
 

Jehannum

Well-known member
Joined
May 3, 2012
Messages
1,346
Location
Albuquerque, NM
Printing my step bit case turned into a bit of a fiasco. The fan on the heatbreak failed, heat crept up the heatbreak, and the thing was clogged straight into my BMG extruder.

I did some quick work with a torch and melted the PETG enough to brush it off with a wire brush, but now I'm waiting for a new 30x30x10 fan to come from Amazon because the one I had on hand is 24V and the CR10 is 12V.
 

Poolshark314

Well-known member
Joined
Jul 5, 2021
Messages
658
Location
MD
Anybody have any recommendations for improving this print? I am comfortable printing with multiple colors, but this is the first time I have tried printing multiple colors at the same layer height. Seems like there is just a little bleed, likely from the hot nozzle touching the black after it's already been printed and is doing the green run.

1677446855269.png
1677446870102.png
1677446880628.png
 

bugnut

ALLIANCE MEMBER
Joined
Jul 14, 2012
Messages
3,834
Location
Central Ohio
Past purchases of electrical connectors for various projects left groups of segregated component in assorted plastic boxes. OCD took over and made a few pieces to increase the holding capacity of my HD boxes. Tool a while to print and all of the HD box divided areas are not the same size. Came up with a best fit that works and satisfies my OCD. More 2 section bins are printing. PS these HD boxes are disconinttued but saw Wally World has some similar need to check that out.
 

Attachments

  • 20230226_111125.jpg
    20230226_111125.jpg
    705.3 KB · Views: 42
  • 20230226_111119.jpg
    20230226_111119.jpg
    633.9 KB · Views: 39
  • 20230226_100124.jpg
    20230226_100124.jpg
    921.2 KB · Views: 35
  • 20230226_100118.jpg
    20230226_100118.jpg
    822.7 KB · Views: 30
  • 20230224_172632.jpg
    20230224_172632.jpg
    575.2 KB · Views: 28
  • 20230224_172627.jpg
    20230224_172627.jpg
    1 MB · Views: 29
  • 20230224_172619.jpg
    20230224_172619.jpg
    918 KB · Views: 27
  • 20230224_172459.jpg
    20230224_172459.jpg
    852.5 KB · Views: 26

ArcReactorKC

Well-known member
Joined
Jun 1, 2019
Messages
2,237
Location
Out in the county NE of KCMO
Anybody have any recommendations for improving this print? I am comfortable printing with multiple colors, but this is the first time I have tried printing multiple colors at the same layer height. Seems like there is just a little bleed, likely from the hot nozzle touching the black after it's already been printed and is doing the green run.
What printer are you using, a bambu? My first instinct looking at the print is that it was done a little too quickly, acceleration and jerk could be calibrated to get crisper edges. That will help with color bleed on it's own. What does your purge block look like?
 

Poolshark314

Well-known member
Joined
Jul 5, 2021
Messages
658
Location
MD
What printer are you using, a bambu? My first instinct looking at the print is that it was done a little too quickly, acceleration and jerk could be calibrated to get crisper edges. That will help with color bleed on it's own. What does your purge block look like?
Ender 3 v2
 

ArcReactorKC

Well-known member
Joined
Jun 1, 2019
Messages
2,237
Location
Out in the county NE of KCMO

Poolshark314

Well-known member
Joined
Jul 5, 2021
Messages
658
Location
MD
Have you got explicit instructions for that infill? I just leave holes, and fill them in with a 3-D pen. I'd love to do that with my Ender, but haven't had any luck.
Generally what I would do is separate the print into 2 STLs, where the 2nd file has a void for the 1st file, and then all of the work is done in the slicer
  1. Open both STLs onto the same project and align them exactly how you want to print them
  2. Get your print profile settings correct
  3. Note the X, Y, and possibly even Z coordinates for the 2nd object
  4. Delete the 2nd object from the project
  5. Slice and print the 1st object
  6. Monitor the 1st print and preheat the printer after it finishes ASAP
  7. Change out the filament color for the 2nd print
  8. Hit Undo in your slicer to bring back your 2nd object, or re-add it and use the coordinates you wrote down to put it back in the correct place
  9. Delete the 1st object from the project
  10. Print the 2nd object
Now that I type this out, it looks like a lot, but it really isn't lol
 

ArcReactorKC

Well-known member
Joined
Jun 1, 2019
Messages
2,237
Location
Out in the county NE of KCMO
Generally what I would do is separate the print into 2 STLs, where the 2nd file has a void for the 1st file, and then all of the work is done in the slicer
  1. Open both STLs onto the same project and align them exactly how you want to print them
  2. Get your print profile settings correct
  3. Note the X, Y, and possibly even Z coordinates for the 2nd object
  4. Delete the 2nd object from the project
  5. Slice and print the 1st object
  6. Monitor the 1st print and preheat the printer after it finishes ASAP
  7. Change out the filament color for the 2nd print
  8. Hit Undo in your slicer to bring back your 2nd object, or re-add it and use the coordinates you wrote down to put it back in the correct place
  9. Delete the 1st object from the project
  10. Print the 2nd object
Now that I type this out, it looks like a lot, but it really isn't lol
On your first file, after slicing it, open the Gcode in notepad. You should see an M140 as one of the last few lines of Gcode. Delete that line and the bed won't try to drop temperature so you don't have to monitor it as it will maintain temperature until you interfere.
 

rollinlower

Well-known member
Joined
Oct 17, 2017
Messages
174
Location
Rogersville TN
Anybody have any recommendations for improving this print? I am comfortable printing with multiple colors, but this is the first time I have tried printing multiple colors at the same layer height. Seems like there is just a little bleed, likely from the hot nozzle touching the black after it's already been printed and is doing the green run.

1677446855269.png
1677446870102.png
1677446880628.png
thanks now i know what ill be making for christmas presents
 

Jehannum

Well-known member
Joined
May 3, 2012
Messages
1,346
Location
Albuquerque, NM
The larger Irwin step bit is a little wonky in there, but I'm not going to let the good enough be the enemy of leaving them in the top drawer while they dull themselves against everything else in there.

messages_0(10).jpeg

messages_0(11).jpeg

Ended up having to go .5mm oversized on the lid in each direction to get the lid to fit nicely.
 

bugnut

ALLIANCE MEMBER
Joined
Jul 14, 2012
Messages
3,834
Location
Central Ohio
Last of the sub dividing bins finished overnight and I have a couple spares. Ended up making two different sizes as one was square and the other rectangular. Done for now!
 

Attachments

  • 20230224_172619.jpg
    20230224_172619.jpg
    918 KB · Views: 23
  • 20230226_111119.jpg
    20230226_111119.jpg
    633.9 KB · Views: 33
  • 20230301_100829.jpg
    20230301_100829.jpg
    997.9 KB · Views: 62
To avoid these ads, REGISTER NOW!

kppolich

Well-known member
Joined
Apr 7, 2020
Messages
344
Location
Eastern Iowa
3D printer to the rescue once again for a small bike related maintenance task.

5 minute design (square with a round whole through it, cut it in half, 10 minute print and I now have a solution for removing old SRAM Barb/Olives from their hoses without forcing me to cut them.

Success today with this crude 2 piece clamp, but a lifesaver on an internally routed bike (Tarmac SL7) and $100 hoses.

Basically, clamp this on the hose to keep it from being crushed/spinning with regular pliers and use the T8 key to unscrew the whole thing (Barb + Olive). I clipped the very end of the hose off to get a fresh end to work with, but it's better than losing a few centimeters.
 

Attachments

  • TLVbWmx.jpg
    TLVbWmx.jpg
    247.4 KB · Views: 52
  • 2oCkdai.jpg
    2oCkdai.jpg
    215 KB · Views: 43

slodat

ALLIANCE MEMBER
Joined
Feb 6, 2010
Messages
3,679
Location
Central-ish, WA
Had this waiting for me on the X1C this morning when I got to the shop.

A329B1DD-24C0-4935-9036-A3F9C337AF97.jpeg

7E1D5767-1E2A-4E47-A561-7A7D43457E8D.jpeg

It's a holder for CAT40 tool tags. The tags are also 3d printed. The idea is the tag has pertinent information for the tool, its height offset specifically. When the tool is loaded in the tool changer, the tag is placed in this rack so you know what tool is in the machine, and you can keep the tool and tag associated with one another. Seems like a good system. Of course, the X1C does an amazing job printing the part.

Fired up the Prusa for the first time in a long while. It's printing more tool tags.

1DC80839-5AE0-4916-9176-3E380092EED8.jpeg

Watching the Prusa print the first layer is almost painful after getting use to the X1C. The Prusa will have about an hour in the first layer. Two printers is faster than one, and I'm still happy to have the Prusa in the shop. It makes really nice parts with PETG. These tool tags turn out flawless.
 

sh944

ALLIANCE MEMBER
Joined
Jan 1, 2014
Messages
291
Location
Linwood, KS
Yeah, I’m still blown away by how well the Bambu prints. I still like my Qidi but wouldn’t buy another one if I can buy a X1C…
 

slodat

ALLIANCE MEMBER
Joined
Feb 6, 2010
Messages
3,679
Location
Central-ish, WA
That's how I feel. My Prusa is really well dialed in for PETG. It will stick to that. The X1C is truly effortless. It just makes nice parts.
 

Jehannum

Well-known member
Joined
May 3, 2012
Messages
1,346
Location
Albuquerque, NM
That's how I feel. My Prusa is really well dialed in for PETG. It will stick to that. The X1C is truly effortless. It just makes nice parts.
The only changes i make between PETG and ABS is a little bit lower Z-offset (and running a little slower for ABS).

I need to figure out how to put that in my starting/stopping G-code in cura, but for now, I just manually adjust by 1/4mm. If I put the PETG down that close, I've ended up breaking the bed glass trying to get it off afterwards.
 

LS1-IROC

Well-known member
Joined
Aug 6, 2011
Messages
173
Location
Grand Rapids MI
I'm considering a bambu printer. Having trouble deciding between the P1P and the X1. I like the Lidar and the touch screen of the X1, just not sure if the extra $500 is worth it. Anyone have experience with the P1P yet?
 

ArcReactorKC

Well-known member
Joined
Jun 1, 2019
Messages
2,237
Location
Out in the county NE of KCMO
I'm considering a bambu printer. Having trouble deciding between the P1P and the X1. I like the Lidar and the touch screen of the X1, just not sure if the extra $500 is worth it. Anyone have experience with the P1P yet?
Coming from someone who owns printers up and down the scale from contraptions I built myself up to Raise 3d industrial machines the Bambu X1 is worth the money. I have mine running profit prints non-stop. The lidar has caught full build plates of first layer garbage of expensive filaments that wouldn't have been caught until they were a half-kg of waste on the P1P. I've been using Octoprint for years and started using the Spaghetti-detective when it was still just in it's infancy and it wouldn't have caught the imperfections the lidar does.

The lidar and included camera are worth it. This is my current favorite printer, it's not the most capable by size but it does have the widest range.

It's like tools, trucks, houses, shops. Buy once cry once, you may not always need it but man it's nice to have.
 

LS1-IROC

Well-known member
Joined
Aug 6, 2011
Messages
173
Location
Grand Rapids MI
Coming from someone who owns printers up and down the scale from contraptions I built myself up to Raise 3d industrial machines the Bambu X1 is worth the money. I have mine running profit prints non-stop. The lidar has caught full build plates of first layer garbage of expensive filaments that wouldn't have been caught until they were a half-kg of waste on the P1P. I've been using Octoprint for years and started using the Spaghetti-detective when it was still just in it's infancy and it wouldn't have caught the imperfections the lidar does.

The lidar and included camera are worth it. This is my current favorite printer, it's not the most capable by size but it does have the widest range.

It's like tools, trucks, houses, shops. Buy once cry once, you may not always need it but man it's nice to have.
That's a good point, thank you for the feedback, it's much appreciated.
 

kppolich

Well-known member
Joined
Apr 7, 2020
Messages
344
Location
Eastern Iowa
I needed a solution to get this cooler up off the ground so I printed a custom width of this hook customizable and voila.
 

Attachments

  • IMG_7446 Large.jpeg
    IMG_7446 Large.jpeg
    187.8 KB · Views: 29

slodat

ALLIANCE MEMBER
Joined
Feb 6, 2010
Messages
3,679
Location
Central-ish, WA
Made another. This time for a tension/compression tapping chuck. I have a few collets and they have been rolling around in a Shaller bin. wanted a better way to organize and store what will be a full set #6 through 1/2. Spent some time in Fusion..

1678247504093.png

Some time for the X1C to do its thing..

9B929BFB-BF85-40DD-91EF-08A476B1D944.jpeg

As I learn to model things, I try to add more detail when it makes sense. The pockets for these collets are a great example. Tray turned out great.

EF1D7F14-D8B5-49D3-B2C7-FC514A79816D.jpeg
 

ER70S-2

Well-known member
Joined
Jan 2, 2015
Messages
796
@slodat That tray looks great. Is the top surface ironed or is that how smooth the top layers usually come out with that printer?
 

psiv92

Member
Joined
Mar 1, 2021
Messages
14
Location
UT
Made another. This time for a tension/compression tapping chuck. I have a few collets and they have been rolling around in a Shaller bin. wanted a better way to organize and store what will be a full set #6 through 1/2. Spent some time in Fusion..

1678247504093.png

Some time for the X1C to do its thing..

9B929BFB-BF85-40DD-91EF-08A476B1D944.jpeg

As I learn to model things, I try to add more detail when it makes sense. The pockets for these collets are a great example. Tray turned out great.

EF1D7F14-D8B5-49D3-B2C7-FC514A79816D.jpeg

Looks great! I've been meaning to do some tool holders for a while now.

Are those numbers painted/sharpied or is that a white filament?
 

slodat

ALLIANCE MEMBER
Joined
Feb 6, 2010
Messages
3,679
Location
Central-ish, WA
@slodat That tray looks great. Is the top surface ironed or is that how smooth the top layers usually come out with that printer?
Thank you! I'm really happy with how these turn out. I am using ironing on these. I use it on most anything with a horizontal flat surface.
Looks great! I've been meaning to do some tool holders for a while now.

Are those numbers painted/sharpied or is that a white filament?
It is white filament. Printed with the Bambu X1C.
 

LS1-IROC

Well-known member
Joined
Aug 6, 2011
Messages
173
Location
Grand Rapids MI
Coming from someone who owns printers up and down the scale from contraptions I built myself up to Raise 3d industrial machines the Bambu X1 is worth the money. I have mine running profit prints non-stop. The lidar has caught full build plates of first layer garbage of expensive filaments that wouldn't have been caught until they were a half-kg of waste on the P1P. I've been using Octoprint for years and started using the Spaghetti-detective when it was still just in it's infancy and it wouldn't have caught the imperfections the lidar does.

The lidar and included camera are worth it. This is my current favorite printer, it's not the most capable by size but it does have the widest range.

It's like tools, trucks, houses, shops. Buy once cry once, you may not always need it but man it's nice to have.
Well, I went ahead and cried once, now I'm excited to get the printer (ETA is end of March). I bought it with the AMS however, I'm not sure how much I will use it. I read that the AMS is sealed? Is it enough to keep hydroscopic filament dry?
 

ArcReactorKC

Well-known member
Joined
Jun 1, 2019
Messages
2,237
Location
Out in the county NE of KCMO
Well, I went ahead and cried once, now I'm excited to get the printer (ETA is end of March). I bought it with the AMS however, I'm not sure how much I will use it. I read that the AMS is sealed? Is it enough to keep hydroscopic filament dry?
Not completely, there is two spots inside for desiccant and it should ship with some. If the desiccant is good and your spools are already dry you should be fine. The app and the screen will also tell you when the humidity is high in the AMS.

I use the AMS a lot, I actually need to replace the slot one first stage feeder as one of the gears seems to be stripped. Although I think Bambu will warranty it.

Once you start printing in multi-color going back to painting seems tedious.
 

Eggman

Well-known member
Joined
Dec 29, 2010
Messages
82
Location
St. Louis
Hope this is the right place for this question.

Picked up a Anycubic Max printer about 3 weeks ago. Printed the owl out pretty well. Nothing stood out as being an issue. Used an object that I designed in Solidworks, saved as an stl file, imported into the prusa and cura slicer programs and used the micro sd card to transfer the files to the Anycubic Max printer. It would print for a while, couple of hours or so, and then create a huge stringy mess. The printer did this whether or not i used a file I created or one I downloaded from thingiverse, same stringy mess. Contacted Anycubic about this and showed them pics, their reply was I got a bad hot bed. It's definately warped. Their solution was to send me a new one in 10 to 12 days. A week went by, I asked for a tracking number. Then I find out the hot bed is out of stock. Same thing for the last week and a half.

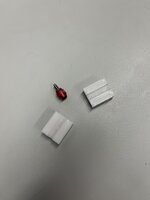
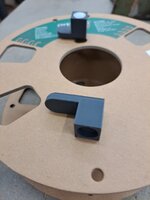
Now its been three weeks since I bought this printer, still no hot bed. Looking at the pic I attached, does it seem that it's a hot bed issue? Or is it something else deeper in the printer itself? The email I got last night says they have them in stock and I can either send the printer back or they will send me a hot bed. I've cleaned the bed with alcohol, used hairspray, still same results. I don't want to keep it and find out that it's more than the hot bed, but I also don't want to send it back to find out the hot bed would've fixed it.

Thanks for the help.

20230311_072053.jpg

20230221_042251.jpg
 
To avoid these ads, REGISTER NOW!
Top Bottom