To avoid these ads, REGISTER NOW!

The Everything 3D Printer Thread

Jswain

Well-known member
Joined
Apr 26, 2013
Messages
2,449
Location
Calgary, AB
Does it do the same thing if you print one of their stock, pre sliced objects? Which would eliminate your slicer settings, which could more likely be the cause.
 
To avoid these ads, REGISTER NOW!

Eggman

Well-known member
Joined
Dec 29, 2010
Messages
82
Location
St. Louis
The only one that I have that is their stock one is the owl. This happens with the ones that I have downloaded which I haven't changed the settings on. I'm going to reprint the owl and see what happpens.
 

Jswain

Well-known member
Joined
Apr 26, 2013
Messages
2,449
Location
Calgary, AB
The only one that I have that is their stock one is the owl. This happens with the ones that I have downloaded which I haven't changed the settings on. I'm going to reprint the owl and see what happpens.
That tells me its probably a setting in your slicer that needs to be changed. If the owl prints fine again then that will confirm

My guess is a retraction or temp issue where its printing a small blob and then hitting it on the next pass knocking the part off the bed and then you get the stringy mess

If the owl prints well I would either take note of the temps etc. It is printing at and mimic them, or do a calibration tower for the temp/retraction/flow individually and then go from there.
 
Last edited:

Jswain

Well-known member
Joined
Apr 26, 2013
Messages
2,449
Location
Calgary, AB
How fast are you printing? I found using only those clips to hold the glass bed on I was getting shifting & a lot of failed prints. I used some painters tape around the perimeter to stick it to tape it to the bed & the problem went away.
 

Eggman

Well-known member
Joined
Dec 29, 2010
Messages
82
Location
St. Louis
According to cura, it's 80mm/s, abs.

It seems the clips hold onto the print surface is held pretty tight to the hot bed. I'll add some painter's tape after lunch and try it again.

We'll see what happens.

Thanks.
 

Jswain

Well-known member
Joined
Apr 26, 2013
Messages
2,449
Location
Calgary, AB
Try slower too. 40mm/s just to see. Then work your way up. Are you printing with an enclosure with the abs? If not it's probably warping(the abs) and popping off the bed. Try some pla or petg
 
Last edited:

ER70S-2

Well-known member
Joined
Jan 2, 2015
Messages
796
@Eggman Is it warping and pulling off the bed right before it starts stringing of is it still firmly stuck to the bed when you discover the spaghetti?
 

Eggman

Well-known member
Joined
Dec 29, 2010
Messages
82
Location
St. Louis
Try slower too. 40mm/s just to see. Then work your way up. Are you printing with an enclosure with the abs? If not it's probably warping(the abs) and popping off the bed. Try some pla or petg
No enclosure, but no breeze (ie ceiling fan). Will try the 40mm/s speed and see what happens.
@Eggman Is it warping and pulling off the bed right before it starts stringing of is it still firmly stuck to the bed when you discover the spaghetti?
I don't know. It happens after I quit watching it. It is definitely not stuck to the bed when I find it with the spaghetti all over it.
Sounds like bad adhesion to the bed at first read
I've cleaned it several times with alcohol, making sure it's as clean as it can be. I've read about using hairspray to help with adhesion. Only time will tell.
 

ER70S-2

Well-known member
Joined
Jan 2, 2015
Messages
796
No enclosure, but no breeze (ie ceiling fan). Will try the 40mm/s speed and see what happens.

I don't know. It happens after I quit watching it. It is definitely not stuck to the bed when I find it with the spaghetti all over it.

I've cleaned it several times with alcohol, making sure it's as clean as it can be. I've read about using hairspray to help with adhesion. Only time will tell.
The large difference in temp between the extruded plastic and the room is causing it to warp and pull up from the bed. The part then crashes into the nozzle, gets totally dislodged, and the new filament has nothing to stick to. It then makes spaghetti. ABS's higher extrusion temp can benefit from an enclosure to minimize the difference in temp between the part and the air to prevent warping. That's my guess as to what's happening right now, anyway.
 

Meleon

Active member
Joined
May 25, 2013
Messages
32
When I print ABS, I spread ABS juice (search it in google it’s easy to make) on my bed and I made a box out of foam core board (just 4 sides, no top or bottom) for a make shift enclosure)
60% of the time, it works every time.
 

Jswain

Well-known member
Joined
Apr 26, 2013
Messages
2,449
Location
Calgary, AB
I would try another type of filament unless you specifically need abs. Pla is an excellent choice to figure out your settings. Petg would be a good choice after that if you want outdoor parts or pla+
 

LeonardY

Well-known member
Joined
Apr 16, 2011
Messages
5,020
Location
Southern California
Hope this is the right place for this question.

Picked up a Anycubic Max printer about 3 weeks ago. Printed the owl out pretty well. Nothing stood out as being an issue. Used an object that I designed in Solidworks, saved as an stl file, imported into the prusa and cura slicer programs and used the micro sd card to transfer the files to the Anycubic Max printer. It would print for a while, couple of hours or so, and then create a huge stringy mess. The printer did this whether or not i used a file I created or one I downloaded from thingiverse, same stringy mess. Contacted Anycubic about this and showed them pics, their reply was I got a bad hot bed. It's definately warped. Their solution was to send me a new one in 10 to 12 days. A week went by, I asked for a tracking number. Then I find out the hot bed is out of stock. Same thing for the last week and a half.

Now its been three weeks since I bought this printer, still no hot bed. Looking at the pic I attached, does it seem that it's a hot bed issue? Or is it something else deeper in the printer itself? The email I got last night says they have them in stock and I can either send the printer back or they will send me a hot bed. I've cleaned the bed with alcohol, used hairspray, still same results. I don't want to keep it and find out that it's more than the hot bed, but I also don't want to send it back to find out the hot bed would've fixed it.

Thanks for the help.

20230311_072053.jpg

20230221_042251.jpg
A hotbed issue will cause a print not to stick to the bed. if a part breaks free then the filament is just coming out with nothing to attach to. So yes, this looks like a hotbed issue.
Few questions.
Did you check your settings in CURA? Make sure your bed is turned on. (I don't use Prusa slicer but I assume they have the same.)
Do you preheat the bed?
What temperature do you have the bed set at?
Have you checked the connectors to the hotbed to make sure they are seated properly?
What type of filament are you printing with?
 

pwhittle

Well-known member
Joined
May 9, 2011
Messages
252
Location
Woodstock, GA
I pretty much only print with ABS.

i have very good print surface adhesion to the point that it is pulling the magnetic print surface off the magnetic bed From the ABS warping

it is a 38 hour print, so will have to start it over with clips helping to hold it down.

Paul
 

Attachments

  • 1C6499D1-69CE-45FF-A497-DE59870DE1F5.jpeg
    1C6499D1-69CE-45FF-A497-DE59870DE1F5.jpeg
    916 KB · Views: 86

Eggman

Well-known member
Joined
Dec 29, 2010
Messages
82
Location
St. Louis
Thanks for all of the great ideas and suggestions.

I lowered the speed to 50mm/s, moved it to a different room that is typically warmer that the rest of the house, used some hair spray for the next print. It made it farther than any of the other prints have done.

Used the PLA that the printer came with and it printed the owl out just fine. Of course they didn't send any more than what it was going to take to do the owl.

Looked up the ABS juice and glue, have to get some acetone to make some later today and give it a try. When I get the acetone, I'm going to pick up some foam board for a make shift enclosure.

Bed is turned on, it has to be preheated otherwise the printer won't start printing. Bed temp is set at the highest that the Kobra Max will allow 90 degrees C. I have checked all of the connectors on the entire printer per Anycubic's trouble shooting info.

My current choices of filament are ABS by Nova maker, PC by CC3ID, and ABS-Carbon Fiber by IEMAI. Yea, I evidently picked some tough filaments to print. I mainly need to print boat trim pieces and off road buggy trim pieces and parts. Thus the prints need to stand up to higher than normal temps.
 

Jehannum

Well-known member
Joined
May 3, 2012
Messages
1,347
Location
Albuquerque, NM
According to cura, it's 80mm/s, abs.

It seems the clips hold onto the print surface is held pretty tight to the hot bed. I'll add some painter's tape after lunch and try it again.

We'll see what happens.

Thanks.
oof, ABS at 80mm/s is way too fast.

I usually run at 50mm/s tops, and that's if I don't care about the surface finish of the final product. ABS is a tricky beast to get right. I usually use PVA glue and a room with no active HVAC.
 
To avoid these ads, REGISTER NOW!

Jswain

Well-known member
Joined
Apr 26, 2013
Messages
2,449
Location
Calgary, AB
I think a combination of slower speeds a makeshift enclosure and the home brew glue should net you more success!

If you print in smaller batches it will help as well as then if 1 is messed up it won't ruin 10 parts, and the part will be stuck to the bed for much less time so the chance of success will increase.
 

JackOfDiamonds

Well-known member
Joined
Jul 31, 2020
Messages
706
Location
Idaho (USA)
I have a question. I just learned they sell steel and ruby nozzles to prevent wearing out with"abrasive filaments" whatever that is. Does this happen with regular plastic too?

I've printed hundreds of pounds of PETG and never thought to change my nozzle. My rule for 3D printing is if it works, I don't mess with it. But I was just wondering if maybe my 0.6 nozzle might be a 0.8 by now.
 

Eggman

Well-known member
Joined
Dec 29, 2010
Messages
82
Location
St. Louis
I'm now running it at 50mm/s, pre heating the temporary enclosure (made with 1x2's and plastic sheathing), hairspray on the plate after washing it with dawn. We'll see how that goes. I'll stop tomorrow after work and get some acetone to try the homebrew glue.

With the Kobra max, the sd card slot that the machine recognizes is inside the enclosure not on the lcd screen.
 

Jehannum

Well-known member
Joined
May 3, 2012
Messages
1,347
Location
Albuquerque, NM
I have a question. I just learned they sell steel and ruby nozzles to prevent wearing out with"abrasive filaments" whatever that is. Does this happen with regular plastic too?

I've printed hundreds of pounds of PETG and never thought to change my nozzle. My rule for 3D printing is if it works, I don't mess with it. But I was just wondering if maybe my 0.6 nozzle might be a 0.8 by now.
Yes, brass nozzles wear out. Tool steel nozzles ****, because you have to run about 10-15° more and run slower because they're worse at conducting heat than brass. Abrasive filaments are things like glow-in-the-dark, or fiber-reinforced filaments.

I use tungsten carbide nozzles, but to be honest, you can buy a lot of brass nozzles for the $55 it cost to get the tungsten nozzle.
 

LeonardY

Well-known member
Joined
Apr 16, 2011
Messages
5,020
Location
Southern California
I've somehow angered the 3D printing gods.
1678685074109.png

I've used up all my first born. So I contacted QIDI support and after a number for tests. It appears I have to replace my main board.
I have researched and found it could be the MAX6675 chip and I have located it on the board. I have a replacement chip on the way and I will see if I can replace it. If not I guess I'll be buying a new main board.
 

Black300zx

Well-known member
Joined
Apr 8, 2019
Messages
781
Location
Elkton, Md
One of my winter projects on the boat was to move the VHF radio out of the dash "glovebox" and mount it somewhere where it's easily accessible and the speaker isn't muffled by a closed door. Found a spot under the dash, but needed an L-shaped bracket to mount it at a good, visible angle.

10 minutes of measuring, maybe 20minutes of modelling. I got fancy and made a 2D drawing so that I could quickly cut and hot-glue together some 1/4" plywood scraps to confirm I got the angles, hole sizes, and spacing right before printing. Let it print while I was working on other stuff and 7hrs later I have a mounted VHF :cool: 
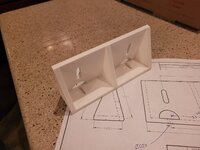
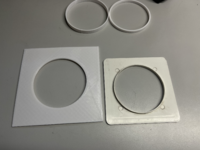
Could have made it out of wood, but frankly this was easier, less work, looks nicer, and I don't have to worry about sealing the wood from moisture.
 

Attachments

  • 20230312_192431.jpg
    20230312_192431.jpg
    608.1 KB · Views: 84
  • 20230312_200016.jpg
    20230312_200016.jpg
    753.6 KB · Views: 83

slodat

ALLIANCE MEMBER
Joined
Feb 6, 2010
Messages
3,679
Location
Central-ish, WA
The slicer has this section in it's settings:

1678730136506.png


Ironing goes back over top surfaces, at the prescribed speed an (low) flowrate. This has a smoothing effect on the surface. Without it, the parts have the visible witness lines of the print. It is remarkably good! This is the only printer I've used this on.
 

kaymccampbell

Well-known member
Joined
Feb 27, 2015
Messages
29,402
Location
Upstate New York
The slicer has this section in it's settings:

1678730136506.png


Ironing goes back over top surfaces, at the prescribed speed an (low) flowrate. This has a smoothing effect on the surface. Without it, the parts have the visible witness lines of the print. It is remarkably good! This is the only printer I've used this on.
I've always enjoyed the grain of printed things, but there were a couple I'd have liked smoother, for bolt up purposes. This could be my answer. Thanks.
 

no704

Well-known member
Joined
Apr 27, 2016
Messages
5,203
Does quidi print have ironing features? I usually print for casting moulds and frequently have issues with top flat surfaces.
 

ER70S-2

Well-known member
Joined
Jan 2, 2015
Messages
796
Does anyone have any tips for bridging with polycarbonate? Everything is beautiful except for the bridges which turn into blobby messes. The print does conclude after the blobby messes get covered up, but it's not ideal. Printing in an enclosure at 90F with Polymaker PC-Max (now called PolyMax). I have tried everything from no fan up to 100% fan on bridges and extruder temps from 250-270. 250 with 100% fan on bridges has yielded the best results so far, but it's not that much different than 270 with no fan. The only things I can think of trying next are:

a) Drying the filament (I don't think this will do anything because it seems pretty dry as-is)
b) Supports
 

ArcReactorKC

Well-known member
Joined
Jun 1, 2019
Messages
2,237
Location
Out in the county NE of KCMO
Does anyone have any tips for bridging with polycarbonate? Everything is beautiful except for the bridges which turn into blobby messes. The print does conclude after the blobby messes get covered up, but it's not ideal. Printing in an enclosure at 90F with Polymaker PC-Max (now called PolyMax). I have tried everything from no fan up to 100% fan on bridges and extruder temps from 250-270. 250 with 100% fan on bridges has yielded the best results so far, but it's not that much different than 270 with no fan. The only things I can think of trying next are:

a) Drying the filament (I don't think this will do anything because it seems pretty dry as-is)
b) Supports
How long of a bridge?

PC is not an easy to print filament in general, I have had luck with pausing at the first bridge layer with the nozzle parked away from the object, turning on my enclosure vent and dropping enclosure temp to 60, wait another 30 seconds for the temp in the enclosure to more or less stabilize and then print just the first layer that includes the bridge at 250 and 100% fan, pause again parked away from the object and bring the enclosure back up to 90 and the nozzle to 265-275 depending on brand of PC and move on.

It gives a decent first layer of bridge that helps it not be as stringy and thin. It is a pain in the *** of post processing gcode though.
 

ER70S-2

Well-known member
Joined
Jan 2, 2015
Messages
796
How long of a bridge?

PC is not an easy to print filament in general, I have had luck with pausing at the first bridge layer with the nozzle parked away from the object, turning on my enclosure vent and dropping enclosure temp to 60, wait another 30 seconds for the temp in the enclosure to more or less stabilize and then print just the first layer that includes the bridge at 250 and 100% fan, pause again parked away from the object and bring the enclosure back up to 90 and the nozzle to 265-275 depending on brand of PC and move on.

It gives a decent first layer of bridge that helps it not be as stringy and thin. It is a pain in the *** of post processing gcode though.
Only about 3/8"! Your idea sounds like a good plan, but it won't work for this part because the bridge is at an angle, so bridging occurs during many layers. I'm trying tree supports now. Hopefully it works out.

This is the part:
https://www.printables.com/model/62523-delta-p-fan-duct-v2-r2-for-mk3s-extruder#preview

The problematic area is the roof directly over where the air exits the duct. I was able to print a really nice one with ASA which should work for a while, but I'd like to have the increased temperature resistance of PC.
 

kppolich

Well-known member
Joined
Apr 7, 2020
Messages
344
Location
Eastern Iowa
Today I installed a new dryer vent outside louver piece. However the end on the inside that accepts the dryer duct was a bit short and I always wanted a bigger piece to fill in the backside you see in our basement bathroom.

3 hours on the printer, 2 prints, voila!

Next up, touch up paint on the duct work.
 

Attachments

  • tempImagevfcgyp.png
    tempImagevfcgyp.png
    4.4 MB · Views: 31
  • tempImageUN6CjB.png
    tempImageUN6CjB.png
    4.8 MB · Views: 31
  • tempImageyqTMhp.png
    tempImageyqTMhp.png
    4.5 MB · Views: 36
  • tempImagekf7BIO.png
    tempImagekf7BIO.png
    5.7 MB · Views: 34
To avoid these ads, REGISTER NOW!
Top Bottom