To avoid these ads, REGISTER NOW!

The Hobby Garage

Alexbn921

Well-known member
Joined
Aug 22, 2013
Messages
579
Location
East Bay Nor Cal
I started working on my garage as soon as we bought our first house 1 year ago. It was mostly a storage area with just enough space to work on my bikes, RC cars, house… My car use to be in it but that is gone and I have some time to really work on making it a fun useful place for me. It still has to store overflow from the house and my kids many outdoor toys. I enjoy working on cars, bikes, motorcycles, RC’s of all sorts. I also want to be able to do wood and metal work for the house and other projects. I started looking for inspiration online and stumbled onto the 12 gauge garage and the rest of Garage journal. It has inspired me to look for creative solutions and remake my small garage.
About the garage:
19X20 with a 15 foot wide door, 1 house door 1 outside door.
First thing I did was replace the outside door that was rotted out and added some shelving. It stayed that way for almost a year, now it is moving along fast.


Work bench, back wall as of 12-1-14


List of things done:
1. Insulation
Garage door with radiant barrier bubble insulation. (must be done with an air gap!)


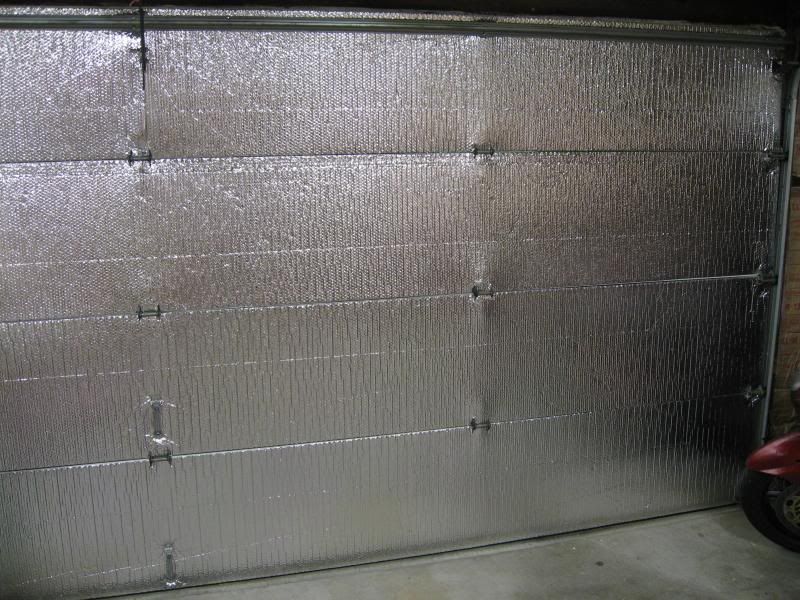
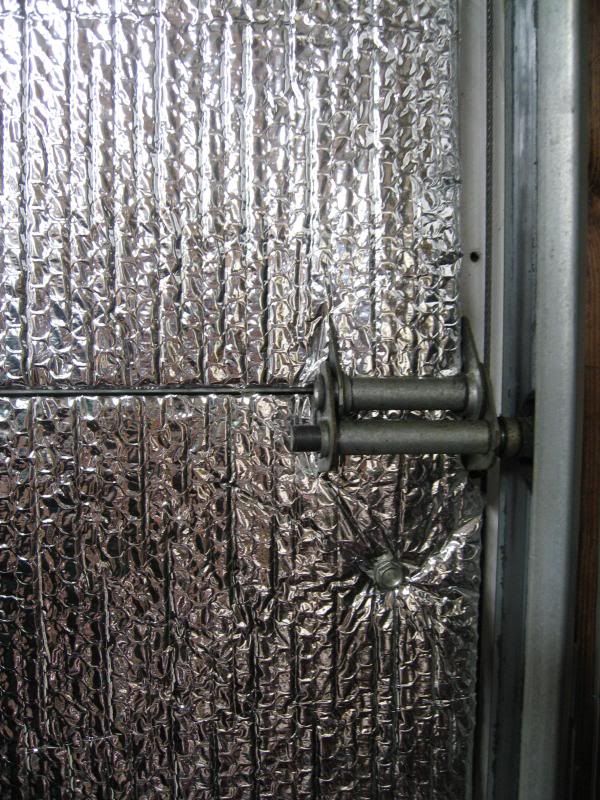
Super light and easy. The afternoon sun hits the door and it was 130+ on an average day. This made the garage unbearably hot. Afterwards it much cooler and quitter too.
R-13 on all walls and in the roof. Went from +20 to less the outside. This made such a huge difference, I wish I had done it sooner.
2. Install Panasonic FV-30VQ3 WhisperCeiling 290 CFM Ceiling Mounted Fan with weekly timer switch. Runs from noon to 8pm every day.
(fan pic)
3. Demoed 60 year old shelves and cabinets.

4. Rebuild shelves using as much of the old wood as possible.
a. Floor to ceiling made for Rubbermaid 18 gal Roughneck Storage Box. 2 sets of 4 foot by 2 foot with 4 shelves. 3 boxes per shelf.

b. I had to move the garage door supports to clear the new shelfs

5. Stereo system. PC 200 Watt systems with Ipod dock, remote and old bookshelf speakers.
6. Rebuild old falling down work bench for Chop saw. I used the original wood and 1 sheet of plywood. I located it outside to keep the mess out of the garage. Stained to protect from elements.


7. Installed a 16x16 foot sunshade on the side of the house.
8. Move compressor outside and ran all air, wiring with remote switch.

List of things to do:
1. Build workbench. Need to find one more toolbox as a base.
2. Install wall control metal pegboard.
3. Paint back wall.
4. Build a shed. Get all the unused **** out.
5. Find a bigger vise.
6. Install a quick release system on outdoor bench.
 
Last edited:
To avoid these ads, REGISTER NOW!
OP
A

Alexbn921

Well-known member
Joined
Aug 22, 2013
Messages
579
Location
East Bay Nor Cal
My intention for this tread is to chronicle how I use and improve my garage.
My project for the weekend was cleaning installing new rotors on the bike.
I just received my XTR Carbon Pads and carbon rotor.
Bling bling stoppers
Cleaned, taped and torqued everything. They are a little warped, so I'm going to have to work on that.


Last edited:
OP
A

Alexbn921

Well-known member
Joined
Aug 22, 2013
Messages
579
Location
East Bay Nor Cal
Charging station

Charging station

If you are like me you have a lot of chargers. I like unplug them when they are not in use and I need a place to keep them all. Right now there are 7 chargers that I use:
Ipod
RC car 1, 2
RC Heli / Plane
Bicycle light 1,2
Garmin / GoPro / Samsung
Plus the all-important stereo system.
I ordered a 8 port DJ switch and wired it up to an outlet so that it doesn’t take up a plug. It is fused and each port is switched.
 
OP
A

Alexbn921

Well-known member
Joined
Aug 22, 2013
Messages
579
Location
East Bay Nor Cal
Tool box Snap-on krl761b

Hi
I picked up a Snap-on krl761b on Craigslist for $1500. It is in good shape, but I wanted to clean up the slides and paint. Thanks for all the garage journal posts on how to clean up these boxes.
I removed all the slides and took some pictures, so enjoy.
Not to bad, but a couple of the drawers where not the smoothest.

Used a screwdriver to pry out the slides and then lift them up. You have to start at the top and work your way down.

Took pictures so I could put it back together.


Most of the slides ready for cleaning

Cleaned everything with diesel and and a brush.
Lubed with Super lube 21030. I used a small paint brush to get into the nooks and crannies.
 

51rider

Well-known member
Joined
Dec 21, 2009
Messages
502
Location
London, England.
Good work on the Snappy.
Just done the same thing to my tool box-found the instruction book to my DeWalt cordless in the bottom of the cab. Have absolutely no idea how it got in there:dunno:
 
OP
A

Alexbn921

Well-known member
Joined
Aug 22, 2013
Messages
579
Location
East Bay Nor Cal
Thanks 51rider
I finally got it all back together last night. Damn that was a lot of work, but the drawers are soooooo smooth now.

I need to work on organizing it a little better and make some more labels. I used magnets so they can be moved as I load the box up.

Next on the list is to make a work bench.
I'm looking for 2 Vidmar like cabinets to make a 9-10ft work bench out of. I want to be able to sit down and work on things.
 
OP
A

Alexbn921

Well-known member
Joined
Aug 22, 2013
Messages
579
Location
East Bay Nor Cal
Mac tools MB8800 Clean and Lube
I got a used Mac MB8800 this weekend and needed to clean it up. I had just done my other box so I had all the stuff I needed. This is a ball bearing box with detents.
You cannot remove the drawers with the sides on like a Snap-on box. Push the little tabs on the inside of the box and pull the front of the slide out while pushing the drawer back. This will separate the slides from the drawer.

Once everything is out, I cleaned and lubed.

This box had all small drawers on top and I wanted a 4”, so I switch around the slides to get the correct layout.

This box is going to be used as a support for my new workbench. I am taking off the wheels so that I can get a 37” work surface. Still thinking about layout and whether To have 12ft of butcher block or 6 Butcher and 6 steel.

Need a spot for a vise. A drill press will go on the far left and peg board will line the wall under the cabnets.
 
OP
A

Alexbn921

Well-known member
Joined
Aug 22, 2013
Messages
579
Location
East Bay Nor Cal
Wilton 300S vise restore
3 inch jaws and 26ish lb’s.
I picked this up on Craigslist for $110. It’s in pretty good shape to start and it is not missing any parts.


The action is a little sticky and it has been used outside for most of its life.


To start, I completely disassembled the vise.


Then I took a wire brush in a drill to most of the parts. The rust is not that bad and most of it came off with little effort.
I’m going to uses Permatex type anti-seize on all the threads. Super lube on the main slides and for a protector on the non-painted areas like the bottom clamp. Paint will be Rust-Oleum Hammered Metal Finish Spray, Verde Green.
I have some questions for the Wilton experts.
Is it worth doing a Molasses soak to get every last bit of rust or am I fighting a losing battle?
The center pin has markings on one side; do the markings go up or down?
 
OP
A

Alexbn921

Well-known member
Joined
Aug 22, 2013
Messages
579
Location
East Bay Nor Cal
This weekend I moved my compressor outside and ran the electrical and air hose. It’s nothing special but it gets the job done. One thing is that it is stupid loud and takes up a fair share of space. I got the box as scrape from work. It is weather tight and vented. The steel is around 10 gage. To start I leveled the area with pavers and set the box in place, all 100+ lb’s of it. Then I cut an old 2 inch pipe and a stub of PVC. I wanted the connection to the house to be a slip fit. This was if something moves it won’t hurt the house. I already had most of the hose in place, so I just added another line outside. There was already a dedicated outlet for the compressor that I moved up and installed a switch in it. This will control the compressor from inside and give me a power source for the bench that I am going to build. I was going to put a plug, but decided to just wire it directly. Too bad it’s on 115v and not 230.


OP
A

Alexbn921

Well-known member
Joined
Aug 22, 2013
Messages
579
Location
East Bay Nor Cal
Thanks Guys
I am still working on the boxes and moving stuff as the plan comes together more. Here is a pic of one drawer. As soon as I find another box for the workbench everything will get moved around.
 
OP
A

Alexbn921

Well-known member
Joined
Aug 22, 2013
Messages
579
Location
East Bay Nor Cal
Making some progress.
I wire wheeled everything except for the base last night and it is looking good. Paint should be here by the weekend.

 
OP
A

Alexbn921

Well-known member
Joined
Aug 22, 2013
Messages
579
Location
East Bay Nor Cal
One step closer to done. Cleaned everything for the last time and prepped for paint. Lube/coated all bare metal parts with Superlube and assembled. Taped then acetone wiped and primed. Pins are in and are going to be painted. Endcap, handles and jaws will be polished and waxed.


Bricen18

Well-known member
Joined
Mar 9, 2013
Messages
279
Location
PA
nice work. Those tool boxes really cleaned up, and the vise is looking good!
 

smokeysevin

Well-known member
Joined
Aug 17, 2013
Messages
131
Location
Houston
That vice came out great, very impressive. Where did you get the DJ power block? I like that idea a lot.

Sean
 
To avoid these ads, REGISTER NOW!

don long

Well-known member
Joined
Mar 31, 2012
Messages
8,841
Location
southern california
Thanks for sharing Alex
I thing the vice came out very nice
I like the way you displayed each piece of it when it was dismantled
You have given me the inspiration I need to tear down my wilton and refresh the paint on it

I never thought of restacking tool box drawers before
You got to love the "Garage Journal"

Thanks
Don
 
OP
A

Alexbn921

Well-known member
Joined
Aug 22, 2013
Messages
579
Location
East Bay Nor Cal
Thanks to Hiball I decided to tear apart my 4 year old Craftsman 2 ton aluminum jack. It started leaking right away and then would not lift to full height. I have not used it in 2 years and finally decided to tear it apart. Nothing to lose at this point.


Pulled out the ram unit. It was only held in by a couple bolts and a pin.

Pump piston was leaking so off it came.


I replaced all the O-rings and cleaned everything. I laid out all the parts so I won’t miss anything.

 
OP
A

Alexbn921

Well-known member
Joined
Aug 22, 2013
Messages
579
Location
East Bay Nor Cal
Road bike needed some new rubber and a little love. I ordered up some new Schwalbe One 25mm tires. Baby powdered the insides of the tires and installed them. Cleaned up the brake tracks and adjusted the bearings. Ready to go for the weekend.


nmk_61802

Well-known member
Joined
Mar 6, 2008
Messages
965
Location
Central IL
It looks like the rear cap on your Wilton was missing originally? Do you have a part number for what you replaced it with? I have been told that a bearing cap works well, but cannot seem to find one the proper size for my vise.
 
OP
A

Alexbn921

Well-known member
Joined
Aug 22, 2013
Messages
579
Location
East Bay Nor Cal
Thanks Guys
The end cap was not missing but it was banged up. I massaged it back and cleaned it up.
Paint is Rust-Oleum Hammered Metal Finish Spray, Verde Green. I ordered it on Amazon. If you want the hammered finnish you really need to put it on thick.
 

mattyschopshop

Active member
Joined
Mar 25, 2013
Messages
28
Location
pottstown pa
just wondering how did you cman jack work out did you finish it up also if you did does it work and not leak i have the same jack and same issue
 

G20-Budo

Well-known member
Joined
May 31, 2013
Messages
987
Location
Chandler, AZ
Alex,

Great thread. Those tool boxes you found turned out great! And of course the vise turned out great too.
 

HSpencer

ALLIANCE MEMBER
Joined
Nov 28, 2010
Messages
2,854
Location
South Central US
Beautiful job on the vise!! You did a greatly detailed job on it. And it was a super find and score!!

Best Regards
Herb Spencer
 
OP
A

Alexbn921

Well-known member
Joined
Aug 22, 2013
Messages
579
Location
East Bay Nor Cal
Team associated RC10 4X4

Team associated RC10 4X4.
Picked up a used 1/10 4x4 on Craig’s list and set to work stripping it and ordering parts. I won’t bore you with the details but it is now a very different beast. Top speed GPS verified 29.1 mph. Later next week when all of the parts are in I’ll do another run. Trying to hit 34mph by the end of the week.
Its way bigger then my 1/18. The small one will do 27mph. I had it geared for 40+ and it was uncontrollable.


I added some fender wells to keep the truck from filling up with rocks and stuff.
 
Last edited:
OP
A

Alexbn921

Well-known member
Joined
Aug 22, 2013
Messages
579
Location
East Bay Nor Cal
2007 Roubaix expert
Merry Xmas to me, I got new bars and tape for the bike. Easton EC70 Sl with Roubaix tape. Spent most of the day setting up the controls and changing the cables. I wanted everything to be right, or at least close before taping the bars up. After the bike was all back together 4 hours later I found that my rear brake was not returning to full open. Pulled the rear brake off and the next morning tore it apart for a good clean and fresh lube. Bike back to its glory days and I love my new bars. They are worlds stiffer and make the bike handle better than ever.


JustinS

Well-known member
Joined
Jul 19, 2010
Messages
366
Location
Altoona, IA
Thanks to Hiball I decided to tear apart my 4 year old Craftsman 2 ton aluminum jack. It started leaking right away and then would not lift to full height. I have not used it in 2 years and finally decided to tear it apart. Nothing to lose at this point.


Pulled out the ram unit. It was only held in by a couple bolts and a pin.

Pump piston was leaking so off it came.


I replaced all the O-rings and cleaned everything. I laid out all the parts so I won’t miss anything.

I've got that same jack and it is broke from leaking. Where did you source the new orings?
 
OP
A

Alexbn921

Well-known member
Joined
Aug 22, 2013
Messages
579
Location
East Bay Nor Cal
SC10 diff and battery work

So I disassembled the whole back end of the truck this weekend. First thing on the list was to rebuild the differentials with new seals and gears. I also ground down the outdrive form more clearance. Next I drilled a hole in the firewall and installed a fan for the motor. Before reinstalling the motor, I swapped out the 14 tooth gear for a 16.

The stock tires where completely shot so some street fighters where mounted/glued on new wheels and the old rims will get fresh dirt tires.


I was waiting on conectors for the 2nd battery and they also showed up. Instead of the stock plugs that like to get hot at 100+ amps, the battery was hard wired to a dean’s connector.
Stock


Strapped the GPS and did some speed runs. The new tires are amazing and the 16 gear topped out at 40 mph. Now I need stiffer springs. The body roll is out of control to the point of flipping the truck right over in a fast turn.

I tried to gets some shots of it doing wheelies down the street, but it was getting dark.
 
To avoid these ads, REGISTER NOW!
Top Bottom