To avoid these ads, REGISTER NOW!

Between 265 & 485 SQ/FT The Jungle

Workspaces sized between 265 and 485 squarefeet.

Krang

Well-known member
Joined
Oct 22, 2018
Messages
185
Location
Hawaii
I’m going to edit this once I get to a computer, but here we go.

I like to work on cars and am generally curious about everything. Have been my entire life. This has lead me many interesting places, but I always come back to a garage it seems. Once I had the opportunity to make my own space, I used what I could at the time and here it is.

2 - 40’ shipping containers (one is a shop, one is storage) spaced 14’ apart at one end and 18’ apart at the other (I have an interesting space available, and wanted to make the most of it)

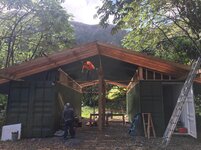
Simple roof between them built with some friends, and I’ve got myself a “garage”!

I built up a grade with surge rock and gravel, leveled it out and compacted / steamrolled.

First container placed
ce164afb0e7fb4b2b26918533cfe8255.jpg

Both containers placed and positioned
777001ab1ec64947268a31a02cbab10d.jpg

Starting to clean and paint
3339f176f18071a86ed91151b9b28e6b.jpg
0f7b6fe9e04a6048c3b4a1ecb2c0ff0c.jpg
d39965a51371a560e8935c0e18c2afcc.jpg

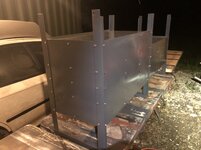
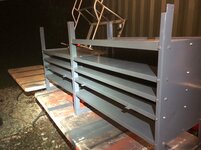
Building shelving inside the containers, and a lockable back room / humidity controlled room
fa080667afe0a362d2638905ecb54b9a.jpg
29bba3c9ee245b484a5d7f1d4bcd5a48.jpg
1b83d04cd2986713e4beffa776337be8.jpg

Cross beams for eventual lighting and to secure the shelving without bolting through the container
80842d4883e03456957a94780fa4f235.jpg

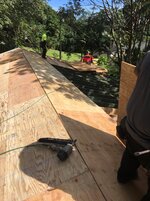
Roof! Because they are not parallel, this was a lot of geometric fun.... not.
735e2a09d075a5379d7ab3780f4a845c.jpg
b1971c948de3ea1ffa446cd4967d3f40.jpg
24bfabf3b5edd6862d7cad108f1c2ba8.jpg
abcd7d8c608962da0fa505818a220ea0.jpg
7e3f6334e5969fae94dd58fda8d563cc.jpg
2c40693c21f4afdbaee03a18acc3ffb0.jpg
9c9d8da43b832d59210a001777e7a654.jpg

No sooner had the roof been completed and we had a storm. A tree fell right on it, thankfully the roof won.
030cc0637c95fa20136754bd4daf13da.jpg

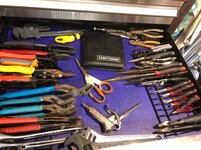
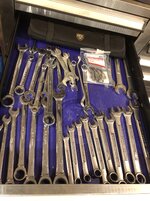
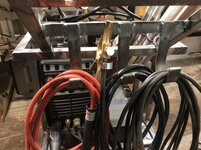
Bringing over the tools, my family was happy to get this stuff out of their garage!
7b24570dece9d0c7feaf4074f00b2fcd.jpg

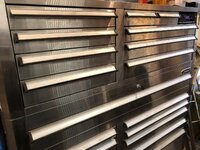
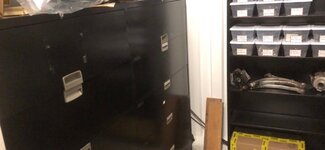
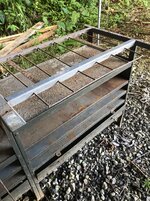
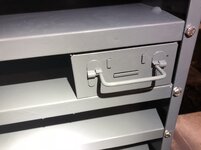
I was in dire need of storage... a local office was selling a bunch of metal filing cabinets and shelving for dirt cheap (the big 4 drawer cabinets were $10!) I figured I could make that work.
3f336b84a89e86ec6a5646783b8b336e.jpg
a4bd5a3bb92f760da7e54ea9ead2b922.jpg

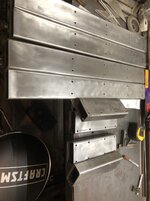
To make the drawers more useful I used the filing system supports to make dividers
1778d591508e032f1d23c7f9cbd3a136.jpg
e734a426134332afd2c0fd0731083748.jpg

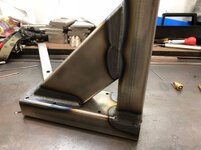
Decided I wanted to learn how to weld tig
c9a02209d64a43e30fae0242776cf8f1.jpg

Made a cart that stores easily under my workbench / shelving
3fc83cd45e3ccde749954d6251bcc22c.jpg
0b120856f87f792f74cfbc19da9991e5.jpg
3e52e7710a11a1eda2201d52e920022f.jpg

Wanted more headroom at my workbench, so I raised the shelf above it
0f15106630110bc5b449e46c9267dab5.jpg

Also repurposed some random cabinet scraps for power tool and clamp storage (they just so happened to be the same color, I didn’t destroy a perfectly good cabinet I promise)
a7694595ee30bf8e1767ed061f362842.jpg

Took lots of stuff out and am in the process of reorganizing now
1b296153d631cea7243a0729e8bdd08b.jpg

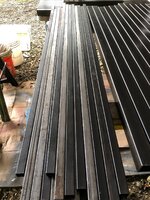
Found 200 pieces of 3/4” stainless tube dimensioned to 18” at a local recycler, figures I could make better use of it...
0752a25b208f16b1e4ae6ff9d1747f9b.jpg

Practicing some detail stuff, made a clock
57af60b0cb39f1b4d90eb000f9c34b67.jpg
638e67dd288d9eddc77f9187c94bb3f8.jpg
da3784704c4392d58fb9c4b2f84a6212.jpg
3e4d7ab35a06fe3bf07367760b256b84.jpg
5fed9202c7dbe4a371a58c3b83f79254.jpg

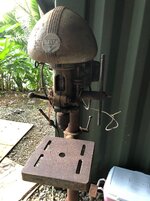
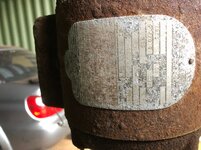
I’ve been needing a heavy duty work surface, found this brute on Craigslist, cams with a Yost 202 Vise! Weighs 250lbs easy without the drawers. Should do the trick. However, it was destroyed. So, weekend project is to clean it up!
05f79cf234e2024d95a0e6309c4e81f8.jpg

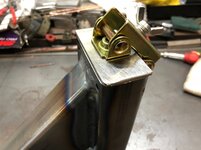
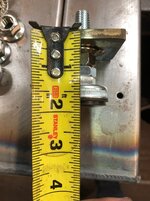
Old school ingenuity here... the drawers are not on slides so they can just pop out when moving the bench. This grate was built in, pulls out of the top under bench area and latches on the bottom to hold the drawers in!
0e9325aa2d4365307f79abcb213a7391.jpg
4226aa2a1cf58ade918a744742bbc8e3.jpg


Vise was done first..
aa4331184528de4a4954dc8dbef53dc0.jpg

The bench is disassembled, wire wheeled, sanded, treated with phosphorus etch-and-prep, rinsed, and drying now. Should have things back together in a few days. It’s missing some drawers so I will probably try and make some. Thinking 2 - 3/4” sheets of hardwood ply and a piece of Masonite on top. Capped with a stainless steel sheet. Should be stout enough to take some pounding if needed.

Sent from my iPhone using The Garage Journal mobile app
 

Attachments

  • 3e4d7ab35a06fe3bf07367760b256b84.jpg
    3e4d7ab35a06fe3bf07367760b256b84.jpg
    111.8 KB · Views: 4
  • 3fc83cd45e3ccde749954d6251bcc22c.jpg
    3fc83cd45e3ccde749954d6251bcc22c.jpg
    295.8 KB · Views: 2
  • e734a426134332afd2c0fd0731083748.jpg
    e734a426134332afd2c0fd0731083748.jpg
    170 KB · Views: 2
  • 1778d591508e032f1d23c7f9cbd3a136.jpg
    1778d591508e032f1d23c7f9cbd3a136.jpg
    106.8 KB · Views: 2
  • a4bd5a3bb92f760da7e54ea9ead2b922.jpg
    a4bd5a3bb92f760da7e54ea9ead2b922.jpg
    231 KB · Views: 2
  • 3f336b84a89e86ec6a5646783b8b336e.jpg
    3f336b84a89e86ec6a5646783b8b336e.jpg
    67.9 KB · Views: 2
  • 7b24570dece9d0c7feaf4074f00b2fcd.jpg
    7b24570dece9d0c7feaf4074f00b2fcd.jpg
    484 KB · Views: 1
  • 030cc0637c95fa20136754bd4daf13da.jpg
    030cc0637c95fa20136754bd4daf13da.jpg
    743.2 KB · Views: 1
  • 9c9d8da43b832d59210a001777e7a654.jpg
    9c9d8da43b832d59210a001777e7a654.jpg
    373.2 KB · Views: 2
  • 2c40693c21f4afdbaee03a18acc3ffb0.jpg
    2c40693c21f4afdbaee03a18acc3ffb0.jpg
    492.5 KB · Views: 2
  • c9a02209d64a43e30fae0242776cf8f1.jpg
    c9a02209d64a43e30fae0242776cf8f1.jpg
    413.2 KB · Views: 1
  • 7e3f6334e5969fae94dd58fda8d563cc.jpg
    7e3f6334e5969fae94dd58fda8d563cc.jpg
    423.4 KB · Views: 0
  • 0b120856f87f792f74cfbc19da9991e5.jpg
    0b120856f87f792f74cfbc19da9991e5.jpg
    566.8 KB · Views: 0
  • 3e52e7710a11a1eda2201d52e920022f.jpg
    3e52e7710a11a1eda2201d52e920022f.jpg
    466.6 KB · Views: 0
  • 638e67dd288d9eddc77f9187c94bb3f8.jpg
    638e67dd288d9eddc77f9187c94bb3f8.jpg
    179.3 KB · Views: 0
  • 5fed9202c7dbe4a371a58c3b83f79254.jpg
    5fed9202c7dbe4a371a58c3b83f79254.jpg
    124.5 KB · Views: 0
  • 57af60b0cb39f1b4d90eb000f9c34b67.jpg
    57af60b0cb39f1b4d90eb000f9c34b67.jpg
    176 KB · Views: 0
  • 0752a25b208f16b1e4ae6ff9d1747f9b.jpg
    0752a25b208f16b1e4ae6ff9d1747f9b.jpg
    234.4 KB · Views: 0
  • 1b296153d631cea7243a0729e8bdd08b.jpg
    1b296153d631cea7243a0729e8bdd08b.jpg
    263.8 KB · Views: 0
  • a7694595ee30bf8e1767ed061f362842.jpg
    a7694595ee30bf8e1767ed061f362842.jpg
    454.4 KB · Views: 0
  • 0e9325aa2d4365307f79abcb213a7391.jpg
    0e9325aa2d4365307f79abcb213a7391.jpg
    862.5 KB · Views: 0
  • 0f15106630110bc5b449e46c9267dab5.jpg
    0f15106630110bc5b449e46c9267dab5.jpg
    238.7 KB · Views: 0
  • 4226aa2a1cf58ade918a744742bbc8e3.jpg
    4226aa2a1cf58ade918a744742bbc8e3.jpg
    762.7 KB · Views: 0
  • aa4331184528de4a4954dc8dbef53dc0.jpg
    aa4331184528de4a4954dc8dbef53dc0.jpg
    195.2 KB · Views: 0
  • da3784704c4392d58fb9c4b2f84a6212.jpg
    da3784704c4392d58fb9c4b2f84a6212.jpg
    253 KB · Views: 0
  • abcd7d8c608962da0fa505818a220ea0.jpg
    abcd7d8c608962da0fa505818a220ea0.jpg
    388 KB · Views: 0
  • 24bfabf3b5edd6862d7cad108f1c2ba8.jpg
    24bfabf3b5edd6862d7cad108f1c2ba8.jpg
    380.9 KB · Views: 0
  • 29bba3c9ee245b484a5d7f1d4bcd5a48.jpg
    29bba3c9ee245b484a5d7f1d4bcd5a48.jpg
    231.7 KB · Views: 0
  • 05f79cf234e2024d95a0e6309c4e81f8.jpg
    05f79cf234e2024d95a0e6309c4e81f8.jpg
    225.2 KB · Views: 0
  • 0f7b6fe9e04a6048c3b4a1ecb2c0ff0c.jpg
    0f7b6fe9e04a6048c3b4a1ecb2c0ff0c.jpg
    797.6 KB · Views: 0
  • 3339f176f18071a86ed91151b9b28e6b.jpg
    3339f176f18071a86ed91151b9b28e6b.jpg
    550.4 KB · Views: 0
  • 777001ab1ec64947268a31a02cbab10d.jpg
    777001ab1ec64947268a31a02cbab10d.jpg
    585.5 KB · Views: 0
  • 1b83d04cd2986713e4beffa776337be8.jpg
    1b83d04cd2986713e4beffa776337be8.jpg
    201.1 KB · Views: 0
  • 80842d4883e03456957a94780fa4f235.jpg
    80842d4883e03456957a94780fa4f235.jpg
    169 KB · Views: 0
  • ce164afb0e7fb4b2b26918533cfe8255.jpg
    ce164afb0e7fb4b2b26918533cfe8255.jpg
    543 KB · Views: 0
  • fa080667afe0a362d2638905ecb54b9a.jpg
    fa080667afe0a362d2638905ecb54b9a.jpg
    192.2 KB · Views: 0
  • b1971c948de3ea1ffa446cd4967d3f40.jpg
    b1971c948de3ea1ffa446cd4967d3f40.jpg
    296.5 KB · Views: 0
  • 735e2a09d075a5379d7ab3780f4a845c.jpg
    735e2a09d075a5379d7ab3780f4a845c.jpg
    458 KB · Views: 0
  • d39965a51371a560e8935c0e18c2afcc.jpg
    d39965a51371a560e8935c0e18c2afcc.jpg
    904.4 KB · Views: 0
Last edited:
To avoid these ads, REGISTER NOW!

95riosnake

Well-known member
Joined
Oct 26, 2013
Messages
394
Location
Pittsburgh, PA
Very cool project, that roof really set off the whole structure nicely. Those overhangs give you a lot of covered area on the sides also. Definitely subscribing!
 

tooltwister

New member
Joined
Nov 17, 2013
Messages
3
Very nice set up. I am having a hard time finding containers under $6000 and I am only 150 miles from Albuquerque, NM. I would like to do something similar.

Why the wood and shingle roof instead of coraggeted? It looks great, but expensive as well.

Looks great. Be safe.
 
OP
K

Krang

Well-known member
Joined
Oct 22, 2018
Messages
185
Location
Hawaii
These were used, and had a few dings but they were minor (and easily repaired). $3500 each, so not bad! The biggest improvement I made was installing zerk grease fittings on the door hinges.

I live in a semi-residential area and the roof needed to look decent and match the surroundings. Also, it needed to be quite strong as we receive lots of rain and heavy winds regularly. Finally, I knew how to build it and had never done a corrugated roof.

The wing walls are sheeted with roughsawn plywood with batons in the event I ever want to enclose the barn.


Sent from my iPhone using The Garage Journal mobile app
 
OP
K

Krang

Well-known member
Joined
Oct 22, 2018
Messages
185
Location
Hawaii
Interesting build. Using the storage containers has me thinking.


If you have access to a plasma cutter or the like you can easily cut doors in the sides too. Hard to beat the bang/buck for a container for sqft and security. I couldn’t have built a comparable framed structure for $3500, so it was a no brainer.
 
OP
K

Krang

Well-known member
Joined
Oct 22, 2018
Messages
185
Location
Hawaii
Progress today! All shelves and panels were stripped, sanded, and rust neutralized. Then painted as close to the original color that I could get. Reassembled with stainless hardware.

fbb1294d05203db6f971f5df152efc88.jpg

ca55f8f9d2c77edbe5ec76ad75f55f5b.jpg

e14d330da46cdbbd5dfdb8bdadec4906.jpg


For the drawers I have some UHMW tape to help them slide easier and lined the insides with toolbox liner:

d5d5f82b28c390d5b9943c064dba32d7.jpg

047f721f7dc8b4c303cafadf84cf2c60.jpg

d563b2f39870af83fd3cb2d2486cec6f.jpg

1c2cb6aee1f48a0ca08529ee2082f6c0.jpg

Also, finished the vise a few days ago, ended up needing to clean the handles down to bare metal straighten them out, polish, and oil them. Should be all set.

54a07e64091cb18fc793be734a43a1b0.jpg

Finished:FBE8B8CA-15AB-45DE-85BF-F5FCC28F20F1.jpeg
 

Attachments

  • fbb1294d05203db6f971f5df152efc88.jpg
    fbb1294d05203db6f971f5df152efc88.jpg
    398.8 KB · Views: 0
  • ca55f8f9d2c77edbe5ec76ad75f55f5b.jpg
    ca55f8f9d2c77edbe5ec76ad75f55f5b.jpg
    207.1 KB · Views: 0
  • e14d330da46cdbbd5dfdb8bdadec4906.jpg
    e14d330da46cdbbd5dfdb8bdadec4906.jpg
    370.9 KB · Views: 0
  • d5d5f82b28c390d5b9943c064dba32d7.jpg
    d5d5f82b28c390d5b9943c064dba32d7.jpg
    261.8 KB · Views: 0
  • 047f721f7dc8b4c303cafadf84cf2c60.jpg
    047f721f7dc8b4c303cafadf84cf2c60.jpg
    128.2 KB · Views: 0
  • d563b2f39870af83fd3cb2d2486cec6f.jpg
    d563b2f39870af83fd3cb2d2486cec6f.jpg
    244 KB · Views: 0
  • 1c2cb6aee1f48a0ca08529ee2082f6c0.jpg
    1c2cb6aee1f48a0ca08529ee2082f6c0.jpg
    338.6 KB · Views: 0
  • 54a07e64091cb18fc793be734a43a1b0.jpg
    54a07e64091cb18fc793be734a43a1b0.jpg
    215.8 KB · Views: 9
Last edited:

Mikkeli

Well-known member
Joined
Apr 12, 2018
Messages
192
Location
Central Finland
That is something really different, clever use of containers. Also really nice work with the workbench and the Yost vise.
 

LXCam

ALLIANCE MEMBER
Joined
Apr 23, 2013
Messages
19,090
Location
AZ
That turned out incredibly cool. And I know you said you like unique spaces but was there any other reason to build a structure that difficult to construct and wasteful with material. Don't get me wrong, I luv it and dig what you're doing with it as I basically did something very similar for my shop. Mine is 18ft clear and as it is, it's loaded. I just can't imagine utilizing that space effectively unless it's just a dry parking area. Don't mean to come across as a Debbie downer, but my OCD required me to ask ;)
 
OP
K

Krang

Well-known member
Joined
Oct 22, 2018
Messages
185
Location
Hawaii
Really, it’s the space I had to work with, and I wasn’t looking at a permanent structure at the time. The roof is constructed entirely with screws, save for the shingles. It was always meant to come apart easily should I want to move it.

For me, the space between the containers is plenty. I can fit three cars in there with the roof overhang, or two with plenty of room to work on them. It may not seem like it yet but that is my main reason for having a shop, space to work on my cars.

Someday I will break this all down, and either move it or RE-use the lumber and containers in some way.


Sent from my iPhone using The Garage Journal mobile app
 

Pluribus

Well-known member
Joined
Dec 16, 2012
Messages
2,143
Location
Skagit County, WA
Yup, this is a thread I will follow! You're doing some really cool stuff.

I have a shipping container and love it. Mine is mainly tractor & implement storage, but you are getting really creative with yours.
 

TurtleValley

Well-known member
Joined
Dec 4, 2017
Messages
253
Location
BC. Canada
Awesome build. Love the use of containers and the roof overhang. Lots of rain over there and that looks like good protection.

Mind me asking which island?
 

rharman

Well-known member
Joined
Apr 22, 2012
Messages
8,743
Location
SoCal
That's a really interesting build. Any thought of a man door on the inside sides of the containers for easier access from the carport section?
 
OP
K

Krang

Well-known member
Joined
Oct 22, 2018
Messages
185
Location
Hawaii
So I found a deal.... for me its a significant deal, and gives me the opportunity to do something really cool.

I found a tattoo shop going out of business, and they had been using some gladiator cabinets and toolboxes for working area cabinets. They were selling 5 x Gladiator 1 Drawer + Cabinet, 1 x Craftsman 5-Drawer Toolbox, and 1 x Random 2 - Drawer Toolbox (ignore this one for now) - got everything for $500 and of course they are all in like-new condition more or less, stoked!
IMG_3733.jpg

I already had, and use 1 x Gladiator 1 Drawer + Cabinet & 1 x Craftsman 5-Drawer Toolbox. So, my totals are as follows:

6 - Gladiator 1 Drawer + Cabinet
2 - Craftsman 5-Drawer


I want storage, a solid work surface for my benchtop bandsaw, belt sander, and plentiful workspace. So I made a plan...

Looks something like this:
IMG_3734.JPG

I have enough boxes to make two of these, a tad less than 20' of workbench. Combined with my restoration project in the previous post, I think I will be in good shape for whatever I want to do now.

This is what I hope to do for the worktop... I have a bunch of the tabbed plastic hardware boxes, so you can see how I plan to implement the usage of those within the backsplash. I wanted a high backsplash because once these are in place, getting behind them to clean is not going to be easy.. need to keep the mess on the surfaces. I don't have a brake nearly large enough so I'm going to have a local shop bend this up. I have two pieces of mirrored, 4x10' stainless steel that were BURIED on my property when I purchased it, going to use those for the final layer of the work worktops, with 1 layer of 3/4 birch marine ply and 1 layer of 3/4 MDF sandwiched underneath. I'm hoping that gives some good absorption and solidity.

IMG_3732.JPG


The way they're designed is actually quite efficient, my local metal supplier sells 20' lengths. For one bench the cut list looks like this:

2 - 20' (2 @ 54", 2 @ 56")
2 - 20' (3 @ 41", 6 @ 16")

Each bench leaves 1" cutoff waste, I can live with that. Still at the planning stages obviously, but I'm liking the way this will turn out so far.
 
Last edited:
OP
K

Krang

Well-known member
Joined
Oct 22, 2018
Messages
185
Location
Hawaii
Picked up the metal today, going to clean it up and prep this weekend, might tack it together


Sent from my iPhone using Garage Journal
 
OP
K

Krang

Well-known member
Joined
Oct 22, 2018
Messages
185
Location
Hawaii
Step 1: clean... I’ve had a few projects lately and friends coming over to do some stuff also.. the place was an absolute mess. Spent about 5 hours just cleaning and reorganizing. Ended up redoing my toolbox layout, I like this better.. before the wrenches and measuring tools were more piled on each other.

- it’s a kobalt chest.. had it for about 7 years, held up okay so far. Eventually will need to be painted though.

8c5e82f2ba9af7b3e89f1f304f946ecb.jpg

f026c6d3513f7cccfafdebef4d34e776.jpg

175f88cf6a2d6a9201d5419b91c99241.jpg

12014c16934e24de2b9e6ecccdf98642.jpg

e45419ea36892fff2ca9791d7f017cab.jpg

d599651b3cf4d2bac148f71fa71cf625.jpg


Step 2: brace my upper 2x4 shelves so I can remove the outer support leg.

This should work! I feel as though I should get a MIG for this mild steel work... only having a tig process machine makes this quite slow.

4102cfa6e15d58edd4c0d47d76cfebdf.jpg

1deb94dbe40301b5a3964f988594d5da.jpg

One is completely welded, I just tacked the others, needed a break.

851be1a5de445d83c6b97716a8707e8d.jpg

fc0382475c2b997e8f3601d9bf98f259.jpg

c3e737b12712991e313c655c5fec5331.jpg


Sent from my iPhone using Garage Journal
 

Attachments

  • fc0382475c2b997e8f3601d9bf98f259.jpg
    fc0382475c2b997e8f3601d9bf98f259.jpg
    371.3 KB · Views: 3
  • 851be1a5de445d83c6b97716a8707e8d.jpg
    851be1a5de445d83c6b97716a8707e8d.jpg
    194.9 KB · Views: 1
  • 1deb94dbe40301b5a3964f988594d5da.jpg
    1deb94dbe40301b5a3964f988594d5da.jpg
    376 KB · Views: 1
  • 4102cfa6e15d58edd4c0d47d76cfebdf.jpg
    4102cfa6e15d58edd4c0d47d76cfebdf.jpg
    382.4 KB · Views: 1
  • c3e737b12712991e313c655c5fec5331.jpg
    c3e737b12712991e313c655c5fec5331.jpg
    222.2 KB · Views: 1
  • d599651b3cf4d2bac148f71fa71cf625.jpg
    d599651b3cf4d2bac148f71fa71cf625.jpg
    606.8 KB · Views: 1
  • e45419ea36892fff2ca9791d7f017cab.jpg
    e45419ea36892fff2ca9791d7f017cab.jpg
    320.4 KB · Views: 1
  • 8c5e82f2ba9af7b3e89f1f304f946ecb.jpg
    8c5e82f2ba9af7b3e89f1f304f946ecb.jpg
    364.1 KB · Views: 1
  • f026c6d3513f7cccfafdebef4d34e776.jpg
    f026c6d3513f7cccfafdebef4d34e776.jpg
    328.8 KB · Views: 1
  • 175f88cf6a2d6a9201d5419b91c99241.jpg
    175f88cf6a2d6a9201d5419b91c99241.jpg
    223.7 KB · Views: 1
  • 12014c16934e24de2b9e6ecccdf98642.jpg
    12014c16934e24de2b9e6ecccdf98642.jpg
    581.4 KB · Views: 1
Last edited:
To avoid these ads, REGISTER NOW!
OP
K

Krang

Well-known member
Joined
Oct 22, 2018
Messages
185
Location
Hawaii
I had planned to paint these Grey... but I might just throw some clear on them. I like how the coloring is so even.

2dbeece2e14447b641f13b02a90cc54b.jpg


Also, yes, my work is getting way too hot. I’m limited to about 95 amps.... I don’t have a 220 outlet up here and I should be running about 130 amps for this 1/8” wall mild steel


Sent from my iPhone using Garage Journal
 

Attachments

  • 2dbeece2e14447b641f13b02a90cc54b.jpg
    2dbeece2e14447b641f13b02a90cc54b.jpg
    197.2 KB · Views: 2
OP
K

Krang

Well-known member
Joined
Oct 22, 2018
Messages
185
Location
Hawaii
While I let my work cook a bit... here are all the cut pieces for the workbenches...

b2e233fe61d5ad99efcaa50f991589ea.jpg

And about 100’ of 1x1” x 5’ remnants that were at the metal shop looking for a home.. probably will end up as a MiG cart and long stock storage shelves, but who knows!

1cb7676db1270e2927b7cefa5f115ae3.jpg

Will clean these all today and start making the plates that the leveling feet will screw into.

For that, I have these flange nuts and these feet.. they’re rated for 650lbs per foot. The next size up from these that I could find got VERY expensive. If they don’t work I will make my own.

f7057376c6469ce216be311d4fce5710.jpg

3c0aeac8a758687e112e23f4d633f2ed.jpg

Sent from my iPhone using Garage Journal
 

Attachments

  • 1cb7676db1270e2927b7cefa5f115ae3.jpg
    1cb7676db1270e2927b7cefa5f115ae3.jpg
    867.3 KB · Views: 2
  • b2e233fe61d5ad99efcaa50f991589ea.jpg
    b2e233fe61d5ad99efcaa50f991589ea.jpg
    592.3 KB · Views: 1
  • f7057376c6469ce216be311d4fce5710.jpg
    f7057376c6469ce216be311d4fce5710.jpg
    215 KB · Views: 1
  • 3c0aeac8a758687e112e23f4d633f2ed.jpg
    3c0aeac8a758687e112e23f4d633f2ed.jpg
    108 KB · Views: 1
Last edited:
OP
K

Krang

Well-known member
Joined
Oct 22, 2018
Messages
185
Location
Hawaii
Going to make up some caps for the ends. I thought about leaving the long side open so I could put something in it at some point, but it just looks weird with the open end.

d75175387f3e6c78654e684684590358.jpg


Sent from my iPhone using Garage Journal
 

Attachments

  • d75175387f3e6c78654e684684590358.jpg
    d75175387f3e6c78654e684684590358.jpg
    245.2 KB · Views: 1
OP
K

Krang

Well-known member
Joined
Oct 22, 2018
Messages
185
Location
Hawaii
Yay mag tabs
a0bdfa65af31da6dcef04c3eb176ea67.jpg


Sent from my iPhone using Garage Journal
 

Attachments

  • a0bdfa65af31da6dcef04c3eb176ea67.jpg
    a0bdfa65af31da6dcef04c3eb176ea67.jpg
    173.9 KB · Views: 1
OP
K

Krang

Well-known member
Joined
Oct 22, 2018
Messages
185
Location
Hawaii
Shelf hangars all done, made the end tab wrap around the shelf a bit to hold anything in.

e56b3e3dff91f42d37b3903535469bbe.jpg


Sent from my iPhone using Garage Journal
 

Attachments

  • e56b3e3dff91f42d37b3903535469bbe.jpg
    e56b3e3dff91f42d37b3903535469bbe.jpg
    678.6 KB · Views: 2
OP
K

Krang

Well-known member
Joined
Oct 22, 2018
Messages
185
Location
Hawaii
These are the leg ends for the adjustable feet. I could only find stainless flange nuts so using stainless filler for this, and trying not to heat the work too much and warp the threads. I’m going to chase these all with a tap just to be sure, this is not high quality hardware by any means and I don’t want them to bind.

7f3f3e0c0f42d11a523933260e427efd.jpg

Also, four of the feet arrived after I wrapped up for the day. They are very beefy and will surely do the trick. Each bench has 6 of these.

95622777c0981d54d7baa9823abef8a9.jpg

050d64a65f3992b6ce3818e19e13bd20.jpg

ca16210047110a30b824747caf857026.jpg

e7653d361dc794959531697c7279ccc9.jpg

a65db680094cfb088239f364f6b65446.jpg


Sent from my iPhone using Garage Journal
 

Attachments

  • 7f3f3e0c0f42d11a523933260e427efd.jpg
    7f3f3e0c0f42d11a523933260e427efd.jpg
    552.1 KB · Views: 1
  • 95622777c0981d54d7baa9823abef8a9.jpg
    95622777c0981d54d7baa9823abef8a9.jpg
    461.3 KB · Views: 1
  • 050d64a65f3992b6ce3818e19e13bd20.jpg
    050d64a65f3992b6ce3818e19e13bd20.jpg
    379.6 KB · Views: 1
  • ca16210047110a30b824747caf857026.jpg
    ca16210047110a30b824747caf857026.jpg
    209.7 KB · Views: 1
  • e7653d361dc794959531697c7279ccc9.jpg
    e7653d361dc794959531697c7279ccc9.jpg
    218.4 KB · Views: 1
  • a65db680094cfb088239f364f6b65446.jpg
    a65db680094cfb088239f364f6b65446.jpg
    902.9 KB · Views: 2
OP
K

Krang

Well-known member
Joined
Oct 22, 2018
Messages
185
Location
Hawaii
Nice setup, how do the containers do with the humidity? Also more info on the mag tabs please.


I originally saw these on weldingtipsandtricks.com and I ended up using an amazon gift card to pick one up. Had I known it would be so useful I would have done it sooner!

They are really just some small neodium magnets

Weldingtipsandtricks also has a YouTube channel, and admittedly I am self taught from YouTube for the most part, but he has all kinds of easy stuff that makes life much easier when getting into it.


b791bbe0f7d53959f9b23e0257c528c1.jpg


Sent from my iPhone using Garage Journal
 

Attachments

  • b791bbe0f7d53959f9b23e0257c528c1.jpg
    b791bbe0f7d53959f9b23e0257c528c1.jpg
    137.3 KB · Views: 4
OP
K

Krang

Well-known member
Joined
Oct 22, 2018
Messages
185
Location
Hawaii
So now I feel like I’m falling down the rabbit hole....

All of that 1x1 stock I got from the remnant pile could easily make a shelving system like this, and save me some significant room from the wood shelving I have now.

IMG_3795.jpg

They hang from the hooks in the ceiling and rest against the walls as part of their support. I could have the whole area be floating shelves...

Damn internets.


Sent from my iPhone using Garage Journal
 

nsula_country

Well-known member
Joined
May 23, 2013
Messages
1,534
Location
Northwestern Louisiana
This is just too cool!

My first shop was a 40' container. Still have it for storage. I'm getting many ideas.

Your TIG welding is good. Better than mine. I only have stick machines. One day would like to get a multi-process machine of about 250A. Thermal Dynamics (sp) has some good ones.

CT
 
OP
K

Krang

Well-known member
Joined
Oct 22, 2018
Messages
185
Location
Hawaii
Nice setup, how do the containers do with the humidity? Also more info on the mag tabs please.


Regarding the humidity, it’s something we live with. Where I’m at it rains one a day, every day. We get over 100” a year. That said, since there is minimal temperature differential, I probably don’t have near the problem others do.

I use air dryers to keep the interior of the containers reasonably dry, so far so good. Even bare metal seems to last a good long while before hazing whereas it’s a day or two tops if left outside, so they must be doing something positive.

Like this, but not this specific product.

6987d31d60e3e3db8c7a986178a81a6c.jpg

Ironwood Pacific DryWave 1000 Air Dryer, Prevents Mold and Mildew, Ideal for Boats, RVs, Cabins, Basements https://www.amazon.com/dp/B000BTAQIG/?tag=atomicindus08-20


Sent from my iPhone using Garage Journal
 

Attachments

  • 6987d31d60e3e3db8c7a986178a81a6c.jpg
    6987d31d60e3e3db8c7a986178a81a6c.jpg
    132.5 KB · Views: 4
OP
K

Krang

Well-known member
Joined
Oct 22, 2018
Messages
185
Location
Hawaii
This is just too cool!

My first shop was a 40' container. Still have it for storage. I'm getting many ideas.

Your TIG welding is good. Better than mine. I only have stick machines. One day would like to get a multi-process machine of about 250A. Thermal Dynamics (sp) has some good ones.

CT


Thank you!

Ideas are good, putting everything in a journal like this helps cultivate them too, which is part of why I try and update.

I don’t know about good TIG though, I think it’s enough to get by, but I have difficulty with the thinner stuff. Hard to blow out 1/8” mild steel, lol.


Sent from my iPhone using Garage Journal
 
OP
K

Krang

Well-known member
Joined
Oct 22, 2018
Messages
185
Location
Hawaii
Yesterday, finished up the last of my adjustable leg ends, at lowest setting they will add 2” to my 41” table legs.. + 1 1/2” for the surface. 44 1/2” is a good height for me at 6’2” I think. Going to leave it as is.

820183f4b7a772945581be143427af09.jpg

ce2fad9cebd1fd366a79578a8817c91b.jpg

5f80d14ee2179be51e48244c4b73c82f.jpg

Mounted one of the 2x4 shelf brackets. They work great but I’m going to do this differently. Going with a floating container-specific design I saw. Here is how it turned out though:

3674fa4af314719ff307739e344735b6.jpg

Since I’m going full-crazy I started moving stuff around... got the whole top shelf moved to my other container and started on the opposite side. Should finish this today.

ca6c5eec0c0bd30602e1f91a7394ffa4.jpg

Lastly, while running errands early yesterday I popped in to a local metal recycler I check out from time to time... found some GLENAIR Mil-Spec plugs that were useable... picked all 4 up for $40. These are easily $100+ each, new. And they’re badass.

5625966fd2f6b851afb2945c3f4608f8.jpg

a8e26b163977b7d7399fd9f5fa3b2ee3.jpg

1ad5869e259838b4b7900335284f5978.jpg

2cf704eb7f8640a8000b3be4d583b648.jpg


Sent from my iPhone using Garage Journal
 

Attachments

  • 1ad5869e259838b4b7900335284f5978.jpg
    1ad5869e259838b4b7900335284f5978.jpg
    153.6 KB · Views: 1
  • a8e26b163977b7d7399fd9f5fa3b2ee3.jpg
    a8e26b163977b7d7399fd9f5fa3b2ee3.jpg
    165.2 KB · Views: 1
  • ca6c5eec0c0bd30602e1f91a7394ffa4.jpg
    ca6c5eec0c0bd30602e1f91a7394ffa4.jpg
    182.3 KB · Views: 1
  • 3674fa4af314719ff307739e344735b6.jpg
    3674fa4af314719ff307739e344735b6.jpg
    157.3 KB · Views: 1
  • 5f80d14ee2179be51e48244c4b73c82f.jpg
    5f80d14ee2179be51e48244c4b73c82f.jpg
    242 KB · Views: 1
  • ce2fad9cebd1fd366a79578a8817c91b.jpg
    ce2fad9cebd1fd366a79578a8817c91b.jpg
    215.1 KB · Views: 1
  • 5625966fd2f6b851afb2945c3f4608f8.jpg
    5625966fd2f6b851afb2945c3f4608f8.jpg
    214.7 KB · Views: 1
  • 820183f4b7a772945581be143427af09.jpg
    820183f4b7a772945581be143427af09.jpg
    333.8 KB · Views: 1
  • 2cf704eb7f8640a8000b3be4d583b648.jpg
    2cf704eb7f8640a8000b3be4d583b648.jpg
    178.3 KB · Views: 1
OP
K

Krang

Well-known member
Joined
Oct 22, 2018
Messages
185
Location
Hawaii
Christmas Tree setup and errands this morning:
aa86201d5e83cd5dd70774307ab2eda9.jpg

Welded up all the bases and tops for 20’ of workbench that I’m building. I wish so much that I had something flat that I could clamp down to. That’s going to be the next project. Had to build these mostly on saw-horses shimmed to level:

521abc73881122ee9ca1969373201468.jpg

For assembling the legs I decided to put them on this stainless steel restaurant prep table. It’s not flat, but since I’m building it on the side it won’t matter, just need to square up all the legs:

103808a15187e8e8d2e950595e6bbcc8.jpg

Did this whole build with a new toy, Hobart 140, works like a charm so far! I need to go slower than I’m used to, never used a MiG that wasn’t 220v, but it works great for what it is. I’m using MiG process with C25, .030 wire.

0e9d541be14985cdda2c3a57701f7116.jpg

This is going to be the first project on the new workbenches, refurbishing this Delta drill press:

4fa3948911e9b9c8bc3b6c8ff8a8708d.jpg

d307073a6cebb5785b21480ba2ff26ad.jpg

I can’t read hardly anything on this spec plate, but I’m hoping it cleans up well:

2f706bf5b607c2e3f1353b73959683aa.jpg


Sent from my iPhone using Garage Journal
 

Attachments

  • aa86201d5e83cd5dd70774307ab2eda9.jpg
    aa86201d5e83cd5dd70774307ab2eda9.jpg
    390.5 KB · Views: 1
  • 521abc73881122ee9ca1969373201468.jpg
    521abc73881122ee9ca1969373201468.jpg
    259.6 KB · Views: 1
  • 103808a15187e8e8d2e950595e6bbcc8.jpg
    103808a15187e8e8d2e950595e6bbcc8.jpg
    200.9 KB · Views: 1
  • 0e9d541be14985cdda2c3a57701f7116.jpg
    0e9d541be14985cdda2c3a57701f7116.jpg
    243.9 KB · Views: 1
  • 4fa3948911e9b9c8bc3b6c8ff8a8708d.jpg
    4fa3948911e9b9c8bc3b6c8ff8a8708d.jpg
    272.3 KB · Views: 1
  • d307073a6cebb5785b21480ba2ff26ad.jpg
    d307073a6cebb5785b21480ba2ff26ad.jpg
    265.4 KB · Views: 2
  • 2f706bf5b607c2e3f1353b73959683aa.jpg
    2f706bf5b607c2e3f1353b73959683aa.jpg
    334.1 KB · Views: 2
OP
K

Krang

Well-known member
Joined
Oct 22, 2018
Messages
185
Location
Hawaii
Finished the workbench frame and got it painted:

0096f4d90b776500a87796ba89ee0ca5.jpge6ccc32e93366001200355548e2ef422.jpg


Sent from my iPhone using Garage Journal
 

Attachments

  • 0096f4d90b776500a87796ba89ee0ca5.jpg
    0096f4d90b776500a87796ba89ee0ca5.jpg
    829 KB · Views: 1
  • e6ccc32e93366001200355548e2ef422.jpg
    e6ccc32e93366001200355548e2ef422.jpg
    703.6 KB · Views: 1
OP
K

Krang

Well-known member
Joined
Oct 22, 2018
Messages
185
Location
Hawaii
Got my 2x4 shelving deconstructed, and cleaned the area. Moved in the frame and proceeded to fit the cabinets. I used a 1/2” plywood base mostly because some of the cabinets wouldn’t be completely full and I wanted to be able to easily screw them down and be secure:

8d477e0df3b80b6e2b0c8f28e408b04e.jpg

About as level as the can get them. I can shim the tops if I feel like it:

79ed1e0f3dff7d4c44200357998d0e13.jpg

b500ea25945bc859bee85c3635cd6a97.jpg

7e164c7b2ceccc174e476e333dbf1053.jpg

I unscrewed some of the assembly bolts for the gladiator cabs and bolted them together, so far so good. However, I somehow miscalculated on the space required for the craftsman box. I’m going to figure out a way to use that space effectively. Possibly for hardware boxes:

34220776cb6b233f9f6a0e4561587e64.jpg
 

Attachments

  • 34220776cb6b233f9f6a0e4561587e64.jpg
    34220776cb6b233f9f6a0e4561587e64.jpg
    213.6 KB · Views: 1
  • 7e164c7b2ceccc174e476e333dbf1053.jpg
    7e164c7b2ceccc174e476e333dbf1053.jpg
    203.6 KB · Views: 1
  • b500ea25945bc859bee85c3635cd6a97.jpg
    b500ea25945bc859bee85c3635cd6a97.jpg
    229.8 KB · Views: 1
  • 79ed1e0f3dff7d4c44200357998d0e13.jpg
    79ed1e0f3dff7d4c44200357998d0e13.jpg
    171.3 KB · Views: 2
  • 8d477e0df3b80b6e2b0c8f28e408b04e.jpg
    8d477e0df3b80b6e2b0c8f28e408b04e.jpg
    233.6 KB · Views: 4
To avoid these ads, REGISTER NOW!
Top Bottom