OP

You are using an out of date browser. It may not display this or other websites correctly.
You should upgrade or use an alternative browser.
You should upgrade or use an alternative browser.
The making of a table
- Thread starter RivennHewn
- Start date

OP
RivennHewn
Well-known member


OP
RivennHewn
Well-known member
Quick and easy way to get rid of some old iron? Build a bench.
I like the way the shiny round leg looks with the rough torch cut on the other end.
I could clean this up a little more, but I think I'll just let it rain on it.
Passed the 10,000 view mark on this thread!
I like the way the shiny round leg looks with the rough torch cut on the other end.
I could clean this up a little more, but I think I'll just let it rain on it.
Passed the 10,000 view mark on this thread!
Attachments


Kevin54
MEMBER EMERITUS
Rivenn.....Absolutely fantastic work. 
I think this light is just great!!!!!! If you don't mind me asking, how much is it selling for if it's for sale?

I think this light is just great!!!!!! If you don't mind me asking, how much is it selling for if it's for sale?
OP
RivennHewn
Well-known member
Thanks Kevin.
Coming from you, that's a complement I'll take.
I need to re-arrange a few things in the shop to make room for the light, but I'm thinking it will have a home above one of my workbenches.
In general, I have a problem putting prices on my projects and an even bigger problem letting them leave the shop. Something I'm working on getting better at.
1/2 Cup
Member Emeritus
Quick and easy way to get rid of some old iron? Build a bench.
Passed the 10,000 view mark on this thread!
Congratulations on the mile stone, it is not too difficult to see why, you should be proud of your achievements, well done.
Last edited:
OP
RivennHewn
Well-known member
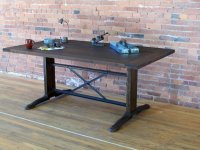
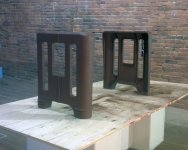
This was the table that got me thinking about starting this thread.
I utilized some left-over Douglas Fir from a job. The timber came from Duluth Timber Co. in Blaine, Wa.: http://duluthtimber.com
It was reclaimed from the old Boeing B-17 plant. : http://inhabitat.com/boeing-plant-h.../duluth-timber-company-boeing-plant-2-wood-4/
The table also has vintage cast iron feet circa 1900. They came out of a basement machine shop that was in a historic building that was completed in 1901.
The ladder type stretcher was completed by myself.
There was a lot of layout, cutting and routing to get the half lap joints as well as each piece is tongue and groove jointed.
I really do wish I'd have taken the time to photograph the process.
Attachments
OP
RivennHewn
Well-known member
OP
RivennHewn
Well-known member


Kevin54
MEMBER EMERITUS
This was the table that got me thinking about starting this thread.
I utilized some left-over Douglas Fir from a job. The timber came from Duluth Timber Co. in Blaine, Wa.: http://duluthtimber.com
It was reclaimed from the old Boeing B-17 plant. : http://inhabitat.com/boeing-plant-h.../duluth-timber-company-boeing-plant-2-wood-4/
The table also has vintage cast iron feet circa 1900. They came out of a basement machine shop that was in a historic building that was completed in 1901.
The ladder type stretcher was completed by myself.
There was a lot of layout, cutting and routing to get the half lap joints as well as each piece is tongue and groove jointed.
I really do wish I'd have taken the time to photograph the process.
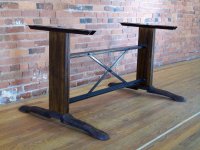
That table looks fantastic!!!!!
 And with it staged like that, I can just see a machinist sitting at it working on the days project.
OP
RivennHewn
Well-known member

Kevin54
MEMBER EMERITUS
Rivenn.....Where do you find the old industrial legs and such? Around here, the scrap yards don't even have anything that cool.
And I do have to say....you have a very artistic eye and mind. I'm used to machining metal and designing tooling, but what you do, I think is absolutely fantastic. You go way beyond the furniture only aspect and are into the art aspect of things. You need to quit your day job and open up an art gallery and get into selling your work as high end furniture and art. I absolutely love all of it.
The light that you show above that i commented on, do you have a shot of the front of it? The pic shows the side, but it's hard to see the front detail.
OP
RivennHewn
Well-known member
Thanks again Kevin,
A few words of encouragement can go a long way.
The legs mostly come from construction jobs, but I have a small network of people who know what I do, and what to look for.
I guess the long term plan is to get to a point where I can quit my day job.
Selling on Etsy, Ebay and CL isn't very productive, so I'm working on making connections with architects and designers. People who can spec my work into jobs.
I'll try to get a good pic of the light, but it's actually a hard thing to photograph.
Well today, I almost cried when I realized I damaged the badge on one of the legs. The first leg I stripped didn't have one, so I wasn't really paying attention.
The chemical stripper and the wire wheel all but wrecked it.
I'd love to see if anyone has knowledge of the time frame that this Deco style logo was used.
I'm sure the neighbors loved me today. Hours of grinding and running the needle scaler/ compressor. My ears are still ringing and I had protection on.
Attachments

OP
RivennHewn
Well-known member
Scouting around online and found what looks like a nice replacement badge for the one I screwed up.
http://www.ebay.com/itm/NEW-Delta-D...716?pt=LH_DefaultDomain_0&hash=item4ad09d127c
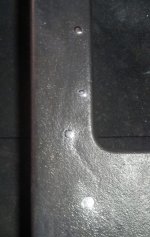
After cleaning up the legs, I realized that there are a lot of holes in them.
Ranging from 1/8" to 1/2". Some are threaded, some not.
If I was going to leave the legs bare, I wouldn't worry about the holes.
I'm thinking of painting them, and don't want the holes to show.
What would be the 'best practice' for filling holes in cast iron?
I'm thinking about the epoxy sticks that you cut and knead, or would plug welding be better?
I'd hate to grind the welds and end up with smooth spots that don't match the original texture of the cast.
Any help would be great
http://www.ebay.com/itm/NEW-Delta-D...716?pt=LH_DefaultDomain_0&hash=item4ad09d127c
After cleaning up the legs, I realized that there are a lot of holes in them.
Ranging from 1/8" to 1/2". Some are threaded, some not.
If I was going to leave the legs bare, I wouldn't worry about the holes.
I'm thinking of painting them, and don't want the holes to show.
What would be the 'best practice' for filling holes in cast iron?
I'm thinking about the epoxy sticks that you cut and knead, or would plug welding be better?
I'd hate to grind the welds and end up with smooth spots that don't match the original texture of the cast.
Any help would be great
Attachments


Kevin54
MEMBER EMERITUS
JB Weld or some Bondo should take care of the holes. After you have them filled, use a wire brush lightly in a couple of different directions to add some texture, or if you are going to leave the metal raw, use All-Metal instead. It's basically bondo with aluminum in it and dries to an aluminum color.
Last edited:
ishiboo
Well-known member
Turn em sideways, hold a copper strip to the back of each and fill with solder.
No bond on those beauties!
No bond on those beauties!
1/2 Cup
Member Emeritus
Turn em sideways, hold a copper strip to the back of each and fill with solder.
No bond on those beauties!
I have to agree, it was a common practice in the foundries of old to fill casting imperfections with lead or solder.
BTW Exquisite work as per usual.
OP
RivennHewn
Well-known member
Thanks all for the ideas on filling the holes. I will do a few of each to see what works best for me.
As the Delta legs have a definite Art Deco feel to them, I want to stay in that theme. I have decided to use them for a desk.
I'm seeing a 40's era Deco-aviation themed desk. I'm working on an era correct color scheme.
Leaning towards a brownish-burgandy color for the legs, while the Art Deco styled back would be copper with maybe some black details.
The top and the trapezoid feature will be polished aluminum, possibly with some rivets for added aviation feel.
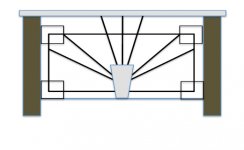
Here is a 1st - rough draft of what I'm seeing.
Open to suggestions.............
As the Delta legs have a definite Art Deco feel to them, I want to stay in that theme. I have decided to use them for a desk.
I'm seeing a 40's era Deco-aviation themed desk. I'm working on an era correct color scheme.
Leaning towards a brownish-burgandy color for the legs, while the Art Deco styled back would be copper with maybe some black details.
The top and the trapezoid feature will be polished aluminum, possibly with some rivets for added aviation feel.
Here is a 1st - rough draft of what I'm seeing.
Open to suggestions.............
Attachments
OP
RivennHewn
Well-known member
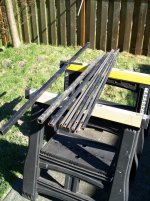
Another beautiful, sunny day in Seattle.
Gave me a chance to get outside and start working on the cut list.
Salvaged a bunch of 1/2" square tube from an awning we demo'd awhile back.
I'll use this for the Deco back on the desk.
I love re-using materials that others were just throwing away.
Gave me a chance to get outside and start working on the cut list.
Salvaged a bunch of 1/2" square tube from an awning we demo'd awhile back.
I'll use this for the Deco back on the desk.
I love re-using materials that others were just throwing away.
Attachments
OP
RivennHewn
Well-known member

OP
RivennHewn
Well-known member
Making a little fabrication progress on the desk project.
Cutting, fitting, grinding, and welding.
Wife and kids are gone..... no one to bother me!
Cutting, fitting, grinding, and welding.
Wife and kids are gone..... no one to bother me!
Attachments


1/2 Cup
Member Emeritus
Making a little fabrication progress on the desk project.
Cutting, fitting, grinding, and welding.
Wife and kids are gone..... no one to bother me!
Its great to have Quality Shed Time with no interruptions occasionally, it can be very productive, looking forward to this build.
OP
RivennHewn
Well-known member
OP
RivennHewn
Well-known member
OP
RivennHewn
Well-known member
After a wet few days, it turned nice again this afternoon so I was able to get out and continue with the cutting, grinding, welding.
The back is pretty much done except for the trapezoid detail, and a lot of surface prep prior to paint.
The other pics I stole off the web. They are just some of the reference material I'm using for the overall design of the desk.
The back is pretty much done except for the trapezoid detail, and a lot of surface prep prior to paint.
The other pics I stole off the web. They are just some of the reference material I'm using for the overall design of the desk.
Attachments


Last edited:
OP
RivennHewn
Well-known member

OP
RivennHewn
Well-known member
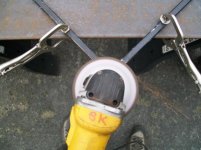
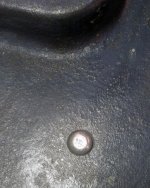
I've been wanting to try the solder technique of filling the holes. Finally got around to it tonight.
I was concerned that the solder wouldn't stick to the cast. I drop some hot solder onto it, and once cooled it came right off.
I figured I'd need to clean the holes prior to filling, and came up with drilling them out a 64/th bigger would give me clean metal.
I then ran my countersink from both sides. I'm hoping that the double bevel will help grab the cast, locking in the solder.
I wire wheeled the excess off of the front side, but decided to leave the little bubble of solder on the backside.
Seems to hold just fine.
I will have to run a little spot glazing putty on a few of them, but I'm pretty happy with the results.
Attachments

OP
RivennHewn
Well-known member
Found this guy on the internets.
He puts on paper what I'm trying for on this desk.
http://stefanparis.deviantart.com
He puts on paper what I'm trying for on this desk.
http://stefanparis.deviantart.com
Attachments


Kevin54
MEMBER EMERITUS
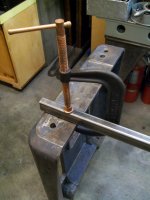
Anybody else loving their free Wilton C-clamp?
I got to use mine one time since I received it

1/2 Cup
Member Emeritus
I am glad to see that the soldering technique worked, its a little tricky getting the heat just right, especially on a cast piece like yours. Certainly worth the effort.
Well done and thanks for posting.
Well done and thanks for posting.
OP
RivennHewn
Well-known member
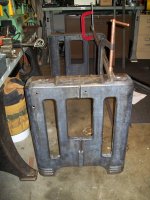
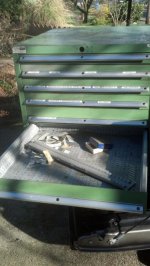
Craigslist came thru for me this weekend.
Got a Lista drawer cabinet, a vintage DeWalt RAS, and a pair of cast iron Delta lathe legs.
And, I got a coat of primer and paint on the desk legs.
Got a Lista drawer cabinet, a vintage DeWalt RAS, and a pair of cast iron Delta lathe legs.
And, I got a coat of primer and paint on the desk legs.
Attachments


1/2 Cup
Member Emeritus
Nice scores all round, the cast legs like yours are a real scare commodity out here and if they come up for sale command bid dollars.
Here is a pair on Ebay this morning.
http://www.ebay.com.au/itm/old-cast...Decorative_Arts_Homewares&hash=item2336ce0773
What are the plans for them?
Cheers.
the cast legs like yours are a real scare commodity out here and if they come up for sale command bid dollars.Here is a pair on Ebay this morning.
http://www.ebay.com.au/itm/old-cast...Decorative_Arts_Homewares&hash=item2336ce0773
What are the plans for them?
Cheers.
Last edited:
OP
RivennHewn
Well-known member
No plans for the new legs as of yet.
I need to hang out with them for awhile, drink a beer with them, get to know them.
Then maybe they'll tell me what they want to be when they grow up.
I need to hang out with them for awhile, drink a beer with them, get to know them.
Then maybe they'll tell me what they want to be when they grow up.
OP
RivennHewn
Well-known member
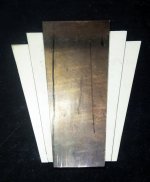
Haven't gotten much shop time the last few days, but I did manage to get the front detail roughed out.
The bottom two are cut from an old aluminum door, and they are 1/8" thick.
The top copper piece is 3/16", and came from another door I salvaged awhile back.
The bottom trapezoid will be black, the middle one will be polished aluminum, and the front will be polished copper.
Overall height is 12-1/2"
The bottom two are cut from an old aluminum door, and they are 1/8" thick.
The top copper piece is 3/16", and came from another door I salvaged awhile back.
The bottom trapezoid will be black, the middle one will be polished aluminum, and the front will be polished copper.
Overall height is 12-1/2"
Attachments
OP
RivennHewn
Well-known member
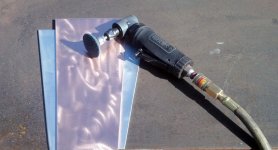
Started out with a random orbit sander, then went with some Roloc disc on the die grinder.
Any tips on polishing aluminum and copper would be greatly appreciated.
Something I've never done before.
Thanks
Any tips on polishing aluminum and copper would be greatly appreciated.
Something I've never done before.
Thanks
Attachments


OP
RivennHewn
Well-known member
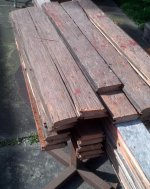
I'm doing a little demo at work, and started tearing up a 125 year old floor.
Salvaged some 1" thick T&G Fir flooring.
****, or gold?
Guess I'll find out when it becomes something new.
Had a great afternoon in the sun, making noise and dust int the back yard cutting it up.
The pieces that still had good T&G I kept as is, the stuff with broken edges got them trimmed off.
Salvaged some 1" thick T&G Fir flooring.
****, or gold?
Guess I'll find out when it becomes something new.
Had a great afternoon in the sun, making noise and dust int the back yard cutting it up.
The pieces that still had good T&G I kept as is, the stuff with broken edges got them trimmed off.
Attachments


OP
RivennHewn
Well-known member

1/2 Cup
Member Emeritus
Started out with a random orbit sander, then went with some Roloc disc on the die grinder.
Any tips on polishing aluminum and copper would be greatly appreciated.
Something I've never done before.
Thanks
With Aluminium or most metals for that matter that you intend to polish the trick is not to go too course of grit with your Rolocs in the first place as you only create unnecessary work for your self. Looking at you pics, IMHO, try progressively finer grits, then block it out with wet and dry, much like you would do with a painted finish on a car.
Your starting point should be as finer grade of abrasive dry that you can go to remove any scratch marks in the metal.
Once you are satisfied that you have a reasonably consistent finish, say equal to a 800 grit, hand blocked for instance, use a buffing wheels with the appropriate cutting/buffing compounds to progressively work the surface to a mirror finish.
It can be fairly tedious work but very rewarding when you see the final results.
BTW those cast legs on EBAY finished at $520.00.
Cheers.
Last edited:
OP
RivennHewn
Well-known member
Polishing is a PITA. Wish I had stared with a nice, new piece of copper. What I had was an old door handle with lots of little knicks and dings. It would look like I sanded everything out, so I'd move to the next higher grit. Only to find out the scratches were still there. I'm not liking this at all.
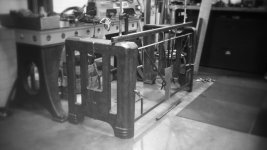
Got a start on assembling the whole thing. Hoping to find a top for it this weekend.
$520? Ouch! I'd go broke in no time.
Got a start on assembling the whole thing. Hoping to find a top for it this weekend.
$520? Ouch! I'd go broke in no time.
Attachments

1/2 Cup
Member Emeritus
I really enjoy polishing metal as I find it very rewarding. Its like most things in life, you get out of it what you put into it.
Speaking of cast iron legs, I got caught up yesterday and missed a nice pair in my watch list that went for $26. I cant work it out when you compare the last set at $520.
http://www.ebay.com.au/itm/201049899453?ssPageName=STRK:MEWAX:IT&_trksid=p3984.m1423.l2649
Have a good one.
Speaking of cast iron legs, I got caught up yesterday and missed a nice pair in my watch list that went for $26. I cant work it out when you compare the last set at $520.
http://www.ebay.com.au/itm/201049899453?ssPageName=STRK:MEWAX:IT&_trksid=p3984.m1423.l2649
Have a good one.