To avoid these ads, REGISTER NOW!

The making of a table

OP
R

RivennHewn

Well-known member
Joined
Jun 4, 2011
Messages
10,373
Location
PNW
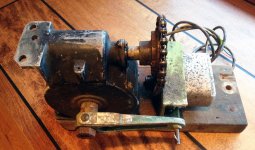
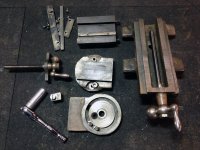
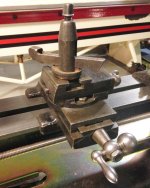
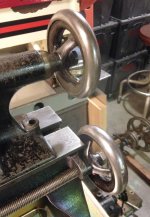
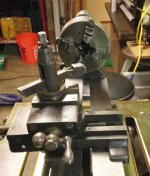
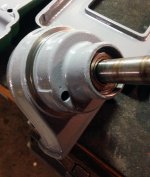
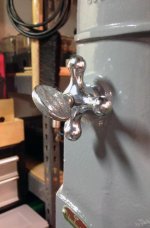
Dial indicator show negligible runout, so I'm not going to pull the bearings.

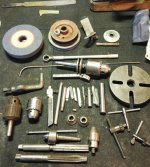
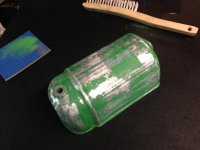
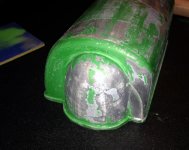
I did manage to look at it hard enough for it to come apart.

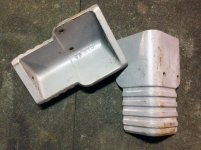
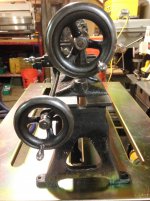
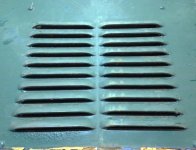
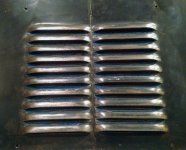
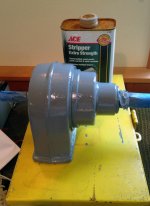
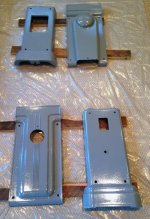
I'm going to get it blown out, cleaned up, and ready for paint!
 
To avoid these ads, REGISTER NOW!

rippered

Well-known member
Joined
Nov 27, 2010
Messages
440
Location
Olympia,WA
That was a great price on the sander. When I rebuilt mine the drum had spun on the shaft and took heat and a puller to come off. Lots of rebuilds on OWWM.
 
OP
R

RivennHewn

Well-known member
Joined
Jun 4, 2011
Messages
10,373
Location
PNW
The sander was missing the switch cover, so I just found and purchased this one on Ebay.

Looks period correct?

I like the little safety detail around the switch.

Not sure that the specs match mine unit, so I may do something else with the label plate.
 

Attachments

  • $_57.jpg
    $_57.jpg
    147.3 KB · Views: 81
OP
R

RivennHewn

Well-known member
Joined
Jun 4, 2011
Messages
10,373
Location
PNW
I'm going to need some help with this one.

Looking for ideas on how/what to do with this old electrical knife blade circuit box.

Salvaged from an old building.
 

Attachments

  • SCL1.jpg
    SCL1.jpg
    149.3 KB · Views: 156
  • SCL2.jpg
    SCL2.jpg
    143.5 KB · Views: 138
  • SCL3.jpg
    SCL3.jpg
    139.4 KB · Views: 179

1/2 Cup

Member Emeritus
Joined
Apr 28, 2012
Messages
19,283
Location
Shepparton. Victoria. Australia
I'm going to need some help with this one.

Looking for ideas on how/what to do with this old electrical knife blade circuit box.

Salvaged from an old building.

Now that's a nice switch, you wouldn't be able to use it out here for any thing other than what we call extra low voltage and that's any thing up to 50 volts.

You could use it as disconnects for low voltage garden lighting or similar perhaps but check your local codes first.

Regards
 
OP
R

RivennHewn

Well-known member
Joined
Jun 4, 2011
Messages
10,373
Location
PNW
At one time, there was some serious power running thru this box.

The building it came out of was a manufacturer of commercial/industrial electrical service gear.

I pulled two of them out.

The two studs are drilled for lockout tags. Only City Power would have ever gotten into them.

I'd be afraid to even open it while hot.
 
OP
R

RivennHewn

Well-known member
Joined
Jun 4, 2011
Messages
10,373
Location
PNW
The belt sander is missing a few things, and has a few problems.

The minor irritations are mostly wear from the belt cutting into the guards.

The bottom guard/ dust shoot is broken in two places. I have the pieces.

Can they be welded? They are cast aluminum that is about 3/32nds thick.
 

Attachments

  • brokenguard.jpg
    brokenguard.jpg
    135.4 KB · Views: 86
  • cutguard.jpg
    cutguard.jpg
    138.5 KB · Views: 80
  • cutguard2.jpg
    cutguard2.jpg
    106.3 KB · Views: 78

shocwav3

Well-known member
Joined
Dec 17, 2012
Messages
112
Location
Clifton NJ
The belt sander is missing a few things, and has a few problems.

The minor irritations are mostly wear from the belt cutting into the guards.

The bottom guard/ dust shoot is broken in two places. I have the pieces.

Can they be welded? They are cast aluminum that is about 3/32nds thick.


I've welded casting like that without to much trouble. Gouge with a carbide burr for a nice chamfered clean edge, a little pre heat depending on your machine.
After the first bead is laid the build up will run nicley
 
OP
R

RivennHewn

Well-known member
Joined
Jun 4, 2011
Messages
10,373
Location
PNW
My Ebay find showed up today.

Looks to be vintage, yet unused.

All the knockouts are intact.
 

Attachments

  • oldswitch2.jpg
    oldswitch2.jpg
    139.7 KB · Views: 103
  • oldswitch1.jpg
    oldswitch1.jpg
    147.9 KB · Views: 115
OP
R

RivennHewn

Well-known member
Joined
Jun 4, 2011
Messages
10,373
Location
PNW
Old school tinsmith:


This old guy is pretty cool too:

 
Last edited:
OP
R

RivennHewn

Well-known member
Joined
Jun 4, 2011
Messages
10,373
Location
PNW
Out with the green, in with the grey!

Feeling much better already.
 

Attachments

  • Deltagrey.jpg
    Deltagrey.jpg
    127.8 KB · Views: 74
  • Deltagrey2.jpg
    Deltagrey2.jpg
    139.6 KB · Views: 67
OP
R

RivennHewn

Well-known member
Joined
Jun 4, 2011
Messages
10,373
Location
PNW
More masking and painting.

I lack the patience to be a good masker, but so far I'm pretty happy with the results.

Already gone thru 3 of the large rattle cans.
 

Attachments

  • rockwellscale.jpg
    rockwellscale.jpg
    140.5 KB · Views: 1,733
  • rockwellpainting.jpg
    rockwellpainting.jpg
    131.6 KB · Views: 78
  • paintedparts.jpg
    paintedparts.jpg
    136 KB · Views: 72
  • maskedoff.jpg
    maskedoff.jpg
    138.4 KB · Views: 65
  • rockwellbadge.jpg
    rockwellbadge.jpg
    127.1 KB · Views: 76
Last edited:
OP
R

RivennHewn

Well-known member
Joined
Jun 4, 2011
Messages
10,373
Location
PNW
Started focusing in the top belt cover tonight.

Besides the cut from the belt, the green paint and the original paint is in bad shape.

The top and bottom covers are the only parts that are cast aluminum.

They don't seem to take paint very well.

The cut I patched with the epoxy dough that you knead and apply.

The outside I sanded out smooth, but left a bunch inside to help bolster the repair. We'll see how it works.
 

Attachments

  • IMG_1191.jpg
    IMG_1191.jpg
    142.5 KB · Views: 63
  • beltcover1.jpg
    beltcover1.jpg
    135.4 KB · Views: 73
  • beltcover2.jpg
    beltcover2.jpg
    108.4 KB · Views: 79
OP
R

RivennHewn

Well-known member
Joined
Jun 4, 2011
Messages
10,373
Location
PNW
Thanks 1/2 cup. Not quite as ambitious as your storage project, which is looking great!

Received the lower belt cover that I ordered off Ebay today. Took me about 10 days of watching the new listings, but I got one!
 

Attachments

  • rockwell covers.jpg
    rockwell covers.jpg
    139.2 KB · Views: 53
OP
R

RivennHewn

Well-known member
Joined
Jun 4, 2011
Messages
10,373
Location
PNW
Spent a little time stripping the new lower dust cover.

They're both ready for primer, but it was too dang cold today.

Also took the knobs to the buffing wheel and shined them up a bit.

I started some assembly, and as soon as I started tightening things down, the bearing started making funny noises and aren't as free as they were.

Thinking I'm going to tear it back down and go ahead and replace them.

Anybody got a good source for bearings for vintage machines?: Bearings ordered!
 

Attachments

  • shinyknob.jpg
    shinyknob.jpg
    131.5 KB · Views: 80
  • shinyknobs.jpg
    shinyknobs.jpg
    139.3 KB · Views: 73
  • shinycovers.jpg
    shinycovers.jpg
    140.4 KB · Views: 60
  • primedparts.jpg
    primedparts.jpg
    117.7 KB · Views: 54
Last edited:
To avoid these ads, REGISTER NOW!
OP
R

RivennHewn

Well-known member
Joined
Jun 4, 2011
Messages
10,373
Location
PNW
Painting is complete.

Will give it a few days to cure up before I start assembly of the stand.

The bearings will show up sometime next week, then it will be ready to finish.

The hard part is going to be finding space in my cluttered shop!
 

Attachments

  • darkmachinerygrey.jpg
    darkmachinerygrey.jpg
    145.2 KB · Views: 73
OP
R

RivennHewn

Well-known member
Joined
Jun 4, 2011
Messages
10,373
Location
PNW
I love Craigslist!

Sypher metal lathe circa 1930.

Misc parts and pieces included in the price of "Free":rocker:

More pics to come.
 

Attachments

  • Sypherlathe.jpg
    Sypherlathe.jpg
    158 KB · Views: 287
Last edited:
OP
R

RivennHewn

Well-known member
Joined
Jun 4, 2011
Messages
10,373
Location
PNW
I have no idea where I'm going to set this thing up.

Major re-org coming soon?

Last pic: WTF is it?
 

Attachments

  • WTFisit.jpg
    WTFisit.jpg
    151.7 KB · Views: 181
  • Syphertail.jpg
    Syphertail.jpg
    148.2 KB · Views: 134
  • Sypherrest.jpg
    Sypherrest.jpg
    141 KB · Views: 132
  • Sypherpulley.jpg
    Sypherpulley.jpg
    137.8 KB · Views: 121
  • Sypherbadge.jpg
    Sypherbadge.jpg
    151.6 KB · Views: 121

Fyrme

Well-known member
Joined
Nov 28, 2012
Messages
2,231
Location
Green country, Oklahoma
Nice score on the lathe. I've got a grinder mandrel identical to that little blue one you have there. As for that last pic, the only thing I can make out is the 90˚ gear box. Need more pics from different angle to guess any further....
 

theoldwizard1

Well-known member
Joined
Feb 22, 2011
Messages
43,182
Location
SE MI
I have no idea where I'm going to set this thing up.
Very cool. I hope you have the spaces for it.

After basic cleanup, you need to find a local machinist to assess the viability of restoring this thing into a usable tool by adjusting the pre-tension on various parts as well as what bearing need to be replaced.

Repeatability is typically more important than accuracy.
 
OP
R

RivennHewn

Well-known member
Joined
Jun 4, 2011
Messages
10,373
Location
PNW
Very cool. I hope you have the spaces for it.

After basic cleanup, you need to find a local machinist to assess the viability of restoring this thing into a usable tool by adjusting the pre-tension on various parts as well as what bearing need to be replaced.

Repeatability is typically more important than accuracy.


I have to admit that I'm in over my head on this one.

Last time I used a metal lathe was in Jr. High shop.

Bring it into a shop for assessment is a very good idea.
 
OP
R

RivennHewn

Well-known member
Joined
Jun 4, 2011
Messages
10,373
Location
PNW
Delta Rockwell cast iron feet.

Not sure what machine they come from, but I think it was the Homecraft shaper.

Had to win two Ebay auctions to get them. Won 1 set, Buy It Now on the other.

funny thing is, all for are left feet. Or maybe all rights, I don't know.

All the holes face the same way.

Interesting to see the slight color difference too.

Approx. 6" high
 

Attachments

  • castironfeet.jpg
    castironfeet.jpg
    146.1 KB · Views: 41
  • castironfeet2.jpg
    castironfeet2.jpg
    144.2 KB · Views: 35

larry_g

Well-known member
Joined
Apr 28, 2007
Messages
16,885
Location
oregon
More masking and painting.

I lack the patience to be a good masker, but so far I'm pretty happy with the results.

Already gone thru 3 of the large rattle cans.

attachment.php


I have this same sander and one of the things missing when I got it was the curved key that goes in the slot pictured above. To make one I turned a washer on the lathe and cut it in half to use for the key. Every once in a while the other half rises to the top of the pile in the shop. If you want it I will send it to you.

lg
no neat sig line
 

dwysywd

Well-known member
Joined
Sep 21, 2014
Messages
892
Location
SE Michigan - Romeo area
Subscribed and given me inspiration to finish my own project desk. Thanks for the ideas! It is threads like this that keep new comers engaged.


Sent from my bag phone...
 
OP
R

RivennHewn

Well-known member
Joined
Jun 4, 2011
Messages
10,373
Location
PNW
Larry,

The sander is missing the work table and trunion.

I have been searching for one since I picked up the sander. Not an everyday item.

Sooner or later I'll come up with one, but a lot of what I do will be free-hand. I removed the table from my 1" X 48" because I don't use it much.

Thanks for the offer. I may hit you up for it in the future.

Best,


Thanks Dwysywd
 
OP
R

RivennHewn

Well-known member
Joined
Jun 4, 2011
Messages
10,373
Location
PNW
Ripped from the web:
 

Attachments

  • bb448g.jpg
    bb448g.jpg
    96.4 KB · Views: 47
  • bb448h.jpg
    bb448h.jpg
    89.1 KB · Views: 44
  • bb448f.jpg
    bb448f.jpg
    78.3 KB · Views: 45
  • bb448e.jpg
    bb448e.jpg
    78.4 KB · Views: 44
  • bb448d.jpg
    bb448d.jpg
    102.8 KB · Views: 48
  • img0.jpg
    img0.jpg
    21.4 KB · Views: 44
OP
R

RivennHewn

Well-known member
Joined
Jun 4, 2011
Messages
10,373
Location
PNW
Spent today cleaning the lathe. Actually a pretty simple tool.

Dismantled everything, some parts in the solvent tank and got the SS brush treatment.

Wiped everything down with acetone, and finally a coat of Penetrol.

Penetrol makes the original japanning look black again, and seals the bare metal from rust.

All back together, but it still has some slop that needs to be addressed.

plan is to give it a new platform and motor/pulley mounts.
 

Attachments

  • crossslidelathe.jpg
    crossslidelathe.jpg
    144.4 KB · Views: 69
  • lathemiscparts.jpg
    lathemiscparts.jpg
    143.8 KB · Views: 79
  • Sypherbadge2.jpg
    Sypherbadge2.jpg
    151.3 KB · Views: 78
  • toolpost.jpg
    toolpost.jpg
    140.2 KB · Views: 75
  • lathehandwheels2.jpg
    lathehandwheels2.jpg
    144.5 KB · Views: 74
  • lathehandwheels1.jpg
    lathehandwheels1.jpg
    142.5 KB · Views: 80
  • cleanlathe1.jpg
    cleanlathe1.jpg
    139.4 KB · Views: 90
OP
R

RivennHewn

Well-known member
Joined
Jun 4, 2011
Messages
10,373
Location
PNW
Maybe this pic should be in the Thread of Awesome.

Alfred Eisenstaedt, 1939, A man standing in the lumberyard of Seattle Cedar Lumber Manufacturing.


A little more research: The plant caught on fire in 1958.

It was the second largest fire in Seattle history.
 

Attachments

  • lumberyard.jpg
    lumberyard.jpg
    154.5 KB · Views: 184
  • 960x540.jpg
    960x540.jpg
    49.1 KB · Views: 139
Last edited:
OP
R

RivennHewn

Well-known member
Joined
Jun 4, 2011
Messages
10,373
Location
PNW
Nasty old fan that was mounted in a window.

I was just about to throw it in the garbage, when I realized how heavy it was.

The louvers are pressed out of 1/8" steel.

Some how, some way they should end up incorporated into a project.
 

Attachments

  • nastylouver3.jpg
    nastylouver3.jpg
    140.7 KB · Views: 73
  • nastylouver2.jpg
    nastylouver2.jpg
    150.7 KB · Views: 65
  • nastylouvers.jpg
    nastylouvers.jpg
    149 KB · Views: 58
OP
R

RivennHewn

Well-known member
Joined
Jun 4, 2011
Messages
10,373
Location
PNW
Got a few minutes to clean up the louvers.

3 coats of paint. Tried the wire wheel 1st, then opened up the stripper.

Still a little paint in the hard to reach areas.

Still looking for ideas of what to do with it.
 

Attachments

  • louversclean2.jpg
    louversclean2.jpg
    141.8 KB · Views: 66
  • louversclean.jpg
    louversclean.jpg
    146.1 KB · Views: 63
  • louverback.jpg
    louverback.jpg
    145.5 KB · Views: 75

little d

Well-known member
Joined
Nov 13, 2009
Messages
815
Location
NW Oklahoma
Riven&Hewn,
just spent the morning looking through your thread, truly amazing work. Thank you for taking the time to document and post your work,
D
 
OP
R

RivennHewn

Well-known member
Joined
Jun 4, 2011
Messages
10,373
Location
PNW
little d, Thank you. I'm hoping to get back to work on a few projects that seem to be lagging.

1953mercury, Iron Man project is still "Hush-hush". Don't need the bad guys looking for me until I get it finished.

Was really disappointed to find that my press isn't large enough to handle pressing out the shaft and bearings on my Sander.
 

Attachments

  • Bearings.jpg
    Bearings.jpg
    137.3 KB · Views: 52
Last edited:
To avoid these ads, REGISTER NOW!
Top Bottom