To avoid these ads, REGISTER NOW!

The making of a table

OP
R

RivennHewn

Well-known member
Joined
Jun 4, 2011
Messages
10,373
Location
PNW
Sometimes you have to leave the shop.

I had a great day with the wife today.

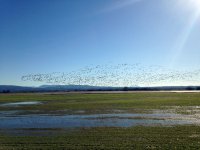
Started out watching the Snow Geese in the fields around LaConner, Wa.


Then went into LaConner for Smelt days (who knew?) Actually had smelt for lunch, with Clams and such.

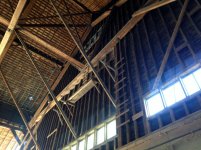
Stuck my head in a dilapidated old building, that was awesome.

Then drove over Deception Pass bridge, and down Whidbey Island, then caught the ferry for a sunset cruise home.

Made for a great day!
 

Attachments

  • snowgeese1.jpg
    snowgeese1.jpg
    142.1 KB · Views: 73
  • timberframe5.jpg
    timberframe5.jpg
    97.3 KB · Views: 110
  • timberframe6.jpg
    timberframe6.jpg
    96.9 KB · Views: 89
  • deceptionpassbridge.jpg
    deceptionpassbridge.jpg
    101.3 KB · Views: 81
  • deceptionpass.jpg
    deceptionpass.jpg
    83.9 KB · Views: 74
  • sunsetcruise.jpg
    sunsetcruise.jpg
    89.6 KB · Views: 75
To avoid these ads, REGISTER NOW!
OP
R

RivennHewn

Well-known member
Joined
Jun 4, 2011
Messages
10,373
Location
PNW
Another perfect day in Seattle.

55 and sunny!

Taking the opportunity to play outside.

Started cutting and fitting the sandblasted Douglas Fir I brought home awhile back.

Hmmmm…… biscuits.
 

Attachments

  • bisquicks.jpg
    bisquicks.jpg
    86.6 KB · Views: 114
  • sandblasted.jpg
    sandblasted.jpg
    86.1 KB · Views: 121
OP
R

RivennHewn

Well-known member
Joined
Jun 4, 2011
Messages
10,373
Location
PNW
Got the main planks glued and clamped up.

Will let them dry, then cut the ends in preparation for adding the breadboard ends.

Now, I need to start thinking about the base.
 

Attachments

  • glueup2.jpg
    glueup2.jpg
    95.4 KB · Views: 74
  • glueup1.jpg
    glueup1.jpg
    82.3 KB · Views: 70

LXCam

ALLIANCE MEMBER
Joined
Apr 23, 2013
Messages
19,148
Location
AZ
Three evenings it took me to digest this thread Riven. Absolutely stunning work and a great eye for obscure design. My hat off to you bud and keep up the great work!
 
OP
R

RivennHewn

Well-known member
Joined
Jun 4, 2011
Messages
10,373
Location
PNW
Popped the top out of the clamps, and scraped the excess glue/ squeeze out.

The sandblasted texture is interesting, but I'm thinking its too rough for a table.

I want to take it down to a more friendly finish without losing the interest.

Luckily, I have excess material that I can experiment with different techniques.

The end detail will have to wait for a couple days til the mailman brings me my new toy.
 

Attachments

  • roughtop.jpg
    roughtop.jpg
    141.6 KB · Views: 99
  • roughtop2.jpg
    roughtop2.jpg
    78.2 KB · Views: 81
OP
R

RivennHewn

Well-known member
Joined
Jun 4, 2011
Messages
10,373
Location
PNW
Thanks 1/2cup, That made for a nice looking bench.

I've got to ask, what is the tripod stand? Or, more importantly, what is that stand going to be?


Looks like some vintage cast iron goodness.

Best
 

1/2 Cup

Member Emeritus
Joined
Apr 28, 2012
Messages
19,283
Location
Shepparton. Victoria. Australia
The stand was going in the hard rubbish at a place where I was picking up an EBAY purchase in Melbourne, an old cast iron mangle.

View media item 38316
The seller said that I could take it as I was only going to land fill, I also score a pair of cast sewing machine legs as well.

The legs will be destined for another table, this time a round unit.

Regards
 
OP
R

RivennHewn

Well-known member
Joined
Jun 4, 2011
Messages
10,373
Location
PNW
The stand was going in the hard rubbish at a place where I was picking up an EBAY purchase in Melbourne, an old cast iron mangle.

View media item 38316
The seller said that I could take it as I was only going to land fill, I also score a pair of cast sewing machine legs as well.

The legs will be destined for another table, this time a round unit.

Regards


Wow! Some guys have all the luck:thumbup:


Got a couple great projects. I'll be watching your thread a like a hawk.
 
Last edited:
OP
R

RivennHewn

Well-known member
Joined
Jun 4, 2011
Messages
10,373
Location
PNW
Messed around with adding extensions on some casters this afternoon.

Playing around with using this old cast iron leg as part of the base for the new table top.
 

Attachments

  • casterfitting.jpg
    casterfitting.jpg
    76.3 KB · Views: 80
  • casterextension.jpg
    casterextension.jpg
    122.9 KB · Views: 78
OP
R

RivennHewn

Well-known member
Joined
Jun 4, 2011
Messages
10,373
Location
PNW
I left work a little early today to get home and open up my new Makita track saw that UPS brought today.

As soon as I saw the box, I knew there was a problem.

There was no way a 55" guide rail would fit in the box.

I ordered the saw with rail kit, but Amazon sent me the bare tool. No rail.

Spent the next hour chatting with a customer service rep.

I will say that she was good at her job, and took care of the problem to my satisfaction.

Even though I won't be able to work on my table top til Friday. Oh well.
 
OP
R

RivennHewn

Well-known member
Joined
Jun 4, 2011
Messages
10,373
Location
PNW
Now that's the right sized box!

I must say that Amazon customer service and shipping did me right this time.

Problems happen, Knowing how to make them right is the true test.

More to come…...
 

Attachments

  • bigbox.jpg
    bigbox.jpg
    135.9 KB · Views: 43
OP
R

RivennHewn

Well-known member
Joined
Jun 4, 2011
Messages
10,373
Location
PNW
Started trimming the ends of my new table with my new toy.

Made two cuts, and I"m in love
Xp5C


euC3
 
OP
R

RivennHewn

Well-known member
Joined
Jun 4, 2011
Messages
10,373
Location
PNW
I also got to work on the base. Drug out just about every tool I own.
(not really)
PNJM


And came up with this:
rrc9
 
OP
R

RivennHewn

Well-known member
Joined
Jun 4, 2011
Messages
10,373
Location
PNW
I have access to the Festool version at work, and they are very nice.

I couldn't justify the cost for my personal use.

Frankly, I was really hoping I didn't make a mistake buying the Makita version.

Out of the box, and the first series of cuts, and I know I made the right decision for me.

Set it up ran a bunch of kerfs for the half lap bread board ends, then knocked them out with a chisel and mallet.

Cut the mating side with the table saw, and glued it in.

Will do the other side tomorrow.
 

Attachments

  • kerfs.jpg
    kerfs.jpg
    105.5 KB · Views: 107
  • chisel'n.jpg
    chisel'n.jpg
    100 KB · Views: 113
  • end.jpg
    end.jpg
    103.4 KB · Views: 118

Toxicscrew

Well-known member
Joined
Nov 22, 2006
Messages
296
Location
Saint Louis, MO
I bought that saw in November. Mine wasn't in a box that size. Actually 3 different ones, one for the saw, and two for the tracks. Little thin boxes.

Table is looking good!
 
OP
R

RivennHewn

Well-known member
Joined
Jun 4, 2011
Messages
10,373
Location
PNW
I bought that saw in November. Mine wasn't in a box that size. Actually 3 different ones, one for the saw, and two for the tracks. Little thin boxes.

Table is looking good!


You were supposed to tell me that it's held up great, and is the best $$ you've spent on tools. :lol_hitti
 
To avoid these ads, REGISTER NOW!
OP
R

RivennHewn

Well-known member
Joined
Jun 4, 2011
Messages
10,373
Location
PNW
Thanks Nine,

You might recognize the leg from my brake stand build:

KCYs


The new table is the middle leg that I didn't use on the brake stand.

Couple before and after pics of the new leg getting a Penetrol coating.

Not a huge difference, but it does bring out the color a bit, and no need to worry about rust.
 

Attachments

  • prepenetrol.jpg
    prepenetrol.jpg
    95.8 KB · Views: 60
  • postpenetrol.jpg
    postpenetrol.jpg
    100 KB · Views: 62
OP
R

RivennHewn

Well-known member
Joined
Jun 4, 2011
Messages
10,373
Location
PNW
The sandblasted Douglas Fir top is complete.

I did some test finishes/techniques on some scrap, and decided to go with a vinegar/rust solution for the stain.

It goes on like water, and takes about 15 minutes to complete the chemical reaction with the tannins in the wood.

I have yet to sand the top, so now when I do the high grain will sand off and the low grain will remain dark.

Should give an interesting look.

B2GH
 
OP
R

RivennHewn

Well-known member
Joined
Jun 4, 2011
Messages
10,373
Location
PNW
Thanks 1/2 cup,

Still watching the shed thread for your vintage cast iron. (previous page)

Any thoughts on what you're going to do with it?
 
OP
R

RivennHewn

Well-known member
Joined
Jun 4, 2011
Messages
10,373
Location
PNW
That Red Gum looks wonderful.


Usually on a rustic table like this one, I skip the jointer step, and leave the joints rough. This makes for some gaps that need to be addressed.

I've used different techniques to accomplish filling gaps like the black rubber caulk, clear epoxy, or inlaid wood.

This time I decided to use polyurethane and wood dust.

I rubbed a little dust into the voids, then used a syringe to soak the dust with the poly.

Time consuming task. Doing it in direct sunlight helped. At least with my attitude.

IeOW
 
Last edited:
OP
R

RivennHewn

Well-known member
Joined
Jun 4, 2011
Messages
10,373
Location
PNW
A little sanding, a little stain, and a coat of poly:

lxD5


I also received my Femi ABS105 bench top bandsaw today.

The first cut:


Need to learn the tool. material-feedrate-pressure-blade selection

The user manual is a little much to understand on the 1st read thru.

Going to have to spend some time with it.


Even Lazze like them:

 
Last edited:
OP
R

RivennHewn

Well-known member
Joined
Jun 4, 2011
Messages
10,373
Location
PNW
Not much going on around my shop the last few days other than watching poly dry.

Almost as much fun as watching paint dry.:p

I was liking the open ended foot detail on my C-chanel leg, until I noticed a problem.

Imagine a woman in open toed shoes ramming her toenail into the end of the foot. I've lost toenails before, and it isn't fun.

Thought I'd better close off the end.
 

Attachments

  • shoefoot.jpg
    shoefoot.jpg
    123.9 KB · Views: 57
  • toenailcatcher.jpg
    toenailcatcher.jpg
    117.3 KB · Views: 50
OP
R

RivennHewn

Well-known member
Joined
Jun 4, 2011
Messages
10,373
Location
PNW
Started cutting and fitting some material to close off the ends.
 

Attachments

  • cuttnpieces.jpg
    cuttnpieces.jpg
    79.5 KB · Views: 83
  • cutline.jpg
    cutline.jpg
    143.3 KB · Views: 79
  • beveling.jpg
    beveling.jpg
    120.9 KB · Views: 77
  • fitup10.jpg
    fitup10.jpg
    89 KB · Views: 102
OP
R

RivennHewn

Well-known member
Joined
Jun 4, 2011
Messages
10,373
Location
PNW
Although I do prefer the look of the open ends, I'm happy with how they turned out.

Just doing what I can to help keep women's feet beautiful.:lol:
 

Attachments

  • fillet.jpg
    fillet.jpg
    116.3 KB · Views: 109
OP
R

RivennHewn

Well-known member
Joined
Jun 4, 2011
Messages
10,373
Location
PNW
playing around with the Femi band saw again:


Cut on 1-1/4" bar stock:
xQ-4


Super thin cut off:
B1hW
 
OP
R

RivennHewn

Well-known member
Joined
Jun 4, 2011
Messages
10,373
Location
PNW
I may not be the right person to answer that, as I have limited experience with cold saws.

The ones I have used had been rode hard and put away wet.

In general, I think the cold saws have a more robust frame, but lack the accuracy.

They are also more expensive, and require 240V power. Blades cost more as well.

The newer versions like the Evolution type saws I have yet to play with.

Time will tell how the Femi holds up.
 
Last edited:

little d

Well-known member
Joined
Nov 13, 2009
Messages
815
Location
NW Oklahoma
Since you guys are talking saws, I hope you don't mind me asking this. Been thinking for a while about modifying a wood cut off saw for metal, swapping the gears to slow the blade down? What do you two think, worth the effort or not?
 
OP
R

RivennHewn

Well-known member
Joined
Jun 4, 2011
Messages
10,373
Location
PNW
little d,

I'm not sure. Not really my area of knowledge.

I wouldn't really know where to even start.
 
To avoid these ads, REGISTER NOW!
Top Bottom