The Bean
Well-known member
^^ thanks for that idea!

Edit- Figured it out. I had blocked the op so I wasn’t able to see this whole thread. Weird that it didn’t just block his posts, instead of the whole thread.
I can't believe I didnt notice for so long, I love this thread.lolI did that once. It blocks all threads started by, in addition to all posts by.
It's fairly easy to do when browsing on a phone. I've done it to posters accidentally before.He hasnt posted since 2020, dont even remember blocking him. Maybe it was recently, but his recent content was removed?
Ya, I probably hit it by mistake.It's fairly easy to do when browsing on a phone. I've done it to posters accidentally before.

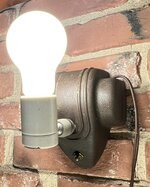
That's brilliant (and beautiful)!Repurposed an art deco cast iron wall sconce light into a benchtop gooseneck adjustable table top work light.

Much appreciated. Proof of concept worked, got another one to go..That's brilliant (and beautiful)!
Winner, winner! Great job on this project!Repurposed an art deco cast iron wall sconce light into a benchtop gooseneck adjustable table top work light.
Removed the pressed in swivel ceramic socket within the cast iron wall sconce base.
Drilled casting center hole to accept 1/2 dia pipe with 1/8ips internal threads for attaching the gooseneck threads and locking everything up tight.
Added a new 24” chrome gooseneck adjustable post & wired up new ceramic socket, on/off toggle switch, installed a NOS vintage metal light blub reflector.


1/2” thick solid surface countertop material works great for various things. The cutouts from sinks can sometimes be acquired cheaply at countertop fabricator shops. It cuts and sands great. At one time I had 1/4” polypropylene from work as bench tops in my previous workshop. Pieces can also be found on FB marketplace.The restaurant (might want to spell it right in for the link) supply tip is great--we order a fair amount of stuff from them for the pub kitchen.
I find the 1/2 and 3/4" the most useful for projects, but the 1" would be good to have on hand.
Here's a piece of 1/2" used as a spacer for a drive nut:
3/4" would have been perfect, but I didn't have any so added a piece of 1/4" Al plate.
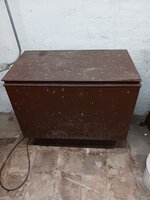
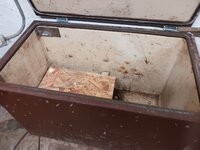
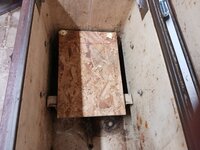
Friend of mine said that back in the 1950's he and his brothers used a church key to open the bottles at the local gas station while they were still in the locked slots and drink the sodas with a straw...Stand-by refrig/cooler; Back in 1985 Pepsi put in a new pop machine at work. the old machine, which was a chest type were you put the money in and slid the bottles over to the end of the row and lifted them out. basically, you could buy grape, orange and root beer. The guy cleaned out the machine and did not seem to be thrilled about lugging the old machine to Toledo. I asked if I could have it and he said yes. I have had it for 40 years now. it works great. Cleaned out the guts, put new springs on the lid, painted it, and put a wood cover over the motor to protect it.

Yes sir.Friend of mine said that back in the 1950's he and his brothers used a church key to open the bottles at the local gas station while they were still in the locked slots and drink the sodas with a straw...


I had a riding mower engine flywheel I didn't need, a pole off of a dead oscillating fan and an LED light crying for support. I cleaned up the flywheel and bondoed the voids to make it symmetrical. I slit a length of 1/4" fuel hose lengthwise and worked it over the ring gear (superglued the ends together). I drilled holes in the flywheel and screwed the fan pole to it. I made two telescoping extensions out of EMT and other pipe I had laying around. I then painted the whole thing (except the rubber tubing) Mazda Red Fire Metallic from a spray can I had made up years ago when I had a car that color. The base is heavy, this is not going to tip over.


Oregon makes (or made) an excellent one. If you want to get all fancy, they even made with with auto-advance. Every time you lift the grinder, it advances one tooth. A PITA to set up for your particular chain pitch, but once set, you can sharpen the same size chain really fast.I took an old monitor (speaker, not computer) stand...
drilled a couple of holes...
& it became an adjustable height stand for my HF chainsaw sharpener.
I love/hate this sharpener. I like the design. It's fast & simple to use. The handbrake clamp it a real time saver. But it's so cheaply made I'm afraid I'll overtighten a knob & break the dumb thing. I'd like to find a better made one with a similar design.


I have this same project waiting for one day. Not sure what to use for the slats as it stays outdoors.The neighbor had this bench on his porch. It was a mess of twisted, cracked, and one broken slats.
I should have taken a before picture but the repurposed part was my use of discarded bed slats to replace the seat boards.
He claims he’s going to repaint the whole thing (wink, wink) so he didn’t want to pay me to replace the wood on the backrest.
Poplar is an excellent non-ground-contact outdoor wood. Big plus is that it doesn't make slivers.I have this same project waiting for one day. Not sure what to use for the slats as it stays outdoors.


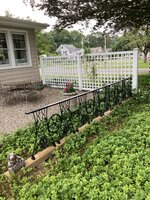
I'm sure there's a Singer treadle-machine collector out there crying in his beer, but I think it looks GREAT--especially the way you integrated the treadles and flywheels!Greetings!
My wife and I had been searching for a few short sections of vintage wrought iron fence for a few years. It was the Goldilocks syndrome over and over. “That one’s the perfect pattern but too high”. On and on went the search.
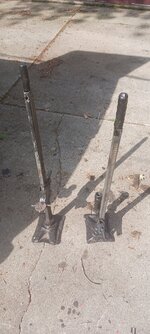
Then back in February as I was mindlessly wandering around FB Marketplace, I saw an ad for two leg sections from an antique Singer sewing machine. It was the way they were displayed that made me say, “hmmnn”. They were separate from the machine, leaning up against a garage door side by side. I showed them to my wife and asked what she thought about making the fence from a few of them.
She thought about it and said it certainly would be something that no one else around would have. “Do it!”.
We bought four machines over the course of a few months, came up with a design, poured some footings, lagged two 8’ 4”x6” ‘s on and started fabrication.
I just finished it this morning around 6. Wanted to get out before the close to 100 degree temp and humidity arrived.
Be well
Jeff
The fire station my boy scout troop met at had one too. We'd all bring straws to the scout meetings. They finally started stacking a bunch of heavy stuff on the pop machine so we couldn't get in without a bunch of work. Years later I worked with a guy who was a fireman there. He said they'd curse us kids for doing that but they admired our ingenuity and laughed it off.Friend of mine said that back in the 1950's he and his brothers used a church key to open the bottles at the local gas station while they were still in the locked slots and drink the sodas with a straw...
Thanks Beerhippie!I'm sure there's a Singer treadle-machine collector out there crying in his beer, but I think it looks GREAT--especially the way you integrated the treadles and flywheels!
Did you weld it together? Any problems welding the castings?


")


Or put the small nuts on the side closest to the open end.I wanted to check the spark plug conditions in Clarence before leaving tomorrow for a 4-day road trip. The boots on these plugs are really really really tough to pull off of the plugs. I have one of those factory made boot pullers somewhere but can't find it. Here's my solution. 7/16" wrench heated and bent 90*. A bolt and some nuts from the hardware drawer and bang! Plug puller tool. Probably was easier to make the tool than to fight with the boots by hand. Took a second or two to pull each boot. b-t-w; the wrench is an oddball that's not part of a set. It's the only wrench of that brand that I have. I may (or may not) heat and bend the box end to be perpendicular to the shaft. Probably isn't worth the effort.