To avoid these ads, REGISTER NOW!

The repurposing thread

Copymutt

Well-known member
Joined
Sep 3, 2016
Messages
3,382
Location
Colorado
IMG_5885.jpegIMG_5888.jpegIMG_5889.jpegIMG_5892.jpegIMG_5893.jpegIMG_5894.jpegIMG_5891.jpegOld scrap garden hose to the rescue.

Decided to refurb a 30 yr. old courtyard pond. Over the decades it got overgrown w/ water lillies & all the river rock used ended up just filling it in.
Project started this summer when I unwinterized it and it would drop 4” water height in a 1/2 day. After removing literally tons of rock I concluded it was the massive lillie infestation that was transevaporating the water, no leak after all.
Used tile & flagstone to rebuild. Tile on the verticle walls needed support and something to keep it in place. Garbage water hose slit to form a push on gasket top & bottom of the run of tile was the answer.
Best method to slit the hose turned out to be a gut hook on a hunting knife. Clamped the hose in an old B&D style workhorse and use the knife to follow a colored line on the hose. Worked well.

Cant explain why pics precede the discussion, started almost a yr. ago & can‘t get the post rearranged..
 
To avoid these ads, REGISTER NOW!

FullRaceMerc

Well-known member
Joined
Jan 9, 2015
Messages
3,830
Location
SoCal (SGV)
Pretty cool. Looks good. (y)
Clamped the hose in an old B&D style workhorse
Have you seen the B&D Workmate thread? Might want to show your technique there too.
 
Last edited:

gleman

Well-known member
Joined
Jun 24, 2019
Messages
2,969
Location
Michigan And Florida too!
IMG_5885.jpegIMG_5888.jpegIMG_5889.jpegIMG_5892.jpegIMG_5893.jpegIMG_5894.jpegIMG_5891.jpegOld scrap garden hose to the rescue.

Decided to refurb a 30 yr. old courtyard pond. Over the decades it got overgrown w/ water lillies & all the river rock used ended up just filling it in.
Project started this summer when I unwinterized it and it would drop 4” water height in a 1/2 day. After removing literally tons of rock I concluded it was the massive lillie infestation that was transevaporating the water, no leak after all.
Used tile & flagstone to rebuild. Tile on the verticle walls needed support and something to keep it in place. Garbage water hose slit to form a push on gasket top & bottom of the run of tile was the answer.
Best method to slit the hose turned out to be a gut hook on a hunting knife. Clamped the hose in an old B&D style workhorse and use the knife to follow a colored line on the hose. Worked well.

Cant explain why pics precede the discussion, started almost a yr. ago & can‘t get the post rearranged..
Nice job on the pond!
 

SnookSniper

Well-known member
Joined
Jul 6, 2016
Messages
79
Location
Seminole, FL
What a fun thread! I'm going to be reading on here for hours.

I wanted a way to store my Harbor Freight parts bins. I took an old steel frame, two file cabinets, and the dissected carcasses of two sets of garage shelves to make a large parts storage unit. Bolted and pop riveted the whole thing together and put it on casters. The top is even a handy spot to store some large saws. I also made a Youtube video of the build.


PartZilla.jpg
 

RMERR

Well-known member
Joined
Mar 22, 2017
Messages
429
Location
Northern CA
Might be stretching the repurposing thread here, but here's a couple "repurposed" items I find useful in the shop. First is a simple brush that works great for chips and sawdust. It's a umpire's home plate brush. Nice long semi-stiff bristles nicely brushes metal chips away and keeps fingers away from sharp/moving tools. I've cut a couple in half and use full-size and half-size alike. Good for pushing buildup out of drill flutes as well as table slots.
Brush1.JPGBrush2.JPGBrush3.JPG

Next is a great use for old Levis or denim. Cut off leg at knee, turn inside out, hem the cut end. Turn rightside out and fill about 2/3 with sand. Cinch the the top with wire ties and snip the tail. The added bulk of the pants hem will keep the tie from ever coming off. Great for nesting or holding down irregular shaped objects for grinding, wire brushing, etc. Also great hold-downs for long and low items in pick-up that don't lend themselves to roping and strapping. I keep multiple in the shop and truck, I buy a bunch at thrift stores and make a batch of 10 at a time.
Bag1.JPGBag2.JPGBag3.JPGbag3a.JPGBag4.JPGBag5.JPG
 

RMERR

Well-known member
Joined
Mar 22, 2017
Messages
429
Location
Northern CA
While I'm at it, here's one more. I used two quarter sheet size aluminum baking pans to make a slot cover/chip catcher for my new to me small Rockwell mill. I cut off one end of each and added pull handles to both of them. They were a little too reflective of the lights so I sprayed them with some black appliance paint. Some 1/4" screws and nuts "key" them into the slots and hold them snug. Easily lift out and dump chips.
 

Attachments

  • Pans1.JPG
    Pans1.JPG
    808.2 KB · Views: 75
  • pans2.JPG
    pans2.JPG
    726.3 KB · Views: 68
  • pans3.JPG
    pans3.JPG
    656.2 KB · Views: 61
  • pans4.JPG
    pans4.JPG
    672.4 KB · Views: 54

dscheidt

Well-known member
Joined
Apr 26, 2017
Messages
2,880
Might be stretching the repurposing thread here, but here's a couple "repurposed" items I find useful in the shop. First is a simple brush that works great for chips and sawdust. It's a umpire's home plate brush. Nice long semi-stiff bristles nicely brushes metal chips away and keeps fingers away from sharp/moving tools. I've cut a couple in half and use full-size and half-size alike. Good for pushing buildup out of drill flutes as well as table slots.
Brush1.JPGBrush2.JPGBrush3.JPG
I, on the other hand, use a 3" chip brush as a plate brush. I needed one (I coach a youth baseball team), and couldn't find one, so I cut the handle off a chip brush, and rounded the end with a bench grinder. a proper brush works better, the stiffer bristles make a difference, but it works well enough. And I've managed to hang on to it much longer than I ever did a real brush....
IMG_4395.jpeg
 

jives

Well-known member
Joined
Jan 4, 2013
Messages
2,803
Location
Central NY
Not sure if refurbish or rebuild or repurpose. Pop up camper to utility trailer. We've had at least one recent build like this on GJ, so here is mine in short order. The pics are a bit out of order, but you can see the progress, which took about 8 mos. Pop up belonged to a neighbor, leaking roof, tried to FBM for $100. My son, living with us at the time said he would take it for free and build a mobile workshop. It is a heavy duty Coleman with an original GVWR of 3800 lbs. Life intervened -- job, school, wife, kid -- so I took over the project as I was tired of the thing in my yard after 5 years. Tearing the thing down was a huge pain, but I did get about $180 in scrap metal. But dump fees for the rest were about $60. Most of the added steel were free bedframes. Lumber was $210, self drill/tap screws for deck were about $40. Lights and wiring about $40. Paint about $25. Fenders were made from old dryer sheet metal I was saving as inventory. Some hardware, other fasteners, welding wire. It has both RV 7 pin and flat 4. It all seems to work, but not sure if the brakes truly work as I can hear some noise from the hub when the brakes are compressed. That will do for now. Will need to weigh, register as homemade. Not sure if keep or sell.
 

Attachments

  • IMG_0003.jpg
    IMG_0003.jpg
    185.9 KB · Views: 27
  • IMG_0004.jpg
    IMG_0004.jpg
    184.7 KB · Views: 27
  • Trailer demolish 2.jpg
    Trailer demolish 2.jpg
    1.4 MB · Views: 25
  • Trailer Frame 2.jpg
    Trailer Frame 2.jpg
    186.7 KB · Views: 25
  • Trailer Frame 3.jpg
    Trailer Frame 3.jpg
    192.6 KB · Views: 23
  • Trailer Frame 4.jpg
    Trailer Frame 4.jpg
    132.5 KB · Views: 21
  • Trailer frame fender step 2.jpg
    Trailer frame fender step 2.jpg
    101.8 KB · Views: 22
  • Trailer frame fender step.jpg
    Trailer frame fender step.jpg
    155 KB · Views: 26
  • trailer demolish 1.jpg
    trailer demolish 1.jpg
    1.2 MB · Views: 27

mikeinri

Well-known member
Joined
Nov 29, 2019
Messages
8,206
Location
MA
Wow, nice job!

I Iove to see these conversions. Doesn't look like you needed to add much steel (bed frames)?

Did you repack the wheel bearings, or refurb the brakes?

Mike
 

jives

Well-known member
Joined
Jan 4, 2013
Messages
2,803
Location
Central NY
Wow, nice job!

I Iove to see these conversions. Doesn't look like you needed to add much steel (bed frames)?

Did you repack the wheel bearings, or refurb the brakes?

Mike
I had three bedframes and used all the long pieces. These served to frame in the long sides and cover the ends of the deck boards at the front and back. Admittedly, I have yet to take off the wheels, repack the bearings, and inspect the brakes I will. . .at some point.
 
Last edited:

Beerhippie

Well-known member
Joined
Oct 13, 2023
Messages
9,622
Location
Far NE Oregon
I don't recall just which piece of equipment this conveyor table came with, but it's currently our pack-off accumulator for the canning line at the brewery:

54758813527_6a37570fe9_o.jpg

I had to do a lot of of repurposing to make it work for this.

For one thing, it had no guards over the ends of the belt. While it moves very slowly, it's also about impossible to stop. At one point, I had an e-stop button near where users stood, but guards were obviously the right answer.

Dented kegs to the rescue again!

54760002835_d560801923_o.jpg

54759988865_196dc64b72_o.jpg

54759896734_b9b62afc73_o.jpg

Done.

Now, this side table extension was on the wrong side:

54759878233_a9a858a2e0_o.jpg

That was a "simple" matter of just disassembling the entire erector-set extrusion thing and putting it back together reversed.

Now, if you've ever used this particular extrusion, it takes bolts like flat-head carriage bolts that have to slide to the end of the extrusion to remove them. That can be a problem when the ends of the extrusion are covered by another piece, in which case all you have to do is take the whole thing apart. Again.

Or:

54760002825_2d6326c498_o.jpg

Yeah, that works.
 
To avoid these ads, REGISTER NOW!

Sweetcorn

Well-known member
Joined
Feb 14, 2018
Messages
665
Location
North Central Ohio
Now, if you've ever used this particular extrusion, it takes bolts like flat-head carriage bolts that have to slide to the end of the extrusion to remove them. That can be a problem when the ends of the extrusion are covered by another piece, in which case all you have to do is take the whole thing apart. Again.

Or:

54760002825_2d6326c498_o.jpg

Yeah, that works.
FYI for those who might not have seen them, you can get drop in nuts for extrusions like these made by 80/20 and some other manufacturers. No need to drill unless you want to.
 

Beerhippie

Well-known member
Joined
Oct 13, 2023
Messages
9,622
Location
Far NE Oregon
FYI for those who might not have seen them, you can get drop in nuts for extrusions like these made by 80/20 and some other manufacturers. No need to drill unless you want to.
The slots in this extrusion are too shallow to use a t-head style bolt. The unit came with the flat-head carriage bolt things and those seem to be about all that fits.
 

Sweetcorn

Well-known member
Joined
Feb 14, 2018
Messages
665
Location
North Central Ohio
The slots in this extrusion are too shallow to use a t-head style bolt. The unit came with the flat-head carriage bolt things and those seem to be about all that fits.
Have you tried looking through the 80/20 catalog for a drop in nut?

I won't say I use this stuff everyday, but I do multiple times a week. Im sure you can get a drop in nut that works.

They're narrow enough to pass through the slot opening, then they rotate/index when you tighten them and pull up to the back side of the slot. There's a bunch of styles of them, drop in, roll in, all kinds of shapes, etc.
 

Attachments

  • Screenshot_20250907_140259_Chrome.jpg
    Screenshot_20250907_140259_Chrome.jpg
    547.7 KB · Views: 19

mikeinri

Well-known member
Joined
Nov 29, 2019
Messages
8,206
Location
MA
Have you tried looking through the 80/20 catalog for a drop in nut?

I won't say I use this stuff everyday, but I do multiple times a week. Im sure you can get a drop in nut that works.

They're narrow enough to pass through the slot opening, then they rotate/index when you tighten them and pull up to the back side of the slot. There's a bunch of styles of them, drop in, roll in, all kinds of shapes, etc.

Very cool, thank you. My trailer is a Trailex, and I think they sell something similar, but it'd be good to have another option (the 80/20 catalog).

Mike
 

mikeinri

Well-known member
Joined
Nov 29, 2019
Messages
8,206
Location
MA
Does repurposing a wire coat hanger to mend a cooking basket count???

I dug my 20+ year-old campfire basket out of the RV's basement storage today, only to find that the "hinges" had given up the ghost. Of course, this was after I'd already left Walmart, where I was looking at a new one. And, the fire was going, and food was needing to be prepped!

Luckily, I found an old wire coat hanger in the same storage bay as the basket. No idea why I had it in there in the first place, but glad I found it, LOL...

Used my Vise Grip channel lock pliers, and made a VERY crude repair that allowed me to successfully cook the sausages!

20251012_181537~2.jpg20251012_181556.jpg20251012_192144.jpg20251012_201141.jpg

Mike
 
Last edited:

jives

Well-known member
Joined
Jan 4, 2013
Messages
2,803
Location
Central NY
Okay, more of a what is it?
A skid, or sled for my Wheel Horse tractor snow/dozer blade. Made from a steel snow shovel -- more of the long, narrow snow pusher -- purchased at the local ReUse for $3. The reason for this is because my driveway was re-graveled by a guy who did not know how to tailgate spread. Long story short, it is thick in spots, not packed (long story), and all made worse by the drought we are in. the stones have not worked their way into the subbase, which in the spring is pure mud. I could set the blade at about 1" or so, but this sled will prevent digging in. Have some adjustments to make, but will need to see actual snow. The first snows I will attempt to pack down with the truck, and hopefully it freezes, but getting this ready now.


IMG_0027.jpgIMG_0026.jpg
 
Last edited:

Muckin_Slusher

Well-known member
Joined
Apr 1, 2017
Messages
465
Location
Abitibi
Needed a small grommet/strain relief for a heated helmet plug on a sled.

Wandered around the shop until I saw my bag of chinese rubber valve stems. Pulled the core and the wire fit perfectly. Installed and trimmed to proper height.


20251007_094325.jpg


20251007_094334.jpg


20251007_094341.jpg
 

zimman

Well-known member
Joined
Mar 2, 2014
Messages
2,001
Location
Mark Twain National Forest
When I worked for Advance Auto Parts we had a rolling ladder out back we were scrapping for safety reasons. At the time I was building race cars and didn't have a 1" die for my tubing bender. I looked at the hand rail and up at the top was a nice curve so I cut out both sides and turned it into a parachute mount. Worked great at 160mpg for my customer.
Zim

EDIT; AN IMPORTANT NOTE THAT THE PARACHUTE IS NOT ANCHORED TO THE BRACKET FOR THE BAG. ITS ANCHORED TO THE FRAME OF THE CAR. MY PRACHUTE BRACKET JUST HOLDS THE BAG FOR THE PARACHUTE.

nOe5iN4 (1) (1).jpg
 
Last edited:

Copymutt

Well-known member
Joined
Sep 3, 2016
Messages
3,382
Location
Colorado
IMG_6071.jpegIMG_6072.jpegIMG_6070.jpegI don’t need to remind you that almost nothing gets thrown away.
My early 80’s Mainline walk behind tractor has an ACME engine🧨
The carb bowl has been rotted out for over a decade. Managed to keep it functioning w/ a 2” pvc cap & generous dose of Seal All(the only gas proof sealer that works for me).
Decided to try to duplicate the original cast aluminum factory bowl as parts are no longer available. Go to was sand casting which failed miserably, too deep& too many dents to get it out of the mold & leave a good impression.
What worked amazingly well was a section of lower car shock tube. Cutting the length needed. It was the same ID & OD as the original bowl.😱
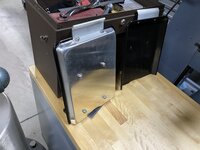
.Then cut off the bushing mount leaving a nice bottom flat spot to tap & thread in the drain screw. Using multiple booger welds I fastened two nuts to the top rim. Used the original to locate them. Original in pics might look usable, but its got a ton of JB Weld to plug up the rot.
Cant wait till someone in the future insists the carb is made by Monroe😜
 

slowtwitch73

Well-known member
Joined
Apr 18, 2019
Messages
5,876
Location
Hellgate
Got tired of my Jacobs chuck key.. dropping it into the lathe tray of doom, misplacing it between lathe and mill.. seemed the sob was always flying around.

Don't know why it took so long, but today was the day. Found an old pipe cutter handle in the stash box and voila. Nice reach, no weird handle, big enough to keep track of, hefty enough to hammer on stuff.

key.jpg
 
To avoid these ads, REGISTER NOW!
Top Bottom