To avoid these ads, REGISTER NOW!

The repurposing thread

Hephaestus29

Well-known member
Joined
Mar 13, 2011
Messages
2,969
Location
Indianapolis
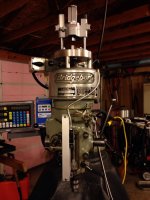
Here's my latest re-purpose. It's a Bosch Plunge Router Base, turned into a power draw bar, using a butterfly air wrench like other people have done. I may be the first to use a plunge router base though. It already had the springs and smooth up and down motion to do the job. I still have to make a handle for it since I'm not using a cylinder to force it down, I might try that later if it proves to be a pain in the a$$ but it will still be much faster than hand tightening with a wrench every time.
It still needs plumbed in also but you get the idea.
 

Attachments

  • IMG_9675.jpg
    IMG_9675.jpg
    140.1 KB · Views: 566
  • IMG_8151.jpg
    IMG_8151.jpg
    132.7 KB · Views: 486
  • IMG_3184.jpg
    IMG_3184.jpg
    133.2 KB · Views: 458
  • IMG_0367.jpg
    IMG_0367.jpg
    142.5 KB · Views: 429
To avoid these ads, REGISTER NOW!

AnEv942

Well-known member
Joined
Sep 14, 2013
Messages
238
Location
Central Coast Ca
Does FAIL count?
glite1.jpg
My bench grinder has a small 12 v light. Has never really worked in it needs to be 3" from wheel to see anything. Had an old RV fixture that uses small projection bulb-
glite2.jpg
Rewired and some fiddling around and got it mounted to flex rod.
glite3.jpg
Few more holes to let heat out and added the wood handle as this thing gets pretty hot. Light for days. Mounted to grinder, turned it on and bulb snapped. Put another bulb in turned it on and it super nova'ed and winked out while at the same time I realized its seeing 110v. Light is automotive-chassis grounded, mounted to grinder frame tying the 12&110 duh!
Its that thinking thing.
OK.. easy enough to make an isolating mount between flex stalk and grinder frame. Turned it on nada, tried another bulb nope. Metered the socket, 14v now only shows 2volts. Hmm guess that explains the magic smoke.

lamp%201.jpg
New 110v machine light on order...
 

kbs2244

Well-known member
Joined
Nov 11, 2006
Messages
14,065
"Who says grown men don't cry."
What did Edison say his success to fail ratio was?
 

Slednut

Well-known member
Joined
Dec 20, 2012
Messages
2,550
Location
Washington state
Last summer I used a tool box to install some high mounted cabinets by myself.
 

Attachments

  • P82A0707.jpg
    P82A0707.jpg
    125.3 KB · Views: 427
  • P82A0711.jpg
    P82A0711.jpg
    132.1 KB · Views: 346

AMT17

Member
Joined
Jan 6, 2017
Messages
8
Location
PA
So I built a bench grinder from broken sump pump that I found on the side of the street. The submerged portion was seized so I cut it off with a hacksaw. I wired in a rheostat so I could control the speed of the grinder if I wanted. I bought an arbor and grinding wheel from a local hardware store. I added a few "L" brackets and welded them in order to keep the machine stable. Yes it's dangerous, and I don't really use it. I just wanted to see if I could make it work.
In total it costed me maybe $15 to make?
 

Attachments

  • 20170107_152951_HDR.jpg
    20170107_152951_HDR.jpg
    146.1 KB · Views: 430
  • 20170107_152940_HDR.jpg
    20170107_152940_HDR.jpg
    146.3 KB · Views: 417
  • 20170107_152934_HDR.jpg
    20170107_152934_HDR.jpg
    139.8 KB · Views: 414
  • 20170107_152920_HDR.jpg
    20170107_152920_HDR.jpg
    144.3 KB · Views: 420
  • 20170107_152855_HDR.jpg
    20170107_152855_HDR.jpg
    146.9 KB · Views: 502

pepi

Well-known member
Joined
Mar 27, 2013
Messages
2,883
Location
Woodstock, GA
What's dangerous, smart enough to build it. My money says you're smart enough to use it.... good one!

Greg
 

falconero

Well-known member
Joined
Mar 10, 2014
Messages
191
So I built a bench grinder from broken sump pump that I found on the side of the street.

In total it costed me maybe $15 to make?


nice work,
now you got me trying to figure out what you got going on with the "not potable water "


Sent from my iPhone using Tapatalk
 

Hephaestus29

Well-known member
Joined
Mar 13, 2011
Messages
2,969
Location
Indianapolis
So I built a bench grinder from broken sump pump that I found on the side of the street. The submerged portion was seized so I cut it off with a hacksaw. I wired in a rheostat so I could control the speed of the grinder if I wanted. I bought an arbor and grinding wheel from a local hardware store. I added a few "L" brackets and welded them in order to keep the machine stable. Yes it's dangerous, and I don't really use it. I just wanted to see if I could make it work.
In total it costed me maybe $15 to make?
How many RPM's do you get out of it ?
 

AMT17

Member
Joined
Jan 6, 2017
Messages
8
Location
PA
nice work,
now you got me trying to figure out what you got going on with the "not potable water "


Sent from my iPhone using Tapatalk
Still trying to figure out how to quote multiple people but

Pepi: Thanks a lot! It doesn't have a shield on it so I wear a full face shield when using it, it also does wobble a little bit as the grinding wheel is not perfectly centered.

Falconero:
My work bench at my parents house (Still in college) is actually an old dark room from a previous owner, they were really into photography and built a desk/sink. Works nice as the depth is only 2-3 in and it keeps stuff from rolling away. There's still water connections which flow, but I don't use it because I don't trust the condition of the pipes or the drain.

Hephaestus29: I'm not quite sure of the RPM output as I don't have a tachometer or means to measure it. It gives out a 1/3HP when there's no added resistance. I can't imagine that it's spinning more than 2000 rpm.
 

Fyrme

Well-known member
Joined
Nov 28, 2012
Messages
2,231
Location
Green country, Oklahoma
Hey AMT, way to be creative. I've retrofitted many A/C condenser motors in my days. I've never put a speed control on one however, so good thinking. Be sure that rheostat is good for a 1/3hp motor. It looks like a low wattage wall unit. I'd hate for that thing to break out in a ball of flames while you're running it at a low rpm. Even if it's designed for a ceiling fan, many of those motors are only like 1/10hp.
 

jimgood

Well-known member
Joined
Aug 4, 2014
Messages
2,394
Location
Marshall, VA
Still trying to figure out how to quote multiple people
Multi quote:
As an example, if you have three posts you want quote, click the MULTI-QUOTE button on the first two then click the "QUOTE" button on the third. You won't see anything happening when you click the MULTI-QUOTE button but when you click the "QUOTE" button, it brings up the edit window with all three quotes.
 

great white tj

Well-known member
Joined
Apr 12, 2009
Messages
545
Location
Ocala Fl.
No forge coal shovel.. to much back pain to forge and hammer. So I used an old chipping hammer spring handle.
 

Attachments

  • Coal Shovel.jpg
    Coal Shovel.jpg
    141.5 KB · Views: 232
  • Coal Shovel 2.jpg
    Coal Shovel 2.jpg
    142.7 KB · Views: 218
  • Coal Shovel 3.jpg
    Coal Shovel 3.jpg
    138.5 KB · Views: 184

VC455

Well-known member
Joined
Dec 26, 2009
Messages
222
Location
NH
Thanks jimgood,
I (and no doubt others) appreciate yout toutoring.
 

AMT17

Member
Joined
Jan 6, 2017
Messages
8
Location
PA
Hey AMT, way to be creative. I've retrofitted many A/C condenser motors in my days. I've never put a speed control on one however, so good thinking. Be sure that rheostat is good for a 1/3hp motor. It looks like a low wattage wall unit. I'd hate for that thing to break out in a ball of flames while you're running it at a low rpm. Even if it's designed for a ceiling fan, many of those motors are only like 1/10hp.

Yeah I had checked the rheostat for it's maximum voltage and confirmed that it was in limits with my electrical teacher.
 

Revelations

Well-known member
Joined
Jul 8, 2015
Messages
274
Re purposed 4x4's ! 70f5bc6f937ea939185faf1da62233ce.jpg

Shopping Cart? e07cca7dc203cedece6940303afd1725.jpg


Sent from a Galaxy far far away.
 

Attachments

  • 70f5bc6f937ea939185faf1da62233ce.jpg
    70f5bc6f937ea939185faf1da62233ce.jpg
    59.1 KB · Views: 10
  • e07cca7dc203cedece6940303afd1725.jpg
    e07cca7dc203cedece6940303afd1725.jpg
    102.9 KB · Views: 7
To avoid these ads, REGISTER NOW!

GCncsuHD

Well-known member
Joined
Aug 19, 2013
Messages
968
Location
Salisbury, NC
Yeah I had checked the rheostat for it's maximum voltage and confirmed that it was in limits with my electrical teacher.

Voltage is not the concern at all, amperage is what will do the damage.

A 1/3 hp motor will probably pull 7-8 amps when loaded down, I don't know what your rheostat is rated for, but most wall mounted light dimmers/ceiling fan speed controls are rated for 1-2 amps.
 
Last edited:

custergary

New member
Joined
Dec 15, 2016
Messages
1
Voltage is not the concern at all, amperage is what will do the damage.

A 1/3 hp motor will probably pull 7-8 amps when loaded down, I don't know what your rheostat is rated for, but most wall mounted light dimmers/ceiling fan speed controls are rated for 1-2 amps.


Don't use a light dimmer to control motor speed. Light dimmers don't reduce voltage like a variac. They clip the sine wave and are the source of noise & voltage spikes. It's a good way to burn your house/shop down.


Sent from my iPhone using Tapatalk Pro
 

KMinAF

Well-known member
Joined
Mar 5, 2011
Messages
698
Location
Fairview Utah
Even old toilet bowl brushes can be repurposed! I recently purchased a new (as in less than 100 miles of use) set of rims and tires for my Montero. The rims were badly stained from lack of cleaning and brake dust. with a bit of 409, dishwasher detergent and a toilet brush in a cordless drill "tool" I had them looking like new in no time!
 

Attachments

  • IMG_20170111_162654.jpg
    IMG_20170111_162654.jpg
    145.2 KB · Views: 347
  • IMG_20170111_163534.jpg
    IMG_20170111_163534.jpg
    140.7 KB · Views: 365
  • IMG_20170111_163546.jpg
    IMG_20170111_163546.jpg
    136.4 KB · Views: 484

The Original Fisho

Well-known member
Joined
Dec 30, 2014
Messages
109
70e45c07c78e34c40d0e90c5aaee7bff.jpg

Busted milwaukee flashlight hooked up to single tone alarm. Works great for getting the attention of coworkers that are distracted by their phones at work.

Sent from my SM-G903W using Tapatalk
 

Attachments

  • 70e45c07c78e34c40d0e90c5aaee7bff.jpg
    70e45c07c78e34c40d0e90c5aaee7bff.jpg
    46 KB · Views: 16

vettex2

Banned
Joined
Jul 30, 2012
Messages
1,146
Location
Northern Ca.
Originally Posted by jeremy v View Post
4- SmartReloader #10 22LR/25ACP ammo boxes (Qty5 for $15 shipped on Ebay) repurposed as 1/4" hex bit organizers. I love these. Longer bits will stand pretty straight up and down, but the bits also fit loosely so there is no resistance when you want to take them in and out. I took the lids off of my cases for more permanent storage, but you can also keep the lids on and use them as handy portable organizers if you only fill them with 1" long hex bits. If you keep the lids on they have actual hinges as well, not the kinked plastic hinges that usually split within a few uses.
This. You just gave me a great idea for organizing my bits, getting tired of sorting through the box looking for the right one every time I need a weird Torx bit or something like that...
I just did this and it works GREAT
 

Slednut

Well-known member
Joined
Dec 20, 2012
Messages
2,550
Location
Washington state
My wife likes this little 18 volt leaf blower, the NiCad battery died so I sawed the bottom off an old Craftsman drill I had that failed, mounted it on the leaf blower so she can use the 20 volt lithium batteries on her leaf blower.
 

Attachments

  • P82A0944.jpg
    P82A0944.jpg
    120.5 KB · Views: 427
  • P82A0943.jpg
    P82A0943.jpg
    113.6 KB · Views: 422

frenchdakota

Member
Joined
Dec 26, 2016
Messages
9
Location
Normandy, France
Hi everyone...

Well, this is my very first post here on GJ, so please be gentle !!! (and don' t hesitate to correct my English if it goes bad !!!) :D
As a lot of you guys, I hate to throw things away, but love to repurpose them as much as possible...
So here's what I began with...
First let me tell you that I'm a maintenance engineer in a small factory, we make paper and cardboard packaging for the bakery and catering industry...
Our building is quite big, but I'm a little lazy, so I decided to repurpose an old bike into a 3 Wheeler cargo bike, like this :
http://www.garagejournal.com/forum/attachment.php?attachmentid=616748&stc=1&d=1484909147

First, I discarded the rear rim and just kept the hub (complete).

Then I made a frame that attach to the existing frame of the bike, using the rear brake brackets and the fender attachment.
http://www.garagejournal.com/forum/attachment.php?attachmentid=616750&stc=1&d=1484909147
Then a rear axle and 2 pillow blocks for the new rear wheels. There is a driving wheel and and an idle wheel (otherwise never try to make a turnaround !!!). The driving wheel is achieved by a piece of tube welded between a shaft collar and the rim of the new Wheel (there still is the needle bearing inside the wheel, but it doesn't turn anymore).
http://www.garagejournal.com/forum/attachment.php?attachmentid=616751&stc=1&d=1484909147

To be continued.....
 

Attachments

  • 003-min.jpg
    003-min.jpg
    142.6 KB · Views: 396
  • 007-min.jpg
    007-min.jpg
    148.1 KB · Views: 328
  • 005-min.jpg
    005-min.jpg
    136.7 KB · Views: 323
  • 004-min-min.jpg
    004-min-min.jpg
    145.9 KB · Views: 313
  • 001-min.jpg
    001-min.jpg
    136.2 KB · Views: 423
  • 006-min.JPG
    006-min.JPG
    138.8 KB · Views: 311
  • 008COMP-min.jpg
    008COMP-min.jpg
    142.1 KB · Views: 307

frenchdakota

Member
Joined
Dec 26, 2016
Messages
9
Location
Normandy, France
the 3 Wheeler cargo bike (continued....)

As I now had a rear axle and 2 wheels, I wanted to connect it to the existing 18 gears of the bike. So I added a sprocket on the axle (there's a keyway on the axle and a grubscrew on the bored sprocket). And Ialso added a sprocket, plug welded to the existing hub of the bike
http://www.garagejournal.com/forum/attachment.php?attachmentid=616757&stc=1&d=1484911382
Everybody's OK, I don't go too fast ??? :lol::lol::lol:

Then I reinforced the whole shebang with some brackets between the new and the old frames...

I fabricated a flatbed for this truck, with a piece of OSB...

All in all it works like a charm, and it makes everyone laugh at work. Even my boss was impressed !!!!

So sometimes being lazy makes you popular...
:lol_hitti:lol_hitti:lol_hitti

Thanks for watching
 

Attachments

  • 009MIN-min.jpg
    009MIN-min.jpg
    146.9 KB · Views: 223
  • 008COMP-min.jpg
    008COMP-min.jpg
    142.1 KB · Views: 230
  • 007-min.jpg
    007-min.jpg
    148.1 KB · Views: 221

Basher

Well-known member
Joined
Sep 14, 2009
Messages
146
Location
Blighty
"Oh là là!"

Welcome, Frenchdakota
;)


your cargo bike is a cute project - very inventive &
looking good. Well done

:thumbup:
 
Last edited:

Aimsmall

Well-known member
Joined
Mar 5, 2016
Messages
55
It's been done before but here's another welding cart. I cut the wheels off an old floor jack and an old cart I had laying around, used some scraps and a filing cabinet I found on the side of the road for the rest.


More scraps and the other 2 floor jack wheels


Lhorn

Well-known member
Joined
Sep 17, 2008
Messages
1,487
Great looking cart. I've been thinking about adding 1-2 shallow drawers to mine. I just have two shelves and when you simply sit small items like tips, pliers etc on the shelf there is so much wasted vertical space.
 
To avoid these ads, REGISTER NOW!
Top Bottom